9.1 Understanding the Trust Model
Setting up trust involves system administrators agreeing on how to establish a secure method for providing and consuming authentication assertions between their Identity Servers. An Identity Server is always installed as an identity provider, which is used to provide authentication to trusted service providers and embedded service providers (ESPs).
9.1.1 Identity Consumer
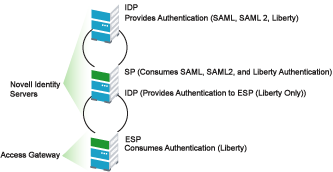
An Identity Server also can be configured as an identity consumer (service provider), which enables the Identity Server to consume authentication assertions from trusted identity providers. Figure 9-1 depicts how two Identity Servers can be configured in a trust model using the SAML and Liberty protocols to provide authentication for an Access Gateway ESP.
Figure 9-1 Identity Server Trust
As an administrator, you determine whether your server is to be used as the identity provider or service provider in the trust relationship. You and the trusted partner agree to exchange Identity Server metadata, and then you create references to the trusted partner’s Identity Server in your Identity Server configuration. You can obtain metadata via a URL or an XML document, then enter it in the system when you create the reference.
9.1.2 Embedded Service Providers
In addition to setting up trust with internal or external service providers, you can reference embedded service providers (ESPs) in your enterprise. An ESP uses the Liberty protocol and does not require metadata entry, because this exchange happens automatically. The ESP comes with Access Manager and is embedded in the Access Gateway and the J2EE agent. The ESP facilitates authentication between the Identity Server and the resource protected by the Access Gateway or agent, as shown in as shown in Figure 9-2.
Figure 9-2 Embedded Service Provider
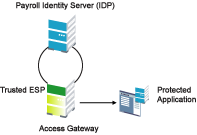
The components in this example reside in the same trust store and represent a typical Access Manager configuration used within an enterprise.
9.1.3 High-Level Steps
The following high-level steps describe setting up the trust model between an identity provider and a service provider. These steps assume that both providers are using the Novell® Identity Server provided with Access Manager.
-
Administrators at each company install and configure the Identity Server.
The Identity Server that consumes authentications must be enabled to run as a service provider. See Section 6.1.1, Creating a Cluster Configuration. (It is recommended that you are already familiar with the Novell Access Manager 3.0 SP4 Installation Guide.)
-
Administrators at each company must import the trusted root certificate of the other Identity Server into the NIDP trust store.
Click > > > > > , then auto import the certificate. Use the SSL port (8443) even if you haven’t set up the base URL of the Identity Server to use HTTPS.
-
Administrators must exchange Identity Server metadata with the trusted partner.
Metadata is generated by the Identity Server and can be obtained via a URL or an XML document, then entered in the system when you create the reference. This step is not applicable if you are referencing an ESP. When you reference an ESP, the system lists the installed ESPs for you to choose, and no metadata entry is required.
-
Create the reference to the trusted identity provider and the service provider.
This procedure associates the metadata with the new provider. See Section 9.2, Creating a Trusted Provider Reference.
-
Configure user authentication.
This procedure defines how your Identity Server interacts with the trusted provider during user authentication. Access Manager comes with default basic authentication settings already enabled. See Section 10.0, Configuring User Authentication and Federation.
Additional important steps for enabling authentication between trusted providers include:
-
Setting up the necessary authentication contracts. See Section 8.4, Configuring Authentication Contracts.
-
Enabling the profiles that you are using. See Section 12.2, Enabling Web Services and Profiles.
-
Enabling the option on the Web Service Consumer page. See Section 12.8, Configuring the Web Service Consumer.
-
-
(Conditional) If you are setting up SAML 1.1 federation, the protocol does not allow the federation link to be automatically added to the login page. You must manually configure this setting.
See Section 9.7.1, Configuring Display and Access Settings. Specify a value for the and , then select .
For more information, see TID 3247813.