6.2 Configuring Federation
Federation requires the configuration of a trusted relationship between an identity provider and a service provider. Figure 6-2 illustrates setting up federation between two Identity Servers, because a Novell Identity Server can act as either an identity provider or a service provider.
Figure 6-2 Configuring Trust Between Site A and Site B
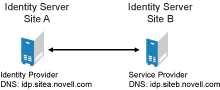
Site A must be configured to trust Site B as a service provider, and Site B must be configured to trust Site A as an identity provider. Until this two-way trust is established, federation cannot occur.
Before setting up a trusted relationship, you must make the following decisions:
Protocol: The Identity Server supports SAML 1.1, SAML 2.0, and Liberty. You need to decide which of these protocols to use. If no user interaction is needed, SAML 1.1 is probably a good choice. The SAML 2.0 and Liberty protocols permit user interaction when federating. The user decides whether to federate (link) the accounts and must be logged in at both sites to accomplish this. Liberty offers an additional service, not available with SAML 2.0, that allows the user to select attributes that can be shared with the service provider.
The instructions in this documentation, starting in Section 6.2.1, Prerequisites, use the Liberty protocol. They also indicate how to configure for the SAML 2.0 and SAML 1.1 protocols.
Trust Relationship: You need to decide whether the trusted relationship is going to be from Site A to Site B, from Site B to Site A, or bidirectional from Site A to Site B and from Site B to Site A. Federation is set up to go from the most secure site to the less secure site. The only time federation is set up to be bidirectional is when both sites are equally secure. The scenario described in Figure 6-1 is an example of a trusted relationship that you would want to go only one way, from Site A to Site B, because Site B is not as secure as Site A.
The instructions, starting in Section 6.2.1, Prerequisites, explain how to set up the trusted relationship between Site A and Site B. You can easily modify them to set up the bidirectional trust relationships by substituting Site B for Site A (and vice versa) in the instructions and then repeating them for Site B
Attributes to Share: You need to decide whether there are user attributes or roles at Site A that you want to share with Site B. The attributes from Site A can be used to identify the users at Site B. Other attributes might be needed to access protected resources, for example, to satisfy the requirements of an Identity Injection policy.
For all the protocols, Section 6.3, Sharing Roles explains how to share the roles at Site A with Site B. For the SAML 1.1 protocol, the instructions starting in Section 6.2.1, Prerequisites use the LDAP mail attribute to share the user’s e-mail address.
User Identification: You need to decide how assertions can be used to map users from Site A to users at Site B. The Identity Server supports four methods.
-
Temporary: This method allows the user access to Site B solely from the credentials of Site A. No effort is made to map the user to a user account at Site B. A temporary account is set up for the user on Site B, and when the user logs out, the account is destroyed.
-
Login: This method requires that the user have login credentials at both Site A and Site B, and when logged in at both sites, the user can select to federate the accounts.
-
Mapped Attributes: This method requires that the sites share attributes and that these attributes are used to create a matching expression that determines whether the user accounts match. For an added security check, the first time the accounts are matched, the user is asked to verify the match by supplying the password for Site B.
If the match fails, you can allow the federation to fail or configure the method to allow the user to use the Login method or the Provisioning method.
-
Provisioning: This method allows the user to create a new, permanent account at Site B.
The configuration instructions, starting in Section 6.2.1, Prerequisites, use the Login method for the SAML 2.0 and Liberty protocols and Mapped Attributes method for the SAML 1.1 protocol.
The instruction for setting up a trusted relationship between two Novell Identity Servers have been divided as follows:
6.2.1 Prerequisites
-
A basic Access Manager configuration with the Identity Server and Access Gateway configured for SSL.
This can be one you set up using the instructions in either Section 1.0, Setting Up a Basic Access Manager Configuration or Section 7.0, Digital Airlines Example. For SSL configuration, see Section 3.0, Enabling SSL Communication.
The Identity Server from this configuration becomes Site B in Figure 6-2.
-
A second Identity Server with a basic configuration, an LDAP user store, and SSL. This Identity Server is configured to be Site A in Figure 6-2.
-
Time synchronization must be set up for all the machines, or authentication can fail if assertions expire before they can be used.
-
A DNS server must be configured to resolve the DNS names of Site A, Site B, and the Access Gateways.
-
(Recommended) Logging has been enabled on the Identity Servers of Site A and Site B. See
Configuring Identity Server Logging
in the Novell Access Manager 3.0 SP4 Administration Guide. Make sure that you enable at least Application logging at an Info level.
6.2.2 Establishing Trust between Providers
To set up this very basic example of federation, complete the following tasks.
Configuring Site A to Trust Site B as a Service Provider
To establish trust between Site A and Site B, you must perform two tasks:
-
The providers must trust the certificates of each other so you need to import the trusted root certificate of Site B to Site A.
-
You must also import the metadata of Site B to Site A. The metadata allows Site A to verify that Site B is truly Site B when Site B sends a request to Site A.
The following instructions explain how to import the certificate and the metadata:
-
Log in to the Administration Console for Site A.
The configuration for Site A can be created in the same Administration Console as Site B; it cannot be configured to be a cluster member of Site B.
-
In the Administration Console, click > > > .
-
In the Trusted Roots section, click , then fill the following fields:
Server IP/DNS: Specify the IP address or DNS name of Site B. For Site B in Figure 6-2 specify the following:
idp.siteb.novell.com
Server Port: Specify 8443.
-
Click , then specify an alias for the certificate (for example, SiteB).
-
Examine the trusted root that is selected for you.
If the trusted root is part of a chain, make sure you select the parent and all intermediate trusted roots.
-
Click .
The trusted root certificate of Site B is added to the NIDP trust store.
-
Click > > .
Wait for the health status to return to green.
-
To verify the certificates in the trust store, click > > .
-
For the same Identity Server configuration, click > > .
-
Click , select , then fill the following fields:
Name: Specify a name for the provider. If you plan on configuring more than one protocol, include the protocol as part of the name, such as, SiteB_Liberty
Metadata URL: Specify the URL of the Liberty metadata on Site B. For Site B in Figure 6-2, specify the following:
http://idp.siteb.novell.com:8080/nidp/idff/metadata
This example uses port 8080 to avoid any potential certificate problems that occur when the Identity Server and the Administration Console are installed on separate machines.
SAML 2.0: If you are using SAML 2.0, the metadata path is /nidp/saml2/metadata. For Site B in Figure 6-2, specify the following for SAML 2.0:
http://idp.siteb.novell.com:8080/nidp/saml2/metadata
SAML 1.1: If you are using SAML 1.1, the metadata path is /nidp/saml/metadata. For Site B in Figure 6-2, specify the following for SAML 1.1:
http://idp.siteb.novell.com:8080/nidp/saml/metadata
-
Click > .
-
Click > .
Wait for the health status to return to green.
-
Continue with Configuring Site B to Trust Site A as an Identity Provider.
Configuring Site B to Trust Site A as an Identity Provider
The following instructions explain how to import the trusted root certificate and metadata of Site A into the configuration for Site B.
-
Log in to the Administration Console for Site B.
The configuration of Site B can be created in the same Administration Console as Site A; it cannot be configured to be a cluster member of Site A.
-
In the Administration Console, click > > > .
-
In the Trusted Roots section, click , then fill the following fields:
Server IP/DNS: Specify the IP address or DNS name of Site A. For Site A in Figure 6-2, specify the following:
idp.sitea.novell.com
Server Port: Specify 8443.
-
Click , then specify an alias for the certificate (for example, SiteA).
-
Examine the trusted root that is selected for you.
If the trusted root is part of a chain, make sure you select the parent and all intermediate trusted roots.
-
Click .
The trusted root certificate of Site A is added to the NIDP trust store.
-
Click > > .
Wait for the health status to return to green.
-
To verify the certificates in the trust store, click > > .
-
For the same Identity Server configuration, click > .
-
Click , select , then fill the following fields:
Name: Specify a name for the provider. If you plan on configuring more that one protocol, include the protocol as part of the name, such as SiteA_Liberty
Metadata URL: Specify the URL of the Liberty metadata on Site A. For Site A in Figure 6-2, specify the following:
http://idp.sitea.novell.com:8080/nidp/idff/metadata
This example uses port 8080 to avoid any potential certificate problems that occur when the Identity Server and the Administration Console are installed on separate machines.
SAML 2.0: If you are using SAML 2.0, the metadata path is /nidp/saml2/metadata. For Site A in Figure 6-2, specify the following for SAML 2.0:
http://idp.sitea.novell.com:8080/nidp/saml2/metadata
SAML 1.1: If you are using SAML 1.1, the metadata path is /nidp/saml/metadata. For Site B in Figure 6-2, specify the following for SAML 1.1:
http://idp.siteb.novell.com:8080/nidp/saml/metadata
-
Click > .
-
Click > > .
Wait for the health status to return to green.
-
Continue with one of the following:
-
If you are using Liberty or SAML 2.0, continue with Verifying the Trust Relationship.
-
If you are using SAML 1.1, continue with Configuring SAML 1.1 for Account Federation.
-
Verifying the Trust Relationship
Before continuing with federation configuration, you need to verify that Site A and Site B trust each other.
-
To test the trusted relationship, log in to the user portal of Site B. For Site B in Figure 6-2, specify the following:
https://idp.siteb.novell.com:8443/nidp/app
The following login screen appears.
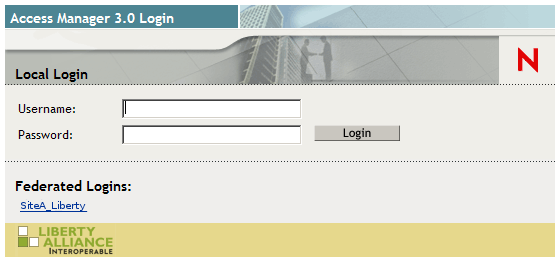
-
Click the Federated Login link.
You are directed to Site A for login.
-
Enter the credentials for a user from Site A.
The Federation consent prompt appears:
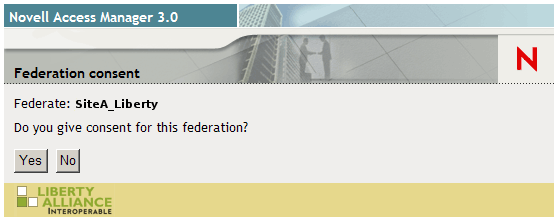
-
Click .
You are returned to the login page for Site B.
-
Enter the credentials of a user from Site B that you want to federate with the user from Site A.
These two accounts are now federated. You can enter the URL to the user portal on Site A or Site B, and you are granted access without logging in again.
If you log out and log back in, the accounts are still federated, but you might be prompted for login credentials as you access resources on Site A, Site B, and the Access Gateways. To enable a single sign-on experience, Site A, Site B, and the Access Gateways must be configured to share a contract.
-
To enable a single sign-on experience, continue with Configuring User Authentication.
Configuring User Authentication
The following instructions describe one way to enable single sign-on to the Identity Servers and Access Gateways in Figure 6-1. It explains how to configure all sites to use the same contract. The instructions explain the following tasks:
-
Selecting the contract for federation
-
Configuring the contract at Site B to allow authentication at Site A
-
Configuring Site A so its contract can satisfy the requirements of the contract at Site B
-
Configuring Site A and Site B to use this contract as their default contract
To configure the contracts:
-
Log in to the Administration Console for Site B.
-
Click > > > > > > .
-
Verify the settings of the following fields:
Allow users to federate: Make sure this option is selected. If this option is not selected, users cannot federate their accounts at Site A with an account at Site B.
Allow after authentication: Make sure this option is selected. Enabling this option assumes that a user account exists at the service provider and that the account can be associated with a user’s account at the identity provider.
Authenticate user with default contract login: Make sure this option is selected. In this example, single sign-on is enabled by specifying the same contract for all sites.
-
For , select .
-
In the section, select the name of the contract used by the protected resources and move it to the section.
If you select a default contract (either Secure Name/Password-Form or Secure Name/Password-Basic), these contracts have been configured to allow federation. If you select a contract you have created, you need to verify that it is configured for federation. See Step 7.
-
Click , then update the Identity Server configuration.
-
Verify that the contract at Site B allows federation:
-
Click > > > .
-
Record the URI for the contract you are using. This URI needs to exist as a contract on Site A. The name of the contract can be different at each site, but the URI must be the same.
-
Click the name of the contract.
-
Make sure the option is selected.
-
Click twice, then update the Identity Server if you made any changes.
-
-
Verify that Site A contains the same contract:.
-
Log in to the Administration Console for Site A.
-
Click > > > .
-
Match the URI from Step 7.b to a contract.
If such a contract does not exist, you need to create it. For help, see
Configuring Authentication Contracts
in the Novell Access Manager 3.0 SP4 Administration Guide. -
Click .
-
-
In the Administration Console for Site A, click > > > .
-
For the Authentication Contract, select the name of the contract from Step 8.c.
-
(Conditional) If you have multiple user stores, set the default contract for each user store.
-
Click , then update the Identity Server.
-
Test the configuration:
-
Enter the URL to the user portal of Site B.
-
Click the federated login link to Site A.
-
Enter the credentials for Site A and log in.
-
Enter the URL for a protected resource.
You are granted access without being prompted for credentials.
-
-
If you want the authentication to the user portal on Site B to allow single sign-on to the Access Gateway protected resources or authentication to a protected resource to allow single sign-on to the user portal on Site B, you must configure the default contract for the Identity Server of Site B to match the contract used by the protected resources.
-
In the Administration Console for Site B, click > > > > .
-
For the Authentication Contract, select the name of the contract used by the protected resources.
-
(Conditional) If you have multiple user stores, set the default contract for each user store.
-
Click , then update the Identity Server.
-
To test single sign-on, log in to the user portal on Site B, then enter a URL for a protected resource.
-
6.2.3 Configuring SAML 1.1 for Account Federation
SAML 1.1 does not support user-controlled federation, but you can configure it so that accounts that match are automatically federated. The Liberty and SAML 2.0 protocols allow users to federate accounts without sharing any common attributes, but the SAML 1.1 protocol requires that the user accounts need to share some common attributes in order for SAML 1.1 to match them and allow federation.
Configuring User Account Matching
When federating with SAML 1.1, the security of a user matching method depends upon the accuracy of the mapping. You need to select an attribute or attributes that uniquely identify the user at both Site A and Site B. The attributes must identify only one user at Site A and match only one user at Site B. If the attributes match multiple users, you have a security problem,
The following steps use the e-mail address of the user and the LDAP mail attribute to set up a matching rule that matches one user account at Site A with one user account at Site B. To securely use such a matching rule, you need to have a rule in place at both Site A and Site B to ensure that all users had unique email addresses.
Configuring Site B for User Account Matching
-
In the Administration Console of Site B, click > > > > > > > .
-
Select .
-
Click the icon.
-
Move the user store that you want to search for the attribute to the list.
-
For the , select .
-
Specify a name for the matching expression, such as email.
-
In , click the icon, select , then click .
The form allows you to create a very complex set of matching rules, with multiple conditions. This example uses one attribute, the simplest form of a matching expression.
-
Click , then select your matching expression for the .
-
Click .
-
For the option, select the contract that you want to use for single sign-on.
For this example, select .
-
Click twice, then update the Identity Server.
-
Continue with Configuring the Attribute for Sharing.
Configuring the Attribute for Sharing
-
In the Administration Console of the Site B (the service provider), click > > .
-
Click , then click .
-
Specify a , such as email, then click .
-
Click , then fill the options:
Local attribute: Select .
Remote attribute: Leave this field empty. It is an optional value.
-
Click , then click .
Your newly created attribute mapping appears in the list of Attribute Sets.
-
Repeat Step 1 through Step 5 for Site A (the identity provider).
If Site A and Site B are imported into the same Administration Console, skip this step.
-
Continue with Configuring the Providers to Use the Shared Attribute.
Configuring the Providers to Use the Shared Attribute
You need to configure Site A to send the shared attribute with the authentication credentials, and you need to configure Site B to process the shared attribute that is included with the authentication credentials.
-
In the Administration Console for Site B, click > > > > > > .
-
For the , select the set name you created in Configuring the Attribute for Sharing.
-
Move the email attribute so that it is obtained at authentication.
-
Click twice, then update the Identity Server.
-
In the Administration Console for Site A, click > > > > > > .
-
For the , select the set name you created in Configuring the Attribute for Sharing.
-
Move the email attribute so that it is sent with authentication.
-
Click twice, then update the Identity Server.
-
Continue with Configuring the Default Contract for Single Sign-On
Configuring the Default Contract for Single Sign-On
The Identity Servers at Site A and Site B need to use the contract you specified in your user matching expression to be the default contract for Site A, Site B, and the protected resources of the Access Gateway.
For the user matching expression contract, see Step 10 in Configuring Site B for User Account Matching.
To configure the default contracts for Site A and Site B:
-
In the Administration Console for Site B, click > > > > .
-
For the Authentication Contract, select the name of the contract used by the user matching expression.
-
(Conditional) If you have multiple user stores, set the default contract for each user store.
-
Click , then update the Identity Server.
-
For the Access Gateway, review the contracts you have assigned to the protected resources.
-
In the Administration Console for Site B, click > > Edit > > > .
-
For single sign-on, change the contract to match the contract for the user matching expression.
-
(Conditional) If you have multiple reverse proxies and proxy services, verify the contracts on all protected services that you want enabled for single sign-on.
-
Click to save your changes, then update the Access Gateway.
-
-
Continue with Configuring a Federated Login Link for the Login Page.
Configuring a Federated Login Link for the Login Page
The Liberty and SAML 2.0 protocols allow Access Manager to automatically add a federated login link to the Login page when a trusted relationship is established. For SAML 1.1, you must configure and enable this link.
-
In the Administration Console for Site B, click > > > > > .
-
In the Display section, fill the following fields:
Icon URL: (Optional) If you have an icon you want displayed for the federated link, specify the URL to this icon.
Login URL: Specify the Intersite Transfer Service URL to Site A. For Figure 6-1, specify the following value:
https://idp.sitea.novell.com:8443/nidp/saml/idpsend?PID=https://idp.siteb.novell.com:8443/nidp/saml/metadata&TARGET=https://idp.siteb.novell.com:8443/nidp/app
For more information, see
Specifying the Intersite Transfer Service URL for the Login URL Option
in the Novell Access Manager 3.0 SP4 Administration Guide.Advertise on Login page: Select this option.
-
Click twice, then update the Identity Server.
-
Continue with Verifying the Trust Relationship with SAML 1.1.
Verifying the Trust Relationship with SAML 1.1
-
To test the trusted relationship, enter the URL for the user portal of Site B. For Site B in Figure 6-2, you would specify the following:
https://idp.siteb.novell.com:8443/nidp/app
The following login screen appears.

If you do not see the Federated Login link for SAML 1.1, verify the Login URL. See Configuring a Federated Login Link for the Login Page.
-
Click the Federated Login link.
You are directed to Site A for login.
-
Enter the credentials for Site A.
If the user credentials at Site A successfully map to a user at Site B, you are authenticated and redirected to the User Portal on Site B.
-
Verify that the Authentication and Federation pages in the user portal for Site B contain values about your federation. If they don’t, the user account matching failed. To find the problem, review the tasks in Configuring User Account Matching.
-
If your protected resources on the Access Gateway use the same contract, enter the URL to one of these resources.
You are granted access without entering any additional credentials.