7.3 Installing SSL VPN Services
Your installation depends on the preferred deployment scenario explained in Section 7.1, Identifying the Installation You Should Use. Decide which scenario to use, make sure you have filled the prerequisites, then install SSL VPN.
This section includes the following topics:
-
Section 7.3.2, Deployment Scenario 1: Installing SSL VPN on the Linux Access Gateway
-
Section 7.3.3, Deployment Scenario 2: Installing SSL VPN on a Separate Machine
-
Section 7.3.4, Deployment Scenario 3: Installing Identity Server and SSL VPN on the same Machine
-
Section 7.3.5, Verifying that Your SSL VPN Service Is Installed
7.3.1 Prerequisites
-
You have root privileges.
-
You have the following information:
-
IP address of the SSL VPN server
-
IP address of the internal interface
-
IP address of the Administration Console installed on the Identity Server
-
7.3.2 Deployment Scenario 1: Installing SSL VPN on the Linux Access Gateway
Standard Installation
In a standard installation of the Linux Access Gateway, SSL VPN is installed automatically. This is the preferred method of installation.
For more information on a standard installation of the Linux Access Gateway, refer to Section 5.3, Using a Standard Linux Installation with the Default Settings.
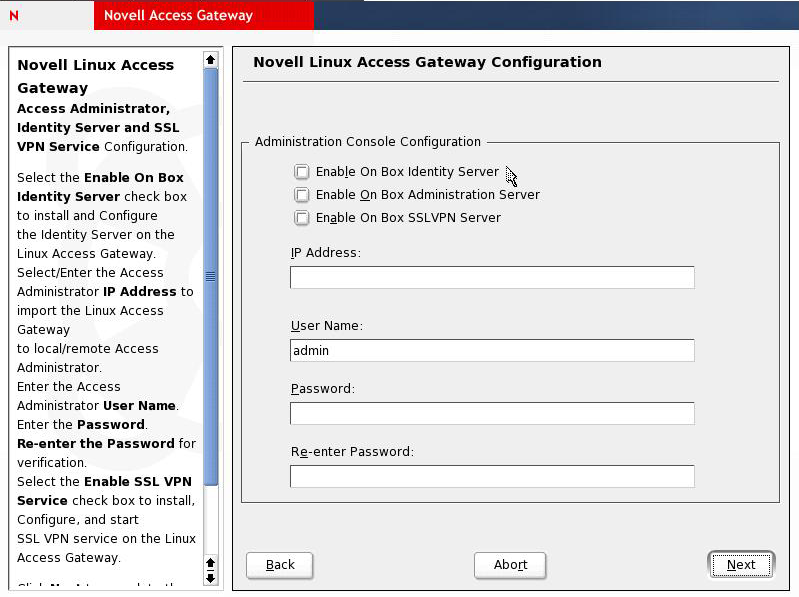
In the Access Administrator Configuration section in the Novell Linux Access Gateway Configuration page, select the check box to install and configure SSL VPN on the Linux Access Gateway.
Figure 7-3 Novell Linux Access Gateway Configuration Page
Advanced Installation
For an advanced installation of Linux Access Gateway, use the following steps to install SSL VPN:
-
Start the advanced installation of the Linux Access Gateway. For details, refer to Section 5.0, Installing the Linux Access Gateway.
-
On the Access Administrator Configuration page, select . This installs SSL VPN along with the Linux Access Gateway.
-
Click .
The Installation Settings page is displayed. If the installation is successful, SSL VPN is displayed in the Software section.
-
Follow the on-screen instructions to continue with the Linux Access Gateway installation.
7.3.3 Deployment Scenario 2: Installing SSL VPN on a Separate Machine
-
Insert the CD into the CD drive, then locate install.sh.
-
At a command prompt, enter the following install script command:
./install.sh
You are prompted to select an installation.
-
Type 3 to install Novell SSL VPN Agent, then press Enter.
The license agreement is displayed.
-
Review and accept the License Agreement.
-
Specify the name of the administrator for the Administration Console.
-
Specify the administration password.
-
Confirm the password.
-
(Conditional) If you are installing the SSL VPN server on the same machine as the Administration Console, you are not prompted for the IP address of the Administration Console. If the Administration Console is on a different machine, you are prompted for its IP address.
-
(Conditional) If the SSL VPN machine has been configured with multiple IP address, you are prompted to select an IP address for the SSL VPN server.
-
Wait while the SSL VPN server is installed on your system and imported into the Administration Console, which takes about 2 minutes.
The installation ends with the following message: Installation complete.
-
To verify the installation of the Access Gateway, continue with Section 7.3.5, Verifying that Your SSL VPN Service Is Installed.
7.3.4 Deployment Scenario 3: Installing Identity Server and SSL VPN on the same Machine
-
Insert the CD into the CD drive, then locate install.sh.
-
At the command prompt, enter the following install script command:
./install.sh
You are prompted to select an installation.
-
When prompted to install a product, type 3 to install the Novell SSL VPN Agent, then press Enter key to begin.
The license agreement is displayed.
-
Review and accept the License Agreement.
-
Specify the name of the administrator for the Administration Console.
-
Specify the administration password.
-
Confirm the password.
-
(Conditional) If you are installing the SSL VPN server on the same machine as the Administration Console, you are not prompted for the IP address of the Administration Console. If the Administration Console is on a different machine, you are prompted for its IP address.
-
(Conditional) If the SSL VPN machine has been configured with multiple IP address, you are prompted to select an IP address for the SSL VPN server.
-
Wait while the SSL VPN server is installed on your system and imported into the Administration Console, which takes about 2 minutes.
The installation ends with the following message: Installation complete.
-
To verify the installation of the Access Gateway, continue with Section 7.3.5, Verifying that Your SSL VPN Service Is Installed.
7.3.5 Verifying that Your SSL VPN Service Is Installed
You can check the status of the SSL VPN server in the Administration Console:
-
In the Administration Console, click > .
A list of SSL VPN servers appears and displays their status under the Server Status icon.
-
Click the icon to display the health of the SSL VPN server.
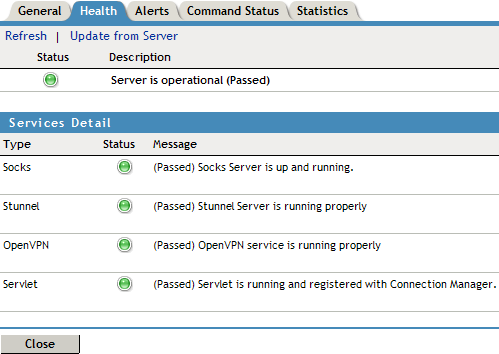
The Socks and Stunnel server connections should display green and report Passed. The Servlet status might report Failed until the connection is configured later. This should not impact server functionality.
-
Continue with see
Configuring SSL VPN to Protect an Application
in the Novell Access Manager 3.0 SP4 Setup Guide.For more information, see
Configuring Basic Setup
in the Novell Access Manager 3.0 SP4 Administration Guide