5.4 Modifying a Trusted Provider
The following sections describe the configuration options available for identity providers and service providers:
You can modify the following features of an identity provider:
-
Communication Security: See Section 5.4.1, Configuring Communication Security Settings.
-
Attributes to Obtain at Authentication: See Section 5.4.3, Selecting Attributes for a Trusted Provider.
-
Metadata: See Section 5.4.4, Managing Metadata.
-
Authentication Request: See Section 5.4.5, Configuring an Authentication Request for an Identity Provider.
-
User Identification: See Section 8.0, Configuring User Identification Methods for Federation.
-
Authentication Card: See Section 5.4.7, Managing the Authentication Card of an Identity Provider.
You can modify the following features of a service provider:
-
Communication Security: See Section 5.4.1, Configuring Communication Security Settings.
-
Attributes to Send in the Response: See Section 5.4.3, Selecting Attributes for a Trusted Provider.
-
Intersite Transfer Service: See Configuring an Intersite Transfer Service Target for a Service Provider.
-
Metadata: See Section 5.4.4, Managing Metadata.
-
Authentication Response: See Section 5.4.6, Configuring an Authentication Response for a Service Provider.
5.4.1 Configuring Communication Security Settings
You can configure the security settings to control direct communication between the Identity Server and a trusted provider across the SOAP back channel. These methods apply to the trusted identity provider and are similar between Liberty and SAML.
-
In the Administration Console, click > > > .
For the protocol, select Liberty, SAML 1.1, or SAML 2.0.
-
Click the name of a provider.

-
On the Trust page, fill in the following fields:
Name: Specify the display name for this trusted provider. The default name is the name you entered when creating the trusted provider.
The section specifies how to validate messages received from trusted providers over the SOAP back channel. Both the identity provider and the service provider in the trusted relationship must be configured to use the same security method.
Encrypt name identifiers: (SAML 2.0 only) Select this option if you want the name identifiers encrypted on the wire.
Encrypt assertions: (SAML 2.0 Service Provider only) Specifies that you want the assertions encrypted on the wire.
Select one of the following security methods:
-
Message Signing: Specifies no security and relies upon message signing using a digital signature.
-
Mutual SSL: Specifies that this trusted provider provides a digital certificate (mutual SSL) when it sends a SOAP message.
SSL communication requires only the client to trust the server. For mutual SSL, the server must also trust the client. For the client to trust the server, the server’s certificate authority (CA) certificate must be imported into the client trust store. For the server to trust the client, the client’s certificate authority (CA) certificate must be imported into the server trust store.
-
Basic Authentication: Specifies standard header-based authentication. This method assumes that a name and password for authentication are sent and received over the SOAP back channel.
Send: The name and password to be sent for authentication to the trusted partner. The partner expects this password for all SOAP back-channel requests, which means that the name and password must be agreed upon.
Verify: The name and password used to verify data that the trusted provider sends.
-
-
Click twice.
-
Update the Identity Server.
5.4.2 Using the Intersite Transfer Service
Understanding the Intersite Transfer Service URL
The Intersite Transfer Service is used by an identity provider to cause authentication to occur at a service provider that it trusts. The URLs for accessing the Intersite Transfer Service are different for each supported protocol (Liberty, SAML 1.1, and SAML 2.0). The Novell Access Manager identity and service provider components use the following format of the Intersite Transfer Service URL:
-
SAML 1.1: <identity_provider_base_URL>/saml/idpsend? PID=<service_provider_base_URL>/nidp/saml/metadata& TARGET=<final_destination_URL>
-
SAML 2.0: <identity_provider_base_URL>/saml2/idpsend? PID=<service_provider_base_URL>/nidp/saml2/metadata& TARGET=<final_destination_URL>
-
Liberty: <identity_provider_base_URL>/idff/idpsend? PID=<service_provider_base_URL>/nidp/idff/metadata& TARGET=<final_destination_URL>
The <identity_provider_base_URL> is the Base URL of the identity provider that is providing authentication, followed by the path to the protocol application being used for federation. Notice that the path is different for each protocol. The <service_provider_base_URL> is the Base URL of the service provider, followed by the path to the protocol metadata. Notice that the path is different for each protocol. The scheme (http or https) in the PID must match what is configured for the Base URL for the service provider.
The <final_destination_URL> is the URL to which the browser is redirected following a successful authentication at the identity provider. If this target URL contains parameters (for example, TARGET=https://login.provo.novell.com:8443/nidp/app?function_id=22166&Resp_Id=55321 &Resp_App_Id=810&security_id=0), it must be URL encoded to prevent the URL from being truncated.
Examples:
-
SAML 1.1: https://idp.sitea.novell.com:8443/nidp/saml/idpsend?PID=https://idp.siteb.novell.com:8443/nidp/saml/metadata&TARGET=https://eng.provo.novell.com/saml1/myapp
-
SAML 2.0: https://idp.sitea.novell.com:8443/nidp/saml2/idpsend?PID=https://idp.siteb.novell.com:8443/nidp/saml2/metadata&TARGET=https://eng.provo.novell.com/saml2/myapp
-
Liberty: https://idp.sitea.novell.com:8443/nidp/idff/idpsend?PID=https://idp.siteb.novell.com:8443/nidp/idff/metadata&TARGET=https://eng.provo.novell.com/liberty/myapp
The Intersite Transfer Service URLs of third-party identity and service provider implementations are different than those shown above for the Novell providers. Check the third party documentation for the URL information.
Specifying the Intersite Transfer Service URL for the Login URL Option
Liberty and SAML 2.0 support a single sign-on URL. Because SAML 1.1 does not support a single sign-on URL, you need to specify the Intersite Transfer Service URL in the option on the authentication card for the SAML 1.1 identity provider:
Figure 5-3 SAML 1.1 Authentication Card
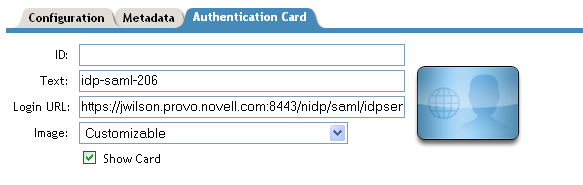
In order for a card to appear as a login option, you must specify a and select the option. Figure 5-4 illustrates a possible configuration that requires the Intersite Transfer Service for the SAML 1.1 protocol.
Figure 5-4 Federated Identity Configuration
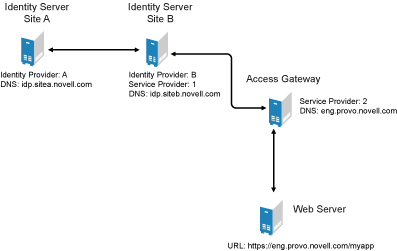
If you want a card to appear that allows the user to log in to Site A (as shown in Figure 5-3), you need to specify a value for the option.
Using the DNS names from Figure 5-4, the complete value for the option is as follows:
https://idp.sitea.novell.com:8443/nidp/saml/idpsend?PID=https://idp.siteb.novell.com:8443/nidp/saml/metadata&TARGET=https://idp.siteb.novell.com:8443/nidp/app
The following happens when this link is invoked:
-
The browser performs a Get to the identity provider (Site A).
-
If the identity provider (Site A) trusts the service provider (Site B), the identity provider prompts the user for authentication information and builds an assertion.
-
The identity provider (Site A) sends the user to the service provider (Site B) using the POST or Artifact method.
-
The service provider (Site B) consumes the assertion and sends the user to the TARGET URL (the user portal on Site B).
To configure the settings for the intersite transfer service.
-
Click > > > > > .
-
Fill in the following fields:
ID: (Optional) Specify an alphanumeric value that identifies the card. If you need to reference this card outside of the Administration Console, you need to specify a value here. If you do not assign a value, the Identity Server creates one for its internal use.
Text: Specify the text that is displayed on the card to the user.
Login URL: Specify an Intersite Transfer Service URL.The URL has the following format, where idp.sitea.novell.com is the DNS name of the identity provider and idp.siteb.novell.com is the name of the service provider:
https://idp.sitea.novell.com:8443/nidp/saml/idpsend?PID=https://idp.siteb.novell.com:8443/nidp/saml/metadata&TARGET=https://idp.siteb.novell.com:8443/nidp/app
Image: Specify the image to be displayed on the card. Select the image from the drop down list. To add an image to the list, click .
Show Card: Determine whether the card is shown to the user, which allows the user to select and use the card for authentication. If this option is not selected, the card is only used when a service provider makes a request for the card.
-
Click twice.
-
Update the Identity Server.
Using Intersite Transfer Service Links on Web Pages
The Intersite Transfer Service URL can be used on a Web page that provides links to various protected resources requiring authentication with a specific identity provider and a specific protocol. Links on this Web page are configured with the URL of the Intersite Transfer Service of the identity provider to be used for authentication. Clicking these links directs the user to the appropriate identity provider for authentication. Following successful authentication, the identity provider sends a SAML assertion to the service provider. The service provider uses the SAML assertion to verify authentication, and then redirects the user to the destination URL as specified in the TARGET portion of the Intersite Transfer Service URL.
Below are sample links that might be included on a Web page. These links demonstrate the use of SAML 1.1, SAML 2.0, and Liberty formats for the Intersite Transfer Service URL:
SAML 1.1: <a href="https://idp.sitea.novell.com:8443/nidp/saml/idpsend?PID=https://idp.siteb.novell.com:8443/nidp/saml/metadata&TARGET=https://eng.provo.novell.com/saml1/myapp">SAML1 example</a>
SAML 2.0: <a href="https://idp.sitea.novell.com:8443/nidp/saml2/idpsend?PID=https://idp.siteb.novell.com:8443/nidp/saml2/metadata&TARGET=https://eng.provo.novell.com/saml2/myapp">SAML2 example</a>
Liberty: <a href="https://idp.sitea.cit.novell.com:8443/nidp/idff/idpsend?PID=https://idp.siteb.novell.com:8443/nidp/idff/metadata&TARGET=https://eng.provo.novell.com/liberty/myapp">Liberty example</a>
Figure 5-5 illustrates a network configuration that could use these sample links.
Figure 5-5 Using the Intersite Transfer Service URL
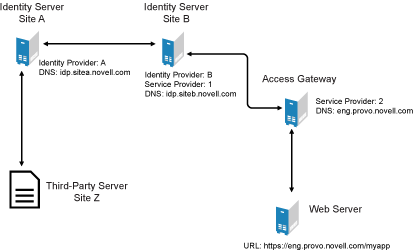
In this example, Site Z places links on its Web page, using the Intersite Transfer Service URL of Site A. These links trigger authentication at Site A. If successful, Site A sends an assertion to Site B. Site B verifies the authentication and redirects the user to the myapp application that it is protecting.
Configuring an Intersite Transfer Service Target for a Service Provider
If you have created Web pages that have links that specify a Intersite Transfer Service URL (see Using Intersite Transfer Service Links on Web Pages), you can have the Identity Server control the TARGET parameter.
-
Click > > > , or > > .
-
Fill in the following:
ID: (Optional) Specify an alphanumeric value that identifies the target. If you need to reference the target outside of the Administration Console, you need to specify a value here. If you do not assign a value, the Identity Server creates one for its internal use.
Target: Specify the URL of the page that you want to display to users when they authenticate using an Intersite Transfer URL.The behavior of this option is influenced by the option.
Allow any target: If this option is selected, the user can use the target that was specified in the Intersite Transfer URL. If this option is not selected, the target value in the Intersite Transfer URL is ignored and the user is sent to URL specified in the option.
-
Click twice.
-
Update the Identity Server.
5.4.3 Selecting Attributes for a Trusted Provider
You can select attributes that an identity provider sends and a service provider receives in an authentication. You can also create attribute sets or select attribute sets that you created globally in Section 4.1, Configuring Attribute Sets.
-
In the Administration Console, click > > > > > > .

-
(Conditional) To create an attribute set, select from the drop-down menu.
An attribute set is a group of attributes that can be exchanged with the trusted provider. For example, you can specify that the local attribute of any attribute in the Liberty profile (such as Informal Name) matches the remote attribute specified at the service provider.
-
Select an attribute set
-
Select attributes from the list, and move them to the left side of the page.
-
If you are configuring a service provider, the left side of the page lists the attributes that you want sent in an assertion to the service provider.
-
If you are configuring an identity provider, the attributes that you move to the left side of the page lists the attributes you want to be obtained during authentication.
-
-
Click twice.
-
Update the Identity Server.
5.4.4 Managing Metadata
The Liberty, SAML 1.1, and SAML 2.0 protocols contain pages for viewing and reimporting the metadata of the trusted providers. Only the SAML 1.1 protocol allows you to edit the metadata.
Viewing and Reimporting a Trusted Provider’s Metadata
You might need to reimport a trusted provider’s metadata if you learn that it has changed. The metadata changes when you change the provider to use HTTPS rather than HTTP and when you change the certificate that it is using for SSL. The steps for reimporting the metadata are similar for Liberty and SAML protocols.
-
In the Administration Console, click > > > .
-
Click the trusted provider, then click the tab.
This page displays the current metadata the trusted provider is using.
-
To reimport the metadata, click .
Follow the prompts to import the metadata.
-
Specify the new metadata information as described in Section 5.3, Creating a Trusted Provider.
-
Confirm metadata certificates, then click .
Editing a SAML 1.1 Identity Provider’s Metadata
Access Manager allows you to obtain metadata for SAML 1.1 providers. However, metadata for SAML 1.1 might not be available for some trusted providers. Therefore, you can enter metadata manually. The page for this is available if you clicked the option when you created the trusted provider.
IMPORTANT:The SAML 2.0 and Liberty 1.2 protocols define a logout mechanism whereby the service provider sends a logout command to the trusted identity provider when a user logs out at a service provider. SAML 1.1 does not provide such a mechanism. For this reason, when a logout occurs at the SAML 1.1 service provider, no logout occurs at the trusted identity provider. A valid session is still running at the identity provider, and no credentials need to be entered. In order to log out at both providers, the user must navigate to the identity provider that authenticated him to the SAML 1.1 service provider and log out manually.
For conceptual information about how Access Manager uses SAML, see Section C.0, Understanding How Access Manager Uses SAML.
-
In the Administration Console, click > > > > > .
You can reimport the metadata (see Step 2) or edit it (see Step 4).
-
To reimport the metadata from a URL or text, click on the View page.
The system displays the Create Trusted Identity Provider Wizard that lets you obtain the metadata. Follow the on-screen instructions to complete the steps in the wizard.
-
Select either or , then fill in the field for the metadata on the page.
-
To edit the metadata manually, click .

-
Fill in the following fields as necessary:
Supported Version: Specifies the version of SAML that you want to use.
Provider ID: (Required) The SAML 1.1 metadata unique identifier for the provider. For example, https://<dns>:8443/nidp/saml/metadata. Replace <dns> with the DNS name of the provider.
Source ID: The SAML Source ID for the trusted provider. The Source ID is a 20-byte value that is used as part of the Browser/Artifact profile. It allows the receiving site to determine the source of received SAML artifacts. If none is specified, the Source ID is auto-generated using a SHA-1 hash of the site provider ID.
Metadata expiration: The date upon which the metadata is no longer valid.
SAML attribute query URL: The URL location where an attribute query is to be sent to the partner. The attribute query requests a set of attributes associated with a specific object. A successful response contains assertions that contain attribute statements about the subject. A SAML 1.1 provider might use the base URL, followed by /saml/soap. For example, https://<dns>:8443/nidp/saml/soap. Replace <dns> with the DNS name of the provider.
Artifact resolution URL: The URL location where artifact resolution queries are sent. A SAML artifact is included in the URL query string. The target URL on the destination site the user wants to access is also included on the query string. A SAML 1.1 provider might use the base URL, followed by /saml/soap. For example, https://<dns>:8443/nidp/saml/soap. Replace <dns> with the DNS name of the provider.
-
To specify signing certificate settings, fill in the following fields:
Attribute authority: Specifies the signing certificate of the partner SAML 1.1 attribute authority. The attribute authority relies on the identity provider to provide it with authentication information so that it can retrieve attributes for the appropriate entity or user. The attribute authority must know that the entity requesting the attribute has been authenticated to the system.
Identity provider: (Required) Appears if you are editing identity provider metadata. This field specifies the signing certificate of the partner SAML 1.1 identity provider. It is the certificate the partner uses to sign authentication assertions.
-
Click .
-
On the Identity Servers page, click to update the configuration.
Editing a SAML 1.1 Service Provider’s Metadata
Access Manager allows you to obtain metadata for SAML 1.1 providers. However, metadata for SAML 1.1 might not be available for some trusted providers. Therefore, Access Manager allows you to enter metadata manually. The page for this is available if you clicked the option when you created the trusted provider.
For conceptual information about how Access Manager uses SAML, see Section C.0, Understanding How Access Manager Uses SAML.
-
In the Administration Console, click > > > > > .
You can reimport the metadata (see Step 2) or edit it (see Step 3).
-
To reimport the metadata, click on the View page.
Follow the on-screen instructions to complete the steps in the wizard.
-
To edit the metadata manually, click .

-
Fill in the following fields:
Supported Version: Specifies which version of SAML that you want to use.
Provider ID: (Required) Specifies the SAML 1.1 metadata unique identifier for the provider. For example, https://<dns>:8443/nidp/saml/metadata. Replace <dns> with the DNS name of the provider.
Metadata expiration: Specifies the date upon which the metadata is no longer valid.
Want assertion to be signed: Specifies that authentication assertions from the trusted provider must be signed.
Artifact consumer URL: Specifies where the partner receives incoming SAML artifacts. For example, https://<dns>:8443/nidp/saml/spassertion_consumer. Replace <dns> with the DNS name of the provider.
Post consumer URL: Specifies where the partner receives incoming SAML POST data. For example, https://<dns>:8443/nidp/saml/spassertion_consumer. Replace <dns> with the DNS name of the provider.
Service Provider: Specifies the public key certificate used to sign SAML data. You can browse to locate the service provider certificate.
-
Click .
5.4.5 Configuring an Authentication Request for an Identity Provider
The Liberty and SAML 2.0 protocols have slightly different options for configuring an authentication request.
Configuring a Liberty Authentication Request
Use this page to configure how an authentication request is created. When users authenticate to a service provider, they can be given the option to federate their account identities with the preferred identity provider. This process creates an account association between the identity provider and service provider that enables single sign-on and single log-out.
> > > > > >
Allow Federation: Determines whether federation is allowed. The federation options that control when and how federation occurs can only be configured if the identity provider has been configured to allow federation.
-
After authentication: Specifies that the federation request can be sent after the user has authenticated (logged in) to the service provider. When you set only this option, users must log in locally, then they can federate using the Federate option on the card in the Login page of the Access Manager User Portal. Because the user is required to authenticate locally, you do not need to set up user identification.
-
During authentication: Specifies whether federation can occur when the user selects the authentication card of the identity provider. Typically, a user is not authenticated at the service provider when this selection is made. When the identity provider sends a response to the service provider, the user needs to be identified on the service provider to complete the federation. If you enable this option, make sure you configure a user identification method. See Section 8.1, Selecting a User Identification Method for Liberty or SAML 2.0.
Authentication Context
Use Types: Specifies whether to use authentication types. Select the types from the field to specify which type to use for authentication between trusted service providers and identity providers. Standard types include Name/Password, X.509, Token, and so on.
Use Contracts: Specifies whether to use authentication contracts. Select the contract from the list. For a contract to appear in the list, the contract must have the option enabled. To use the contract for federated authentication, the contract’s URI must be the same on the identity provider and the service provider. For information about contract options, see Section 2.4, Configuring Authentication Contracts.
Do not specify: Specifies that the identity provider can send any type of authentication to satisfy a service provider’s request, and instructs a service provider to not send a request for a specific authentication type or contract.
Options
Response protocol binding: Select or or . Artifact and Post are the two methods for transmitting assertions between the authenticating system and the target system.
If you select , you are letting the identity provider determine the binding.
Identity provider proxy redirects: Specifies whether the trusted identity provider can proxy the authentication request to another identity provider. A value of specifies that the trusted identity provider cannot redirect an authentication request. Values 1-5 determine the number of times the request can be proxied. Select to let the trusted identity provider decide how many times the request can be proxied.
Force authentication at the IDP: Specifies that the trusted identity provider must prompt users for authentication, even if they are already logged in.
Use automatic introduction: Automatically attempts single sign-on to this trusted identity provider.
IMPORTANT:Only enable this option when you are confident the server will be up. If the server is down and does not respond to the authentication request, the user gets a page-cannot-be-displayed error. Local authentication is disabled because the browser is never redirected to the login page.
This option should only be enabled when you know the identity provider is available 99.999% of the time or the service provider is dependent upon this identity provider for authentication.
Configuring a SAML 2.0 Authentication Request
> > > > > >
Use this page to configure how an authentication request is federated. When users authenticate to a service provider, they can be given the option to federate their account identities with the preferred identity provider. This process creates an account association between the identity provider and service provider that enables single sign-on and single log-out.
Allow Federation: Determines whether federation is allowed. The federation options that control when and how federation occurs can only be configured if the identity provider has been configured to allow federation.
-
After authentication: Specifies that the federation request can be sent after the user has authenticated (logged in) to the service provider. When you set only this option, users must log in locally, then they can federate using the Federate option on the card in the Login page of the Access Manager User Portal. Because the user is required to authenticate locally, you do not need to set up user identification.
-
During authentication: Specifies whether federation can occur when the user selects the authentication card of the identity provider. Typically, a user is not authenticated at the service provider when this selection is made. When the identity provider sends a response to the service provider, the user needs to be identified on the service provider to complete the federation. If you enable this option, make sure you configure a user identification method. See Section 8.1, Selecting a User Identification Method for Liberty or SAML 2.0.
Authentication Context
Use Types: Specifies whether to use authentication types. Select the types from the field to specify which type to use for authentication between trusted service providers and identity providers. Standard types include Name/Password, X.509, Token, and so on.
Use Contracts: Specifies whether to use authentication contracts. Select the contract from the list. For a contract to appear in the list, the contract must have the option enabled. To use the contract for federated authentication, the contract’s URI must be the same on the identity provider and the service provider. For information about contract options, see Section 2.4, Configuring Authentication Contracts.
Do not specify: Specifies that the identity provider can send any type of authentication to satisfy a service provider’s request, and instructs a service provider to not send a request for a specific authentication type or contract.
Options
Response protocol binding: Select or or . Artifact and Post are the two methods for transmitting assertions between the authenticating system and the target system.
If you select , you are letting the identity provider determine the binding.
Allowable IDP proxy indirections: Specifies whether the trusted identity provider can proxy the authentication request to another identity provider. A value of specifies that the trusted identity provider cannot redirect an authentication request. Values 1-5 determine the number of times the request can be proxied. Select to let the trusted identity provider decide how many times the request can be proxied
Force authentication at the IDP: Specifies that the trusted identity provider must prompt users for authentication, even if they are already logged in.
Use automatic introduction: Automatically attempts single sign-on to this trusted identity provider.
IMPORTANT:Only enable this option when you are confident the server will be up. If the server is down and does not respond to the authentication request, the user gets a page-cannot-be-displayed error. Local authentication is disabled because the browser is never redirected to the login page.
This option should only be enabled when you know the identity provider is available 99.999% of the time or the service provider is dependent upon this identity provider for authentication.
5.4.6 Configuring an Authentication Response for a Service Provider
The Liberty, SAML 1.1, and SAML 2.0 protocols support slightly different options for configuring how you want the Identity Server to respond to an authentication request from a service provider.
Configuring the Liberty Authentication Response
After you create a trusted service provider, you can configure how your Identity Server responds to authentication requests from the service provider.
-
In the Administration Console, click > > > > > .

-
Select the binding method.
If the request from the service provider does not specify a response binding, you need to specify a binding method to use in the response. Select to provide an increased level of security by using a back-channel means of communication between the two servers. Select to use HTTP redirection for the communication channel between the two servers. If you select , you might want to require the signing of the authentication requests. See Section 5.2.1, Configuring the General Identity Provider Options.
-
Specify the identity formats that the Identity Server can send in its response. Select the box to choose one or more of the following:
-
Persistent Identifier Format: Specifies that a persistent identifier, which is written to the directory and remains intact between sessions, can be sent.
-
Transient Identifier Format: Specifies that a transient identifier, which expires between sessions, can be sent.
If the request from the service provider requests a format that is not enabled, the user cannot authenticate.
-
-
Use the button to specify whether a persistent or transient identifier is sent when the request from the service provider does not specify a format.
-
To specify that this Identity Server must authenticate the user, disable the option. When the option is disabled and the Identity Server cannot authenticate the user, the user is denied access.
When this option is enabled, the Identity Server checks to see if other identity providers can satisfy the request. If one or more can, the user is allowed to select which identity provider performs the authentication. If a proxied identity provider performs the authentication, it sends the response to the Identity Server. The Identity Server then sends the response to the service provider.
-
Enable the option if you want to allow the service provider to query the Identity Server for a list of its Web Services. For example, when the option is enabled, the service provider can determine whether the Web Services Framework is enabled and which Web Service Provider profiles are enabled.
-
Click twice, then update the Identity Server.
Configuring the SAML 1.1 Authentication Response
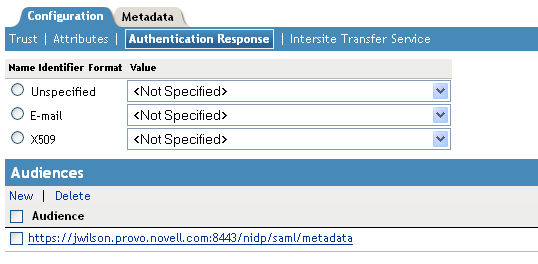
If the service provider does not request a specific format for the name identifier, you can specify the format you want the Identity Server to send. You can also restrict the use of the assertion.
When an identity provider sends an assertion, the assertion can be restricted to an intended audience. The intended audience is defined to be any abstract URI in SAML 1.1. The URL reference can also identify a document that describes the terms and conditions of audience membership.
-
In the Administration Console, click > > > > > .
-
To specify a name identifier format, select one of the following:
-
E-mail: Specifies that an e-mail attribute can be used as the identifier.
-
X509: Specifies that an X.509 certificate can be used as the identifier.
-
Unspecified: Specifies that an unspecified format can be used and any value can be used. The service provider and the identity provider need to agree on what value is placed in this identifier.
-
-
To specify the format of the name identifier, select an attribute.
The available attributes depend upon the attributes that you have selected to send with authentication (see the Attributes page for the service provider).
-
To configure an audience, click .
-
Specify the value.
The Provider ID, which can be used for the audience, is displayed on the Edit page for the metadata.
-
Click twice, then update the Identity Server.
Configuring the SAML 2.0 Authentication Response
After you create a trusted service provider, you can configure how your Identity Server responds to authentication requests from the service provider.
-
In the Administration Console, click > > > > > .

-
Select the binding method.
If the request from the service provider does not specify a response binding, you need to specify a binding method to use in the response. Select to provide an increased level of security by using a back-channel means of communication between the two servers. Select to use HTTP redirection for the communication channel between the two servers. If you select , you might want to require the signing of the authentication requests. See Section 5.2.1, Configuring the General Identity Provider Options.
-
Specify the identity formats that the Identity Server can send in its response. Select the box to choose one or more of the following:
-
Persistent: Specifies that a persistent identifier, which is written to the directory and remains intact between sessions, can be sent.
-
Transient: Specifies that a transient identifier, which expires between sessions, can be sent.
-
E-mail: Specifies that an e-mail attribute can be used as the identifier.
-
Kerberos: Specifies that a Kerberos token can be used as the identifier.
-
X509: Specifies that an X.509 certificate can be used as the identifier.
-
Unspecified: Specifies that an unspecified format can be used and any value can be used. The service provider and the identity provider need to agree on what value is placed in this identifier.
-
-
Use the button to select the name identifier that the Identity Server should send if the service provider does not specify a format.
-
Specify the format of the name identifier.
The persistent and transient formats are generated automatically. For the others, you can select an attribute. The available attributes depend upon the attributes that you have selected to send with authentication (see Section 5.4.3, Selecting Attributes for a Trusted Provider). If you do not select a value for the E-mail, Kerberos, X509, or Unspecified format, a unique value is automatically generated.
-
To specify that this Identity Server must authenticate the user, disable the option. When the option is disabled and the Identity Server cannot authenticate the user, the user is denied access.
When this option is enabled, the Identity Server checks to see if other identity providers can satisfy the request. If one or more can, the user is allowed to select which identity provider performs the authentication. If a proxied identity provider performs the authentication, it sends the response to the Identity Server. The Identity Server then sends the response to the service provider.
-
Click twice, then update the Identity Server.
5.4.7 Managing the Authentication Card of an Identity Provider
When you create an identity provider, you must also configure an authentication card. After it is created, you can modify it.
-
In the Administration Console, click > > > >
-
Modify the values in one or more of the following fields:
ID: If you have need to reference this card outside of the user interface, specify an alphanumeric value here. If you do not assign a value, the Identity Server creates one for its internal use. The internal value is not persistent. Whenever the Identity Server is rebooted, it can change. A specified value is persistent.
Text: Specify the text that is displayed on the card to the user. This value, in combination with the image, should identify to the users, which provider they are logging into.
Login URL: (Conditional) If you are configuring an authentication card for SAML 1.1, specify an Intersite Transfer Service URL.The URL has the following format, where idp.sitea.novell.com is the DNS name of the identity provider, idp.siteb.novell.com is the name of the service provider, and idp.siteb.novell.com:8443/nidp/app specifies the URL that you want to users to access after a successful login:
https://idp.sitea.novell.com:8443/nidp/saml/idpsend?PID=https://idp.siteb.novell.com:8443/nidp/saml/metadata&TARGET=https://idp.siteb.novell.com:8443/nidp/app
For more information, see Specifying the Intersite Transfer Service URL for the Login URL Option.
Image: Specify the image to be displayed on the card. Select the image from the drop-down list. To add an image to the list, click .
Show Card: Determine whether the card is shown to the user, which allows the user to select and use the card for authentication. If this option is not selected, the card is only used when a service provider makes a request for the card.
-
Click twice, then update the Identity Server.