1.3 Customizing the Identity Server Login Page
You can create custom login pages that are displayed when the user authenticates to the Identity Server. You might want to rebrand the User Portal or authenticate users with non-default attributes (such as the email address attribute rather than the cn attribute). You also might be fronting several protected resources with an Access Gateway, and you need to create a unique login page for each resource.
When you customize the login page, you need to decide on the type of page to use. See Section 1.3.1, Selecting the Login Page and Modifying It. After you have made that decision, you need to configure the Identity Server to display the correct login page. See Section 1.3.2, Configuring the Identity Server to Use Custom Login Pages.
Using Custom Pages from Previous Releases: The process for customizing login pages has been modified in Access Manager 3.1 SP1. This new process requires some modifications to login pages that have been customized for either 3.1 or 3.0. If you need information on these modification procedures, see the following sections in the Novell Access Manager 3.1 SP1 Installation Guide:
Modifying the Target of the User Portal: If you want to control the target when users log directly into the Identity Server, see Section 2.7.2, Specifying a Target.
Modifying Error Pages: Both the Identity Server and the Access Gateway return error pages to the user. For information on customizing these messages and pages, see the following:
1.3.1 Selecting the Login Page and Modifying It
You must be familiar with customizing JSP files to create a customized login page. You can use any of the following methods to produce the page:
-
If you only need to customize the credentials (for example prompt the user for an email address rather than a name), you can make most of the modifications in the Administration Console. You need to add some properties to a method, create a contract from that method, and modify the prompt in the login.jsp file. For configuration information, see Customizing the Default Login Page to Prompt for Different Credentials.
-
If you want to maintain the features of the 3.1 page and use its authentication cards but you want to remove the Novell branding, you need to modify the nidp.jsp file. The nidp.jsp file uses iframes, so the devices that your users use for authentication must also support iframes. For configuration information, see Customizing the nidp.jsp File.
-
If you don’t need the authentication cards and if the devices that your users use for authentication support iframes, you can start with the login.jsp file and customize it. For configuration information, see Modifying the 3.1 login.jsp File.
-
If some of your users are using devices that don’t support iframes, you need to customize the 3.0 login page. For configuration information, see Modifying the 3.0 Login Page.
IMPORTANT:After you have created customized login pages, you need to ensure that you back them up before doing an upgrade. The upgrade process overrides any custom changes made to JSP files that use the same filename as those included with the product.
During an upgrade, you can select to restore custom login pages, but Novell still recommends that you have your own backup of any customized files.
Customizing the Default Login Page to Prompt for Different Credentials
This section explains how to prompt the users for an identifier other than the user’s name. Figure 1-2 displays the default login page with the username prompt.
Figure 1-2 Modifying the Credential Prompts
This section explains how to modify the content of the login.jsp file. If you want to modify other aspects of this page, you need to select one of the other methods.
The instructions below explain how to create a method that sets up the appropriate query so that the user can be found in the user store with an identifier other than the username (the cn attribute). The instructions then explain how to create a contract that uses this method and how to modify the login.jsp page so that it prompts for the appropriate identifier such as an email address instead of a username.
-
Create a method with the appropriate query:
-
In the Administration Console, click > > > > .
-
Click , then specify a .
-
In the drop-down menu for classes, select a class that is a username/password class.
-
Leave the option enabled, and configure the user store option according to your needs.
-
In the Properties section, click , then specify the following values:
Property Name: Query
Property Value: (objectclass=person)(mail=%Ecom_User_ID%)
This property is defined so that it queries the user store for the attribute you want to use rather than the cn attribute (in this case, the mail attribute of the person class). The %Ecom_User_ID% variable is the default variable name on the login page. You can change this to %EMail_Address% if you also change the value in your custom login page.
For more information on how to use this property, see Query Property.
-
In the Properties section, click , then specify the following values:
Property Name: JSP
Property Value: <filename>
Replace <filename> with the name of the custom login.jsp page you are going to create so that the page prompts the user for an e-mail address rather than a username. This must be the filename without the JSP extension. For example, if you name your file email_login.jsp, then you would specify email_login for the property value.
-
Click .
-
-
Create a contract that uses this method.
-
Click > .
-
Select the method you just created.
-
Configure the other options to fit your requirements.
For information on configuring the other options for a contract, see Section 2.4, Configuring Authentication Contracts.
-
Click .
-
-
Update the Identity Server.
-
Copy the login.jsp file and rename it. The JSP files are located on the Identity Server in the following directory:
Linux: /var/opt/novell/tomcat5/webapps/nidp/jsp
Windows: C:\Program Files\Novell\Tomcat\webapps\nidp\jsp
-
(Conditional) If you modified the %Ecom_User_ID% variable, find the string in the file and replace it with your variable.
-
(Conditional) If you need to support only one language, modify the prompt in the login.jsp file:
-
Find the following string in the file:
<label><%=handler.getResource(JSPResDesc.USERNAME)%></label>
-
Replace it with the string you want, for example:
<label>Email Address:</label>
-
Copy the modified file to each Identity Server in the cluster.
-
Back up your customized file.
-
-
(Conditional) If you need to localize the prompt for multiple languages, create a custom message properties file for the login prompt. (For more information on how to create a custom message properties file, see Section 1.2.1, Customizing Messages.)
The following steps assume you want to change the username prompt to an e-mail address prompt.
-
Find the following definition in the com/novell/nidp/resource/jsp directory of the unzipped nidp.jar file.
JSP.50=Username:
-
Add this definition to your custom properties file and modify it so that it prompts the user for an e-mail address.
JSP.50=Email Address:
-
Translate the value and add this entry to your localized custom properties files.
-
Copy the customized properties files to the WEB-INF/classes directory of each Identity Server in the cluster.
-
Restart Tomcat on each Identity Server.
Linux Identity Server: Enter the following command:
/etc/init.d/novell-tomcat5 restart
Windows Identity Server: Enter the following commands:
net stop Tomcat5 net start Tomcat5
-
-
To view a sample custom page with these modifications, see Section A.1, Modified login.jsp File for Credential Prompts.
Customizing the nidp.jsp File
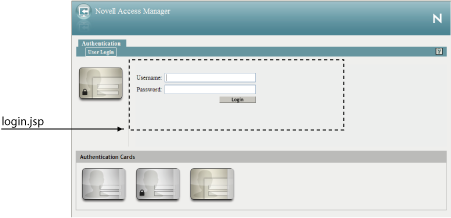
Figure 1-3 displays the default login page provided by Access Manager. Multiple JSPs are used to create the page.
Figure 1-3 The JSPs that Create the Login Page

You can use the nidp.jsp file to customize the header with the Novell Access Manager product name and the Novell logo. The menus.jsp file controls the Authentication and User Login tabs. The login.jsp file controls the credential frame with username and password. The content.jsp file controls what is displayed on the page, including the available authentication cards.
The following sections explain how to modify the nidp.jsp file.
Rebranding the Header
-
Copy the nidp.jsp file and rename it. The JSP files are located on the Identity Server in the following directory:
Linux: /var/opt/novell/tomcat5/webapps/nidp/jsp
Windows: C:\Program Files\Novell\Tomcat\webapps\nidp\jsp
-
Replace the header title that appears in the top frame (“Novell Access Manager” in Figure 1-3):
-
Locate the following string at the top of the file.
String hdrTitle = handler.getResource(JSPResDesc.PRODUCT);
-
Replace the value with the title you want to appear. For example:
String hdrTitle = "My Company"
Make sure to enclose your title value with double quotes.
-
-
Replace the window title that appears in the browser title bar:
-
Locate the following line that appears between the <head></head> tags:
<title><%=handler.getResource(JSPResDesc.TITLE)%></title>
-
Replace the content between the <title> and </title> tags with the title you want to appear. For example:
<title>My Company</title>
-
-
Replace the Access Manager logo on the left of the header (see Figure 1-3):
-
Locate the following string:
String hdrImage = "AMHeader_image.png";
-
Replace the value in the quotes with the path and the filename of the image you want to use.
For example, if you created a /custom_images directory in the images directory, the hdrImage string would have a value similar to the following:
String hdrImage = "/custom_images/myapp.png"
-
-
Replace the Novell logo on the right of the header (see Figure 1-3):
-
Locate the following string:
String hdrLogo = "AMHeader_logo.png";
-
Replace the value of the hdrLogo string with the path and the filename of the image you want to use.
For example, if you created a /custom_images directory in the images directory, the hdrLogo string would have a value similar to the following:
String hdrLogo = "/custom_images/companylogo.png"
-
-
To change the background image for the header (which allows for variable sizing of the page):
-
Locate the following string:
String hdrBgndImg = "AMHeader_background.png";
-
Replace the value of the hdrBgndImg string with the path and the filename of the image you want to use. You can use a color or an image that can be repeated. The style is set to repeat it from left to right as the window expands.
For example, if you created a /custom_images directory in the images directory, the hdrBgndImg string would have a value similar to the following:
String hdrBgndImg = "/custom_images/mybackground.png"
-
-
If your custom images or title do not appear in the header where you want them, you need to modify the style section.
-
Locate the following lines:
#header { background-image: url(<%= handler.getImage(hdrBgndImg,false)%>); background-repeat: repeat-x; } #logo { position: absolute; top: 0px; right: 0px; } #title { position: absolute; font-size: 1.2em; color: white; top: 13px; left: 55px; } -
Modify the top, left, and right values.
-
-
To change the background colors on the page, modify the color values in the <style> section of the <head> element.
-
If you need to create multiple custom login pages, repeat Step 1 through Step 8.
-
Copy the custom login pages and the images they require to each Identity Server in the cluster.
-
Continue with one of the following tasks:
-
To modify what appears in the credential frame, continue with Customizing the Credential Frame.
-
To control the cards displayed in the Authentication Cards section, see Customizing the Card Display.
-
To configure the Identity Server to use your custom pages, see Adding Logic to the main.jsp File.
-
To view a sample custom page with these modifications, see Section A.2, Custom nidp.jsp File with Custom Credentials.
-
Customizing the Card Display
The easiest method to control what appears in the Authentication Cards section is not by modifying the content.jsp file. It is by using the option that appears on the definition of each card. If this option is not selected, the card does not appear in the Authentication Cards section. Each contract has an associated card. For information on modifying the card options, see Section 2.4, Configuring Authentication Contracts.
Continue with one of the following:
-
To modify what appears in the credential frame, continue with Customizing the Credential Frame
-
To configure the Identity Server to use your custom pages, see Adding Logic to the main.jsp File.
Customizing the Credential Frame
The most common reason for modifying the login.jsp page is to prompt the users for an identifier other than the user’s name. To do this, you need to create a method that sets up the appropriate query so that the user can be found in the user store with an identifier other than the username. You then need to create a contract that uses this method. You also need to modify the prompt in the login.jsp page to match the identifier you are prompting for.
-
Create a method with the appropriate query:
-
In the Administration Console, click > > > > .
-
Click , then specify a .
-
In the drop-down menu for classes, select a class that is a username/password class.
-
Leave the option enabled, and configure the user store option according to your needs.
-
In the Properties section, click , then specify the following values:
Property Name: Query
Property Value: (objectclass=person)(mail=%Ecom_User_ID%)
This property is defined so that it queries the user store for the attribute you want to use rather than the cn attribute (in this case, the mail attribute of the person class). Change mail to the name of the attribute in your user store that you want to use for the user identifier.
The %Ecom_User_ID% variable is the default variable name on the login page. You can change this to something like %EMail_Address% if you also change the value in your custom login page.
For more information on how to use this property, see Query Property.
-
In the Properties section, click , then specify the following values:
Property Name: JSP
Property Value: <filename>
Replace <filename> with the name of the custom login.jsp page you are going to create so that the page prompts the user for an e-mail address rather than a username. This must be the filename without the JSP extension. For example, if you name your file email_login.jsp, then you would specify email_login for the property value.
-
Click .
-
-
Create a contract that uses this method:
-
Click > .
-
Select the method you just created.
-
Configure the other options to fit your requirements.
If you are creating multiple custom login pages with customized credentials, you might want to use the URI to hint at which custom login.jsp file is used with which custom nidp.jsp file. For example, the following URI values have the filename of the login page followed by the name of the custom nidp.jsp page:
login1/custom1
login2/custom2
login3/custom3
For information on configuring the other options for a contract, see Section 2.4, Configuring Authentication Contracts.
-
Update the Identity Server.
-
-
Copy the login.jsp file and rename it. The JSP files are located on the Identity Server in the following directory:
Linux: /var/opt/novell/tomcat5/webapps/nidp/jsp
Windows: C:\Program Files\Novell\Tomcat\webapps\nidp\jsp
-
(Conditional) If you modified the %Ecom_User_ID% variable, find the string in the file and replace it with your variable.
-
(Conditional) If you need to support only one language, modify the prompt in the login.jsp file:
-
Find the following string in the file:
<label><%=handler.getResource(JSPResDesc.USERNAME)%></label>
-
Replace it with the string you want, for example:
<label>Email Address:</label>
-
Copy the modified file to each Identity Server in the cluster.
-
Back up your customized file.
-
-
(Conditional) If you need to localize the prompt for multiple languages, create a custom message properties file for the login prompt. (For more information on how to create a custom message properties file, see Section 1.2.1, Customizing Messages.)
The following steps assume you want to change the username prompt to an e-mail address prompt.
-
Find the following definition in the com/novell/nidp/resource/jsp directory of the unzipped nidp.jar file.
JSP.50=Username:
-
Add this definition to your custom properties file and modify it so that it prompts the user for an e-mail address.
JSP.50=Email Address:
-
Translate the value and add this entry to your localized custom properties files.
-
Copy the customized properties files to the WEB-INF/classes directory of each Identity Server in the cluster.
-
Restart Tomcat on each Identity Server.
Linux Identity Server: Enter the following command:
/etc/init.d/novell-tomcat5 restart
Windows Identity Server: Enter the following commands:
net stop Tomcat5 net start Tomcat5
-
-
To view a sample custom page with these modifications, see Section A.2, Custom nidp.jsp File with Custom Credentials.
-
To specify which customized nidp.jsp to display with the contract, you must modify the main.jsp file. Continue with Adding Logic to the main.jsp File.
Modifying the 3.1 login.jsp File
The login.jsp file gives you just the credential frame with the login prompts in an iframe. It has no branding header. If you use this page, you are responsible for writing the HTML code for the header and the branding.
-
Copy the login.jsp file and rename it. The JSP files are located on the Identity Server in the following directory:
Linux: /var/opt/novell/tomcat5/webapps/nidp/jsp
Windows: C:\Program Files\Novell\Tomcat\webapps\nidp\jsp
-
Add the custom branding and any other content you require to the file.
-
To modify the credentials, see Customizing the Credential Frame.
-
Repeat Step 1 through Step 3 for each resource that requires unique branding.
-
Copy the files to each Identity Server in the cluster.
-
Back up your customized files.
-
(Optional) To view a sample custom page with these modifications, see Section A.3, Custom 3.1 login.jsp File.
-
Continue with Using Properties to Specify the Login Page.
Modifying the 3.0 Login Page
If you need a login page that doesn’t use iframes, you can use the 3.0 login page as the starting file for your custom login page. Figure 1-4 illustrates the default look and feel of this page.
Figure 1-4 Access Manager 3.0 Default Login Page
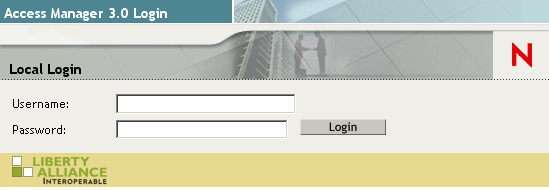
You can change the Novell branding and modify the credential prompts.
Modifying the Branding in the 3.0 Login Page
-
Copy the /var/opt/novell/tomcat4/webapps/nidp/jsp/login.jsp file from your 3.0 Identity Server and rename it.
If you do not have a 3.0 login.jsp file, copy the modified version of this file from
Modifications Required for a 3.0 Login Page
in the Novell Access Manager 3.1 SP1 Installation Guide to a true text editor. Delete all the extra line breaks. -
(Conditional) If you are using the file from your 3.0 Identity Server, modify it so that it can compile on a 3.1 Identity Server. For instructions, see
Modifications Required for a 3.0 Login Page
in the Novell Access Manager 3.1 SP1 Installation Guide. -
Replace the “Access Manager 3.0 Login” string.
-
Find the following line in the file:
<div id="title"><b><%=handler.getResource(JSPResDesc.TITLE)%></b></div>
-
Replace <%=handler.getResource(JSPResDesc.TITLE)%> with your string. Your line should look similar to the following:
<div id="title"><b>HHB Partner</b></div>
-
-
Replace the “Local Login” string.
When a 3.0 page runs on a 3.1 system, the “Local Login” string is replaced by the product string, “Novell Access Manager”. To modify this string:
-
Locate the following string in the file.
<div id="locallabel"><b><%=handler.getResource(JSPResDesc.PRODUCT)%></b></div>
-
Replace <%=handler.getResource(JSPResDesc.PRODUCT)%> with the title you want to appear. For example:
<div id="locallabel"><b>My Company</b></div>
-
-
Replace the window title that appears in the browser title bar:
-
Find the following lines in the file:
<META HTTP-EQUIV="Content-Language" CONTENT="<%=handler.getLanguage Code()%>">
<title><%=handler.getResource(JSPResDesc.TITLE)%></title>
-
Replace the content between the <title> and </title> tags with the title you want to appear. For example:
<title>My World</title>
-
-
Remove the Novell N logo:
-
Find the following line in the file:.
<div id="headimage"><img src="<%= request.getContextPath() %>/images/Odyssey_LoginHead.gif" alt="" height="80" width="550" border="0"></div>
-
Replace Odyssey_LoginHead.gif with Odyssey_Head.gif.
-
Save the file.
-
-
Select one of the following tasks:
-
To modify what appears in the credential frame, continue with Modifying the Credentials in the 3.0 Login Page.
-
To view a file with these modifications, see Section A.4, Custom 3.0 login.jsp File.
-
To configure the Identity Server to use your custom pages, see Using Properties to Specify the Login Page.
-
Modifying the Credentials in the 3.0 Login Page
-
Create a method with the appropriate query:
-
In the Administration Console, click > > > > .
-
Click , then specify a .
-
In the drop-down menu for classes, select a class that is a username/password class.
-
Leave the option enabled, and configure the user store option according to your needs.
-
In the Properties section, click , then specify the following values:
Property Name: Query
Property Value: (objectclass=person)(mail=%Ecom_User_ID%)
This property is defined so that it queries the user store for the attribute you want to use rather than the cn attribute (in this case the mail attribute of the person class). The %Ecom_User_ID% variable is the default variable name on the login page. You can change this to %EMail_Address% as long as you also change the value in your custom login page.
For more information on how to use this property, see Query Property.
-
Click .
-
Create a contract that uses this method.
For information on configuring a contract, see Section 2.4, Configuring Authentication Contracts.
-
Update the Identity Server.
-
-
(Conditional) If you need to support only one language, modify the string in your custom login file:
-
Find the following string in the file:
<label style="width: 100px"><%=handler.getResource(JSPResDesc.
USERNAME)%></label>
-
Replace it with the string you want, for example:
<label style="width: 100px">Email Address:</label>
-
Copy the modified file to each Identity Server in the cluster.
-
Update the Identity Server cluster.
-
Back up your customized file.
-
-
(Conditional) If you need to localize the prompt for multiple languages, create a custom message properties file for the login prompt. (For more information on how to create a custom message properties file, see Section 1.2.1, Customizing Messages.)
The following steps assume you want to change the Username prompt to an Email Address prompt.
-
Find the following definition in the com/novell/nidp/resource/jsp directory of the unzipped nidp.jar file.
JSP.50=Username:
-
Add this definition to your custom properties file and modify it so that it prompts the user for an e-mail address.
JSP.50=Email Address:
-
Translate the value and add this entry to your localized custom properties files.
-
Copy the customized properties files to the WEB-INF/classes directory of each Identity Server in the cluster.
-
Copy the custom login page to the JSP directory of each Identity Server in the cluster.
-
Restart Tomcat on each Identity Server.
Linux Identity Server: Enter the following command:
/etc/init.d/novell-tomcat5 restart
Windows Identity Server: Enter the following commands:
net stop Tomcat5 net start Tomcat5
-
-
(Optional) To view a customized 3.0 login page, see Section A.4, Custom 3.0 login.jsp File.
-
Continue with Using Properties to Specify the Login Page.
1.3.2 Configuring the Identity Server to Use Custom Login Pages
There are two ways to configure the Identity Server to use a custom login page. You can use properties or you can modify the main.jsp file. Which method you can use depends upon your modifications.
-
You can use properties if you created your custom page from the 3.1 login.jsp page or have modified a 3.0 custom page to work on 3.1. See Using Properties to Specify the Login Page.
-
If you created your custom page from the nidp.jsp file, you cannot use properties to specify the main custom page for authentication. You must modify the main.jsp file. See Adding Logic to the main.jsp File.
Using Properties to Specify the Login Page
For each resource that needs a unique login page, you need to create an authentication method and add the JSP and MainJSP properties to the method. You then need to create a contract for each method.
The following steps assume that the custom login page is called custom1.jsp.
-
Create a method for a custom login page:
-
In the Administration Console, click >> > > .
-
Select one of the following actions:
-
If you have create a method for a Query property to be used with your custom login page, click the name of the method.
-
If you didn’t modify the credentials on the login page, click , specify a display name, select a password class, and configure a user store.
-
-
In the Properties section, click , then specify the following.
Property Name: MainJSP
Property Value: true
This property indicates that you want to use a custom login page with this method. It also indicates that the custom login page contains the prompts for user credentials.
Property names and values are case sensitive.
-
Click .
-
(Conditional) If the Properties section does not contain a JSP property, click , specify the following, then click .
Property Name: JSP
Property Value: custom1
The property value for the JSP property is the name of the custom login file without the JSP extension. Replace custom1 with the name of your custom login file. This property determines which login page is displayed when this method is used. The filename cannot contain nidp as part of its name.
For more information about setting property values, see Section 2.2.2, Specifying Common Class Properties.
-
(Conditional) If you created multiple custom login pages, repeat Step 1.b through Step 1.e for each page.
-
-
For each method that you modified for a custom login page, create a contract:
-
Click , then click .
-
Fill in the fields to fit the needs of the resource, but make sure to assign the custom method as the method for the contract.
-
Click , configure a card for the contract, then click .
-
-
Update the Identity Server.
-
For each resource that you have created a custom login page, assign that resource to use the contract that is configured to display the appropriate login page:
-
Click > > > > > .
-
For each protected resource that you have created a custom contract for, select the protected resource, then configure it to use the custom contract.
-
-
Update the Access Gateway.
-
(Conditional) If the custom page does not display correctly, see Section 1.3.3, Troubleshooting Tips for Custom Login Pages.
Adding Logic to the main.jsp File
You can modify the main.jsp file and use the contract URI to specify the login page to display. The Identity Server must be running 3.1 SP1 or later to use this feature. Be aware of the following:
-
The main.jsp file cannot be renamed, so any modifications you make to this file can be lost whenever you upgrade the Identity Server. During the upgrade, you must select to restore custom files or you must restore your modified file after the upgrade.
-
Modifying the main.jsp file requires knowledge of JSP programming and if/else statements.
Modifying the main.jsp file allows you to have the following type of configuration:
-
You can create multiple customized nidp.jsp pages. For example: custom1.jsp, custom2.jsp, and custom3.jsp.
-
You can create multiple customized login.jsp pages that request different login credentials. For example:
login1.jsp: Configured to request username and password.
login2.jsp: Configured to request username, email, and password.
login3.jsp: Configured to request email and password.
With this type of configuration, you must create three different authentication contracts with an authentication method with a JSP property defined for each of them. These contracts require the types of values listed in the table below. The URI is defined so that it reflects the custom login.jsp and the custom nidp.jps that are used by the contract.
The following procedure explains how to configure Access Manager to display these custom login pages with custom credentials.
-
Create a unique method for each custom login.jps file:
-
In the Administration Console, click >> > > .
-
Click , then configure the following fields:
Display name: Specify a name for the method. You might want to use a name that indicates which login page is assigned to this method.
Class: Select a name/password class.
Configure the other fields to match your requirements.
-
In the Properties section, add a Query property if the page uses custom credentials.
For example, to add an email address to the login prompts, add the following property:
Property Name: Query
Property Value: (&(objectclass=person)(mail=%Ecom_User_ID%))
If you are creating a method for Contract 1 in the example above (which prompts for a username and password), you do not need to add a query property unless you are using an attribute other than the cn attribute for the username.
-
In the Properties section, add a JSP property to specify which login.jsp file to use with this method.
For example:
Property Name: JSP
Property Value: login2
-
Click .
-
If you have created more than one custom login.jsp file, repeat Step 1.b through Step 1.e for each page.
To configure the scenario described in this section, repeat these steps for three login pages.
-
-
Create a unique contract URI:
-
In the Administration Console, click .
-
Click , then configure the following fields:
Display name: Specify a name for the contract. You might want to use a name that indicates which login page is assigned to this contract.
URI: Specify a value that uniquely identifies the contract from all other contracts. No spaces can exist in the URI field. You might want to use a name that indicates the custom login page and custom credential page, such as login1/custom1.
Methods and Available Methods: Select the authentication method you configured in Step 1.
-
Configure the other fields to meet your network requirements, then click .
-
Configure the authentication card, then click .
-
(Conditional) If you have created multiple custom login pages, repeat Step 2.b through Step 2.d for each page.
To configure the scenario described in this section, repeat these steps for /login2/custom2 and /login3/custom3.
-
Click , then update the Identity Server.
-
-
Modify the main.jsp file:
-
Open the main.jsp file. The file is located in the following directory:
Linux: /var/opt/novell/tomcat5/webapps/nidp/jsp
Windows: C:\Program Files\Novell\Tomcat\webapps\nidp\jsp
-
Near the top of the file, add the following line:
String strContractURI = hand.getContractURI();
This sets the strtContractURI variable to the value of the contract URI that is being used for authentication. These lines should look similar to the following:
<% ContentHandler hand = new ContentHandler(request,response); String strContractURI = hand.getContractURI(); // Is there a JSP defined on a class definition or a method // definition that should be displayed as the main jsp here? if (handler.contractDefinesMainJSP()) { %> -
After the if statement, add an else if statement for each contract URI you have created. For example:
else if(strContractURI != null && strContractURI.equals("login1/custom1"))
    {
%>
     <%@ include file="custom1.jsp" %>

<%  }
else if(strContractURI != null && strContractURI.equals("login2/custom2"))
    {
%>
        <%@ include file="custom2.jsp" %>

else if(strContractURI != null && strContractURI.equals("login3/custom3"))
    {
%>
        <%@ include file="custom3.jsp" %>
These else if statements set up three contracts for customized login pages:
-
The first else if statement specifies the URI of the login1 contract and configures it to display the custom1.jsp page for authentication.
-
The second else if statement specifies the URI of the login2 contract and configures it to display the custom2.jsp page for authentication.
-
The third else if statement specifies the URI of the login3 contract and configures it to display the custom3.jsp page for authentication.
Your file should look similar to the following:
<%@ page language="java" %> <%@ page pageEncoding="UTF-8" contentType="text/html; charset=UTF-8"%> <%@ page import="com.novell.nidp.*" %> <%@ page import="com.novell.nidp.resource.jsp.*" %> <%@ page import="com.novell.nidp.ui.*" %> <%@ page import="com.novell.nidp.common.util.*" %> <%@ page import="com.novell.nidp.liberty.wsf.idsis.apservice.schema.*" %> <% ContentHandler hand = new ContentHandler(request,response); String strContractURI = hand.getContractURI(); // Is there a JSP defined on a class definition // or a method definition that should be displayed // as the main jsp here? if (hand.contractDefinesMainJSP()) { %> <%@ include file="mainRedirect.jsp" %> <% } else if(strContractURI != null && strContractURI.equals("login1/custom1")) { %> <%@ include file="custom1.jsp" %> <% } else if(strContractURI != null && strContractURI.equals("login2/custom2")) { %> <%@ include file="custom2.jsp" %> else if(strContractURI != null && strContractURI.equals("login3/custom3")) { %> <%@ include file="custom3.jsp" %> <% } // This is the jsp used by default else { %> <%@ include file="nidp.jsp" %> <% } %> -
-
Copy the modified main.jsp file to each Identity Server in your cluster.
-
-
Back up your customized files.
-
For each resource that you have created a custom login page for, assign that resource to use the contract that is configured to display the appropriate login page:
-
Click > > > > > .
-
For each protected resource that you have created a custom contract for, select the protected resource, then configure it to use the custom contract.
-
Update the Access Gateway.
-
-
(Conditional) If the custom page does not display correctly, see Section 1.3.3, Troubleshooting Tips for Custom Login Pages.
1.3.3 Troubleshooting Tips for Custom Login Pages
If your custom login page does not display or generates an error message, use the following procedure to discover the root cause:
-
Set the option of to debug, update the Identity Server, attempt to log in, then view the log file.
Check for “Unable to compile” errors in the log file. If your custom page does not compile, a blank page is displayed.
-
If you receive an “Unable to Find File” error, verify the value of the JSP property. Make sure that the value does not contain the JSP extension as part of the filename.
-
If you see pages that you have deleted or pages where your modifications have not been implemented:
-
Delete the nidp directory in the Tomcat work directory on each Identity Server.
Linux: /var/opt/novell/tomcat5/work/Catalina/localhosts/nidp
Windows: C:\Program Files\Novell\Tomcat\work\Catalina\localhosts\nidp
-
Restart Tomcat on each Identity Server.
-