5.3 Static Routes for LANs
Static routes are useful if you want to do any of the following on your network:
-
Eliminate routing traffic, which increases the bandwidth available for data.
-
Limit user access to one portion of the network. For example, if a static route for a network is configured on a router, any packets that are received by the router are forwarded only to the destination network specified by that static route.
-
Gain access to isolated areas of the network, which is useful if dealing with legacy network topologies.
-
Gain access to a network more than 15 hops away.
-
Use a static route as a backup route to dynamic routes.
HINT:Use this procedure to configure static routes when the next hop router is on the same LAN as the router you are configuring.
5.3.1 How to Configure a LAN Static Route
You can configure a static route for a LAN by using Novell Remote Manager or INETCFG:
Using Novell Remote Manager
-
Log in to Novell Remote Manager, then click Configure TCPIP > Start TCP/IP Configuration > Configure TCP/IP.
-
In the TCP/IP Protocol Configuration window, configure the following static route parameters:
-
LAN Static Routing: Enables LAN static routing on the router. Set this field to Enabled.
-
LAN Static Routing Table: Entry point to the LAN static route configuration parameters.
Click the View/Modify button to the right of LAN Static Routing Table:
Figure 5-7 TCP/IP Static Routes Window
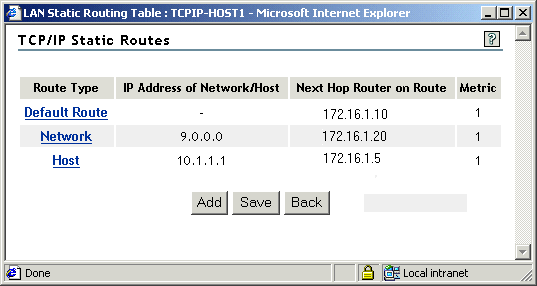
In the TCP/IP Static Routes window, click any of the entries under RouteType to modify the properties of that particular route.
Figure 5-8 Modify Static Route Configuration Window
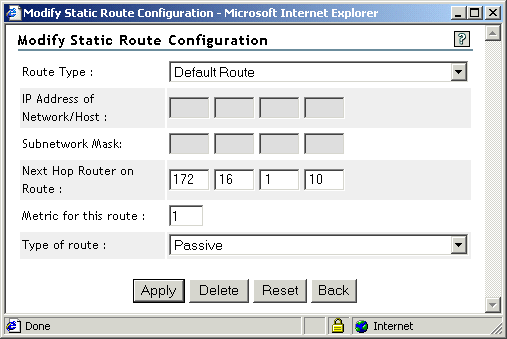
In the Modify Static Route Configuration window, configure the following parameters:
-
Route Type: Select Network or Host if you want the destination at the other end of the static route to be a single IP host or an IP network (that is, a group of hosts). Or, you can select Default Route. If the router must forward a packet for which it can find no destination in its routing table, it sends the packet to the address specified by the next hop for the default route. This type of blind forwarding keeps a packet on the network until a router can forward it to its final destination.
-
IP Address of Network/Host: Type the address of the destination network or host. The list of symbolic network names and addresses corresponds to the sys:\etc\networks file. The list of symbolic host names and addresses corresponds to the sys:\etc\hosts file.
-
Subnetwork Mask: If the destination is an IP network, the subnet mask of that network.
-
Next Hop Router on Route: Explicit destination of the next hop.
Specify the IP address of the next-hop router. To select from a list of symbolic hostnames and addresses, press Insert.
-
Metric for this Route: Number of hops to the destination. This metric is directly proportional to the cost of the route. Given two routes to the same destination, the router chooses the lower-cost route.
If you want to use the static route as a backup route to a dynamic route, select a value that is higher than the cost associated with the dynamic route. This selection ensures that the dynamic route remains the preferred route under typical conditions.
Do not set this metric value to 16 unless you want to disable the route.
-
Type of Route: Specify whether the static route is active or passive.This parameter specifies whether the next hop router for this route actively advertises the route to this network.
Usually, static routes are not advertised and are categorized as passive routes. When a route is marked as active, TCP/IP expects the next hop router to advertise the route regularly. If a router stops advertising an active route, TCP/IP assumes the route is no longer available and deletes it from the routing table.
If the static route is active and the router discovers a lower-cost dynamic route to the same destination, it uses the lower-cost route instead of the active static route. If the lower-cost route becomes unavailable, the router returns to using the active static route.
-
-
-
To save your changes, click Apply > Save.
-
(Optional) - Disable the routing protocol on this interface to reduce routing traffic.
-
In the RIP Bind Options of board_name Interface with IP Address IP_address window, set Status to Disabled.
-
In the OSPF Bind Options of board_name Interface with IP Address IP_address window, set Status to Disabled.
-
If your router has multiple interfaces and you want to disable them, repeat these steps for each interface.
-
-
Click Back to return to the TCP/IP Configuration Menu window.
-
If you want these changes to take effect immediately, click Reinitialize Options.
Using INETCFG
-
Load INETCFG, then select Protocols > TCP/IP.
-
Configure the following static route parameters:
-
LAN Static Routing: Enables LAN static routing on the router. Select this field, then select Enabled.
-
LAN Static Routing Table: Entry point to the LAN static route configuration parameters.
Press Insert and configure the following parameters:
Route Type: Select Network or Host if you want the destination at the other end of the static route to be a single IP host or an IP network (that is, a group of hosts). Or, you can select Default Route. If the router must forward a packet for which it can find no destination in its routing table, it sends the packet to the address specified by the next hop for the default route. This type of blind forwarding keeps a packet on the network until a router can forward it to its final destination.
IP Address of Network/Host: Specify the address of the destination network or host. The list of symbolic network names and addresses corresponds to the sys:\etc\networks file. The list of symbolic host names and addresses corresponds to the sys:\etc\hostsfile.
Subnetwork Mask: If the destination is an IP network, the subnet mask of that network.
Next Hop Router on Route: Explicit destination of the next hop.
Specify the IP address of the next-hop router. To select from a list of symbolic hostnames and addresses, press Insert.
Metric for this Route: Number of hops to the destination. This metric is directly proportional to the cost of the route. Given two routes to the same destination, the router chooses the lower-cost route.
If you want to use the static route as a backup route to a dynamic route, select a value that is higher than the cost associated with the dynamic route. This selection ensures that the dynamic route remains the preferred route under typical conditions.
Do not set this metric value to 16 unless you want to disable the route.
Type of Route: Specify whether the static route is active or passive.This parameter specifies whether the next hop router for this route actively advertises the route to this network.
Usually, static routes are not advertised and are categorized as passive routes. When a route is marked as active, TCP/IP expects the next hop router to advertise the route regularly. If a router stops advertising an active route, TCP/IP assumes the route is no longer available and deletes it from the routing table.
If the static route is active and the router discovers a lower-cost dynamic route to the same destination, it uses the lower-cost route instead of the active static route. If the lower-cost route becomes unavailable, the router returns to using the active static route.
-
-
Press Esc twice, then select Yes to save your changes.
-
(Optional) - Disable the routing protocol on this interface to reduce routing traffic.
-
Select Bindings > an existing binding.
-
Select RIP Bind Options > Status > Disabled.
-
Press Esc and then select OSPF Bind Options > Status > Disabled.
-
If your router has multiple interfaces and you want to disable them, repeat these steps for each interface.
-
-
Press Esc until you are prompted to save your changes, then select Yes.
-
Press Esc to return to the Internetworking Configuration menu.
-
If you want these changes to take effect immediately, select Reinitialize System > Yes.
5.3.2 Configuring a Default Gateway (LAN Static Route)
You can configure multiple default gateways and provide a fault tolerant solution on your network. When the Section 2.8, Dead Gateway Detection feature is enabled and a default gateway goes off-line, the Multiple Default Gateway list is used to switch to the next preferred default gateway, thereby reducing the downtime of your network.
To configure Dead Gateway Detection, see Enabling Dead Gateway Detection. The various ways of configuring multiple default gateways are explained below. The implications of using different methods for configuring multiple default gateways are also given in the table under Comparing Different Default Gateway Configuration Methods.
Using Novell Remote Manager to Add a Default Gateway
To configure multiple default gateways using Internetworking Configuration, see How to Configure a LAN Static Route.
Using BIND to Add a Default Gateway
To add a new default gateway by using BIND, enter the following command at the server prompt:
bind ip board_name addr=x.x.x.x mask=x.x.x.x gate=x.x.x.x cost=n
board_name is the name of the interface board that you assigned as the default gateway. addr is the IP address of the board. mask is the subnet mask address associated with the IP address of the board. gate is the IP address of the gateway, and cost is the value associated with the gateway and is also the primary routing metric for this gateway.
Using TCPCON to Add a Default Gateway
-
Load TCPCON, then select IP Routing Protocol.
-
Select Proceed, press Insert, and configure the following parameters:
Destination: Press Insert to display a list of symbolic network names from the sys:\etc\networks file. Select Default here.
Next Hop: Enter the IP address of the gateway.
Interface: Enter the interface index value through which the next hop of this gateway should be reached.
Cost: Enter the primary routing metric for this gateway.
-
Press Esc until you are prompted to save your changes, then select Yes to return to the IP Routing Table screen.
Configuring RIP to Add a Default Gateway
Using Novell Remote Manager
-
Log in to Novell Remote Manager, then click Configure TCPIP > Start TCP/IP Configuration > TCP/IP to interface Bindings > an existing binding > the View/Modify button to the right of Configure TCP/IP Bind Options > the View/Modify button to the right of RIP Bind Options.
-
In the RIP Bind Options of board_name Interface with IP Address IP_addresswindow, set the Original Default Route to Enabled.
-
To save your changes and return to the TCP/IP Configuration Menu window, click Apply > Apply > Save > Back.
-
If you want these changes to take effect immediately, click Reinitialize Options.
These advertisements from the router are picked up and used by an end node to add a default gateway on it. This is possible only when RIP is enabled on the end node.
Using INETCFG
-
Load INETCFG, then select Bindings > an existing TCP/IP binding > RIP Bind Options.
-
Select Originate Default Route and enable this option.
-
Press Esc until you are prompted to save your changes, then select Yes.
-
Press Esc to return to the Internetworking Configuration menu.
-
If you want these changes to take effect immediately, select Reinitialize System > Yes.
Configuring Router Discovery to Add a Default Gateway
You can configure Router discovery options on a system to add a default gateway. These systems advertise themselves as a gateway and answer queries from end nodes. End nodes use it to locate a gateway on their network. To configure Router Discovery, see Section 5.6, Router Discovery.
5.3.3 Comparing Different Default Gateway Configuration Methods
The table below explains the implications of using different methods for configuring multiple default gateways and describes the priorities associated with each method.
|
Configuration Method Used to Add Multiple Default Gateways |
Metric or Cost Assigned to Default Gateway |
||
|---|---|---|---|
|
Better Than the Cost of Current Default Gateway |
Equal to the Cost of Current Default Gateway |
Worse Than the Cost of Current Default Gateway |
|
|
Using Novell Remote Manager to Add a Default Gateway This process can also be done through INETCFG. |
Added to the Default Gateway list and made the default gateway. |
Not made the default gateway, but the entry is added to the Default Gateway list. |
Not made the default gateway, but the entry is added to the Default Gateway list. |
|
Added to the Default Gateway list and made the default gateway. |
Not made the default gateway, but entry is added to the Default Gateway list. |
Not made the default gateway, but entry is added to the Default Gateway list. |
|
|
Added to the Default Gateway list and is made the default gateway. |
Added to the Default Gateway list and is made the default gateway. |
Not added to the Default Gateway list and is not made the default gateway. |
|
|
Added to the Default Gateway list and is made the default gateway. |
Not made the default gateway, but entry is added to the Default Gateway list. |
Not made the default gateway, but entry is added to the Default Gateway list. |
|
|
Added to the Default Gateway list and is made the default gateway. |
Not made the default gateway, but entry is added to the Default Gateway list. |
Not made the default gateway, but entry is added to the Default Gateway list. |
|
5.3.4 Enabling Dead Gateway Detection
Using Novell Remote Manager
-
Log in to Novell Remote Manager, then click Configure TCPIP > Start TCP/IP Configuration > Configure TCP/IP.
-
In the TCP/IP Protocol Configuration window, set the Dead Gateway Detection to Enabled.
-
Click Save. The system displays a TCP/IP Configuration successful message.
-
Click OK to return to the TCP/IP Configuration Menu window.
-
If you want these changes to take effect immediately, click Reinitialize Options.
Using INETCFG
-
Load INETCFG, then select Protocols > TCP/IP.
-
Select Dead Gateway Detection > Enabled.
-
Press Esc until you are prompted to save your changes, then select Yes.
-
Press Esc to return to the Internetworking Configuration menu.
-
If you want these changes to take effect immediately, select Reinitialize System > Yes.
5.3.5 Configuring Dead Gateway Detection
You can fine-tune the performance of the Dead Gateway Detection feature.
Probe Interval is the time (in seconds) at which probes would be sent to the default gateway to determine whether it is functional or not.
Range = 10 to 1800. Default = 30.
Probe Timeout is the time interval (in seconds) after which the next probe is sent to the default gateway, when there is no reply received by the gateway for the previously sent probe.
Range = 1 to 20. Default = 2.
Configuring the Probe Interval
Using Novell Remote Manager
-
Log in to Novell Remote Manager, then click Configure TCPIP > Start TCP/IP Configuration > Configure TCP/IP.
-
In the TCP/IP Protocol Configuration window, click the View/Modify button to the right of Dead Gateway Detection Configuration.
-
In the Dead Gateway Detection Configuration window, type a Probe Interval value in seconds.
-
To save your changes and return to the TCP/IP Configuration Menu window, click Apply > Save > Back.
-
If you want these changes to take effect immediately, click Reinitialize Options.
Using INETCFG
-
Load INETCFG, then select Protocols > TCP/IP > Dead Gateway Detection Configuration.
-
Select Probe Interval, then enter a value in seconds.
-
Press Esc until you are prompted to save your changes, then select Yes.
-
Press Esc to return to the Internetworking Configuration menu.
-
If you want these changes to take effect immediately, select Reinitialize System > Yes.
Configuring Probe Timeout
Using Novell Remote Manager
-
Log in to Novell Remote Manager, then click Configure TCPIP > Start TCP/IP Configuration > Configure TCP/IP.
-
In the TCP/IP Protocol Configuration window, click the View/Modify button to the right of Dead Gateway Detection Configuration.
-
In the Dead Gateway Detection Configuration window, type a Probe Timeout value in seconds.
-
To save your changes and return to the TCP/IP Configuration Menu window, click Apply > Save > Back.
-
If you want these changes to take effect immediately, click Reinitialize Options.
Using INETCFG
-
Load INETCFG, then select Protocols > TCP/IP > Dead Gateway Detection Configuration.
-
Select Probe Timeout, then enter a value in seconds.
-
Press Esc until you are prompted to save your changes, then select Yes.
-
Press Esc to return to the Internetworking Configuration menu.
-
If you want these changes to take effect immediately, select Reinitialize System > Yes.