5.4 Installing Novell Cluster Services
Novell Cluster Services for Linux is included on the add-on media for OES 2 Linux (or later). It is necessary to install OES 2 Linux on every server that you want to add to a cluster. You can install up to 32 nodes in each cluster. For information, see Section 5.1, Novell Cluster Services Licensing.
Installing Novell Cluster Services does the following:
-
If the eDirectory schema has not already been extended for cluster objects, the schema is extended.
-
Installs Novell Cluster Services software on the server.
IMPORTANT:Ensure that your system meets the requirements and guidelines in Section 4.0, Planning for Novell Cluster Services.
If you want Novell Cluster Services to use a local eDirectory database on the same server, you must install and configure eDirectory before installing Novell Cluster Services.
If the eDirectory schema has not been extended in the tree as described in Section 5.2, Extending the eDirectory Schema to Add Cluster Objects, the administrator user that installs Novell Cluster Services must have the rights to extend the schema, such as the tree administrator.
You can install Novell Cluster Services when you install OES 2 Linux, or on an existing OES 2 Linux server. The software must already be installed in order to be able to mark devices as shareable, such as the device (or devices) you want to use for the SBD (split-brain detector) when you configure the cluster or run the sbdutil utility.
5.4.1 Installing Novell Cluster Services during a OES 2 Linux Installation
This section describes only those steps in the install that are directly related to installing Novell Cluster Services. For detailed instructions on installing OES 2 Linux, see the OES 2 SP3: Installation Guide.
IMPORTANT:If you want Novell Cluster Services to use a local eDirectory database on this server, you must install and configure eDirectory before installing Novell Cluster Services.
Repeat the following procedure for each server that you want to add to the cluster:
-
If you have a shared disk system and the server where you are installing Novell Cluster Services is the second node in a cluster, verify that a cluster partition for the cluster’s Split Brain Detector exists on the first cluster node before you begin the install on the second node.
A one-node cluster that has shared disk storage can be configured without an SBD, but the SBD must be created before you add another node.
IMPORTANT:The cluster SBD partition is not required unless you have shared storage.
Typically, you create the SBD when you configure the cluster on the first node. For information about manually creating an SBD, see:
-
Start the YaST install for SUSE Linux Enterprise Server 10 and continue to the Installation Mode page.
-
Select , select , click , then continue through the OES 2 add-on part of the install until you get to the Installation Settings page.
-
On the Installation Settings page, click to open the Software Selection and System Tasks page.
-
Under , select and any other OES components that you want to install, then click .
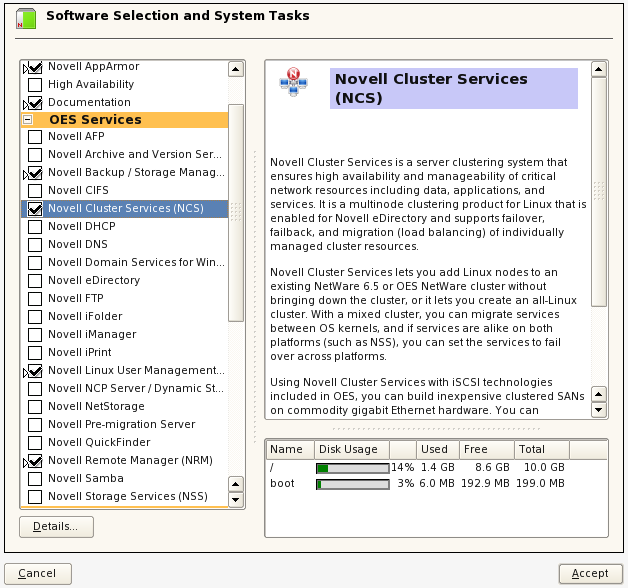
When you select Novell Cluster Services, the following basic services for managing OES 2 are automatically selected:
-
Novell Backup / Storage Management
-
Novell Linux User Management
-
Novell Remote Manager
The following OES services are not automatically selected, but are required for managing and configuring Novell Cluster Services:
-
Novell iManager must be installed on at least one server in the same tree.
-
Novell eDirectory must already be installed on at least one server in the tree where you are installing the cluster. You can install a replica on the cluster server.
Select other protocols and services according to your planned setup. For information, see Section 4.5, Software Requirements for Cluster Services.
IMPORTANT:If you deselect a pattern after selecting it, you are instructing the installation program to not install that pattern and all of its dependent patterns. Rather than deselecting a pattern, click to cancel your software selections, then click the heading again to choose your selections again.
Selecting only the patterns that you want to install ensures that the patterns and their dependent patterns and packages are installed.
If you click , then return to software pattern selection page, the selections that you made become your base selections and must be deselected if you want to remove them from the installation proposal.
-
-
Continue through the installation process, but do not configure Novell Cluster Services when you reach the Novell Open Enterprise Server Configuration page. You configure it later.
-
After the install, use the Software Updater (or other update methods) to download and apply any updates that are in the SLES and OES Updates channels.
-
Ensure that your SAN storage is working properly for the server.
-
Continue with Section 5.5, Configuring Novell Cluster Services.
5.4.2 Installing Novell Cluster Services on an Existing OES 2 Linux Server
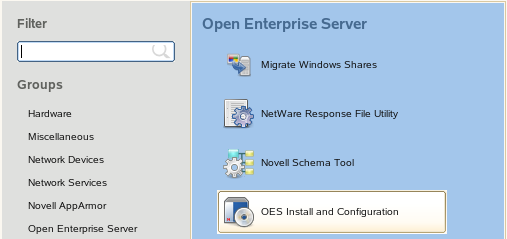
If you did not install Novell Cluster Services during the OES 2 Linux installation, you can install it later by using .
IMPORTANT:If you want Novell Cluster Services to use a local eDirectory database on the existing server, you should install and configure eDirectory before installing Novell Cluster Services.
Repeat the following procedure for each server that you want to add to the cluster:
-
If you have a shared disk system and the server where you are installing Novell Cluster Services is the second node in a cluster, verify that a cluster partition for the cluster’s Split Brain Detector exists on the first cluster node before you begin the install on the second node.
A one-node cluster that has shared disk storage can be configured without an SBD, but the SBD must be created before you add another node.
IMPORTANT:The cluster SBD partition is not required unless you have shared storage.
Typically, you create the SBD when you configure the cluster on the first node. For information about creating the SBD manually, see:
-
Log in to the server as the root user.
-
In YaST, select .
-
On the Software Selection page under , click and any other compatible OES components that you want to install.
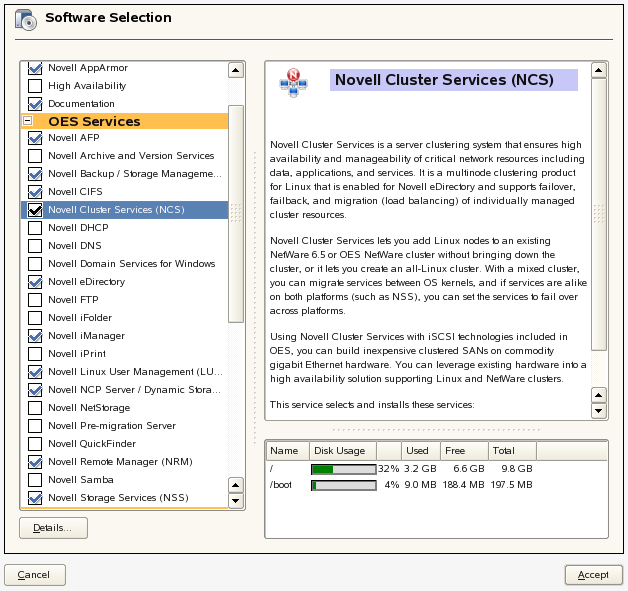
Services that you have already installed are indicated by a blue check mark in the status check box next to the service.
For information about the options, see Step 5 in Section 5.4.1, Installing Novell Cluster Services during a OES 2 Linux Installation.
-
Click to begin the install, then click to accept changed packages.
-
Continue through the installation process, but do not configure Novell Cluster Services when you reach the Novell Open Enterprise Server Configuration page. You configure it later.
-
After the install, use the Software Updater (or other update methods) to download and apply any updates that are in the SLES and OES Updates channels.
-
Ensure that your SAN storage is working properly for the server.
-
Continue with Section 5.5, Configuring Novell Cluster Services.