5.1 Using iManager to Manage CIFS
You can manage CIFS services from iManager 2.7.4. The recommended method to configure, manage, and modify CIFS properties and parameters is using iManager.
NOTE:Admin equivalent/container admin users should be LUM enabled to manage the CIFS server through CIFS iManager plugin.
5.1.1 Prerequisites
-
Install the CIFS iManager plug-in. For details, see Section 4.6, \Installing the CIFS iManager Plug-In.
-
Install CIFS on at least one OES 2 SP3 Linux server. For details on installing CIFS, see Section 4.0, Installing Upgrading and Setting Up CIFS.
-
Ensure that ndsd is running. Use /etc/init.d/ndsd status on the server console to check.
5.1.2 Selecting a Server to Manage
-
In a Web browser, specify the following in the address (URL) field:
http://server_IP_address/nps/iManager.htmlFor example:
http://192.168.0.1/nps/iManager.html
-
At the login prompt, specify the server administrator username and password and click .
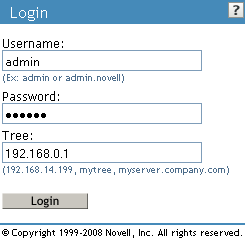
For more information on iManager administration, see the Novell iManager 2.7.4 Administration Guide.
-
In the iManager application left frame, click > .
The default CIFS parameters page is displayed. Use this page to configure and manage CIFS.
-
In the field, specify the OES 2 Linux server name.
or
Browse and select it from the object selector
or
Use the object history button to select it.
-
Verify the status of the server. If the CIFS server is stopped, click to start the CIFS server.
The changes to and all the CIFS properties are displayed on the screen.
If a Samba server is running, CIFS does not start. To resolve this problem, see CIFS Is Not Running With Samba.
-
Continue with other administrative actions as necessary:
5.1.3 Setting the CIFS Server and Authentication Properties
The server and authentication parameters can be set by using the parameters listed under the and tabs on the default CIFS server page in the iManager.
For information on starting iManager and accessing the CIFS server, see Section 5.1.2, Selecting a Server to Manage.
To change these parameters from command line, see Section 5.2.4, Modifying the CIFS Configuration
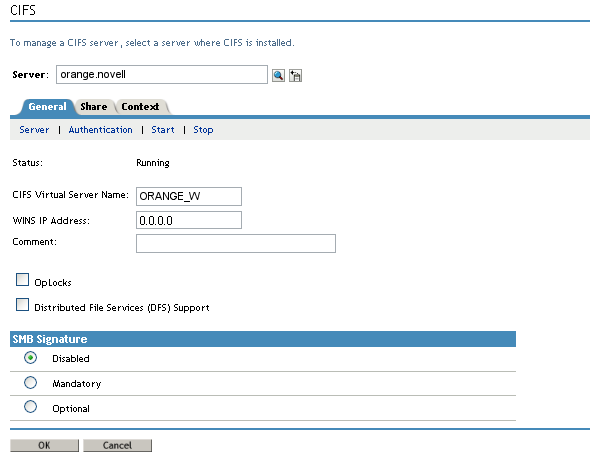
Setting CIFS General Server Parameters
The General page contains the and properties tabs. By default, the Server Properties page is displayed. View or edit the server parameters on this page.
Figure 5-1 CIFS General Server Parameters
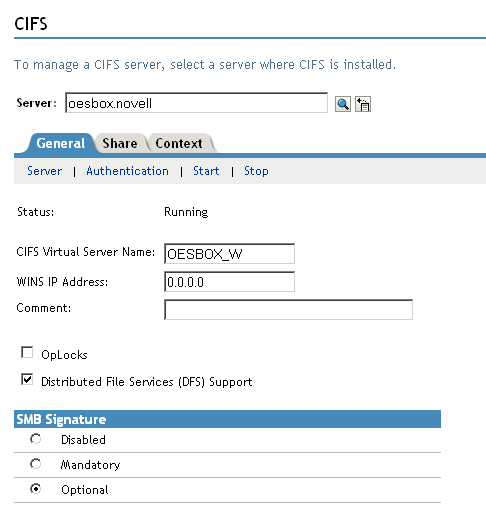
NOTE:For a virtual server, only CIFS Virtual Server Name and Comment are not inherited from the physical server. Hence only these parameters can be edited for CIFS on a shared pool server.
Table 5-1 CIFS Server Page Parameters
|
Parameter |
Description |
|---|---|
|
CIFS Virtual Server Name |
The name of the server running CIFS services. The length can be a maximum of 15 characters. The default server name is the OES 2 Linux server name. |
|
WINS IP Address |
The address of the WINS server. |
|
Comment |
A comment associated with the name of the server running CIFS services. This comment is displayed when viewing details. The maximum length is 47 characters. IMPORTANT:You should use single-byte characters in comments. Double-byte characters are not supported. |
|
OpLocks (Opportunistic Locking) |
Improves file access performance. The option is disabled by default. |
|
This option allows Distributed File Services support in CIFS. The option is disabled by default. |
|
|
SMB Signature |
By default, this is set to . Select or or . For details, see Enabling and Disabling SMB Signing. |
Enabling and Disabling SMB Signing
SMB signing supports message authentication, which prevents active message attacks. The authentication is provided by placing a digital signature into each SMB. The digital signature is then verified by both the client and the server. It can be set to mandatory or optional mode.
SMB signing should be turned off when domain authentication is configured.
To use SMB signing mode, both the client and the server should be enabled for SMB signing. Use either Optional or Mandatory modes to enable it.
Optional mode: If SMB signing is set to the optional mode (the default mode after enabling it by using console commands), it automatically detects whether or not individual clients have SMB signing enabled. If a client does not have SMB signing enabled, the server does not use SMB signing for client communication. If a client has SMB signing enabled, the server uses SMB signing for client communication.
Mandatory mode: If you set SMB signing to mandatory mode, all clients must have SMB signing enabled or they cannot connect to the server. If SMB signing is set as mandatory on the server, clients cannot establish sessions with the server unless they have SMB signing enabled.
Disable mode: You can disable SMB signing by setting SMB signing to disabled mode.
IMPORTANT:After enabling or disabling SMB signing, or changing the mode to optional or mandatory, clients must reconnect in order for changes to take effect. For example, if SMB signing is enabled on the server, SMB signing is not in effect for individual clients until each of those clients reconnects.
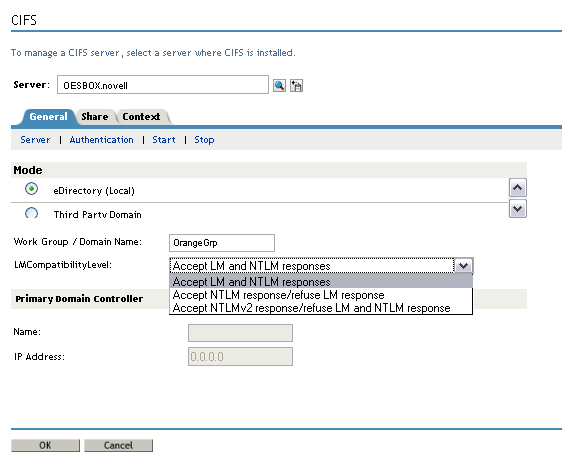
Setting CIFS General Authentication Parameters
On the General page, select to view or edit the CIFS authentication parameters. When a third party domain authentication is selected, SMB signing is disabled.
CIFS pass through authentication works in parity with NetWare.
Figure 5-2 CIFS Authentication Page Parameters
NOTE:For a virtual server, only CIFS Virtual Server Name and Comment are not inherited from the physical server. Hence only these parameters can be edited for CIFS on a shared pool server.
Table 5-2 CIFS Authentication Page Parameters
|
Parameters |
Description |
|---|---|
|
Mode |
Indicates the method of authentication used by CIFS. CIFS uses either eDirectory (local) or third-party Domain authentication mechanisms.
IMPORTANT:If you change the modes from Local to Third Party Domain or from Third Party Domain to Local, restart the CIFS server for the changes to take effect. |
|
Work Group / Domain Name |
The workgroup or domain to which the server belongs. Domain is a third-party domain. |
|
Primary Domain Controller Name |
The name of the PDC server. This is needed if the PDC is on a different subnet. This option should be used only when there is a valid reason for overriding WINS or DNS. This field can be changed only if is selected. |
|
Primary Domain Controller IP Address |
The PDC server’s static IP address. This is needed if the PDC is on a different subnet. This option should be used only when there is a valid reason for overriding WINS or DNS. This field can be changed only if is selected. IMPORTANT:If this is not a static address, the server running CIFS services cannot contact the PDC when PDC reboots and the address changes. |
|
LMCompatibilityLevel |
NTLMv2 is an authentication protocol that is cryptographically stronger than NTLMv1. NTLMv2 is not negotiated between the client and the server. The protocol does not determine the challenge or response algorithms, so it must be configured on both the client and the server by setting the LMCompatibilityLevel (the Windows registry key is at HKEY_LOCAL_MACHINE\System\CurrentControlSet\Control\LSA). Novell CIFS currently supports 0, 4, and 5 compatibility levels for NTLMv2. Select the appropriate LMCompatibilityLevel from the drop-down list.
|
5.1.4 Managing CIFS Shares
The tab on the default CIFS server page in iManager displays the CIFS share details. Use the Shares page to add a new share on the server to be specified as a sharepoint and to be accessible via the Network Neighborhood. NSS Volumes are added by default.
For information on starting iManager and accessing the CIFS server, see Section 5.1.2, Selecting a Server to Manage.
To manage CIFS Shares from command line, see Section 5.2.6, Working with CIFS Shares.
Figure 5-3 CIFS Shares Page Parameters
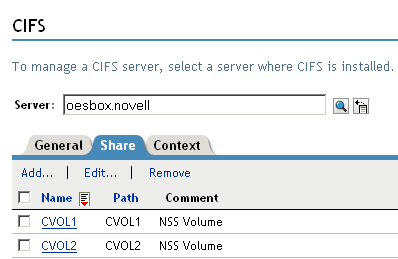
NOTE:If no shares are specified, all mounted volumes are displayed.
IMPORTANT:Double-byte characters are not supported in a Share name, Share path, or Comment.
Administrators can add, edit, and delete CIFS shares.
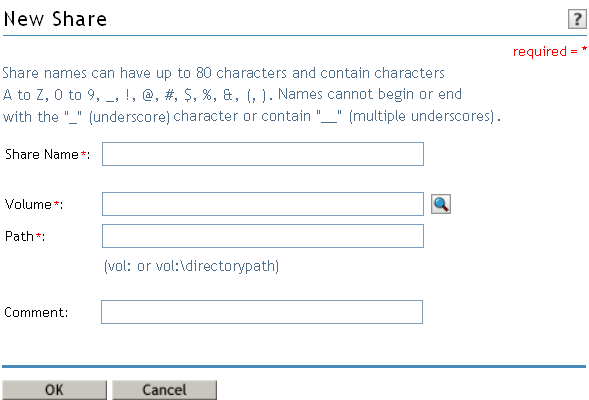
Adding a New CIFS Share
Before adding a new share, ensure that your CIFS server is started and running. For details on how to start the server, see Section 5.1.2, Selecting a Server to Manage.
NOTE:There is a limitation on the number of shares a CIFS server can host. For most configurations this limit is between 300 to 500 shares.
-
On the default CIFS server page in iManager click the tab, then click .
For information on starting iManager and accessing the CIFS server, see Section 5.1.2, Selecting a Server to Manage.
-
Specify the , and for the new share. For details, see Table 5-3.
-
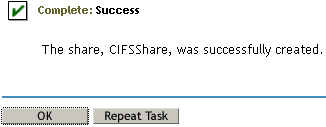
Click to save your changes.
On successful addition of a share, the following message is displayed.
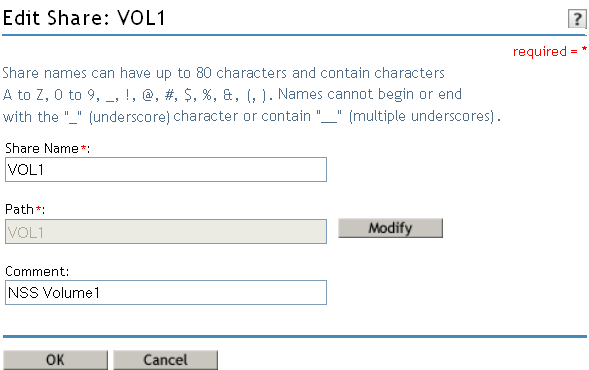
Editing a CIFS Share
Before editing a share, ensure that your CIFS server is started and running.
If you edit the default share name, a new share is created. However, the default share is still present with the same share name.
NOTE:All shares on a volume are removed on pool unmount.
For details on how to start the server, see Section 5.1.2, Selecting a Server to Manage.
-
On the default CIFS server page in iManager click the s tab, then select a share from the list and click , or click a particular share link to edit the share.
For information on starting iManager and accessing the CIFS server, see Section 5.1.2, Selecting a Server to Manage.
-
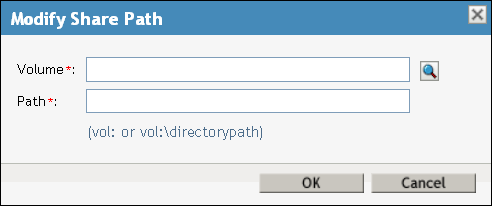
Modify the or or for the share. For details, see Table 5-3.
-
Click the button to modify the and on the pop-up screen. For details, see Table 5-3.
-
Click twice to save your changes.
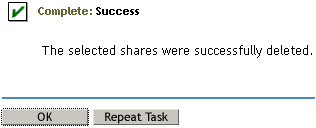
Removing a CIFS Share
Before deleting a share, ensure that your CIFS server is started and running. For information on starting iManager and accessing the CIFS server, see Section 5.1.2, Selecting a Server to Manage.
-
On the default CIFS server page in iManager click the tab, then select one or more shares from the list, then click .
On successful deletion of the share the following message is displayed.
-
Either click to return to the main page or click to delete more shares.
CIFS Share Parameters
Use this table information to create and edit CIFS shares.
Table 5-3 Shares Page Parameters
|
Parameter |
Description |
|---|---|
|
Name |
The name that the CIFS share uses for all the CIFS services and for display on Windows computers. For example, if you specify Company Photos as the share name associated with vol1\graphics, then Windows workstations browsing the network see Company Photos instead of vol1\graphics. A Share name can be up to 80 characters long and can contain any single-byte characters, but should not begin or end with an underscore _ or contain multiple underscores _. |
|
Volume |
The OES 2 volume name. |
|
Path |
The CIFS share path. This is the path to the server volume or directory that becomes the root of the sharepoint. This path may contain single-byte and multi-byte characters. NOTE:Do not end the path with a backslash (\). |
|
Comment |
A description for the sharepoint. The description appears in Network Neighborhood or My Network Places. The maximum length is 47 characters. Comment may contain single-byte and multi-byte characters. |
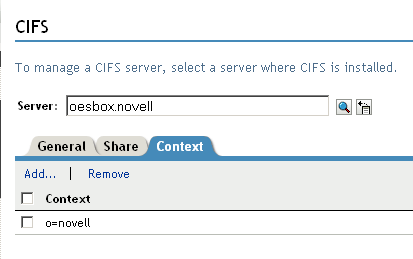
5.1.5 Configuring a CIFS User Context
On the default CIFS server page in iManager click the tab to list, add, and delete the CIFS user contexts.
To configure a context search from the command line, see Section 5.2.7, Configuring the CIFS Context Search File.
Figure 5-4 CIFS Context Page
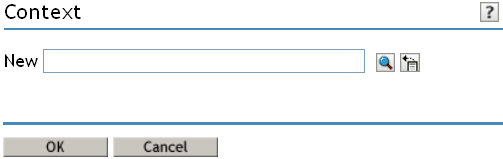
Adding a New Context
Before adding a new context, ensure that your CIFS server is started and running. For details on how to start the server, see Section 5.1.2, Selecting a Server to Manage.
-
Click to add a new user context to CIFS.
Figure 5-5 Add New Context
-
Browse the Object Selector, select a context to add, then click to save.
Removing a Context
Before removing a context, ensure that your CIFS server is started and running. Select one or more contexts and click .
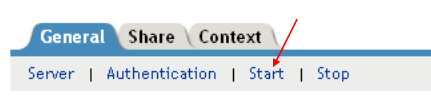
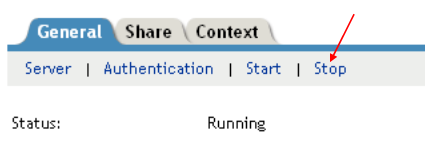
5.1.6 Stopping CIFS
To stop a running CIFS server:
-
If the CIFS server status is on your screen, click to stop the CIFS server.
The changes to and all the CIFS properties are dimmed on the screen.