13.6 Configuring the DST Pool Cluster Resource with a Cluster-Enabled Pool and a Shared Pool
An alternate way to set up the DST pool cluster resource is to cluster-enable the primary pool, then create a shared pool that is not cluster-enabled as the secondary location. You manually modify the primary cluster pool resource scripts with the commands needed to load and unload the secondary pool and volume. The primary pool cluster resource manages the two pools and volumes. The NCP Server object’s name for the secondary volume keeps the hostname of the node where it was created.
The advantage of creating one clustered pool and one shared-but-not-cluster-enabled pool are:
-
A static IP address is not consumed for the secondary pool.
-
The secondary pool and volume are shared but not clustered. This can be useful in a migration scenario to move data to a secondary volume and move the volume to a different node. After you remove the shadow relationship, you mark the secondary pool’s device as to unshare the pool and volume, then use the Update eDirectory option in NSSMU to create storage objects with the new hostname. There are no Cluster objects to clean up.
There disadvantages of this approach are:
-
You must manually enter the lines of code in the primary pool cluster resource’s load, unload, and monitor scripts for the secondary pool.
-
The option to create a pool on a shared device without cluster-enabling it is available only in NSSMU. You cannot use the Storage plug-in to iManager.
-
To later use the secondary pool as an independent cluster resource requires a some extra steps. Use the Update eDirectory option in NSSMU to create storage objects with the new hostname, then cluster-enable the pool by using the Clusters plug-in in iManager.
IMPORTANT:After you modify the primary pool cluster resource, you use the resource to manage the secondary pool and volume.
Use the information in the following sections to set up the DST pool cluster resource.
13.6.1 Overview of the Pool Cluster Resource and Shared Pool
For this method, you need two NSS volumes: one in a clustered-enabled pool and one in a pool that is shared, but not cluster-enabled. For instructions for creating the cluster-enabled pool and the primary NSS volume, see Configuring Cluster Resources for Shared NSS Pools and Volumes in the OES 2 SP3: Novell Cluster Services 1.8.8 Administration Guide for Linux.
To create the secondary shared pool, see Section 13.6.3, Creating a Shared Pool and Volume that Are Not Cluster-Enabled.
The cluster load scripts elsewhere in this section assume the following setup for NSS volumes in the clustered DST volume pair. Ensure that you use the actual information from your setup.
|
Parameter |
Primary Cluster Resource |
Secondary Shared Pool |
|---|---|---|
|
Server hostname for node 1 |
server38 |
server38 |
|
Cluster server name for node 1 |
NCS1 |
NCS1 |
|
Pool name |
POOL1 |
ARCPOOL1 |
|
NSS volume name |
VOL1 |
ARCVOL1 |
|
Cluster resource virtual server name |
NCS1-POOL1-SERVER |
None |
|
Cluster resource IP address |
10.10.10.38 You use the IP address for the primary pool’s cluster resource for the shadow volume. |
None |
|
Volume ID |
254 |
Automatically assigned when you create the volume locally |
When the primary volume has a state of , its NCP volume ID represents the DST shadow volume pair of volumes. A separate NCP volume ID is not assigned to the secondary volume while the volume is in the shadow volume relationship. You use only the ID on the primary volume in the ncpcon mount command in the cluster resource load script.
IMPORTANT:In the cluster load and unload scripts, the add_secondary_ipaddress and del_secondary_ipaddress commands refer to the cluster resource’s IP address that is “secondary” to the node’s actual IP address. It is not related to the DST volume’s terminology.
13.6.2 Viewing the Scripts for Pool Cluster Resource
After you create a clustered pool, view the scripts.
-
In iManager, select , then select .
-
Select the cluster you want to manage.
-
On the Cluster Manager page, click the link of the primary cluster resource to go to the Cluster Pool Properties page, then click the tab view the load, unload, and monitor scripts.
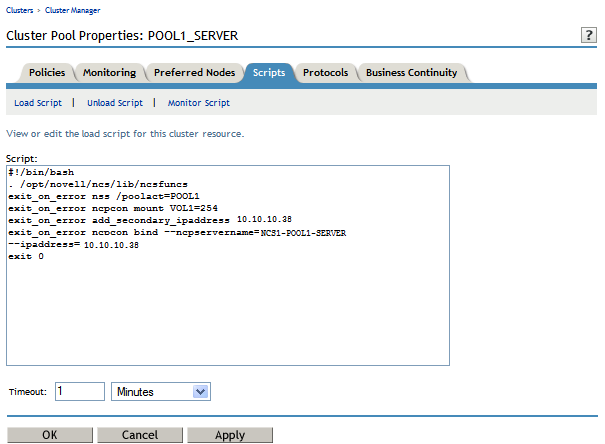
For example, the following table provides sample load, unload, and monitor scripts for the POOL1_SERVER resource for the primary clustered pool named POOL1. Novell CIFS can be configured as an advertising protocol when you set up the primary cluster pool.
Primary Pool Cluster Resource Scripts
Load Script
#!/bin/bash
. /opt/novell/ncs/lib/ncsfuncs

exit_on_error nss /poolact=POOL1

exit_on_error ncpcon mount VOL1=254

exit_on_error add_secondary_ipaddress 10.10.10.38
exit_on_error ncpcon bind --ncpservername=NCS1-POOL1-SERVER --ipaddress=10.10.10.38

#This line is added if Novell CIFS is used as an advertising protocol
#novcifs --add ’--vserver=".cn=NCS1-POOL1-SERVER.ou=ncs.o=novell.t=AVALON_TREE."’
         --ip-addr=10.10.10.38

exit 0
Unload Script
#!/bin/bash
. /opt/novell/ncs/lib/ncsfuncs

#This line is added if Novell CIFS is used as an advertising protocol
#novcifs --remove --vserver=virtualserverFDN --ip-addr=virtualserverip

ignore_error ncpcon unbind --ncpservername=NCS1-POOL1-SERVER --ipaddress=10.10.10.38
ignore_error del_secondary_ipaddress 10.10.10.38

ignore_error nss /pooldeact=POOL1

exit 0
Monitor Script
#!/bin/bash
. /opt/novell/ncs/lib/ncsfuncs

exit_on_error status_fs /dev/pool/POOL1 /opt/novell/nss/mnt/.pools/POOL1 nsspool

exit_on_error status_secondary_ipaddress 10.10.10.38

exit_on_error ncpcon volume VOL1

exit_on_error rcnovell-cifs monitor

exit 0
-
At the bottom of the Scripts page, click to return to the Cluster Manager page.
-
Continue with Section 13.6.3, Creating a Shared Pool and Volume that Are Not Cluster-Enabled.
13.6.3 Creating a Shared Pool and Volume that Are Not Cluster-Enabled
-
On the server where the primary pool cluster resource is assigned, log in as the root user.
-
Open a terminal console, and enter nssmu to open the NSS Management Utility.
-
From the NSSMU main menu, select to go to the Device Management page.
-
Ensure that the device you want to use as the secondary location is available but is not currently shared.
Do not mark the device as shareable at this time. If devices are present but not showing up for creating pools and volumes, you should initialize the disk.
-
From the NSSMU main menu, select to go to the Pools Management page.
-
Create a pool on the device.
Because the device is not yet shared, the page is not part of the pool setup process.
-
From the NSSMU main menu, select to go to the Volumes Management page.
-
Create a volume on the pool.
-
Exit NSSMU.
-
In a Web browser, open Novell Remote Manager for the server, then log in as the root user.
-
In Novell Remote Manager, disable the NCP/NSS Bindings for the NSS volume you created in Step 8.
For instructions, see Section 9.4.1, Disabling the NCP/NSS Bindings for an NSS Volume.
The NSS volume is removed from the list of volumes mounted in NCP. However, if you exit Novell Remote Manager and check the volume in NSSMU, you can see that it is still mounted by NSS.
-
Exit Novell Remote Manager.
-
At a command prompt, launch NSSMU.
nssmu
-
In the NSSMU main menu, select .
-
Select the device that contains the secondary NSS pool and volume, then press F6 to mark the device as .
This automatically changes the share status of all pools on the device to .
-
In NSSMU, select from the main menu.
-
Verify that the share status of the pool is .
-
Exit NSSMU.
13.6.4 Disabling the NCP/NSS Bindings for the Shared Secondary Volume
Before you add commands for the secondary volume in the primary pool cluster resource, disable the volume’s NCP/NSS Bindings.
-
Log in as the root user to the node where the secondary pool is currently active, then launch a terminal console.
-
In Novell Remote Manager, select > , unmount the secondary volume from NCP, then disable the NCP/NSS bindings for the secondary volume as described in Section 9.2.2, Disabling the NCP/NSS Bindings for the Secondary Volume.
An EXCLUDE_VOLUME line is added for the volume in the /etc/opt/novell/ncp2nss.conf file, such as
EXCLUDE_VOLUME ARCVOL1
-
In NSSMU, dismount the secondary volume from NSS, deactivate the secondary pool, then exit NSSMU.
-
For each of the other nodes, log in as the root user, copy or add the EXCLUDE_VOLUME line to the /etc/opt/novell/ncp2nss.conf file, restart /etc/init.d/ndsd, and restart /etc/init.d/ncp2nss.
If you have multiple clustered DST volumes to set up, you can copy the settings for them to the other nodes when you are done. You must complete this before you fail over the DST pool cluster resource to other nodes. For details, see Section 13.8, Copying the NCP/NSS Bindings Setting for the Secondary Volume to All Nodes.
-
Continue with Section 13.6.5, Adding Commands for the Secondary Shared Pool and Volume to the Primary Pool Cluster Resource.
13.6.5 Adding Commands for the Secondary Shared Pool and Volume to the Primary Pool Cluster Resource
Initially, you have a load, unload, and monitor script for the primary pool cluster resource. You modify these scripts to also manage the secondary shared pool and volume so that the NSS volumes in the DST shadow volume pair can fail over or be cluster migrated together.
-
In iManager, dismount the volume and deactivate the shared pool.
-
Select >
-
Click the browser, then locate and select the server where the secondary pool is active.
-
Select the volume, then click .
-
Select >
-
Select the pool, then click .
-
-
In iManager, select , then select .
-
Select the cluster you want to manage.
-
Offline the primary cluster resource.
-
On the Cluster Manager page, select the check box next to the resource.
-
Click .
-
-
Click the name link of the primary pool cluster resource to view its Cluster Pool Properties page, then click the tab.
-
On the > page, modify the load script for the primary cluster resource.
Use the following sample load script as a guide for where to add the lines for each of the items.
Sample DST Pool Resource Load Script
#!/bin/bash . /opt/novell/ncs/lib/ncsfuncs # activate the secondary pool exit_on_error nss /poolact=ARCPOOL1 # activate the primary pool exit_on_error nss /poolact=POOL1 # Optional delay to allow time for pools to activate before mounting the volume sleep 10 #comment out the original volume mount command #exit_on_error ncpcon mount VOL1=254 # Use the ncpcon mount command to create the shadow volume on mount exit_on_error ncpcon mount VOL1=254,shadowvolume=ARCVOL1 exit_on_error add_secondary_ipaddress 10.10.10.38 exit_on_error ncpcon bind --ncpservername=NCS1-POOL1-SERVER --ipaddress=10.10.10.38 #This line is added if Novell CIFS is used as an advertising protocol #novcifs --add ’--vserver=".cn=NCS1-POOL1-SERVER.ou=ncs.o=novell.t=AVALON_TREE."’ --ip-addr=10.10.10.38 # If shadowfs is used, wait for shadowfs to start #for (( c=1; c<=10; c++ )) do # if [ ! -d /media/shadowfs/VOLUME/._NETWARE ]; then sleep 5; fi #done exit 0-
Add a line before the primary pool activation that will activate the secondary pool.
exit_on_error nss /poolact=ARCPOOL1
-
(Optional) Add a sleep command after the pool activation commands to allow both pools time to be activated before you mount the shadow volume pair.
For example:
sleep 10
Vary the time (in seconds) according to what is needed for your system.
IMPORTANT:If wait times are added to the load script or unload script, ensure that you increase the script timeout settings accordingly. Otherwise, the script might time out while you are waiting for the action.
-
Comment out (or remove) the individual mount command for the primary NSS volume by placing a pound sign (#) at the beginning of the line.
For example:
#exit_on_error ncpcon mount VOL1=254
-
Add the mount command for the shadow volume to the primary load script.
exit_on_error ncpcon mount VOL1=254,shadowvolume=ARCVOL1
-
(Optional) If you are using shadowfs to provide the merged file tree view for SMB/CIFS users or for Linux services like rsync, you must allow time in the load script after mounting the shadow volume to allow shadowfs to become active before continuing.
IMPORTANT:Do not perform this step if you are using Novell CIFS to provide access to CIFS users.
Use one of the following approaches to add a wait time:
-
Add a sleep 10 command after mount command, and vary it manually until it allows sufficient wait time for shadowfs to start.
# If shadowfs is used, wait for shadowfs to start
sleep 10
-
Add a script that varies the wait time by checking to ensure that shadowfs is started.
For example:
# If shadowfs is used, wait for shadowfs to start
for (( c=1; c<=10; c++ )) do
 if [ ! -d /media/shadowfs/VOLUME/._NETWARE ]; then sleep 5; fi
done
IMPORTANT:If wait times are added to the load script or unload script, ensure that you increase the script timeout settings accordingly. Otherwise, the script might time out while you are waiting for the action.
-
-
Click to save your changes.
The changes to the script do not take effect until the cluster resource is taken offline and brought online.
-
-
On the > page, modify the unload script for the primary cluster resource.
Use the following sample unload script as a guide for where to add the lines for each of the items.
Sample DST Pool Resource Unload Script
#!/bin/bash
. /opt/novell/ncs/lib/ncsfuncs

# This line is added if Novell CIFS is used as an advertising protocol
#novcifs --remove ’--vserver=".cn=NCS1-POOL1-SERVER.ou=ncs.o=novell.t=AVALON_TREE."’ --ip-addr=10.10.10.38

# If shadowfs is used, unload the volume in FUSE
#ignore_error fusermount -u /media/shadowfs/VOL1

ignore_error ncpcon unbind --ncpservername=NCS1-POOL1-SERVER --ipaddress=10.10.10.38

ignore_error del_secondary_ipaddress 10.10.10.38

# Deactivate the primary pool
ignore_error nss /pooldeact=POOL1

# Deactivate the secondary pool
ignore_error nss /pooldeact=ARCPOOL1

exit 0
-
If you use shadowfs to provide a merged file tree view to Samba users or for Linux file protocols, you must unmount the FUSE-mounted file systems that are displayed in the /media/shadowfs/VOLUME directory.
Add the following line before the unbind command in the unload script:
#unload the volume in FUSE
ignore_error fusermount -u /media/shadowfs/VOLUME
-
Add the following command to dismount the secondary pool after the command to dismount the primary pool.
ignore_error nss /pooldeact=ARCPOOL1
-
Click to save your changes.
The changes to the script do not take effect until the cluster resource is taken offline and brought online.
-
-
On the > page, modify the monitor script for the primary cluster resource.
Use the following sample monitor script as a guide for where to add the lines for each of the items.
Sample DST Pool Resource Monitor Script
#!/bin/bash
. /opt/novell/ncs/lib/ncsfuncs

# Check the status of the secondary pool
exit_on_error status_fs /dev/pool/ARCPOOL1 /opt/novell/nss/mnt/.pools/ARCPOOL1 nsspool

# Check the status of the primary pool
exit_on_error status_fs /dev/pool/POOL1 /opt/novell/nss/mnt/.pools/POOL1 nsspool

exit_on_error status_secondary_ipaddress 10.10.10.38

# Check the status of the primary volume. Do not check secondary volume.
exit_on_error ncpcon volume VOL1

# This line is added if Novell CIFS is used as an advertising protocol
#exit_on_error rcnovell-cifs monitor

exit 0
-
Add a command to check the status of the secondary pool.
# Check the status of the secondary pool
exit_on_error status_fs /dev/pool/ARCPOOL1 /opt/novell/nss/mnt/.pools/ARCPOOL1 nsspool
-
Do not add a check for the secondary volume.
-
Click to save your changes.
The changes do not take effect until the shadow volume cluster resource is brought online.
-
-
Click to save all your changes and return to the Cluster Manager page.
-
Online the primary pool cluster resource. On the Cluster Manager page, select the check box next to the primary cluster resource, then click .
-
Verify that the primary cluster resource is running by going to the page.
The primary cluster resource is .
-
Verify that the shadow volume (VOL1) is mounted in NCP and is shadowed:
-
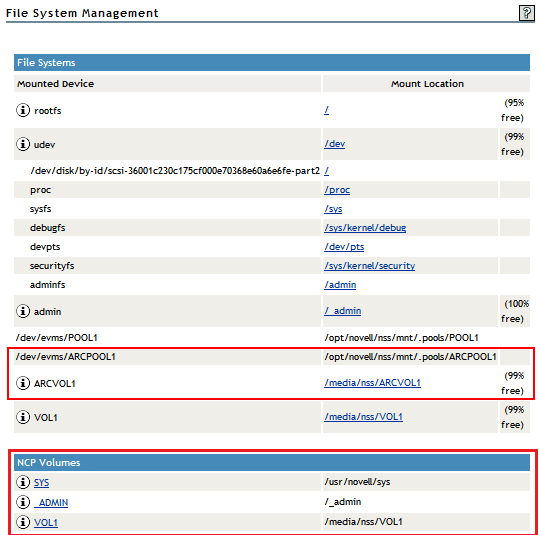
On the first node in the cluster, log in to Novell Remote Manager for Linux as the root user.
-
Select , then verify that the secondary pool ARCPOOL1 and the NSS volume ARCVOL1 are listed under , but the secondary NSS volume is not listed under .
-
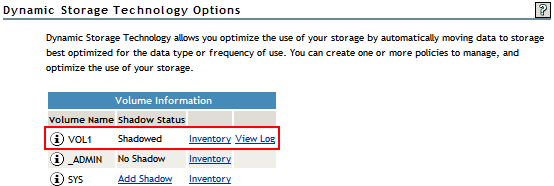
Select > , then verify that the primary volume is listed under , and that its status is .
-
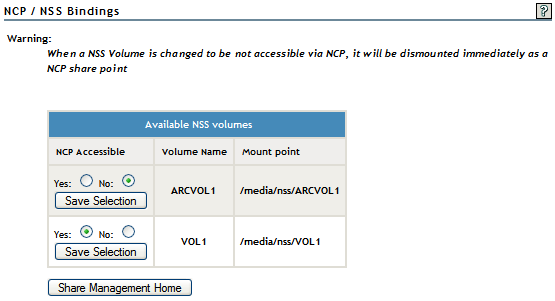
Select > , click NCP/NSS bindings, then verify that the NCP Accessible parameter is turned off for the secondary volume, and turned on for the primary volume.
-
-
If you skipped step to copy the NCP/NSS binding for the resource’s secondary volume to the other nodes, ensure that you do so before you fail over the resource to another node.
For instructions, see Section 13.8, Copying the NCP/NSS Bindings Setting for the Secondary Volume to All Nodes.