2.2 Web Interface
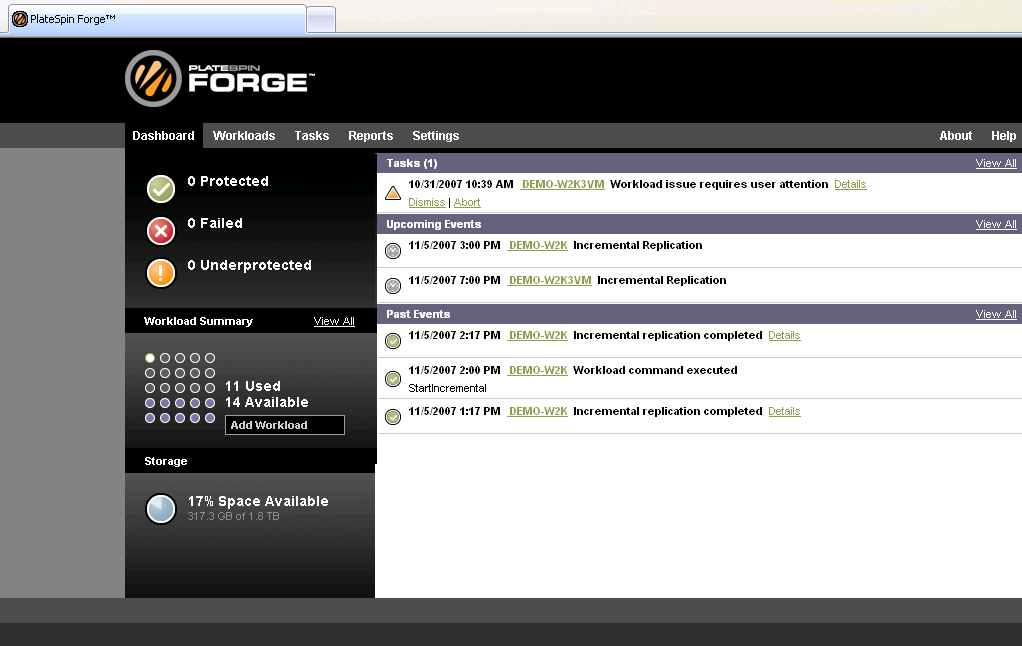
PlateSpin Forge is accessed through the appliance’s Web Interface. Using a browser locally or remotely, you enter the IP address of the Forge appliance. When you are logged on, the main Dashboard page is displayed.
Figure 2-1 Main Dashboard Page
Navigation
Figure 2-2 Navigation Bar

Each PlateSpin Forge Web page contains a navigation bar that allows you to navigate the Web interface’s pages, including viewing the help file and the About page.
2.2.1 The Dashboard Page
The Dashboard page is the appliance’s home page. From the Dashboard page you can see an overview of the PlateSpin Forge appliance’s workload status, activity, and availability.
Visual Summary
The left panel displays information such as a visual workload summary of all licensed workloads and the amount of available storage on the appliance.
On the upper left, a panel displays icons representing protection states:
Figure 2-3 Left Hand Panel
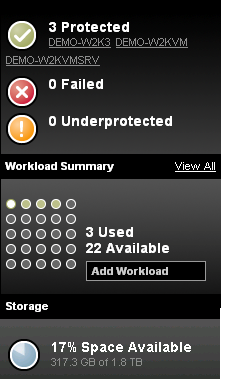
The upper panel icons group the workloads into three categories: Protected, Failed and Underprotected. For definitions of these terms, see Table 2-4.
Click an icon to navigate to the Workloads page and see a list of workloads with that state of protection. Click a workload to view detailed information on the Workload Details page, or to edit the configuration for an unconfigured workload.
Workload Summary
The area in the center of the left panel represents a graphical summary of the Workloads page and uses the following dot icons to represent workloads:


The icons are shown in alphabetical order according to workload name. Hover Mouse over a workload summary icon to display the workload name, or click it to display its Workload Details page. Click to display the Workloads page and see a list of all workloads along with their status and current information.
This area also includes a description of how many workload licenses have been used, and how many are available. Used and expired workload licenses are presented along the bottom of the grouping of icons, and read when you mouse over them . Click to discover a new workload and add it to the PlateSpin Forge appliance.
Storage
The area shows a graphic depicting what percentage of PlateSpin Forge disk space is available. It also displays the total storage space in terabytes.
Tasks and Events
The right side of the Dashboard shows the next , the most recent , and the next . Each category shows a maximum of three entries. To see all tasks or to see past and upcoming events, click in the appropriate section. For more information, see Events and Tasks.
Events are logged whenever something relevant to the system or to the workload occurs. For example, an event could be the addition of a new protected workload, the replication of a workload starting or failing, or the detection of the failure of a protected workload.
2.2.2 The Workloads Page
The Workloads page displays a table with a row for each workload currently on the PlateSpin Forge appliance. Use the drop-down list to filter on all workloads, protected workloads,, failed workloads, or unprotected workloads. Each row shows the workload’s name and the name of the associated Protection Tier. Click a workload name to display a Workload Details page for viewing or editing configuration relevant to the workload. See Workload Details for more information.
Figure 2-4 Workload details page

In addition, each row shows the schedule and workload replication status. An status in the column can refer to either a full or incremental replication. A status in this column means the replication schedule is on hold and the next replication will not run. A “—” status means that the schedule has not yet been set up.
NOTE:All times, including dates and times for the last and next replication and the last test failover, are based on the time zone where the PlateSpin Forge Management VM is located. This might be different from the time zone of the protected workload or of the browser running the PlateSpin Forge Web Interface. A display of the server date and time appears at the bottom right of the PlateSpin Forge UI.
Table 2-4 Workload states


2.2.3 Workload Commands
At the bottom of the Workloads page are command buttons. When a workload is selected on the top part of the page, the commands available for that workload in its current state are enabled. If more than one workload is selected, only commands commonly available to the selected workloads are enabled. This allows users to select multiple workloads when the same command is to be applied to several workloads.
Figure 2-5 Workload commands

Table 2-5 Workload commands
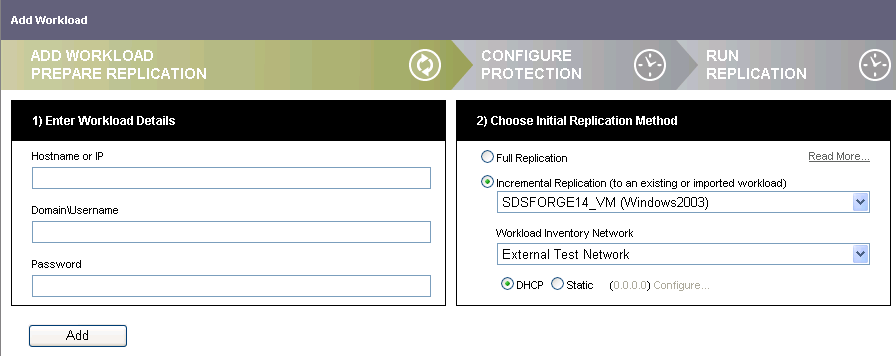
2.2.4 Add Workload
The button at the top of the Workloads page opens a Web page where you can discover a workload and add it to the list on the Workloads page. The button on the Dashboard page can also be used.
Figure 2-6 Add workload
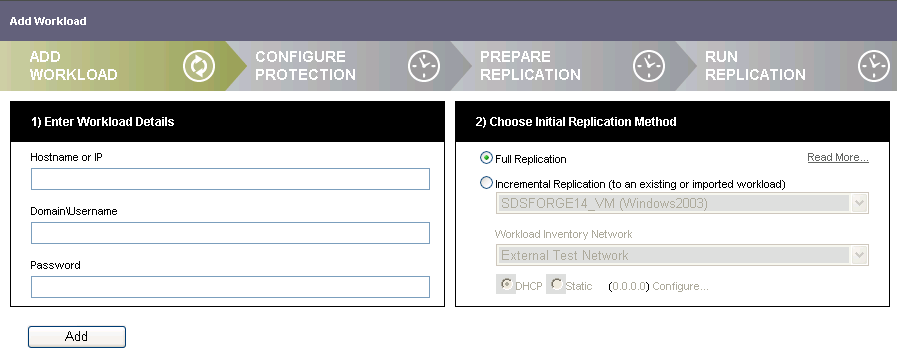
You have the option of adding a workload that uses full replication or adding an existing or imported workload and running incremental replications to save time and bandwidth. When incremental replication is selected, the and steps of the Add Workload Wizard at the top of the Add Workload page are combined so that there are only three steps to the procedure.
NOTE:Regardless of which replication type you select, the workload to be protected still needs to be discovered. The difference is that once you discover a workload with an existing/imported recovery workload on the Forge appliance, you synchronize the discovered workload to the existing/imported recovery workload.
Figure 2-7 Add workload wizard
2.2.5 Remove Workload
Workloads can be removed either by selecting the workload on the Workloads page and then clicking the Remove Workload command button or by clicking the Remove Workload button at the bottom of the Protection Details page for the workload. When you remove a workload, you can choose whether or not to also remove the virtual machine for that workload from Forge. Leaving the VM behind allows you to import the VM at a later time, should you decide to re-add the workload to Forge. This would allow you to only need incremental replications to update the workload instead of having to do a full replication from scratch.
To free up the license associated with the removed workload, see License Designations Tab. For information on importing a workload, see Importing a Workload into Forge.
To remove a workload:
-
Click on the Forge dashboard.
The Workloads page is displayed.
-
Select the workload you want to remove.
-
(Optional) To retain the virtual machine for the workload on Forge, clear the check box.
-
Click .
The Workloads page is displayed, showing that the workload is being removed.
If the workload was protected using block-based tools, a few more steps are required to clean up and uninstall the block-based tools.
-
Click > on the source workload.
-
Type in appwiz.cpl and hit Enter.
The Add/Remove Programs window is displayed.
-
Find in the list of programs and uninstall it.
-
Reboot the source workload.
2.2.6 Workload Details
The Workload Details page displays all the configuration details relevant to protecting and replicating the workload.
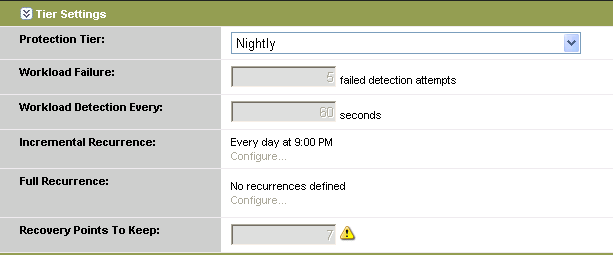
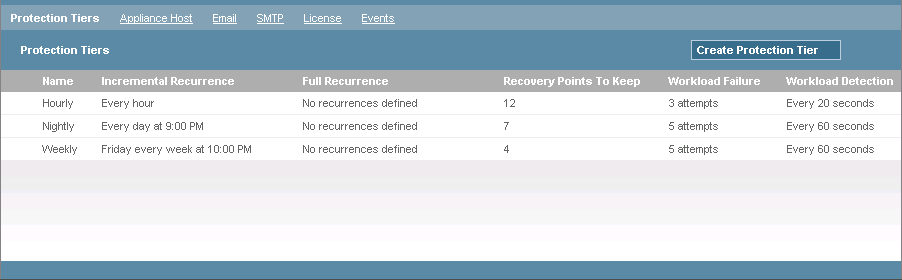
Tier Settings
These settings define when and how often a workload’s replications occur. You can select one of the built-in Protection Tiers or one that you have previously created from the Protection Tier drop-down list. You can also select , which allows you to customize the settings just for this workload. Custom settings are not accessible by other workloads and it is recommended that you create the Protection Tier beforehand to save time and effort. See Protection Tiers and Creating a Protection Tier for more information.
Figure 2-8 Tier settings
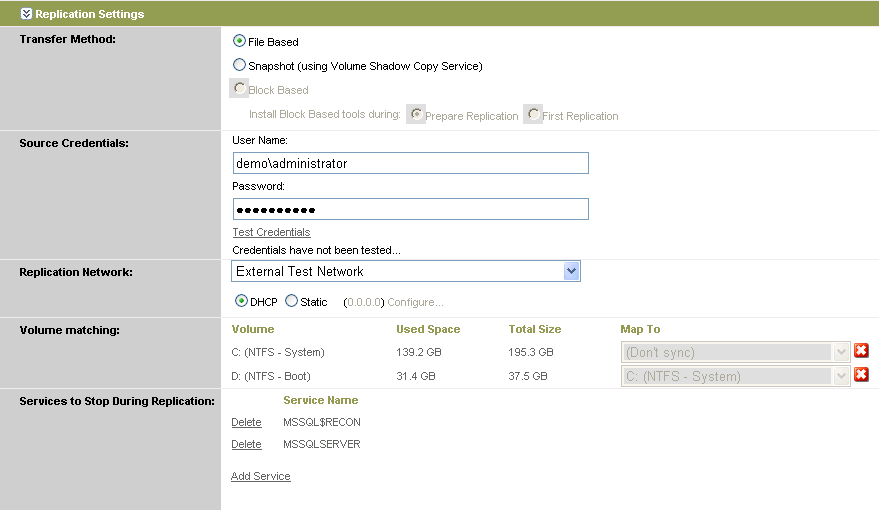
Replication Settings
These settings define how the replication occurs. They provideany necessary network specifications and credentials so the replication can run unattended. These setting also allowyou to specify which volumes to replicate and which services to stop on the protected workloads during replication. For more information on transfer methods, see Supported Transfer Methods.
Figure 2-9 Replication settings
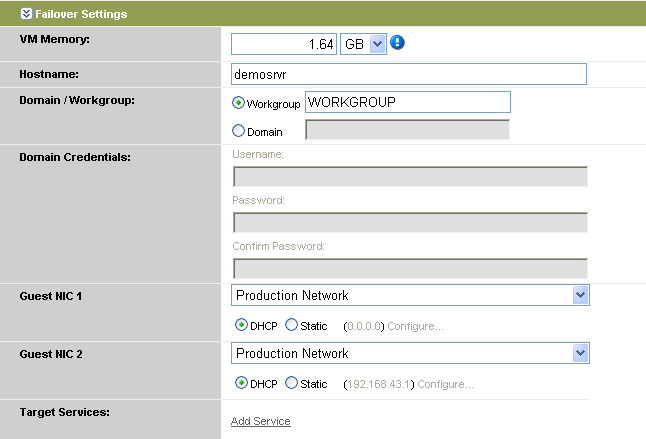
Failover Settings
These settings are used when the recovery workload is brought online to replace a failed protected workload. For more information on failovers, see Failover.
Figure 2-10 Failover settings
Prepare for Failover Settings
This setting allows you to define which network to use for the Prepare for Failover commands. During Prepare for Failover, the recovery workload runs with its network cards mapped to this network.
Figure 2-11 Prepare for failover settings

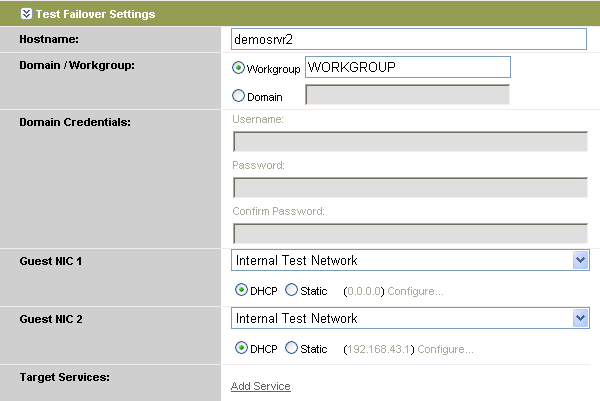
Test Failover Settings
These settings are used when the recovery workload is brought online as a test. These settings are similar to the Failover settings.
Figure 2-12 Test failover settings
Recovery Points
These settings show the recovery points that currently exist for the protected workload, including when they were created.
Figure 2-13 Recovery points

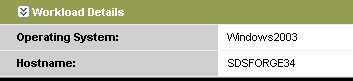
Workload Details
This section shows the operating system and hostname of the protected workload.
Figure 2-14 Workload details
Workload Commands
At the bottom of the Workload Details page is a limited list of workload commands. For an explanation of each command, see Workload Commands.
Figure 2-15 Limited set of workload commands

2.2.7 The Tasks Page
The Tasks page lists individual tasks, each with the following commands representing allowable actions:
Table 2-6 Allowable actions
For more information, see Events and Tasks.
2.2.8 The Reports Page
PlateSpin Forge includes reports that provide information about workload protection and events. These enable users to gain a clear picture into resources being used, save costs by identifying unnecessary data replication, and demonstrate policy compliance.
Click on the navigation bar to display a list of available reports. Click a link to display a particular report page.
To toggle the sort order of column information in a report, click the column header. Reports containing a large amount of information can span multiple pages.
Click to display a print-friendly page. Click to display an XML page. Alternatively, right-click , then click or (depending on the browser) to save the report as an XML file.
Figure 2-16 Report filters

Except for , report pages include date/time and report-specific filters to assist with refining the information displayed. The first box has a drop-down list of time range filters, including current and last day, week, and year filters, as well as a custom filter. The second and third boxes display the start and end date/times of the selected filter. For a custom time range, specify the start and end date/times of the desired period in these boxes, or select from the pop-up calendars.
Use report-specific filters to further refine the information. Click the adjacent  button to display a list box of criteria. Use check boxes to select items individually, or use /, then click . At least one item must be selected when you click , or the filter defaults to the previously selected items. These filters are detailed in subsequent report topics.
2.2.9 Workload Protection
Workload Protection reports show how well workloads are protected over time by displaying all events that have happened to a particular workload, when they occurred, the user who initiated the event, the Job ID of the job that triggered the event, and any details associated with the event.
In addition to date/time filters, Workload Protection reports feature these filters:
-
Workloads: Click or , or use the check boxes to select the particular workloads to include in the report. Click .
-
Protections Tiers: Click or , or use the check boxes to select the particular protection tiers to include in the report. Click .
2.2.10 Replication History
Replication History reports show a record of all protection events that have occurred for a particular workload. Protection events include:
-
Incremental replication completed
-
Incremental eplication did not run at scheduled time
-
Incremental replication failed
-
Full replication completed
-
Full replication did not run at scheduled time
-
Full replication failed
The columns for Replication History reports are the same as those for Event reports (for more information, see Events and Upcoming Events). Use the drop-down list box to select the workload on which to report.
2.2.11 Replication Window
Replication Window reports show how much data PlateSpin Forge is transferring over the network and how long replications take.
For each workload, the report displays the size, speed, and amount of time taken for a Full and an Incremental transfer. The time shown is the amount of time that PlateSpin Forge takes to do the actual copying of the workload from the protected workload to the recovery workload and does not include preparatory steps taken by PlateSpin Forge prior to this transfer.
Use the drop-down box to select the most recent full and incremental replications, the sum of all replications within the specified time period, the peak value for each column in the chart within the specified time period, or the average value for each column in the chart within the specified time period.
2.2.12 Current Protection Status
Current Protection Status reports show how well workloads are protected. For each workload, the report shows the following values:
-
Target Recovery Point Objective (RPO): The largest amount of time during which changes to a workload are not protected. This is the longest interval between replications because any changes since the last replication are not protected in case of failure.
-
Actual RPO: The amount of time that has elapsed since the last full or incremental replication.
-
Actual Recovery Time Objective (RTO): The amount of time it takes from the time the user initiates a test failover until the recovery workload is up and running, ready to be tested.
-
Actual Test Time Objective (TTO): The time it takes to test the recovery workload, from the time the user initiates a test failover until after testing is complete and the recovery workload is powered off.
-
Last Test Restore: The date and time of the last test restore performed on the workload.
-
Last Replication: The date and time of the most recent full or incremental replication performed on the workload.
2.2.13 Events and Upcoming Events
Events reports show a historical record of everything that has occurred on the PlateSpin Forge appliance. Upcoming Events reports show events that are scheduled to occur in the future.
As with Workload Protection reports, Events and Upcoming Events reports allow filtering on workloads and Protection Tiers. In addition, Events reports allow filtering on event types. Click or , or use the check boxes to select which particular event types to include in the report. Use the scroll bar to view all the choices. Click .
Events reports show each event that occurred (except for System events), the workload with which it is associated, and the protection tier to which it belongs. The report also shows the user who caused the event, as well as the date and time at which the event occurred. The column shows a message about a user-initiated event, an error message associated with a failed job, or information about a system event. The column contains a link to a job report associated with the event, if one is available.
2.2.14 The Settings Page
Click the link in the navigation bar to configure the various settings.
Figure 2-17 Settings page
Protection Tiers Tab
This is where you create custom protection tiers that can be used when configuring a workload’s replication details. For more information, see Protection Tiers, Workload Details and Tier Settings.
Permissions Tab
This is where you manage role-based access in Forge, creating security groups, assigning workloads to those groups and then using one of the three types of roles (Administrator, Power User or Operator) to determine who can do what. See Role-Based Access and Managing Role-Based Access for more information.
Appliance Host Tab
This is where you enter credentials for the host running PlateSpin Forge, if the credentials have been changed since the initial configuration. Click .
Figure 2-18 Appliance host tab
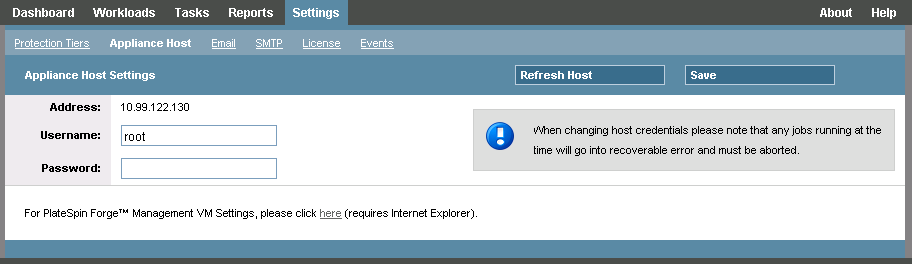
Refresh Host: The Application Host is refreshed every time a replication runs. If you don’t want to wait, you can click to force an immediate refresh.
Windows Administration Web UI: At the bottom of the Application Host page is a hyperlink that allows you to access the Windows Administration Web UI so you can perform administrative functions, such as adding users.
Email Tab
Select to receive e-mail notification of important Protection Events related to protected workloads. See Events and Tasks for a list of which events trigger e-mail notification.
Click to specify addresses to which to send the notifications. In the text box, type an e-mail address or multiple addresses separated by commas and click . To delete listed addresses, click adjacent to the address to be removed.
SMTP Tab
The SMTP (Simple Mail Transfer Protocol) server is used to deliver e-mail notifications to administrators. Specify an SMTP server address, port, and reply address (to e-mail event and progress notifications. Specify valid e-mail account credentials. Click .
License Tab
PlateSpin Forge includes a predefined number of workload licenses. Each workload license can be used to protect, fail over, and fail back one workload. When all workload licenses are used , no more workloads can be protected.
If a protected workload is on a machine that you plan to decommission, you can use the PlateSpin License Entitlement Manager to recover the used workload license and apply it to the replacement machine.
For more information about resetting workloads, see this PlateSpin Knowledge Base article.
The License Settings page displays a list of all available licenses with associated information including what module is licensed, the license’s expiry date, and entitlements. To delete a license, click adjacent to the license to be removed.
WARNING:Do not delete licenses unless instructed to do so by PlateSpin Customer Support.
To add a license, click and select one of the following activation methods:
-
Online Activation
-
Offline Activation
For either activation method, the e-mail address required is the address originally used to place your PlateSpin order. The user name, password, and activation code are provided by PlateSpin in response to the order.
For more information, see License Activation
in the PlateSpin Forge 2.5 Getting Started Guide.
License Designations Tab
When workloads are removed from Forge, the licenses associated with them are not automatically released or transferred to the available license pool. This tab allows you to transfer freed up licenses back to the license pool so they are available for use with other workloads.
After a workload has been removed from Forge, the associated license is available for transfer. On the License Designation tab, licenses with the hyperlink beside them are available for transfer back to the license pool.
-
On the License Designations tab, click next to the license you want to transfer back to the license pool.
-
Follow the on screen instructions to transfer the license.
Events Tab
Type a date (mm/dd/yyyy), or click the calendar icon and select a date, to delete all events before that date. This is used to reduce the size of the database.
WARNING:This command cannot be undone.