5.3 Editing Report Templates
PlateSpin Recon includes a library of standard, predefined templates available for generating reports. Templates specify the content to include in a report and the form in which the content is presented.
PlateSpin Recon reporting capabilities allow for the customization of most report templates to meet specific business requirements. You can configure the content and summaries included in most reports, as well as the time frame, report presentation, and a number of other elements. Users can save modified templates and generate reports from them.
For all reports except Consolidation reports, you can copy the template and then edit each copy. This preserves the original. Use the modified templates to generate alternate reports.
To edit a report template, right-click the template and select from the menu. The Edit Report Template dialog box is displayed.
5.3.1 Report Template Option Tabs
The options available for customizing report templates vary depending on the type of report template selected.
Group Tab
Allows you to select filters or groups of servers to include in the report. See Section 3.4, Working with Groups for more information.
Views Tab
This tab displays the views available for the report, including default and previously created views. Use the arrow buttons to reorder the views. Use the check boxes in the column to determine which views to display in the report.
To add another view to a report, click . To edit an existing view, select it and click . For more information, see Section 5.4.1, Creating and Editing Report Views. To delete a view, select it and click .
Field Filter Tab
You can filter servers based on the constraints you set and use expressions to specify how the constraints should be used and interpreted to narrow or expand the report contents.
Figure 5-3 Field Filter Tab
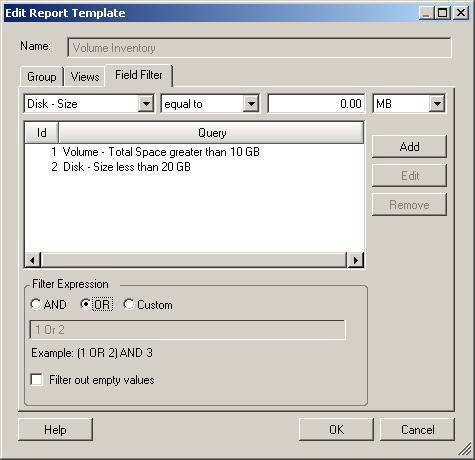
To add a query statement:
-
Enter query constraints in the fields and drop-down lists at the top of the Field Filter page.
There might not be a units field or drop-down list, depending on the resource selected in the first drop-down list.
-
Click .
The query statement is added to the list of queries.
To edit a query statement:
-
Select the query statement.
-
Click .
The query settings are copied to the fields at the top of the page.
-
Edit the settings as desired.
-
Click .
The selected query statement is updated with the new settings.
To remove a query statement:
-
Select the query statement you want to delete.
-
Click .
The selected query statement is deleted.
The filter expression determines how the query statements are evaluated.
Filters affect which servers are made available for a report views.
Table 5-5 Filter Expressions
Select the check box if you want to exclude machines that have null values for the fields included in the specified query.
Row Filter Tab
Used to determine which rows are included or excluded from the report. This is different from tabs, which control which machines are included or excluded from the report, but the guidelines for managing Field Filter criteria can also be applied here See Field Filter Tab.
This option is available only for the Application Complete and Software Complete reports.
Columns Tab
Allows you to customize the columns displayed in the reports generated, based on these templates. See Step 1 for more information on the settings in this page.
This option is available only for the software report templates.
Time Period Tab
Allows you to specify the time period to use for these reports. The settings on this page are the same as the top part of the Date Filter page. See Date Filter Tab and Section 5.3.5, Diagnostics Report Templates.
This option is available only for the diagnostic report templates.
Options Tab
Allows you to specify the counter setting report mode for these reports. See Section 5.3.5, Diagnostics Report Templates.
This option is available only for the missing data diagnostic report templates.
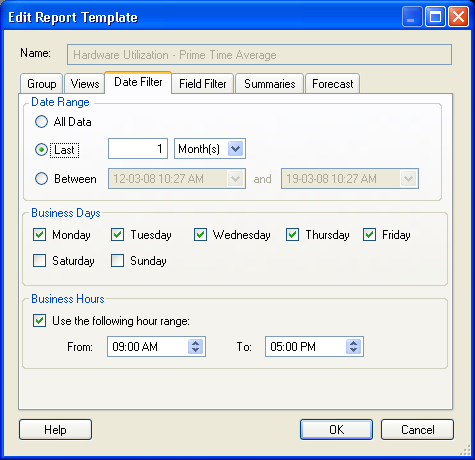
Date Filter Tab
Use this tab to set the date and time range for calculating summary data values in a report. For example, select the Last 1 Month(s) collection range, Monday to Friday, and 9:00 AM to 5:00 PM to view workload data summarized over business hours for all servers that are monitored:
Figure 5-4 Date Filter Tab
Summaries Tab
Summarizes average (AVG), maximum (MAX), minimum (MIN) and standard deviation (STDEV) data types. AVG data can be calculated by Average, Peak Hour, or Total of the data collected.
Calculation types:
-
Average: Average of all hourly values across business days and business hours.
-
Peak Hour: A calculation based on the highest hourly value.
-
Total: Sums all the data points in the time frame. For example, Disk IOs per second, for a 1-hour period equates to 10 disk IOs per second X 60 seconds X 60 minutes = 36000. Select the column in the report to display the columns containing calculated data.
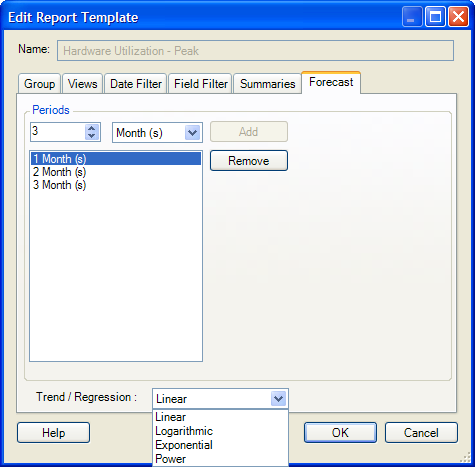
Forecast Tab
Projects workloads and utilization into the future based on summary data for a historical period. This lets data center architects anticipate future needs and plan accordingly.
Figure 5-5 Forecast Tab
5.3.2 Chargeback Report Templates
Edit Chargeback report templates in the same way as Analysis report templates. See Section 5.3.1, Report Template Option Tabs for information about the , , and tabs.
Chargeback reports support only table views. See Creating and Editing a Table View for information about table views. See Section 5.2.4, Working with Report Templates for information about the ,and tabs.
5.3.3 Consolidation Report Templates
Project, Scenario Summary, and Workload Assignment reports are based on editable templates. Unlike Inventory and Analysis report templates, there is only one version of a given Consolidation report template available at a time. Edit the template as desired before viewing the report.
-
In the Report Explorer, right-click the desired report template, then click . The appropriate Default Settings dialog box is displayed.
-
Select the required report columns, data sorting options, and summary rows, then click .
For more detailed information on the other configuration options of the consolidation report template, see Section 5.6.2, Customizing Reports.
5.3.4 Consolidation Project Samples Report Templates
Consolidation Project Samples reports are based on editable templates. The templates can be copied or edited. Edit the template as desired before viewing the report.
-
In the Report Explorer, right-click the desired report template, then click . The appropriate Default Settings dialog box is displayed.
-
Select the required report columns, data sorting options, and summary rows, then click . For information on the option tabs, see Section 5.3.1, Report Template Option Tabs.
For more detailed information on the other configuration options of the Consolidation Project Samples report templates, see Section 5.6.2, Customizing Reports.
5.3.5 Diagnostics Report Templates
Edit Diagnostics report templates by changing options in the Edit Report Template dialog box. To access this dialog box, right-click a Diagnostics report template in the Report Explorer, and on the menu, click .
The available dialog box tabs depend on the report template selected:
-
Group: See Group Tab.
-
Views: See Section 5.4.1, Creating and Editing Report Views.
-
Time Period: Select a time period upon which to base the report. Any intervals during that time period that are missing data are included in the report.
-
Options: For Missing Data reports only. Select a Report Mode to determine which intervals to include in the report:
-
Online: Includes intervals during which all counters are missing data.
-
CPM: Includes intervals during which CPM counters are missing data.
-
Full: Includes intervals during which any counter is missing data.
-
5.3.6 Disk Report Templates
Disk reports are based on editable templates. The templates can be copied or edited. Edit the template as desired before viewing the report.
-
In the Report Explorer, right-click the desired report template, then click . The appropriate Default Settings dialog box is displayed.
-
Select the required report columns, data sorting options, and summary rows, then click . For more information on the option tabs, see Section 5.3.1, Report Template Option Tabs.
For more detailed information on the other configuration options of the Disk report templates, see Section 5.6.2, Customizing Reports.
5.3.7 Inventory Report Templates
Inventory reports are based on editable templates. The templates can be copied or edited. Edit the template as desired before viewing the report.
-
In the Report Explorer, right-click the desired report template, then click . The appropriate Default Settings dialog box is displayed.
-
Select the required report columns, data sorting options, and summary rows, then click . For more information on the option tabs, see Section 5.3.1, Report Template Option Tabs.
For more detailed information on the other configuration options of the Inventory report templates, see Section 5.6.2, Customizing Reports.
5.3.8 Reclamation Report Templates
Reclamation reports are based on editable templates. The templates can be copied or edited. Edit the template as desired before viewing the report.
-
In the Report Explorer, right-click the desired report template, then click . The appropriate Default Settings dialog box is displayed.
-
Select the required report columns, data sorting options, and summary rows, then click .
For more detailed information on the other configuration options of the Reclamation report templates, see Section 5.6.2, Customizing Reports.
5.3.9 Software Report Templates
Software reports are based on editable templates. The templates can be copied or edited. Edit the template as desired before viewing the report.
-
In the Report Explorer, right-click the desired report template, then click . The appropriate Default Settings dialog box is displayed.
-
Select the required report columns, data sorting options, and summary rows, then click . For more information on the option tabs, see Section 5.3.1, Report Template Option Tabs.
For more detailed information on the other configuration options of the Software report templates, see Section 5.6.2, Customizing Reports.
5.3.10 Virtual Infrastructure Report Templates
Virtual Infrastructure reports are based on editable templates. The templates can be copied or edited. Edit the template as desired before viewing the report.
-
In the Report Explorer, right-click the desired report template, then click . The appropriate Default Settings dialog box is displayed.
-
Select the required report columns, data sorting options, and summary rows, then click . For more information on the option tabs, see Section 5.3.1, Report Template Option Tabs.
For more detailed information on the other configuration options of the Virtual Infrastructure report templates, see Section 5.6.2, Customizing Reports.
5.3.11 Volume Report Templates
Volume reports are based on editable templates. The templates can be copied or edited. Edit the template as desired before viewing the report.
-
In the Report Explorer, right-click the desired report template, then click . The appropriate Default Settings dialog box is displayed.
-
Select the required report columns, data sorting options, and summary rows, then click . For more information on the option tabs, see Section 5.3.1, Report Template Option Tabs.
For more detailed information on the other configuration options of the Volume report templates, see Section 5.6.2, Customizing Reports.