6.3 Consolidation Scenarios
Scenarios allow the quick creation and evaluation of one or more consolidation alternatives. Generating multiple scenarios for comparison is recommended. This helps to determine the optimal consolidation scenario.
There are two types of scenarios:
-
Determine the minimum number of servers: PlateSpin Recon determines how many of a specific type of target server are required to balance the workloads. With this type of scenario, only one server template can be used.
-
Specify the number of servers: You set the number and type of target servers for consolidation. PlateSpin Recon calculates the optimal distribution of workloads for the chosen targets. With this type of scenario, multiple server templates can be used.
Any inventoried machine running any virtualization platform supported by PlateSpin Recon is considered a target server.
6.3.1 Determining the Minimum Number of Servers
-
Select a project and click
 .
.
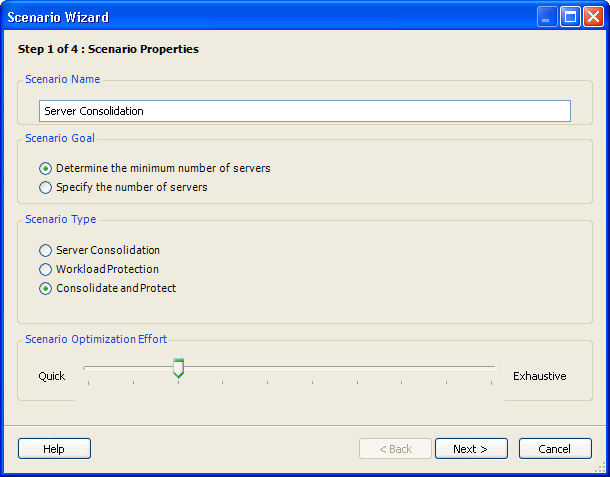
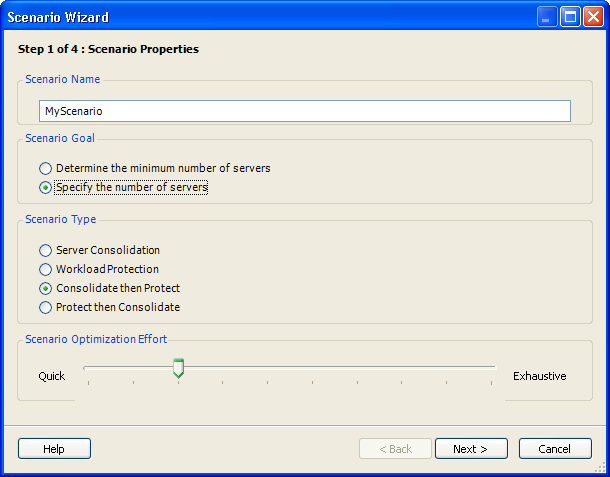
The Scenario Wizard (Step 1 of 4: Scenario Properties) is displayed.
Available are determined by the specified in the Project Wizard.
-
Specify a unique name in the text box.
-
Click .
This goal determines the minimum number of a specific type of target servers to balance workloads. With this option, only one server template can be used.
-
Select a .
This step is relevant only if the project upon which the scenario is based specified (server consolidation and workload protection) as the in the Project Wizard (see Step 3).
-
Adjust the slider. Quick is faster but not as intensive, and Exhaustive takes longer but is more thorough.
-
Click .
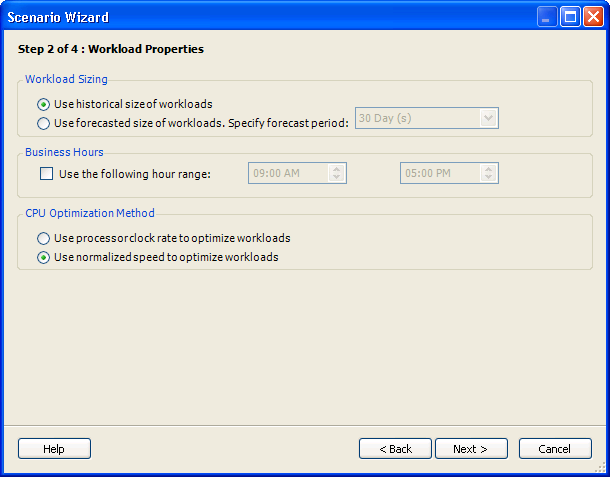
The Step 2 of 4: Workload Properties dialog box is displayed.
-
Specify Workload Sizing:
-
Use historical size of workloads: Create the Scenario based on the historical size of the workloads.
-
Use forecasted size of workloads (specify forecast period): Create the Scenario based on the forecasted size of the workloads after the specified forecast period.
For scenarios based on protection only projects, these values are dimmed.
-
-
To average workload and utilization expressions over a specified time range, select the check box and set the start and end times for the business hours in your environment.
Hours specified here are used for all reports created for this scenario or for any node under this scenario. Report templates do not have any direct control over business/peak hours. Consolidation and Planning charts use both the specified business hours and all 24-hour data points.
-
Specify the CPU optimization method to use:
-
Use processor clock rate to optimize workloads: Optimizes the CPU based on the actual processor clock.
-
Use normalized speed to optimize workloads: Optimizes the CPU based on a normalized value. See Section A.6, CPU Normalization for more information.
Consolidation charts based on this scenario will differ depending on your selection here. If you select normalized speed, the processor utilization and capacity values in consolidation charts created based on this scenario will also use the normalized values.
In any reports, Normalized Speed columns are not displayed by default, even if it's a scenario summary/workload assignment report and the optimization method selected is .
For scenarios based on protection only projects, these values are dimmed.
-
-
Click .
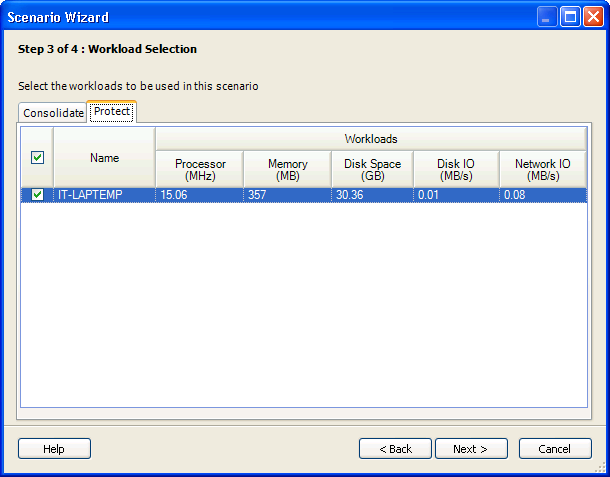
The Step 3 of 4: Workload Selection dialog box is displayed.

-
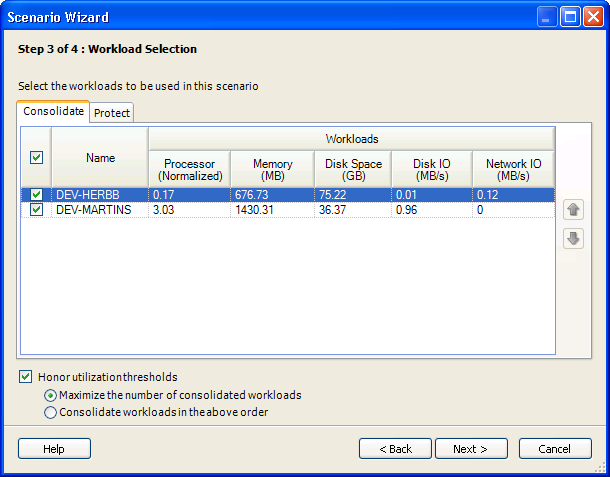
Select workloads or servers, depending on the scenario type.
-
(Conditional) If the includes server consolidation, select the servers to be consolidated in this scenario. By default, all servers specified in the project for consolidation are selected.
-
(Conditional) If the includes workload protection, select workloads on the tab. By default, all workloads specified in the project for protection are selected.
-
Click .
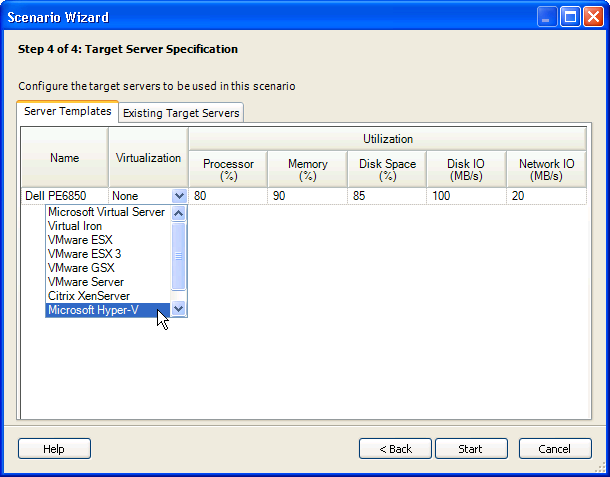
The Step 4 of 4: Target Server Specification dialog box is displayed.
-
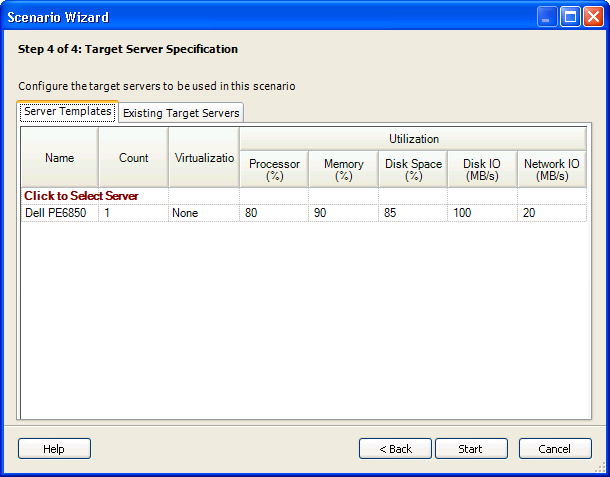
Select the to use from the drop-down list or create a new server template by selecting . In this scenario, one server template can be used.
You must specify at least one server template, even if your intent is to consolidate only to existing target servers.
-
Optional Click the drop-down list and select the Virtualization platform to use.
-
(Optional) Click the tab to use servers included in the project. If there are no existing target servers specified in the project, this option is unavailable.
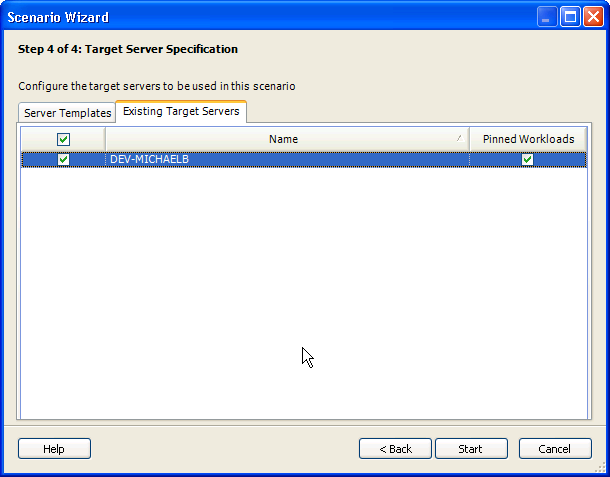
-
Select the existing target servers to use in the scenario, then select the check box to force workloads currently on a particular target server to remain on that server after consolidation.
-
Click .
The Create Scenario job runs. You can watch the progress in the Job Explorer window.When the scenario is created, it is displayed under Scenarios under the base project.
6.3.2 Specifying the Number of Servers
-
Click
to launch the Scenario Wizard (Step 1 of 4: Scenario Properties).
-
Type a unique .
-
Select to set the number and type of target servers for consolidation. With this option, multiple server templates can be used.
-
Select the .
If some workloads must be left unconsolidated because the number of templates specified is inadequate, the algorithm fits as many of the consolidation workloads onto those templates as it can if you choose . The reverse is true if you choose .
-
Adjust the slider. Quick is faster but not as intensive, and Exhaustive takes longer but is more thorough.
-
Click .
The Step 2 of 4: Workload Properties dialog box is displayed.
-
Specify Workload Sizing:
-
Use historical size of workloads: Create the Scenario based on the historical size of the workloads.
-
Use forecasted size of workloads (specify forecast period): Create the Scenario based on the forecasted size of the workloads after the specified forecast period.
For scenarios based on protection only projects, these values are dimmed.
-
-
To average workload and utilization expressions over a specified time range, select the check box and set the start and end times for the business hours in your environment.
Hours specified here are used for all reports created for this scenario or for any node under this scenario. Report templates do not have any direct control over business/peak hours. Consolidation and Planning charts use both the specified business hours and all 24-hour data points.
-
Specify the CPU optimization method to use:
-
Use processor clock rate to optimize workloads: Optimizes the CPU based on the actual processor clock. See Section A.6, CPU Normalization for more information.
-
Use normalized speed to optimize workloads: Optimizes the CPU based on a normalized value.
Consolidation charts based on this scenario will differ, depending on your selection here. If you select normalized speed, the processor utilization and capacity values in consolidation charts created based on this scenario will also use the normalized values.
In any reports, Normalized Speed related columns are not displayed by default, even if it's a scenario summary/workload assignment report and the optimization method selected is .
For scenarios based on protection only projects, these values are dimmed.
-
-
Click .
The Step 3 of 4: Workload Selection dialog box is displayed.
-
(Conditional) If the includes server consolidation, select the servers to be consolidated in this scenario. By default, all servers specified in the project for consolidation are selected.
-
(Conditional) If the includes workload protection, select workloads on the tab. By default, all workloads specified in the project for protection are selected.
If you are running a scenario with a set number of target servers, in some cases the set number of target servers do not have sufficient resources to accommodate all workloads.
By default, is selected. This maintains the total utilization of a target server below the set thresholds. In other words, the sum of workloads will not violate the utilization thresholds for a specified server.
-
Define consolidation priorities by selecting one of these options:
-
Maximize the number of consolidated workloads: Workloads are selected for consolidation with the goal of consolidating the largest possible number of workloads. The order shown is not relevant and the up and down arrows are disabled.
-
Consolidate workloads in the above order: Prioritize workloads for consolidation only, in the given order. This ensures that certain workloads are consolidated. To move workloads into the desired order of consolidation priority, use the up and down arrows.
-
-
Click .
The Step 4 of 4: Target Server Specification dialog box is displayed.
-
Select the to use from the drop-down list or create a new server templates by selecting .
-
Specify the for each server template.
-
It is possible to use existing target servers if they were included in the project. Click the tab to use servers specified in the project. If no existing target servers are specified in the project, this option is not available.
-
Click .
The Create Scenario job runs. You can watch the progress in the Job Explorer window. When the scenario is created, it is displayed under Scenarios under the base project.
6.3.3 Results of Consolidation Scenarios
The result of any scenario depends on the workloads used and the server templates selected. Higher consolidation ratios are achieved with larger target servers. The created scenario is displayed in the Project Explorer. For a description of the icons in the graphic below, see the listing of Project Explorer icons in Table 6-2.
Figure 6-2 Project Explorer
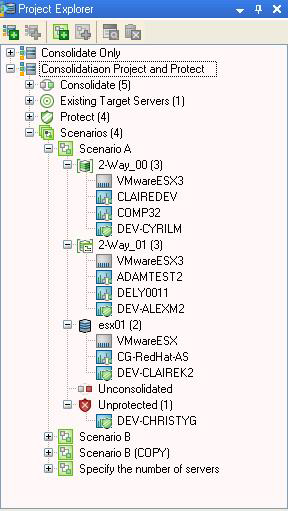
Virtualization Overhead: If server templates configured with a virtualization platform are selected as input to the scenario, the overhead related to the selected virtualization platform is shown as an additional workload under each target server and is named after the virtualization platform. Virtualization overhead workloads are not movable.
Unconsolidated Workloads: Lists all servers that were not consolidated during the scenario creation process. Workloads are rejected if they cannot be added to a server without exceeding utilization thresholds. These servers are listed under in the scenario. Moving unconsolidated workloads to a server can result in a violation of utilization thresholds.
Unprotected Workloads: Lists all servers that were not protected during the scenario creation. Workloads are rejected if they cannot be added to a server without exceeding utilization thresholds. These servers are listed under in the scenario. Moving unprotected workloads to a server can result in a violation of utilization thresholds.
6.3.4 Editing Scenarios
Move workloads between target servers or from or to a target server by dragging and dropping.
Select a scenario and click ![]() to remove consolidated workloads from target servers and move them to . Alternatively, right-click the workload and click on the menu. Deleting protected workloads moves them to .
to remove consolidated workloads from target servers and move them to . Alternatively, right-click the workload and click on the menu. Deleting protected workloads moves them to .
6.3.5 Identifying Consolidation Candidates
This activity involves selecting servers for consolidation. This requires you to generate inventory and analysis reports so you can find a set of servers that meet your consolidation requirements, then you can select your consolidation candidates from that set of servers. For more information, see Section 5.5, Generating Reports.