1.6 Installing and Setting Up the Pidgin Instant Chat Client
This section includes the following topics:
1.6.1 Downloading the Pidgin Client
After you install the Conferencing server, the Pidgin client with Conferencing protocol support can be downloaded from the following URLs.
-
Windows: http://conferencing-portal-hostname/imidio/downloads/pidgin.exe
-
Linux: http://conferencing-portal-hostname/imidio/downloads/pidgin.rpm
These files (or file locations) should be provided to you via a URL (e-mail).
-
Download the pidgin.exe (Windows) or pidgin.rpm (Linux) executable file to your desktop.
-
In Linux and Windows, double-click the (.rpm or .exe) installer (placed on the desktop during download), or select or to invoke the installer.

It might take a while for the installation to begin on the Linux desktop.
-
In the dialog that appears, select your language from the drop-down list.
The installer wizard walks you through the installation process. The defaults should work for your install, although you might want to select the option.
-
Click to complete the installation process.
The integrated Pidgin instant chat client is now installed and ready for use.
See the Conferencing online help or the Conferencing User Guide for information on using the integrated Pidgin client with Conferencing.
1.6.2 Setting Up Your Pidgin Client
-
Start Pidgin.
-
In the dialog that appears, click .
If the dialog does not automatically appear, select the menu item from the Pidgin Buddy List window.
-
Under the tab in the Add Account window:
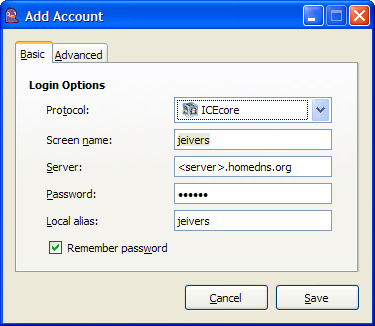
-
Select from the drop-down list.
-
Type in your Conferencing screen name in the field.
-
Type in the Conferencing server address in the field.
-
Type in your Conferencing password in the field.
-
Type in the alias name you would prefer to use in Pidgin instant chat client.
-
Select the option to avoid typing in your password each type you start instant chat.
-
-
Under the tab, select the you want for importing your Conferencing contacts:
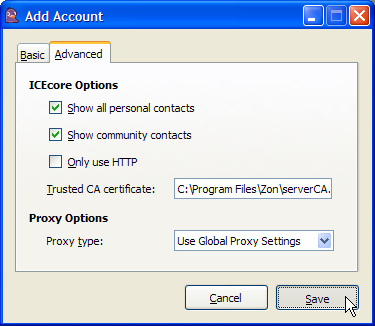
-
Select to import all your personal contacts from Conferencing.
-
Select to import all the contacts from the Conferencing Community Address Book.
-
-
Click .
1.6.3 Accessing the Pidgin Conferencing Features
Selects to view the Conferencing menu items that are available:
Figure 1-3 Accounts Menu
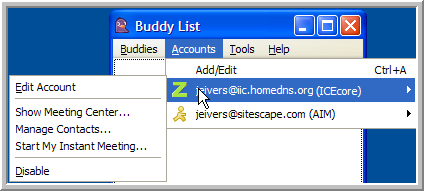
-
: Select this menu item to edit your Pidgin Conferencing account. For more information, see Setting Up Your Pidgin Client.
-
: Select this menu item to open the Conferencing Main Window.
-
: Select this menu item to open the Conferencing Manage Contacts and Users Window. For more information, see Configuring Your Contacts and Buddies.
-
: Select this menu item to start your Conferencing Instant Meeting. For more information, see Running and Editing Your Instant Meeting.
-
: Select this menu item to disable your Pidgin Conferencing account.