2.4 Managing Users and LDAP Authentication
There are two methods of managing users:
-
Basic User Management lets you create and manage individual accounts manually
-
LDAP/eDirectory™ lets you synchronize user account management to a corporate directory
Regardless of which method you choose, it is important to realize that because Novell Teaming is embedded within Liferay, a portion of user management is delegated to the Liferay. For example, Liferay is responsible for all user authentications.
The section includes the following topics:
2.4.1 Basic User Management
This capability comes “out of the box” with the product. No additional setup is required.
-
Using the Liferay portlet, click the tab.
Liferay has two portlets, and . Both have tabs, but they do very different things. Make sure you are using the correct portlet. In the portlet, the tab brings up a list of current Liferay accounts. You can refer to the Liferay documentation for more advanced management.
-
Click .
-
Fill in the and fields, assign a , specify the e-mail address, then click .
NOTE:Do not use any forbidden characters (/\*?"<>;|) in a user’s name.
-
Liferay shows an extended form.
-
Click .
-
Click the tab, type in the password, then click .
-
Repeat these steps to add additional users.
The account is now ready for use, but not fully created. The administrator and other users cannot see the new user until after the user logs in for the first time. After the new user logs in, Novell Teaming creates his or her user workspace, including a blog, calendar, and file area.
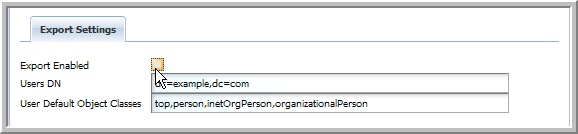
2.4.2 Authenticating Users by E-Mail Address
To use this option:
-
Each e-mail address must be unique (if multiple users share the same e-mail account, authentication can encounter problems).
-
If you are using LDAP synchronization, you must change the search filter. For example, from cn=@screen_name@ to mail=@email_address@. For more information, see Configuring Liferay for LDAP Authentication.
-
You must still map a screen name value to the appropriate Liferay attribute. Novell Teaming requires that each user has a unique screen name. Web services and WebDAV authentications only support login by username.
For more information on these settings, see Configuring Liferay for LDAP Authentication.
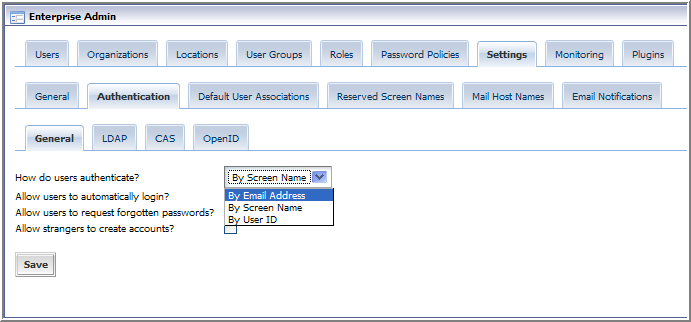
To authenticate users by their e-mail addresses, click , then select in thedrop-down list.
Figure 2-1 Enterprise Admin Authentication
2.4.3 Configuring Liferay for LDAP Authentication
If you want to use a corporate directory as the master reference for user accounts, you need to configure both Liferay and Novell Teaming in a similar manner. The Novell Teaming LDAP configuration pages are designed to look and work in a similar fashion to Liferay, easing this task significantly. You can refer to the Liferay documentation for more detailed information.
WARNING:If you use LDAP, you should require SSL-only connections to Novell Teaming to prevent the possibility of any outside software being set up to packet-grab HTTP posts to the Teaming server and retrieve a user’s login and password credentials. See Secure LDAP/eDirectory Setup.
-
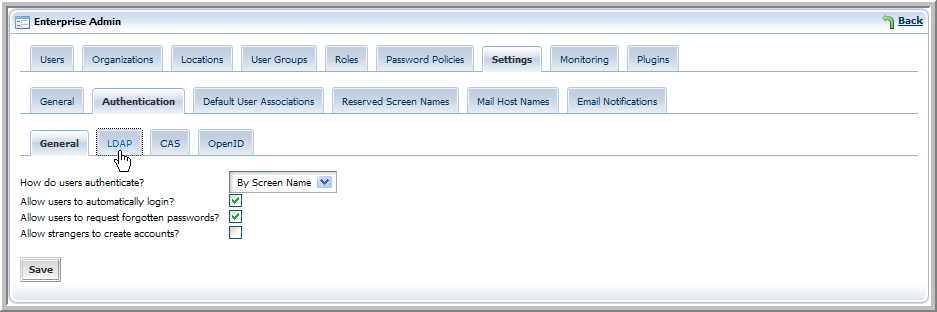
Using the Liferay Enterprise Admin portlet, click the tab (you might need to click thetab to see the tab).

-
Click the tab.
-
Click the tab.
-
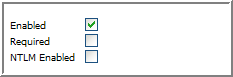
Under , fill out the form with the values needed to map to your corporate directory:
-
Select .
-
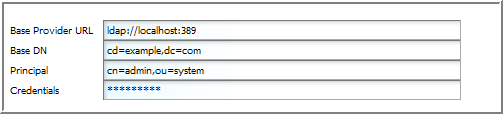
In the field, specify the IP address of your LDAP server, followed by the port number it uses (typically, 389 for non-secure connections or 636 for secure SSL connections).
-
In the field, specify the eDirectory context where Novell Teaming users’ User objects are located (for example, ou=users,o=corporate).
-
In the field, specify the full context of your eDirectory Admin User object (for example, cn=admin, ou=users, o=corporate).
-
In the field, specify the password of your eDirectory Admin user.
-
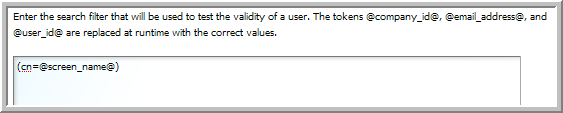
For the search filter, use uid=@screen_name@ or cn=@screen_name@, depending on your site conventions. This should be the same LDAP attribute value that you configure Novell Teaming with to identify the user. For more information, see Configuring Novell Teaming for LDAP Authentication.
-
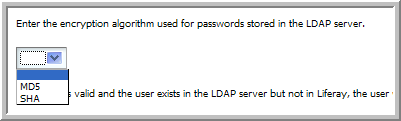
If your LDAP is set up for password comparison, select the algorithm to use for LDAP password encryption from the drop-down list (a blank value means no encryption, MD5 and SHA specify two different algorithms).
-
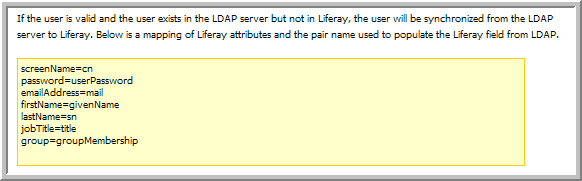
Map the specific LDAP values you want to use for each user to the appropriate Liferay attributes.
When using LDAP/eDirectory™ as the authentication source, a new user can not login until the e-mail attribute is populated. Liferay only requires a non-null value for this attribute to authenticate the source, so this does not need to be a valid e-mail.
-
Under , we recommend deselecting the option.
-
-
Click .
The LDAP connection is tested and an initial test connection to the LDAP server is attempted. A successful connection or failure is reported:
Your request processed successfully.
or
You have entered invalid data. Please try again. Failed to bind to the LDAP server with given values.
To connect to a secure LDAP server, you need to import the server’s certificate into Novell Teaming’s keystore. See Secure LDAP/eDirectory Setup.
2.4.4 Configuring Novell Teaming for LDAP Authentication
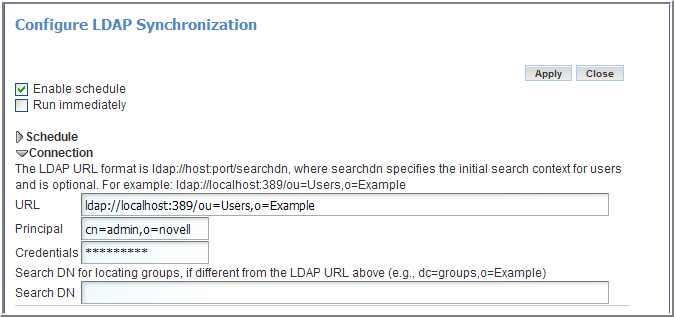
The Teaming LDAP Configuration form is similar to the Liferay form, but includes additional information on scheduling synchronization of all users and, optionally, groups.
-
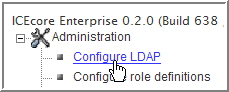
In the Teaming Administration portlet, click .
-
With selected, click , then set the schedule as needed for LDAP synchronization for your Teaming site.
-
Click .
-
In the field, specify the IP address or DNS hostname of your LDAP server, followed by the port number it uses (typically, 389 for non-secure connections or 636 for secure SSL connections).
-
After the port number, type a slash (/), then specify the eDirectory context where Teaming users’ User objects are located (for example, ou=users,o=corporate).
IMPORTANT:Be sure to specify the eDirectory context in the field, not in the field.
-
In the field, specify the full context of your eDirectory Admin User object (for example, cn=admin,ou=users,o=corporate).
-
In the field, specify the password of your eDirectory Admin user.
-
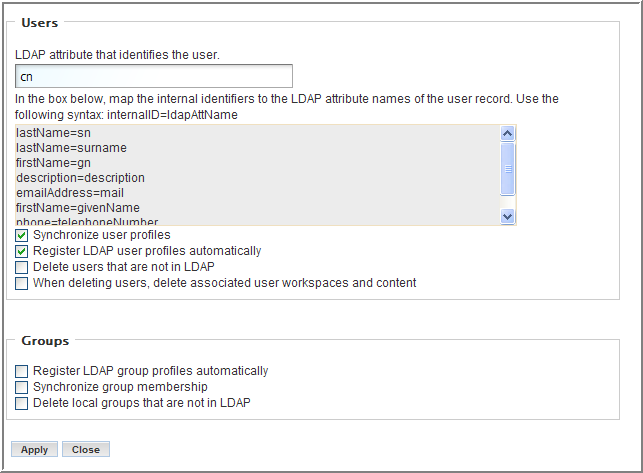
Scroll down to the Users section.
-
Set the field to cn. Use the LDAP attribute that identifies the user, such as uid or cn.
For the LDAP attribute that identifies the user, cn might be a better choice than uid for many sites. This should be the same attribute value you used for the search filter in the Liferay LDAP configuration. For more information, see Section 2.4.3, Configuring Liferay for LDAP Authentication.
-
Map the LDAP attribute names of the user record to the Novell Teaming internal identifiers.
The syntax is: TeamingId=ldapAttName. For example:
-
lastName=sn
-
name=uid
TeamingIds: lastName, firstName, name, description, email, address, phone.
If you need to add additional internal identifiers for your users in Novell Teaming, see Adding a User Internal Identifier in Novell Teaming.
-
-
Select .
-
Select .
Do not select or .
-
If you want to synchronize groups:
-
Select .
-
Select .
Do not select .
-
-
Click to save your Novell Teaming LDAP synchronization settings.
This returns you to the top of the Configure LDAP Synchronization page.
-
Select , then click .
NOTE:Users do not display in the user list until after they have logged in for the first time.
2.4.5 Testing LDAP Authentication and Synchronization
If you complete the instructions in Configuring Liferay for LDAP Authentication and Configuring Novell Teaming for LDAP Authentication, and you receive no error message in your browser, LDAP authentication should be configured and occurring on the schedule you specified during configuration. You cannot see the Novell Teaming accounts on the tab of the Liferay Enterprise Admin portlet until each user logs into the Teaming site, but you can see that the eDirectory accounts are available to the Teaming site.
As a test:
-
Display the Teaming home page.
-
Place your cursor in the field, then type the first letter of an eDirectory username.
If eDirectory synchronization is taking place, a drop-down list displays eDirectory usernames that start with the letter you typed.
-
Sign in to the Teaming site as yourself, using your eDirectory username and password.
After you log in, your account and your personal workspace become visible to other Teaming users.
Changes to user information that are made in eDirectory are automatically synchronized to users’ Teaming accounts.
To verify that synchronization is taking place:
-
In ConsoleOne®, make a change to the information in your eDirectory user account.
-
Run LDAP synchronization immediately from the Teaming Administration portlet.
-
Check your Teaming account to see if the information has been synchronized.
NOTE:Synchronization of user information from Novell Teaming back into eDirectory is not available at the present time.
2.4.6 Secure LDAP/eDirectory Setup
To connect to a secure LDAP server, you need to import the server’s certificate into Novell Teaming’s keystore. If the LDAP server is ldap.company.com, and it’s running on the usual LDAP port (636), then you can follow these steps in the command line interface:
NOTE:An administrator who understands the openssl tool should perform this procedure.
This technique only works for certificates from an external certificate signing authority. If the LDAP server is using a self-signed certificate, you also need to get the certificate for this internal CA and add it to the cacerts file on the Novell Teaming machine. The code at http://blogs.sun.com/andreas/entry/no_more_unable_to_find to get the other certificate appears to be a good example.
-
Make sure you have openssl available.
-
Enter openssl s_client -connect ldap.company.com:636
-
Copy everything from the ‘----BEGIN CERTIFICATE----’ to the ‘----END CERTIFICATE----’ lines (inclusive) into a file, such as cert.ldap (the name does not matter).
-
Change directories to the java/bin directory, then enter (this uses the default directory path /opt/icecore/):
keytool -import -alias ldap.company.com -keystore /opt/icecore/liferay-portal-tomcat-5.5-jdk5-4.3.0/conf/.keystore -file cert.ldapIn order for this command to succeed, the java/bin directory must be in the PATH variable, or the command must be launched from the java/bin directory, for example:
/usr/java/jdk1.5.0_12/bin/keytool -import -alias ldap.company.com -keystore /sitescape-team-0.1.0/liferay-portal-tomcat-5.5-jdk5-4.3.0/conf/.keystore -file cert.ldap
-
If prompted for a password, the keystore’s default password is: changeit
-
Restart Tomcat.
-
Make sure you use ldaps://ldap.company.com:636 as the LDAP URL, rather than the default ldap://ldap.company.com:389 (note protocol and port number changes).
2.4.7 Adding a User Internal Identifier in Novell Teaming
Use the Profile Designer to add a new user element (internal identifier) in Novell Teaming.
-
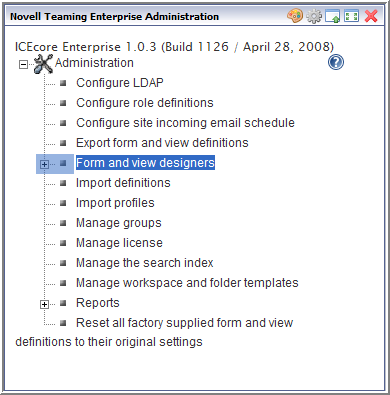
From the portlet on the initial Liferay portal window, click the plus sign (+) to the left of to expand this section and view the available designers.
To add the Teaming Administration portlet to the Liferay portal window, see Adding the Teaming Administration Portlet to Your Home Page.
-
Click .
-
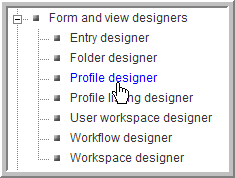
Expand , then click .
-
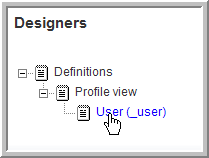
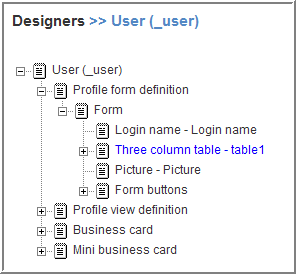
Expand the following items in the designer tree: , then click .
-
In the dialog box on the right, click .
-
Under click .
-
In the dialog box that appears, specify the user-friendly name you want to use for this element in the field, specify the database name in the field (for example, cellphone), then click .
See Section 6.0, The Profile Designer for adding an element to your business card.
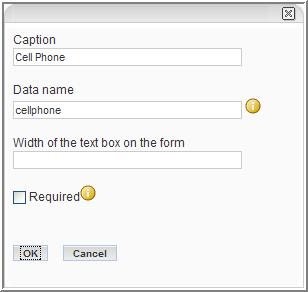
-
After the caption is added, click in the top right corner.
-
In the Teaming Administration portlet, click and map the new element (internal identifier, cellphone) to the appropriate LDAP attribute for this new user information.
-
Select , then click .
For more information, see Configuring Novell Teaming for LDAP Authentication.