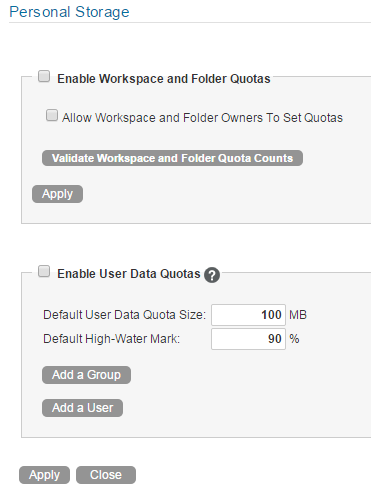
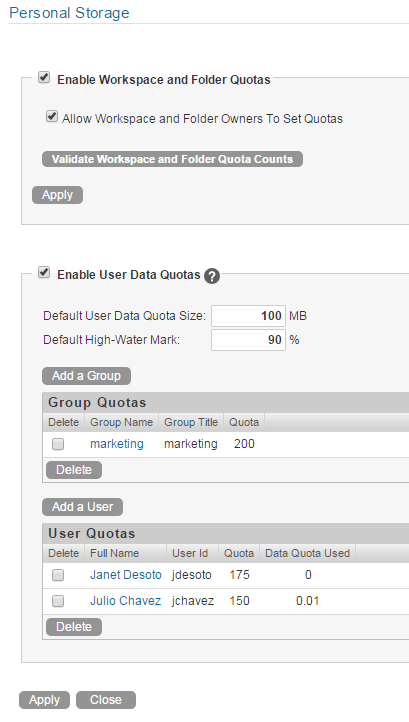
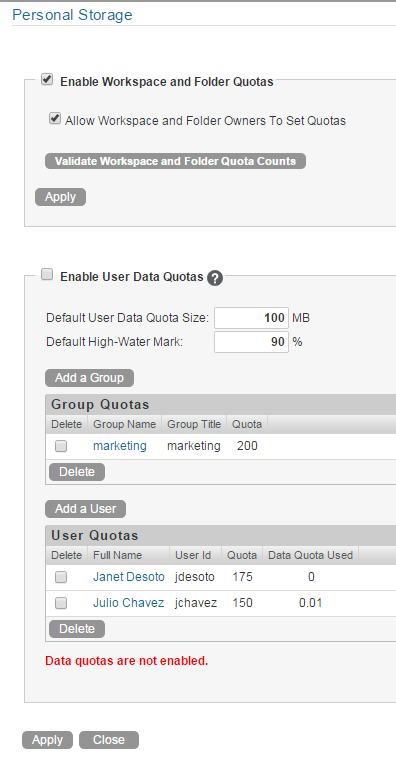
23.4 Managing User Data Quotas

Each user’s data quota establishes how much disk space the user’s attached files and file versions can occupy in the Vibe site. Workspaces, folders, and entries that do not contain files or attachments do not count toward a user’s data quota.

By default, users are not limited in the disk space that their attached files and file versions occupy in the Vibe site. As the Vibe administrator, you can decide when limiting users’ disk space usage becomes appropriate.

23.4.1 Planning User Data Quotas

Understanding User Data Quota Priority

Because users can have multiple data quotas assigned to them, either individually, through group membership, or through the site-wide default, Vibe prioritizes the existing data quotas and uses only one for each individual Vibe user. If users have multiple data quotas that pertain to them, the priority level is as follows:

  1. User Quota: A quota that is set for an individual user overrides the site-wide default quota and any other quotas that are associated with any groups where the user is a member.

  2. Group Quota: A quota that is set for an individual group overrides the site-wide default quota. This pertains to all users who are members of that group.

    When a user is a member of multiple groups that have data quotas associated with them, the user is given the highest data quota. For example, if a Vibe user is a member of Group A, Group B, and Group C, and the data quotas for each of these groups is 10, 20, and 30, the Vibe user’s data quota is 30.

  3. Site-Wide Default: The site-wide default quota is used for all Vibe users who have not been assigned individual quotas, and who are not associated with any groups where a quota has been set.

Selecting the Default User Data Quota for All Users

When you enable the data quota feature, the initial default data quota is 100 MB. This means that each Vibe user can upload 100 MB of files and attachments to the Vibe site. There is one default data quota for each Vibe zone.

When you select the default data quota for your Vibe site, consider the size of your Vibe site, the number of Vibe users, the amount of available disk space, and so on. You can override the default data quota on a per-user and per-group basis, as described in Managing Workspace and Folder Data Quotas.

As described in Exceeding the Data Quota, when a user adds enough files and attachments to exceed the data quota, the user can no longer attach files or create versions until existing files have been deleted and purged to free up storage space.

For information about purging deleted files to make storage space available, see Permanently Deleting Files from the Trash.

For information about the user experience when nearing or exceeding a data quota, see Adding Files and Attachments to the Vibe Site When You Are Over Your Quota in the Micro Focus Vibe 4.0.8 Advanced User Guide.

For information about which data quota is used when users have multiple data quotas that pertain to them, see Understanding User Data Quota Priority.

Selecting an Appropriate High-Water Mark

The high-water mark is the percentage of the data quota when users are notified that they are approaching their data quotas. The default high-water mark is 90% of a user’s data quota.

This high-water mark also applies to data quotas that are set on workspaces and folders.

Determining Data Quotas for Specific Users

If there is a user in your Vibe site who needs either a higher or lower data quota than the site-wide default, you can assign that user an individual user data quota.

When you set data quotas for specific users, remember that individual user data quotas override the default user data quota, as well as quotas that are assigned to any groups where the user is a member, as described in Understanding User Data Quota Priority.

Determining Data Quotas for Specific Groups

When you set data quotas for specific groups, remember that group data quotas override the default site-wide data quota, but do not override individual user quotas, as described in Understanding User Data Quota Priority.

23.4.2 Setting User Data Quotas

You can set data quotas for the entire Vibe site, for individual groups, and for individual users.

Setting a Default Data Quota

When you set a default data quota, the quota applies to all Vibe users who have not been assigned individual quotas, and who are not associated with any groups where a quota has been set.

  1. Log in to the Vibe site as the Vibe administrator.

  2. Click your linked name in the upper right corner of the page, then click the Administration Console icon .

  3. Under Management, click Personal Storage.

  4. Select Enable User Data Quotas.

  5. Set the Default Data Quota Size and Default High-Water Mark options as determined in Planning User Data Quotas.

  6. Click Apply > Close to save the user data quota settings.

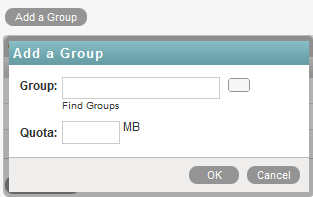
Setting Data Quotas for Individual Groups

  1. Log in to the Vibe site as the Vibe administrator.

  2. Click your linked name in the upper right corner of the page, then click the Administration Console icon .

  3. Under Management, click Data Quotas and File Upload Limits.

  4. Select Enable User Data Quotas.

  5. Click Add a Group.

  6. In the Group field, start typing the name of the group for which you want to set a quota, then click the group name when it appears in the drop-down list.

    Repeat this process to add additional groups for which you want to assign the same data quota.

  7. In the Quota field, specify the disk space limit for the group.

  8. Click OK, then click Apply > Close to save the user data quota settings.

Setting Data Quotas for Individual Users

  1. Log in to the Vibe site as the Vibe administrator.

  2. Click your linked name in the upper right corner of the page, then click the Administration Console icon .

  3. Under Management, click Data Quotas and File Upload Limits.

  4. Select Enable User Data Quotas.

  5. Click Add a User.

  6. In the User field, start typing the name of the user for which you want to set a quota, then click the user’s name when it appears in the drop-down list.

    Repeat this process to add additional users for which you want to assign the same data quota.

  7. In the Quota field, specify the disk space limit for the user.

  8. Click OK, then click Apply > Close to save the user data quota settings.

Setting Data Quotas on Outgoing Email Messages

You can set a maximum file size on individual email messages that are sent from the Vibe system. For more information, see Enabling/Disabling Outbound Emailing of Folder Digests.

23.4.3 Modifying User Data Quotas

Vibe lets you modify data quotas that you have previously set. You can modify data quotas for your entire Vibe site, or modify data quotas for individual groups and users.

Modifying User Data Quotas for the Entire Vibe Site

Vibe lets you easily modify the site-wide default user data quota.

  1. Log in to the Vibe site as the Vibe administrator.

  2. Click your linked name in the upper right corner of the page, then click the Administration Console icon .

  3. Under Management, click Personal Storage.

  4. In the Default User Data Quota Size field, delete the existing quota and specify the new quota.

    You can also modify the default high-water mark in the Default High-Water Mark field. For more information about the high-water mark, see Selecting an Appropriate High-Water Mark.

  5. Click Apply > Close to save the user data quota settings.

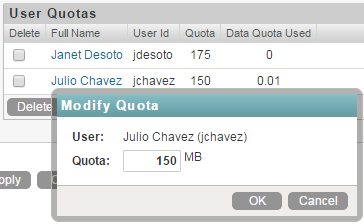
Modifying User Data Quotas for Individual Groups and Users

Vibe lets you easily modify individual group and user data quota settings that you have previously set.

  1. Log in to the Vibe site as the Vibe administrator.

  2. Click your linked name in the upper right corner of the page, then click the Administration Console icon .

  3. Under Management, click Personal Storage.

  4. In the Group Quotas table or User Quotas table, click the group name or user name that represents the group or user whose quota you want to modify.

  5. In the Quota field, delete the existing quota and specify a new quota.

  6. Click OK, then click Apply > Close to save the user data quota settings.

23.4.4 Removing User Data Quotas

Vibe lets you disable data quotas that you have previously set. You can disable data quotas for your entire Vibe site, or remove data quotas from individual groups and users.

Disabling User Data Quotas for the Entire Vibe Site

If you decide that you no longer need to impose limits on the amount of data that users are permitted to upload into the Vibe site, you can disable the data quota feature. Disabling the data quota feature enables all Vibe users to upload as much data to the Vibe site as they want.

  1. Log in to the Vibe site as the Vibe administrator.

  2. Click your linked name in the upper right corner of the page, then click the Administration Console icon .

  3. Under Management, click Personal Storage.

    The Data Quotas and File Upload Limits page is displayed.

  4. Deselect Enable User Data Quotas, then click Apply.

    Data quotas are no longer enabled for your Vibe site.

Removing User Data Quotas from Individual Groups and Users

You can remove data quotas that you have previously set for individual groups and users. Users are held to the site-wide data quota default setting if they do not have an individual quota defined for them and they are not members of any groups where a group quota has been assigned.

  1. Log in to the Vibe site as the Vibe administrator.

  2. Click your linked name in the upper right corner of the page, then click the Administration Console icon .

  3. Under Management, click Personal Storage.

  4. In the Group Quotas table or User Quotas table, select the check box next to the group or user whose quota you want to remove, then click Delete.

  5. Click Apply > Close to save the user data quota settings.

23.4.5 Managing Your Personal Data Quota

NOTE:As a Vibe administrator, you are also held to a data quota. If you want to assign yourself a larger quota than the site-wide default, you can add an individual quota for yourself, as described in Setting Data Quotas for Individual Users.

All Vibe users need to manage their personal data quotas. When you have a limited allocation of disk space, you need to be aware of the amount of disk space that you have available, know how to make more disk space available as you approach your quota, and know what counts against your quota and what doesn’t.

For information on how to accomplish these and other important tasks as you manage your data quota, see Managing Your Data Quota in the Micro Focus Vibe 4.0.8 Advanced User Guide.

23.4.6 Monitoring User Data Quotas

You can monitor which users in the Vibe site have exceeded or are close to exceeding their data quotas by generating the following reports: