11.1 Creating a Simple Workflow
If you have a straightforward business process that you think might benefit from a workflow, you can create a simple workflow to help automate that process, and you don’t need in-depth workflow training to do it.
For example, you might want to create a workflow that automates the review process of articles for the company magazine. To create a simple workflow such as this, complete the following sections:
11.1.1 Creating the Workflow Definition
-
Navigate to the workspace or folder where you want to create the workflow.
You can create workflows at the workspace level or at the folder level. If you create a workflow at the workspace level, the workflow can be applied to all sub-folders and sub-workspaces. If you create a workflow at the folder level, the workflow can be applied only to that folder, and to the folder’s sub-folders.
-
If you are creating the workflow at the folder level, click > in the Action toolbar.
or
If you are creating the workflow at the workspace level, click > in the Action toolbar.
The Form and View Designers page is displayed.
-
In the Form and View Designers page, click > .
The Add a New Definition form is displayed.
-
Specify the following information:
Caption: Specify a name for the workflow process.
This is the name that appears in the Vibe interface. Users see it when they use this workflow. (For example, “Article Production.”)
Name: Specify the internal name for the workflow process.
The name that you enter in this field is not visible to users who use this workflow. (For example, “article_production.”)
-
Click .
-
Continue with Section 11.1.2, Adding Workflow States.
11.1.2 Adding Workflow States
Workflow states are the phases that a workflow goes through as it completes the business process.
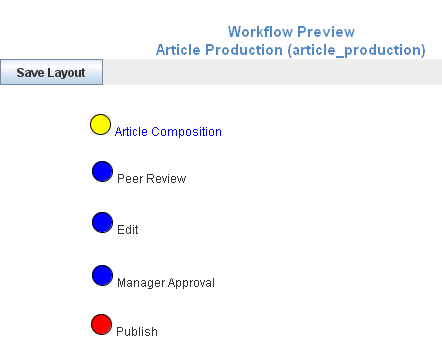
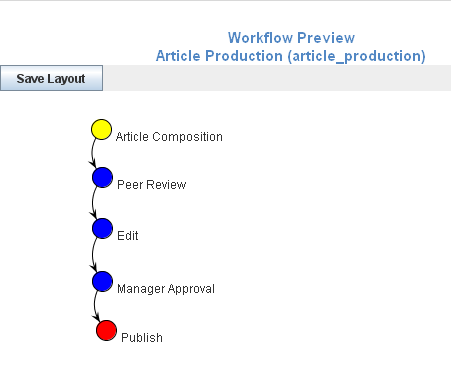
For example, the Article Production workflow contains five states: Article Composition, Peer Review, Edit, Manager Approval, Publish.
-
In the Designer page, expand the workflow definition that you created in Section 11.1.1, Creating the Workflow Definition.

-
Click .
-
Click .
-
Click .
-
Specify the following information:
Caption: Specify a name for the workflow state.
This is the name that appears in the Vibe interface. Users see it when they use this workflow. (For example, “Article Composition.”)
Name: Specify the internal name for the workflow state.
The name that you enter in this field is an internal-use database name. Names for elements in a definition must be unique. The first character must be an alphabetic character (a-z, A-Z). For the rest, you can use alphanumeric characters (a-z, A-Z, 0-9), hyphens (-), and underscores (_).
Description: Describe the function of the state.
-
Click .
-
Repeat Step 2 through Step 6 to add additional workflow states.
The new states are added to the workflow and appear in the section at the bottom part of the window.
For more information on the section, see Section 11.3, Visually Representing a Workflow.

-
Continue with Section 11.2.3, Adding Workflow Start and End States for information on how you can define start and end states for your workflow.
11.1.3 Adding Workflow Start and End States
Vibe enables you to add a Start and End state to your workflow. This is important, because without an End state, a workflow does not officially stop unless you manually stop it. Adding an End state to a workflow automatically stops the workflow when it reaches the final state.
-
Click .
-
In the Workflow process window, click .
-
Specify the following information:
Initial State: Select the Start state of the workflow process.
End State: Select the End (final) state of the workflow process.
You can select multiple End states by holding the Ctrl key while clicking additional states.
Background Actions Will Run in the Context Of: Select either or .
-
Click .
In the section, the Start state is marked with yellow, and the End state is marked with red.
For more information on the section, see Section 11.3, Visually Representing a Workflow.
-
Continue with Section 11.1.4, Adding Manual Transitions for information on how you can create transitions that move an entry from one workflow state to the next.
11.1.4 Adding Manual Transitions
After you have defined the workflow states, you need to create transitions that move an entry from one state to the next. The easiest kind of transitions to implement are manual transitions.
Manual transitions provide a drop-down list in the entry that allows the user to choose when to transition the entry. The workflow creator decides which workflow states the user can select in the drop-down list.
For example, from the “Article Composition” state, the workflow creator might allow the user to transition the entry to either the “Peer Review” or the “Edit” state.
To create manual transitions from one workflow state to the next workflow state:
-
Expand , then expand the workflow state where you want to transition the entry from.
For this example, expand the “Article Composition” state.

-
Click , then click in the box in the right section of the Designer page.
-
Click .
For information regarding the other transition types, see Section 11.2.4, Adding Transitions.
-
In the select box, select the next state in the workflow.
This is the state that users will be allowed to transition the entry to.
-
Click .
Repeat Step 2 through Step 5 if you want to allow users to select from multiple states.
-
Repeat this procedure for all other states in the workflow.
In the section, you see a diagram representing all of your workflow states (circles) and transitions (arrows).
For more information on the section, see Section 11.3, Visually Representing a Workflow.
-
Continue with Section 11.1.5, Sending E-Mail Notifications.
11.1.5 Sending E-Mail Notifications
Now that you have added your workflow states and specified how the entry will transition through those states, you need to set up notifications that inform Vibe users when they need to take action on the entry as it moves into a state corresponding with their area of expertise.
For example, Julio composes an article for the company magazine. After he composes the article, he transitions the entry to the next workflow state, Peer Review. Anne, Julio’s co-worker, then receives an e-mail message notifying her that an article is ready for her to review. After Anne reviews the article, she transitions it to the next workflow state, Edit, and so forth.
-
Expand the workflow definition, then click the workflow state where you want the notification to be sent.
For example, click .
-
Click .
-
Click .
-
In the On Entry box, click .
-
Click . (This is located underneath the workflow state where you just created it.)
In the box, you can select from many options. These are actions that you can choose to perform when the entry enters this workflow state, such as moving the entry to another location, copying the entry, or sending notifications. For this basic workflow example, simply select to send e-mail notifications.
For information about all of the options that you can choose to perform when an entry enters a workflow state, see Section 11.2.6, Adding On-Entry or On-Exit Events.
-
Click > .
-
In the box, specify the following information:
Entry Creator: Select this option if you want to send a notification to the user who created the entry.
Team: Select this option if you want to send a notification to the entire team.
Users: Specify individual users to whom you want to send a notification.
Groups: Specify groups to whom you want to send a notification.
Additional E-Mail Addresses to Notify: Specify an e-mail address where you want a notification to be sent.
Select an Entry Type: Use the drop-down list to select the type of entry that most closely represents the type of entry that is going through the workflow.
Text to be Put in the Notification Subject Line: Specify the text that you want to appear in the subject line of the notification that is sent.
For example, Peer Review Needed.
You can use certain HTML constructs to provide specific information about the entry that is transitioning through the workflow. For example, you can populate the Notification Subject Line with the entry title and who last modified the entry: Workflow notification for {{vibe:title}} from {{vibe:modifiedBy}}.
For more information about all the HTML constructs you can use, see Section B.0, Using HTML Markup in Vibe OnPrem.
Append the Entry Title: (Optional) Select this option if you want the entry title to appear after the text in the subject line.
Text to be Put in the Notification Body: Specify text that you want to appear in the main body of the e-mail notification. You can also select if you want the main body of the entry to display with the e-mail notification message.
Any text formatting that you use in this field needs to be done in the HTML format. Following are some examples of HTML formatting:
-
<i></i> for italics
-
<b></b> for bold
-
<br> for a break (return/enter)
-
<p></p> for a new paragraph
-
<a href=“www.example.com”></a> for links to URLs
You can use certain HTML constructs to provide specific information about the entry that is transitioning through the workflow. For example, you can populate the Notification Body with the name of the user who last modified the entry: This entry was last modified by {{vibe:modifiedBy}}.
For more information about all the HTML constructs you can use, see Section B.0, Using HTML Markup in Vibe OnPrem.
Append the Entry Description: (Optional) Select this option if you want the main body of the entry to display with the e-mail notification message.
-
-
Click .
-
Repeat this process for every workflow state that needs an e-mail notification message.
11.1.6 Enabling Your Workflow for Use
Now that you have created your workflow, you need to enable it. For information on how to do this, see Section 11.7, Enabling Workflows.