11.2 Creating an Advanced Workflow
This section expands the workflow design presented in Section 11.1, Creating a Simple Workflow.
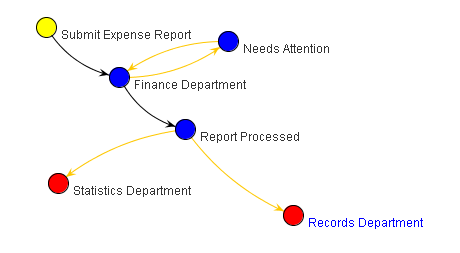
For example, you might want to create a workflow that automates the expense reporting process for your department.
Figure 11-1 Advanced Workflow Example
To create this and other advanced workflows, complete the following sections:
11.2.1 Creating the Workflow Definition
-
Navigate to the workspace or folder where you want to create the workflow.
You can create workflows at the workspace level or at the folder level. If you create a workflow at the workspace level, the workflow can be applied to any folder or workspace included in the workspace. If you create a workflow at the folder level, the workflow can be applied only to that folder, and to the folder’s sub-folders.
-
If you are creating the workflow at the folder level, click > in the Action toolbar.
or
If you are creating the workflow at the workspace level, click > in the Action toolbar.
The Form and View Designers page is displayed.
-
In the Form and View Designers page, click > .
The Add a New Definition form is displayed.
-
Specify the following information:
Caption: Specify a name for the workflow process.
This is the name that appears in the Vibe interface. Users see it when they use this workflow. (For example, “Expense Report Workflow.”)
Name: Specify the internal name for the workflow process.
The name that you enter in this field is not visible to users who use this workflow. (For example, “expense_report_workflow.”)
-
Click .
-
After you define a workflow, you need to add states to your workflow. For information on how to do this, continue with Section 11.2.2, Adding Workflow States.
11.2.2 Adding Workflow States
Workflow states are the phases that a workflow goes through as it completes the business process.
For example, the Expense Report workflow contains six states: Submit Expense Report, Finance Department, Needs Attention, Report Processed, Statistics Department, and Records Department.
-
In the Designer page, expand the workflow definition that you created in Section 11.2.1, Creating the Workflow Definition.

-
Click .
-
Click .
-
Click .
-
Specify the following information:
Caption: Specify a name for the workflow state.
This is the name that appears in the Vibe interface. Users see it when they use this workflow. (For example, “Article Composition.”)
You can use alphanumeric characters (a-z, A-Z, 0-9), dashes (-), underscores (_), and spaces.
Name: Specify the internal name for the workflow state.
The name that you enter in this field is an internal-use database name. Names for elements in a definition must be unique. The first character must be an alphabetic character (a-z, A-Z). For the rest, you can use alphanumeric characters (a-z, A-Z, 0-9), hyphens (-), and underscores (_).
Description: Describe the function of the state.
-
Click .
-
Repeat Step 2 through Step 6 to add additional workflow states.
The new states are added to the workflow and appear in the section located in the bottom part of the window.
For more information on the section, see Section 11.3, Visually Representing a Workflow.

-
After you have added states to your workflow, you need to define the Start and End states. For information on how to do this, see Section 11.2.3, Adding Workflow Start and End States.
11.2.3 Adding Workflow Start and End States
Vibe enables you to add Start and End states to your workflow. This is important, because without an End state, a workflow does not officially stop unless you manually stop it. Adding an End state to a workflow automatically stops the workflow when it reaches the final state.
-
Click .
-
In the Workflow process window, click .
-
Specify the following information:
Initial State: Select the Start state of the workflow process.
End State: Select the End (final) state of the workflow process.
You can select multiple End states by holding the Ctrl key while clicking additional states.
Background Actions Will Run in the Context Of: Select either or .
-
Click .
In the section, Start states are marked with yellow, and End states are marked with red.
For more information on the section, see Section 11.3, Visually Representing a Workflow.

-
Continue with Section 11.2.4, Adding Transitions for information on how to create transitions that move an entry from one state to the next.
11.2.4 Adding Transitions
After you have defined the workflow states, you need to create transitions that move an entry from one workflow state to the next.
-
Expand , then expand the workflow state that you want to transition the entry from.
For this example, expand the “Submit Expense Report” state.

-
Click , then click in the box in the right section of the Designer page.
-
Click the type of transition that you want to add.
Custom Transition: Use this transition if you want to integrate an external process with a Vibe workflow. To do this, consult with your Vibe administrator.
For example, you might want to synchronize a Vibe workflow with an external workflow. You can write some custom Java code and use a custom transition to accomplish this.
Immediate Transition: The entry is immediately transitioned.
Manual Transition: Provides a drop-down list in the entry that allows the user to choose when to transition the entry. The workflow creator decides which workflow states the user can select in the drop-down list.
Transition After Time Elapsed: The entry is transitioned to the next workflow state after a specified amount of time.
Transition on Comment or Reply: The entry is transitioned to the next workflow state after a user makes a comment or a reply on the entry.
Transition on Entry Data Values: The entry is transitioned to a new state based on the value that a user specifies for a custom element in the entry.
For example:
-
If you want to assign an entry to a specific state based on a value the user selects, you define a custom element with multiple values from which a user can make a selection (from a drop-down list on the form). Map each of these values to specific states in the initial workflow state by using the option. This option is useful for assigning help tickets in a help desk, assigning entries to the appropriate review contact, and so on.
-
If you want to transition an entry at a specific time, you can transition the entry based on a custom date element.
Transition on Modify: The entry is transitioned to a new state when it is modified.
This can be useful for review purposes.
Transition on Response: Allows you to transition an entry to a new state based on a response to a question in the entry. Map each possible answer to a workflow question to one of these transitions by using the for each .
For specific instructions on how to do this, see Section 11.2.10, Adding a Question to a Workflow.
Transition on a Variable: You can make decisions based on the value of a variable that you set. For example, you could have a process that sends e-mail notifications when it enters a state. The process re-enters that same state later in the process, but you do not want to send the notifications more than once. Set up that first state so that it sends notifications only if the “sent notifications” variable is not true.
Wait for Parallel Thread(s) to End: Allows you to transition an entry to a new state when one or more specified parallel workflow threads end.
-
-
Specify setup options.
After you select a transition type in Step 3, you must set up the transition. Each transition type requires you to specify different setup options.
For specific information regarding the information that you need to specify for the individual fields, see Setting Up Transition Types.
-
Click .
-
Repeat Step 1 through Step 5 for all other states in the workflow.
In the section, you see a diagram representing all of your workflow states (circles) and transitions (arrows).
For more information on the section, see Section 11.3, Visually Representing a Workflow.
-
After you have set up how entries transition from one workflow state to another in your workflow, you can set up events to occur when the entry enters or exits particular workflow states. For information on how to do this, as well as the kinds of entry and exit events that you can set up, see Section 11.2.6, Adding On-Entry or On-Exit Events.
11.2.5 Setting Up Transition Types
When you choose a specific type of transition, you might need to provide specific information regarding the type of transition that you selected.
Following are the types of transitions that you can choose from, and information describing the fields that you must complete in order to set up each type of transition:
Custom Transition
After you begin creating the Custom Transition as described in Section 11.2.4, Adding Transitions, you see the following options:
Condition Class Name: Specify the Java filename where your Vibe administrator created the custom transition.
Consult with your Vibe administrator to get the name of this file.
To State: Select the state where you want to transition the entry.
Immediate Transition
After you begin creating the Immediate Transition as described in Section 11.2.4, Adding Transitions, you see the following options:
To State: Select the state where you want to immediately transition the entry.
Manual Transition
After you begin creating the Manual Transition as described in Section 11.2.4, Adding Transitions, you see the following options:
To State: Select the state where you want to allow users to transition the entry.
After you create the transition, repeat Step 2 through Step 5 if you want to allow users to select from multiple states.
You can set access controls on the manual transition to allow only certain users to transition the entry. If you do not set any access controls, the default is to allow all users who have Write access to the entry to transition the entry. For more information about how to set access controls on the manual transition, see Section 11.4.3, Setting Access Controls on a Manual Transition.
Transition After Time Elapsed
After you begin creating the Transition After Time Elapsed transition as described in Section 11.2.4, Adding Transitions, you see the following options:
Numbers entered in the following fields must be whole values. Decimal points and fractions are not valid.
Days: Specify how many days to wait before the transition.
Hours: Specify how many hours to wait before the transition.
Minutes: Specify how many minutes to wait before the transition.
To State: Select the state where you want to transition the entry after the elapsed time that you specified.
Transition on Comment or Reply
After you begin creating the Transition on Comment or Reply transition as described in Section 11.2.4, Adding Transitions, you see the following options:
To State: Select the state where you want to transition the entry after a user comments on or replies to the entry.
Transition on Entry Data Values
After you begin creating the Transition on Entry Data Values transition as described in Section 11.2.4, Adding Transitions, you see the following options:
Match Entry Data Values: Select if only one condition must be met for the entry to transition. Select if all conditions must be met before the entry transitions.
To State: Select the state where you want to transition the entry.
Transition on Modify
After you begin creating the Transition on Modify transition as described in Section 11.2.4, Adding Transitions, you see the following options:
To State: Select the state where you want to transition the entry when the entry is modified.
When you are working with a File entry, modifications made to the file also cause the workflow to be transitioned. Modifications to a file include setting the status of the file, incrementing the major version, editing the file note, reverting to a previous version, and deleting the file. For more information about working with File entries, see Working with Files in a Folder Entry
in the Novell Vibe OnPrem 3.1 User Guide
Transition on Response
After you begin creating the Transition on Response transition as described in Section 11.2.4, Adding Transitions, you see the following options:
Workflow Question: Specify the Data Name for the workflow question that you have previously defined.
For information on how to create a workflow question, see Creating a Workflow Question.
Workflow Response: Specify the Data Name for the workflow response that you have previously defined.
For information on how to create a workflow response, see Creating Answers to a Workflow Question.
To State: Select the state where you want to transition the entry after a user responds to the workflow question.
The Transition Occurs When:
-
As Soon As One Person Answers With This Response: Transitions the entry immediately after one person responds to the workflow question with the value that is in the field in the Transition on Response dialog box.
-
As Soon As A Majority Have Answered With This Response: Transitions the entry immediately after a majority of people respond to the workflow question with the value that is in the field in the Transition on Response dialog box.
-
After Everyone Has Responded and All Have Answered With This Response: Transitions the entry after all responders have responded to the workflow question and all people respond with the value that is in the field in the Transition on Response dialog box.
-
After Everyone Has Responded and Somebody Answered With This Response: Transitions the entry after all responders have responded to the workflow question and at least one person responds with the value that is in the field in the Transition on Response dialog box.
-
After Everyone Has Responded and Not All Have Answered With This Response: Transitions the entry after all responders have responded to the workflow question and at least one person responds with a value that is not in the field in the Transition on Response dialog box.
-
After Everyone Has Responded and a Majority Answered With This Response: Transitions the entry after all responders have responded to the workflow question and the majority of people respond with the value that is in the field in the Transition on Response dialog box.
For more information about how to designate specific users to respond to the question, see Designating Specific Users to Respond to a Workflow Question
Transition on a Variable
After you begin creating the Transition on a Variable transition as described in Section 11.2.4, Adding Transitions, you see the following options:
Variable Name: Specify the name of the workflow variable that you want to activate the transition.
You must have already created a workflow variable. You create a workflow variable as an On Entry or On Exit event, as described in Section 11.2.6, Adding On-Entry or On-Exit Events.
Variable Value: Specify the value of the workflow variable that you want to activate the transition.
You must have already created a workflow variable. You create a workflow variable as an On Entry or On Exit event, as described in Section 11.2.6, Adding On-Entry or On-Exit Events.
To State: Select the state where you want to transition the entry.
Wait for Parallel Thread(s) to End
After you begin creating the Wait for Parallel Thread(s) to End transition as described in Section 11.2.4, Adding Transitions, you see the following options:
Parallel Thread Name: Select the parallel thread that you want to wait for.
Transition to State: Select the state where you want to transition the entry after all selected threads have ended.
11.2.6 Adding On-Entry or On-Exit Events
You can take action when a process enters or exits a workflow state. For example, when an entry enters (or exits) a workflow state, you can send a notification, begin or end a parallel process, set a variable, and more.
-
Navigate to and click the workflow state where you want to set up an event to occur when the entry enters or exits the state.
-
Click .
-
Click or , depending on whether you want the event to occur when the entry enters or exits the state.
-
In the On Entry (or On Exit) box, click .
-
Click or , depending on whether you are adding an On Entry or On Exit event. (This is located underneath the workflow state where you just created it.)
-
Click .
-
Click the type of event that you want to add.
Copy Entry: Allows you to copy an entry to a new location in Vibe when it enters or exits a specific state.
Custom Action: Use the custom action if you want to integrate an external process (usually contained within a JAR file) with a Vibe workflow. To do this, consult with your Vibe administrator.
For more information about how Vibe administrators can enable JAR files to be used as custom workflow actions, see
Enabling Custom JAR Files to Be Used on Your Vibe Site
in the Novell Vibe OnPrem 3.1 Administration Guide.Move Entry: Allows you to move an entry to a new location in Vibe when it enters or exits a specific state.
Notifications: Allows you to notify specific users or groups about an entry when it enters or exits the state.
Remote Application: Remote applications communicate with a third-party online application, and send information from that third-party application back into Vibe. You can enable a remote application to start when entries enter or exit a workflow state.
Remote applications need to be set up and configured by your Vibe administrator before you can add them.
Start a Parallel Workflow Thread: Allows you to start a parallel workflow when an entry enters or exits a specific state. Parallel workflows are useful if two or more processes need to occur simultaneously. Only when the parallel thread is finished can the main workflow thread proceed.
Before you can start a parallel workflow thread, you first need to create it. For information on how to create a parallel workflow thread, see Section 11.2.8, Adding a Parallel Workflow Thread.
Start a Workflow Process: Vibe enables you to chain workflows together. When you are creating a workflow (or modifying an existing workflow), you can start an existing workflow process on the workflow you are creating (or modifying). This can speed up the workflow creation process by helping you make use of existing workflows.
Starting an existing workflow process is not the same as starting a parallel workflow thread. Unlike a parallel workflow thread, when you chain workflows together by starting an existing workflow process, there is no way to share variables or states between the two workflows; in other words, there is no physical connection between the two workflows.
Stop a Workflow Thread: Allows you to stop a parallel workflow when an entry enters or exits a specific state.
Workflow Variable: Defines a variable to be used when transitioning a workflow.
This workflow variable is referenced with the Transition On a Variable transition, as described in Section 11.2.4, Adding Transitions.
-
Set up the event you selected in Step 7. Each event type requires you to specify different setup options.
For information on what to specify for the individual fields, see Section 11.2.7, Setting Up On-Entry and On-Exit Events.
-
Click .
-
Repeat this procedure for all other states in the workflow where you want to set up on-entry or on-exit events.
-
Set up access controls on the workflow. For information on how to do this, see Section 11.4, Adding Access Controls to a Workflow.
11.2.7 Setting Up On-Entry and On-Exit Events
After you add an event to a workflow, you need to provide information to set up the event.
Copy Entry
Select the Destination Folder: Select the folder to copy the entry to.
Selected Folder: Displays the destination folder that you selected.
Custom Action
Action Class Name: Specify the name of the custom action that your Vibe administrator has set up.
Work with your Vibe administrator for information on what you should put in this field.
For more information about how Vibe administrators can enable JAR files to be used as custom workflow actions, see Enabling Custom JAR Files to Be Used on Your Vibe Site
in the Novell Vibe OnPrem 3.1 Administration Guide.
Move Entry
Select the Destination Folder: Select the folder to move the entry to.
Selected Folder: Displays the destination folder that you selected.
Notifications
Entry Creator: Select this option if you want to send a notification to the user who created the entry.
Team: Select this option if you want to send a notification to the entire team.
Users: Specify individual users to whom you want to send a notification.
Groups: Specify groups to whom you want to send a notification.
Select an Entry Type: Use the drop-down list to select the type of entry that most closely represents the type of entry that is going through the workflow.
Text to be Put in the Notification Subject Line: Specify the text that you want to appear in the subject line of the notification that is sent.
For example, Peer Review Needed.
Append the Entry Title: (Optional) Select this option if you want the entry title to appear after the text in the subject line.
Text to be Put in the Notification Body: Specify text that you want to appear in the main body of the e-mail notification. You can also select if you want the main body of the entry to display with the e-mail notification message.
Any text formatting that you use in this field needs to be done in the HTML format. Following are some examples of HTML formatting:
-
<i></i> for italics
-
<b></b> for bold
-
<br> for a break (return/enter)
-
<p></p> for a new paragraph
-
<a href=“www.example.com”></a> for links to URLs
Append the Entry Body: (Optional) Select this option if you want the main body of the entry to display with the e-mail notification message.
Remote Applications
Remote Application: From the drop-down list, select the remote application.
Remote applications need to be set up and enabled by your Vibe administrator before you can use them. For more information about remote applications, see Section 12.0, Managing Remote Applications.
Variable Name: Specify the name of the variable to contain the results that are returned by the remote application.
Execute Action in the Context Of: Select who you want the remote application to be in relation to: , , or .
Start a Parallel Workflow Thread
Parallel Thread Name: Select the parallel workflow thread that you want to start.
You must have already created the parallel workflow thread in order for it to be displayed in this list.
For information on how to create a parallel workflow thread, see Section 11.2.8, Adding a Parallel Workflow Thread.
Start a Workflow Process
Workflow Process: From the drop-down list, select the workflow process that you want to start.
Stop a Workflow Thread
Parallel Thread Name: Select the workflow thread that you want to stop.
Workflow Variable
Variable Value: Specify the name of the workflow variable.
Variable Name: Specify the value of the workflow variable. This is the name that is referenced internally.
11.2.8 Adding a Parallel Workflow Thread
Vibe workflows support parallel workflow threads, which enable you to start a second workflow inside of an existing workflow. Parallel workflows are useful if two or more processes need to occur simultaneously. The main workflow is dependent on the parallel workflow thread; only when the parallel thread is finished can the main workflow thread proceed.
To create a parallel workflow thread:
-
Click .
-
Click > .
-
Specify the following information:
Caption: Specify a name for the parallel workflow thread.
This is the name that appears in the Vibe interface, that users see when they use this workflow thread.
Data Name: Specify the internal name for the parallel workflow thread.
The name that you enter in this field is not visible to users who use this workflow thread.
Start State: Select the first state in the parallel workflow thread.
End State: Select the last state in the parallel workflow thread.
-
Click .
For information on how to start and stop a parallel workflow thread after you have created it, see Section 11.2.6, Adding On-Entry or On-Exit Events.
11.2.9 Chaining Workflows
Vibe enables you to chain workflows together by starting a workflow process inside of a workflow that you are creating (or modifying). This can speed up the workflow creation process by helping you make use of existing workflows.
Starting an existing workflow process is not the same as starting a parallel workflow thread. Unlike a parallel workflow thread, when you chain workflows together by starting an existing workflow process, there is no way to share variables or states between the two workflows; in other words, there is no physical connection between the two workflows.
You chain workflows by adding an On Entry or On Exit option to the workflow state where you want to add the existing workflow process. Use the On Entry or On Exit option to add the existing workflow process, as described in Section 11.2.6, Adding On-Entry or On-Exit Events.
11.2.10 Adding a Question to a Workflow
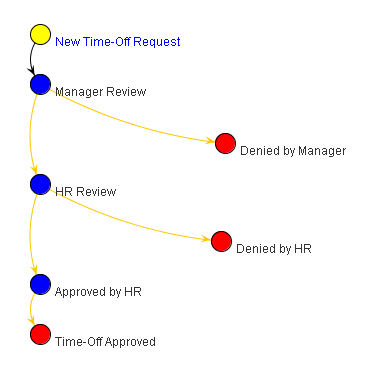
Workflow questions can enhance the ease and usability of workflows. For example, imagine a Time-Off Request workflow where a manager can respond to a request by simply selecting or in the workflow.
In the following example, if the manager selects , the workflow is transferred to the next state of the workflow,. If the manager selects , the request is denied and the workflow is ended.
Figure 11-2 Workflow Question Layout
Creating a Workflow Question
-
Click the workflow state where you want to add the workflow question.
A workflow question can be specific to a single state (each state can have only one associated question), or you can define a global question, which you can then associate with any number of states. Global questions are useful when multiple states require the same question and answer set.
-
Click > .
-
Specify the following information:
Question Text: Specify the question that you want to appear in the workflow.
For example, Approve time-off request?
Data Name: Specify the internal name for the workflow question.
This name must be unique because it is the name that you use to refer to the workflow question in future steps. For example, approve_timeoff_request.
-
Click .
-
Continue with Creating Answers to a Workflow Question.
Creating Answers to a Workflow Question
-
Click .
This is the question that you created in Creating a Workflow Question.
-
Click > .
-
Specify the following information:
Response Text: Specify a single response option.
For example, Yes.
Data Name: Specify the internal name for the workflow response.
For example, yes.
-
Click .
-
Repeat Step 1 through Step 4 to create multiple answers to the same workflow question.
Users using this workflow can choose from the answers that you create.
You can designate specific users as responders to the workflow question, as described in Designating Specific Users to Respond to a Workflow Question.
Designating Specific Users to Respond to a Workflow Question
When you designate specific users as responders to a workflow question, you can configure the workflow to transition only after all responders have answered the workflow question, or only after all responders have answered the workflow question correctly. For more information, see Transition on Response.
-
Click .
This is the question that you created in Creating a Workflow Question.
-
Click > .
The Responders dialog box is displayed.
-
In the provided form, specify which users or groups of users you want to specify as responders to the workflow question:
Folder Default Access: Select this option to specify all users who have access to the folder as responders.
Entry Creator: Select this option to specify the user who created the entry as a responder.
Team: Select this option to specify the team as responders.
Users: Specify individual users as responders.
Groups: Specify groups as resonders.
Select an Entry Type: Select the type of entry that most closely represents the type of entry that is going through the workflow.
Select Elements within the Entry: Enables you to select elements that are contained in the entry. Users associated with that element are granted access.
For example, if you select in the drop-down list, the options that you can select in the are , , .
-
Click .
Creating Transitions
Now that you have created the workflow question and workflow answers, you need to create transitions that correspond to the answers that you created. This kind of transition is called “Transition on Response.”
For information on how to create a Transition on Response, see Section 11.2.4, Adding Transitions.
Setting Access Controls on a Workflow Question
If you want to add access controls to this workflow question, you must use the Transition Out of This State access control setting. For more information, see Section 11.4, Adding Access Controls to a Workflow.
11.2.11 Enabling Your Workflow for Use
Now that you have created your workflow, you need to enable it. For information on how to do this, see Section 11.7, Enabling Workflows.