3.3 Storing and Versioning a Virtual Machine
When you have built or discovered your VMs, and have installed all of the software you need that VM to be running, you can check the VMs into the VM Warehouse. The VM Warehouse stores VM images and the data about the first disk attached to the VM. The VM Warehouse also controls the versioning process.
To store and version a VM, do the following tasks:
3.3.1 Checking In a Virtual Machine
The action of checking the VM into the warehouse begins the versioning process. The first version checked into the warehouse is designated as Gold Master and is Version 1 of the VM. If you use ZENworks Orchestrator Server to deploy the VM from the VM Warehouse, you deploy this version. For information on changing the Gold Master designation, see Section 6.3.7, Changing the Gold Master Designation.
Any subsequent versions you check in to the warehouse are given the next sequential version number. The data on the versions also indicates the parent version of all succeeding versions after the first.
IMPORTANT:Only the first hard disk is stored with the VM image in the warehouse. All other disks and CD-ROM or DVD drives are ignored during check-in, but the configuration is saved to be redeployed with the VM when it is provisioned.
To check VMs into the VM Warehouse:
-
In the ZENworks VM Management Console, do one of the following:
-
Right-click the VM and select .
-
Select the VM, then click > .
-
Select the VM and click the button.
For VMs discovered in the ZENworks Orchestrator Console, see Section 3.3.3, Moving Other Virtual Machines into the Warehouse.
-
-
To deploy your VMs, continue with Section 5.0, Deploying Virtual Machines.
3.3.2 Getting Information about Warehoused Virtual Machines
To get information about VMs in the VM Warehouse, double-click a warehoused VM, or right-click the VM in the warehouse and select .
This provides a list of all the versions of that VM in an edit window on the right. For more information about the edit view window, see Displaying Versions.
3.3.3 Moving Other Virtual Machines into the Warehouse
If you have preexisting Xen VMs in your data center environment, you can check them into the VM Warehouse for version control:
-
In the ZENworks Orchestrator Console, right-click the VM in the Resource Tree.
-
Select .
The following dialog box is displayed:
Figure 3-10 Move VM Disks Dialog Box
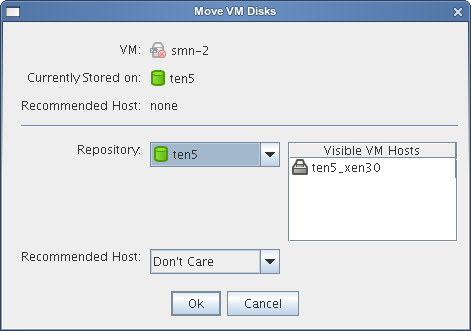
-
In the dialog box, click the drop-down menu.
-
Select .
-
Click .
This launches a move job to move the VM into the VM Warehouse listing and implement version control.
3.3.4 Using Virtual Machines that Are Not in the Warehouse
You can also choose to not move a VM into the VM Warehouse. If you choose to do this, just create and use your VMs as needed and delete the VM when you are finished.
You can use any VM in the system without checking it in to the VM Warehouse, but you do need to check it in if you want version control applied.