Content Management Guide
CHAPTER 15
This chapter describes how to create content using the CMS Administration Console. It has these sections:
What content is Content is defined as information that is viewed or downloaded by users of your exteNd Director application. Content is managed in the CMS Administration Console. (It is important to distinguish content from pages, which are managed in the DAC and present the graphical interface that helps users navigate the Web site.)
 For more information about content, see About the Content Management Subsystem.
The CMS Administration Console supports content in any format that can be digitized, including HTML and binary content imported from other applications.
Before you create content Before you can create content for your exteNd Director application, the following elements of the content infrastructure must be in place:
|
Element |
For information see |
|---|---|
|
Folder for physically storing the content |
|
|
Document type for defining content structure |
Creating document types and Creating fields and adding them to a document type |
Within this infrastructure, you will be able to create content that conforms to the standards your organization has set for structure.
Here is the basic task required to create content in the CMS Administration Console:

First you create content as documents based on a document type; then you can set up relationships between documents by adding child documents and attachments to a parent document. You can also set up relationships between documents by adding child documents and attachments to a parent document.
This section describes procedures for:
After the content has been developed, authorized users can add optional parts of the content infrastructure as needed—such as custom display styles, taxonomies, and categories. These procedures are covered in Setting Up the Optional Infrastructure.
With the CMS Administration Console, content developers create content in the form of documents that reside in folders. Each document is stored in one (and only one) folder.
When you create documents, you must specify three types of information:
Identifying information—or metadata:
Information required by the fields that are part of the document type
Dynamic content that can be entered either as HTML directly in the CMS Administration Console, or uploaded from external files
Each time you edit the content of a document, the CMS Administration Console creates a new version of the document content. The CMS Administration Console does not create a new version of the document content if you change only the metadata or custom field values but not the content.
If you want to create a document for the purpose of testing your style sheets, you can use the CMS Administration Console's Auto Create utility, which automatically fills in boilerplate content for you.
This section describes how to:

Enter templates mode by clicking the Templates button in the toolbar.
A panel appears listing all document types that have been defined.
Select a document type from the list and click Use.
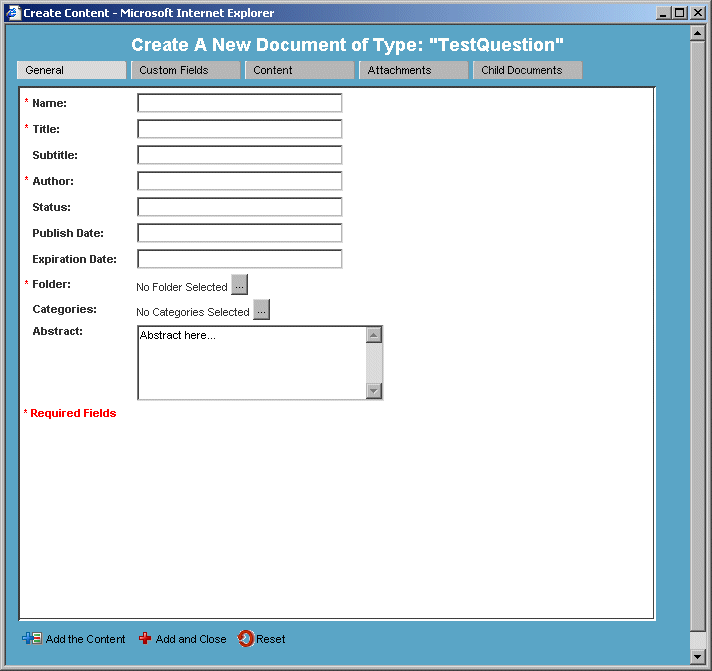
The Create A New Document window opens with the General tab open.
This tab contains the basic document metadata, such as name, title, author, folder that contains the document, any categories that contain the document, and so on:
Enter data into any required fields in the General tab.
TIP: Any fields marked with an asterisk are required fields and must be filled in before you can create the document.
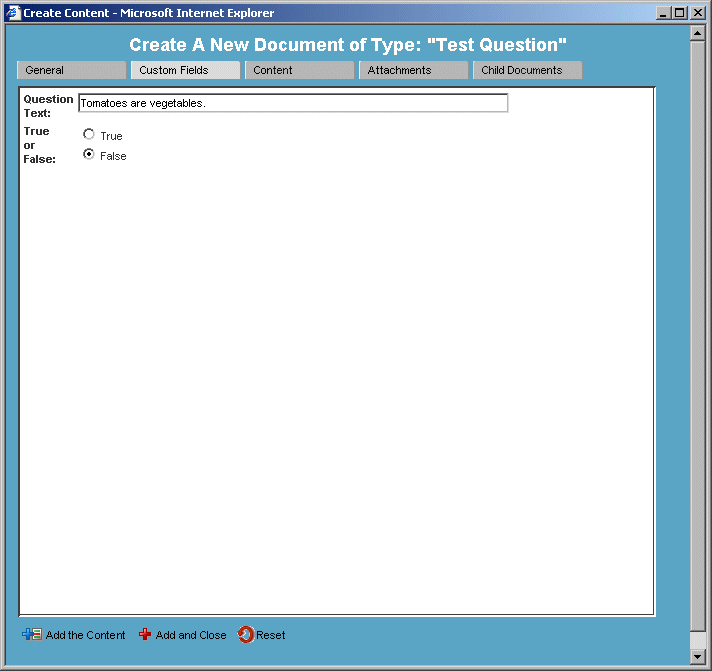
Click Custom Fields and enter data for any fields defined for the document type.
Some example custom fields are shown below:
TIP: Custom fields are in some sense required fields in that you must fill in any empty fields before you can create the document. In the example above, you must fill in the Question Text field and select one of the buttons before the CMS Administration Console can create the document.
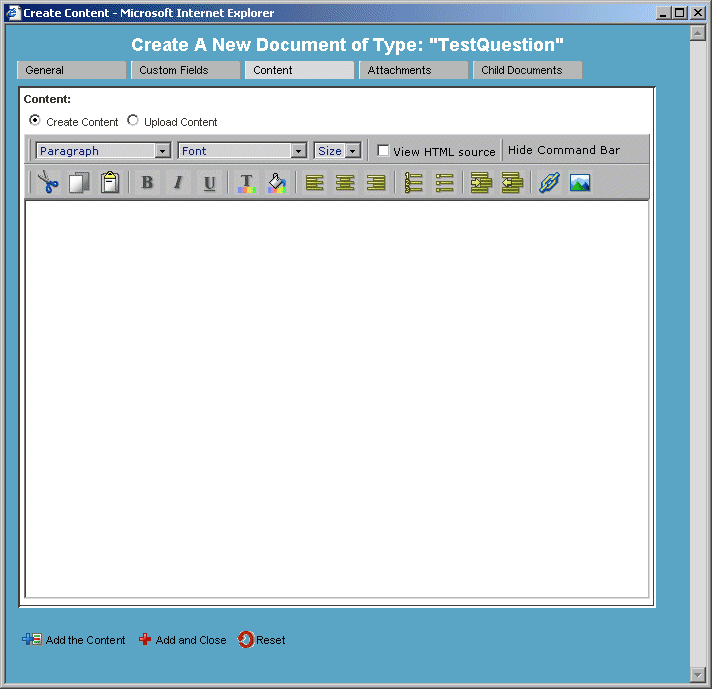
Click the Content tab and specify the dynamic content for the document:
The options for entering content depend on the Default Content setting of the document type (as specified under Creating document types):
If Default Content = Binary, content developers upload content from an external file on the network.
If Default Content = HTML, content developers use the CMS Administration Console's HTML Editor to enter content by typing directly in the edit area or by pasting in HTML source from an external editor.
If Default Content = Choice, content developers can choose the way they enter content, as follows:
|
To |
Do this |
|---|---|
|
Create content in the HTML Editor |
|
|
Upload content from an external source |
TIP: Users with appropriate privileges can modify the Default Content setting in the document type to restrict the type of content users can enter.
To learn how to work with the CMS Administration Console's HTML Editor, see Using the CMS Administration Console's HTML Editor.
Click Add the Content at the bottom of the Create A New Document window.
The document is created in the folder you specified in the General tab.
To view the content you just created, see Previewing content.
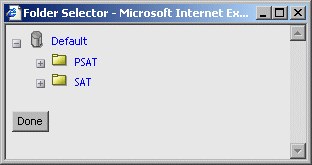
 To specify a folder for a new document:
Enter templates mode by clicking the Templates button in the toolbar.
A panel appears listing all document types that have been defined.
Click the ellipsis next to the Folder field.
Navigate to the folder you want, click the folder name, and click Done.
The name of the selected folder appears in the Folder field of the Create Content window.
To use Auto Create to create a document:
Enter templates mode by clicking the Templates button in the toolbar.
A panel appears listing all document types that have been defined.
Select a document type from the list and click Auto Create.
The Create Content window opens, with most required metadata and fields filled in.
Fill in any other content as desired and click Add the Content.
Content developers can enter content as HTML using the CMS Administration Console's HTML Editor.
The only prerequisite is that you must set the Default Content option to HTML or Choice when creating the document type.
For more information about specifying document type options, see Creating document types.
When you create or edit content using a document type with one of these Default Content settings (Binary, HTML, or Choice), the HTML Editor appears in the Content tab of the Create A New Document or Edit Document window:
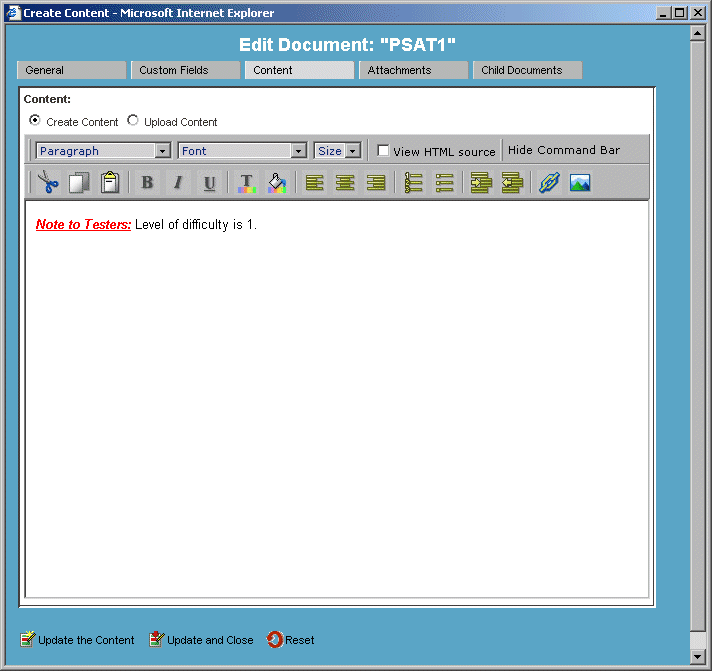
With the CMS Administration Console's HTML Editor you can:
You can use the HTML Editor to edit the portion of the HTML code that would appear in the <BODY> section—not the entire HTML document. For example, you cannot use the HTML Editor to modify HTML code that would appear in the <HEAD> section of the document.
This section describes how to access and use the CMS Administration Console's HTML Editor.
To access the CMS Administration Console's HTML Editor when creating a new document:
Enter templates mode by clicking the Templates button in the toolbar.
A panel appears listing all document types that have been defined.
Select a document type whose Default Content field equals HTML or Choice.
To access the CMS Administration Console's HTML Editor when editing an existing document:
Enter content mode by clicking the Content button in the toolbar.
Your existing folders appear in the content tree view. You may need to expand some of these containers to see the complete view.
Navigate to the document of interest and select it to open its Property Inspector.
In the Property Inspector, select the General tab and click Check-Out.
The CMS Administration Console checks out the latest version of the document.
For more information about checking documents in and out, see Checking documents in and out.
To cut, copy, paste, and format text:
Exposes HTML tags in existing text (entered while this setting was disabled)
Allows the HTML Editor to interpret HTML tags as code when typed in directly or pasted in from an outside source
NOTE: If you enter HTML tags when this option is disabled, the tags are not interpreted as code and instead are converted to text.
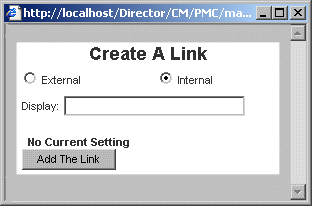
Position the cursor in the HTML Editor where you want to insert the link.
Click the Create Hyperlink button:
Choose the type of link you want to create:
|
Type of link |
Description |
|---|---|
|
Internal |
Link to content that you created in or uploaded to the CMS Administration Console |
|
External |
Link to external content |
Select the Internal radio button.
Search for internal content by name, title, or author by selecting the appropriate radio button, entering the appropriate identifying information, and clicking the Search button.
Select the resource from the search results and click the Close Window button at the bottom of the window.
A text string linking to the resource appears in the Create A Link window. You can click on the text string to view the resource.
Back in the Create A Link window, enter the display text for the link in the Display field and click Add The Link.
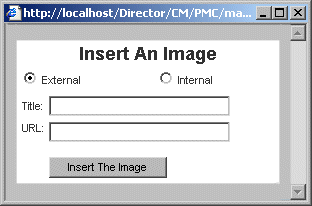
Position the cursor in the HTML Editor area where you want to insert the image.
Click the Insert Image button:
Choose the type of image you want to insert:
|
Type of image |
Description |
|---|---|
|
Internal |
Image that you created in or uploaded to the CMS Administration Console |
|
External |
Image created outside the CMS Administration Console |
Select the Internal radio button.
Search for an internal image by name, title, or author by selecting the appropriate radio button, entering the appropriate identifying information, and clicking the Search button.
Select the image from the search results and click the Close Window button at the bottom of the window.
A text string identifying the image target appears in the Insert An Image window.
Back in the Insert An Image window, enter a title for the image in the Title field.
The title is the hover text that will appear as the cursor moves over the image.
The CMS Administration Console allows you to create two types of relationships between documents:
The definition of document includes not only documents created in the CMS Administration Console, but also documents that are uploaded to the CMS Administration Console, such as images and binary files.
This section describes how to add child documents and attachments to a parent document, and how to remove these relationships.
Users with READ and WRITE permissions can add children to a document. You can add internal child documents or upload external documents.
Enter content mode by clicking the Content button in the toolbar.
Your folders appear in the content tree view. You may need to expand some of these containers to see the complete view.
Click to select the folder that contains the content of interest.
Select the document of interest.
A Child Docs tab appears in the document's Property Inspector.
Click Check-Out to check out your document and then select the Child Docs tab.
Select a document, using one of these methods:
|
To |
Do this |
|---|---|
|
Add an internal document |
|
|
Upload an external document |
The document you select appears as a child of your document in the Property Inspector.
Check your document back in by selecting the General tab, then clicking Check-In.
For more information about checking documents in and out, see Checking documents in and out.
Users with READ and WRITE permissions can add attachments to a document. You can attach internal documents or upload external documents.
Enter content mode by clicking the Content button in the toolbar.
Your folders appear in the content tree view. You may need to expand some of these containers to see the complete view.
Click to select the folder that contains the content of interest.
Select the document of interest.
An Attachments tab appears in the document's Property Inspector.
Click Check-Out to check out your document and then select the Attachments tab.
To attach an internal document (one that has been created in or uploaded to the CMS Administration Console):
Search for a document by name, title, or author by selecting the appropriate radio button, entering identifying information, and clicking the Search button.
(Optional) In the Description text area, enter text about the relationship between the parent document and its attachment.
This text appears in the XML generated by the CMS Administration Console Content Reader.
The document you selected appears as an attachment to your document in the Property Inspector.
To attach an external document:
(Optional) In the Description text area, enter text about the relationship between the parent document and its attachment.
This text appears in the XML generated by the CMS Administration Console Content Reader.
The document you select appears as an attachment to your document in the Property Inspector.
Check your document back in by selecting the General tab, then clicking Check-In.
For more information about checking documents in and out, see Checking documents in and out.
To remove relationships between documents:
To remove the relationship between a parent document and its child or attachment, you need READ, WRITE, and LIST permissions.
Enter content mode by clicking the Content button in the toolbar.
Your folders appear in the content tree view. You may need to expand some of these containers to see the complete view.
Click to select the folder that contains the content of interest.
Select the parent document of interest to open its Property Inspector.
Check out the parent document by clicking Check-Out in its Property Inspector.
Check out the attachment or child document of interest by selecting it in the content list and clicking Check-Out in its Property Inspector.
Select the parent document again and then choose the Attachments or Child Docs tab in its Property Inspector.
Select the attachment or child document of interest in the parent's Property Inspector.
The Property Inspector refreshes to provide a Remove Relationship button.
Click the Remove Relationship button.
The attachment or child document disappears from the parent's Property Inspector, but remains in its CMS Administration Console folder.
Check the parent and child (or attachment) back in by selecting the General tab, then clicking Check-In.
NOTE: The parent and child (or attachment) must both be checked out to sever the relationship. Otherwise, the Remove Relationship button will not appear. Even after you sever the relationship, the attached file or child document remains in the CMS Administration Console.
For more information about checking documents in and out, see Checking documents in and out.
Copyright © 2003 Novell, Inc. All rights reserved. Copyright © 1997, 1998, 1999, 2000, 2001, 2002, 2003 SilverStream Software, LLC. All rights reserved. more ...