Director Tutorials
To enable form-based authentication using replacement strings in Shortcut portlets.
A Shortcut portlet generates a list of shortcut links to Web resources and local applications.
Replacement strings are keywords that reference values that can change dynamically at runtime, such as a user's login name and password.
Before you begin See About exteNd Director Tutorials.
Audience This section is for all users, whether or not they have administrative privileges.

exteNd Director supports several mechanisms for authenticating users of Web applications:
Basic authentication: The Web server authenticates a user against the user name and password obtained from the Web client.
Form-based authentication: The Web server provides an application-specific form for logging in and specifying credentials.
There are several reasons for using form-based authentication instead of basic authentication with exteNd Director:
To customize the authentication user interface—for example, the login and error pages presented to users of your Web application through an HTTP browser
To work around the limitations imposed on basic authentication by the Microsoft Security Patch MS Bulletin MS04-004 Cumulative Security Update, as described in Impact of the Internet Explorer security patch.
The Microsoft Security Patch MS Bulletin MS04-004 Cumulative Security Update impedes basic authentication in several Accessory portlets that ship with exteNd Director: Shortcut, IFrame, NetMail, Notes, and Exchange. If you install this patch, you should configure these portlets to use form-based authentication (instead of basic authentication) for target Web sites and destination servers that support form-based authentication.
NOTE: The exteNd Application Server supports form-based authentication.
To address a potential security breach, the Microsoft patch removes support from Internet Explorer and Windows Explorer for the clear-text authentication syntax http(s)://username:password@server/resource.ext. exteNd Director uses this syntax to support basic authentication in its Accessory portlets by generating URLs that pass clear-text authentication credentials to the target Web site. If the patch has been installed, these URLs generate an invalid syntax error from the browser.
The exercises in this section show you how to configure a Shortcut portlet to use form-based authentication when you log in to Novell Forge, a collaborative Web site for developing open-source projects.
It also provides guidelines for implementing form-based authentication with other Accessory portlets.
Configuring the Shortcut portlet to use form-based authentication
Using replacement strings to secure credentials in form-based authentication
Implementing form-based authentication with other Accessory portlets
In this exercise, you will create an account on Novell Forge, a Web site that supports form-based authentication. Novell Forge provides the ability to create, manage, and contribute to open-source software development projects.
After completing the tutorial exercises, you can use your Novell Forge account to explore ways in which you may use site and the tools it offers.
 To create an account on Novell Forge:
Open a browser and enter this URL:
http://forge.novell.com
The Novell Forge home page opens in your browser. The page should look something like this:
Click Register with Novell Forge.
Fill out the profile according to the instructions on the page, then click next at the bottom of the page.
TIP: Remember the user name and password that you enter. You will need these credentials for a later exercise.
Fill out the account synchronization form as appropriate and click finish at the bottom of the page.
A confirmation window should appear, indicating that you have registered successfully with Novell Forge.
Now you are ready to add a Shortcut portlet to a personal page. Leave your browser running and move to the next exercise.
In this exercise you will create a personal page and add a Shortcut portlet to the page.
Start the exteNd Application Server where the Express Portal application has been deployed.
Start the Express Portal application by entering this URL in your browser:
Log in as an authorized user, then click login or the Enter key.
TIP: If you need to create a user, see the exercise on adding a new user.
The default page for the user you specified opens in your browser.
On the default page, select Personalize.
NOTE: This is the default page for a user who is not an administrator. Your default page will look different if you logged in as an administrator, but the Personalize option is still available in a similar location on the page.
Enter the following properties for the new page:
|
Property |
What to specify |
|---|---|
|
Page Name |
My Authentication Page |
|
Description |
Tutorial |
Now you are ready to add a Shortcut portlet to the new personal page. You will configure the portlet to use form-based authentication when logging in to the Novell Forge site. Leave the Personalizer running and move to the next exercise.
In this exercise, you will use the Content Selector to add a Shortcut portlet to My Authentication Page, the personal page you just created.
To add a Shortcut portlet to your personal page using the Content Selector:
Select My Authentication Page in the Personal Pages list and click Choose Content.
From the Available Content list select Shortcut and add it to the page by clicking Add.
Now you are ready to configure the Shortcut portlet to provide form-based authentication when you log in to the Novell Forge Web site. Leave the Content Selector open and move to the next exercise.
In this section, you will perform the following exercises:
Configure the Shortcut portlet to use form-based authentication for the Novell Forge Web site, as described in Configuring the Shortcut portlet for form-based authentication.
Test the runtime behavior when you log in to the Novell Forge site, as described in Testing form-based authentication for Novell Forge.
The Shortcut portlet provides a wizard that automatically generates site-specific POST parameters. You will learn how to use this wizard in the following exercise.
To configure the Shortcut portlet to use form-based authentication:
Select the Shortcut portlet in the Selected Content list and click Content Preferences.
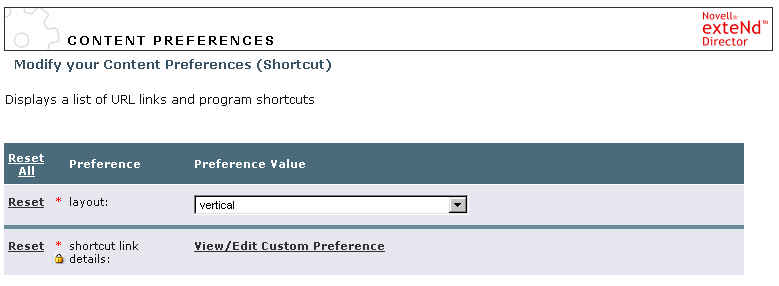
The Content Preferences sheet for the Shortcut portlet opens.
TIP: To get more information about preferences, click Descriptions at the bottom of the preference sheet:
In the Preference Value column for the shortcut link preference, click the View/Edit Custom Preference link.
A second preference sheet opens in your browser containing a set of predefined shortcuts, each with its own set of preferences. You can also add new shortcuts.
Maximize the preference sheet.
Note that a shortcut is already defined for the Novell Forge Web site:
Delete all predefined shortcuts except Novell Forge by clicking their delete buttons:
Display the preferences for the Novell Forge shortcut by clicking the plus sign to the left of Details:
If a popup opens, asking you to select a user name for the form, click Cancel. You will use the Wizard instead.
Click Use Wizard for the URL preference:
A view of the home page for the Novell Forge Web site opens in the wizard.
In the login area, fill in the Username and Password fields with the Novell Forge credentials you created in Creating an account on Novell Forge. Then, click User Login.
If an alert box appears, asking if you want Password Manager to remember your login credentials, respond as appropriate.
If a popup opens, asking you to select a user name for the form, click Cancel.
The Shortcut preferences sheet opens in the wizard, automatically configured for form-based authentication. Note that Post is set to true and that several URL/Post parameters are defined for the Novell Forge site, including the username and password you entered in Step 7, as in this example:
NOTE: Notice that your password appears in the clear in the password field. To avoid exposing your password on the preference sheet, you can use replacement strings, as illustrated in a later exercise, Using replacement strings to secure credentials in form-based authentication.
Back in the Shortcut preference sheet, click Return to List View.
The Content Preferences sheet closes, returning you to the Content Selector.
Click Save Contents to record your changes and dismiss the Content Selector.
By default, sensitive URL/Post parameters (such as passwords) that you enter in the Shortcut Portlet wizard are stored as encrypted values in the exteNd Director database.
Now you are ready to test form-based authentication in your Shortcut portlet. Move to the next exercise.
In this exercise, you will log in to the Novell Forge Web site using form-based authentication. You will then open a new browser session to demonstrate that parameters used in the POST to the Novell Forge site are persisted as portlet preferences in the portal application database, rather than in the current browser session.
To test form-based authentication for Novell Forge:
Start a new browser and log in to the Express Portal application.
TIP: If you need to review these steps, see Adding a Shortcut portlet to a personal page.
When your default portal page opens in the browser, click My Authentication Page under Personal Pages in the navigation area.
My Authentication Page appears in the content area of your browser, displaying your Shortcut portlet.
Click the Novell Forge shortcut link.
A Security Alert appears, indicating you are about to be redirected to a nonsecure connection.
Confirm that you want to proceed.
You are automatically logged in to the Novell Forge application. When you clicked the Novell Forge shortcut link, the Shortcut portlet used form-based authentication to post the credentials from a persistent data store, the exteNd Director database.
Now you are ready to use replacement strings to secure your credentials in form-based authentication. Close the Novell Forge application, but leave My Authentication Page running in the portal in your browser.
When you entered credentials for form-based authentication in a previous exercise, the username and password were exposed, or in the clear. In these exercises, you will secure the identity of your password by using replacement strings, then test the runtime behavior when you log in to the Novell Forge site.
Recall that replacement strings are keywords that reference values that can change dynamically at runtime, such as a user's login name and password.
Using replacement strings to secure credentials in form-based authentication:
Select My Authentication Page in the Personal Pages list, then click Choose Content.
Choose Novell Forge in the Selected Content list, then click Content Preferences.
The preference sheet for your Novell Forge portlet opens in your browser.
NOTE: The preference sheet displays a lock symbol next to details, as in this example:
This symbol indicates that preferences are stored as encrypted values.
Click View/Edit Custom Preference to open the preference sheet for the Novell Forge shortcut link.
Click Details to display the preferences, then maximize the browser window.
Copy your login credentials from the URL/Post Parameter fields to the User and Password fields further down on the preference sheet:
NOTE: Filling in the User and Password fields stores the credentials permanently in the preference so they persist across sessions. The value you copy to the Password field is not exposed on the preference sheet.
In the URL/Post Parameter list, substitute the following replacement strings for the values of username and password:
|
URL/Post Parameter key |
Replacement string |
|---|---|
|
username |
$PORTLET_AUTH_ID$ |
|
password |
$PORTLET_AUTH_PWD$ |
At runtime, the values you entered in Step 6 will be substituted for the associated replacement strings and passed as your credentials to be validated by the server. In addition, the password is stored as an encrypted value in the database.
Set Authentication Required to true.
If an alert box appears, asking if you want Password Manager to remember your login credentials, respond as appropriate.
Back in the Shortcut preference sheet, click Return to List View.
The Content Preferences sheet closes, returning you to the Content Selector.
Close all other browser windows.
Now you are ready to test form-based authentication using replacement strings. Move to the next exercise.
To test form-based authentication using replacement strings:
Start a new browser and log in to the Express Portal application.
TIP: If you need to review these steps, see Adding a Shortcut portlet to a personal page.
When your default portal page opens in the browser, click My Authentication Page under Personal Pages in the navigation area.
My Authentication Page appears in the content area of your browser, displaying your Novell Forge portlet. This time, the Novell Forge shortcut link appears with a button next to it:
This symbol indicates that stored credentials exist for this shortcut link. If you click this image, you can modify the stored credentials associated with this shortcut link—in this case, the credentials for the Novell Forge site.
Click the Novell Forge shortcut link.
A Security Alert appears, indicating you are about to be redirected to a nonsecure connection.
You are automatically logged in to the Novell Forge application, again demonstrating that single sign-on was achieved using credentials that persist across sessions.
In the previous exercises, you learned how to configure the Shortcut portlet to use form-based authentication. You can also implement form-based authentication with other Accessory portlets that ship with exteNd Director:
|
Accessory portlet |
Description |
To implement form-based authentication |
|---|---|---|
|
IFrame |
Displays a given URL in an IFrame |
See Configuring IFrame, NetMail, and Exchange portlets for form-based authentication. |
|
NetMail |
Provides Novell NetMail calendar and messaging functions |
See Configuring IFrame, NetMail, and Exchange portlets for form-based authentication. |
|
Exchange |
Provides access to Microsoft Exchange calendar and messaging functions |
See Configuring IFrame, NetMail, and Exchange portlets for form-based authentication. |
|
Notes |
Provides access to Lotus Notes/Domino HTTP email |
See Configuring Notes portlets for form-based authentication. |
Unlike Shortcut, the IFrame, NetMail, and Exchange portlets do not have wizards for setting site-specific URL/Post parameters automatically. As an alternative, you can use the Shortcut portlet wizard to define the key/value pairs for the target site, then copy these pairs manually to the URL/Post parameter fields in the IFrame, NetMail, or Exchange portlet.
For the Notes portlet, the URL/Post parameters are hard-coded specifically for the Lotus Notes/Domino server.
The Notes portlet posts to an URL of this form:
protocol + "://" + IP address + ":" + port + "/names.nsf?Login"
Here is an example:
http://weddev2:80?names.nsf?Login
The Notes portlet also provides the following parameters on the POST:
|
Parameter key |
Description |
|---|---|
|
Username |
Lotus Notes user ID |
|
Password |
Lotus Notes password |
|
RedirectTo |
Lotus Notes URL to redirect to after a successful login |
If you need more flexibility in specifying an URL and POST parameters, use the IFrame portlet instead of the Notes portlet for form-based authentication.
Browse the Novell Forge site for information about collaborative, open-source development projects.
Configure the IFrame, NetMail, and Notes portlets to use form-based authentication.
Copyright © 2004-2005 Novell, Inc. All rights reserved. Copyright © 1997, 1998, 1999, 2000, 2001, 2002, 2003 SilverStream Software, LLC. All rights reserved. more ...