Application Techniques
Writing EJB Applications Using Accessors
How to write EJB applications that use SilverStream accessor object technology.
About this technique
|
Details
|
|---|
Category
|
Enterprise JavaBean Techniques
|
Description
|
You'll learn about:
|

|
You can run this technique code from:
NOTE First make sure that database is running on your localhost SilverStream Server
|
 Related reading
|
See the Developing EJBs section in the Programmer's Guide
|
SilverStream's accessor object technology allows you to write applications that pass entity bean data efficiently between EJB clients and the entity beans that contain the data. They provide the following benefits to EJB applications using entity beans:
You might choose not to use accessor beans because they are not portable to non-SilverStream EJB servers.
How accessor components work 
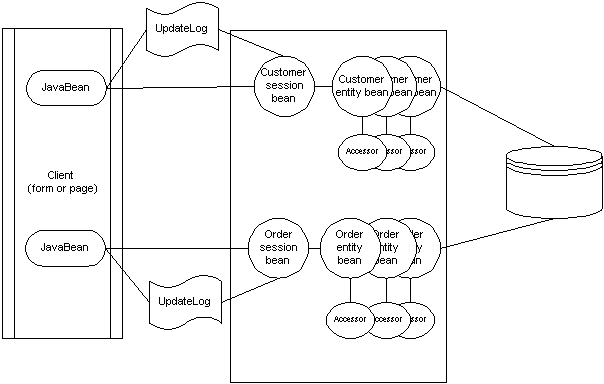
An accessor application includes both server-side and client-side components.
Server-side components
An application using accessor technology includes the following server-side components:
Object
|
Description
|
|---|
Entity beans
|
These entity beans are user-written. They provide the data needed for your application. The number of entity beans varies per application.
They contain methods that create accessor objects.
|
Session beans
|
These session beans are user-written. They provide transaction demarcation for the entity beans and serialize the accessor objects between clients and the SilverStream Server.
You can use one session bean to manage multiple entity beans, or you can write one session bean per entity bean. To provide simplified examples, the Accessor3 database uses one session bean per entity bean.
|
Accessor objects
|
These accessor objects are user-written. They extend from the com.sssw.accessor.common.AccessorBase class.
The accessor class's function is twofold:
-
It provides the entity bean data to the SilverStream client.
-
It provides a description of the data to the SilverStream Designer so that you can bind directly to the appropriate fields.
There is one accessor per entity bean.
|
An UpdateLog (SilverStream-supplied)
|
The UpdateLog is supplied by SilverStream and resides in the com.sssw.accessor.common package.
It serializes the client's changes to the entity bean data between the client and the session bean.
You make the UpdateLog available by adding AccessorCommon.JAR to the form, page, or business object.
|
Client-side components
Client-side components include:
Object
|
Description
|
|---|
One or more JavaBeans
|
SilverStream supplies these generalized controls in the com.sssw.accessor.client package of the Accessor3 database. The one for forms is called AccessorRCFormBean; the one for pages is called AccessorRCPageBean.
They provide client-side data binding, data navigation, and data caching. You must:
-
Add one JavaBean per accessor.
-
Package these objects in a JAR file, which you then make available to the calling page or form.
|
SilverStream form or page clients
|
These objects are user-written. You write the UI as you normally would with the following additions:
-
The form or page needs to refer to the JAR file containing the JavaBean.
-
You need to bind the data-aware controls to the JavaBean.
|
Here is a typical configuration for accessor components:
How accessors work
Here is how data flows among the components:
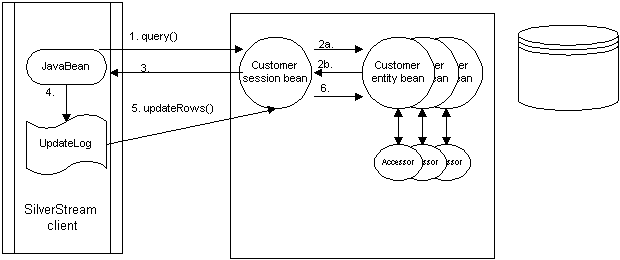
-
A client requests a record (for example, a Customer record).
-
The session bean receives a request for a record.
-
The session bean calls the appropriate finder method, which returns either a single entity bean or a Collection of entity beans.
-
For each entity bean that is returned, the session bean calls the entity bean's createAccessor() method to construct an accessor object for each corresponding entity bean, and the session bean populates the accessor from the entity bean.
-
The session bean serializes the Collection of accessors to the JavaBean on the page or form. (This is the client-side data cache.)
-
The client manipulates the data using AgiRowCursor methods.
-
For deleted rows, a reference to the accessor is put in the UpdateLog with a deleted flag (AccessorRCFormBean.row_deleted or AccessorRCPageBean.row_deleted).
-
For inserted rows, a new accessor is constructed (on the client) and a reference to it is added to the UpdateLog with an inserted flag (AccessorRCFormBean.row_inserted or AccessorRCPageBean.row_inserted).
-
For modified rows, a new accessor is constructed and a reference to it is added to the UpdateLog with a modified flag (AccessorRCFormBean.row_modified or AccessorRCPageBean.row_modified). The original accessor is also added to the UpdateLog also with the modified flag.
-
The client calls updateRows() to pass the data back to the server.
-
For deleted, inserted, and modified rows, the accessor is sent to the server in its entirety. (This allows for concurrency checking.)
-
The session bean receives the changes. It loops through the UpdateLog and processes the changes accordingly:
Type row
|
What the session bean does
|
|---|
Deleted
|
Finds the appropriate entity bean (by its primary key).
Removes the bean by calling its remove() method.
|
Inserted
|
Gets the field values from the accessor.
Calls the bean's create() method to insert a corresponding row in the database.
|
Modified
|
Finds the appropriate bean from its primary key.
Compares the entity bean field values (the original values) with the new accessor values. If they are different, it sets the entity bean values to the new (accessor) values.
|
-
Returns the UpdateLog to the client. This updates the client's view of the data.
NOTE The changes are committed to the database as defined within the session bean transaction management code.
How to write accessor applications
To write an application that uses accessor objects, you must:
-
Write the entity bean (you can also use a preexisting entity bean)
-
Write the session bean
-
Write the accessor class
-
Write the accessor client
Using Accessor3 classes in your own application database
SilverStream supplies all of the base classes and interfaces that you need to use in the Accessor3 database. When you write your own accessors, you will most likely want to do so in your own application database. Follow these steps to make the accessor classes available to another database:
-
From the Accessor3 database, save the AccessorClient.JAR and the AccessorCommon.JAR files to disk.
-
Upload the AccessorCommon.JAR and the AccessorClient.JAR to your application databaes using either the SilverCmd ImportMedia or the Designer's Upload JAR, ZIP, or Media menu option.
-
Write your accessor application.
-
Create a JAR and add your accessor classes plus the AccessorCommon.JAR and the AccessorClient.JAR to it.
-
Create an EJB JAR for your own entity and session beans. The EJB JAR must contain a Class-path entry listing the JAR containing your accessor classes and the AccessorCommon.JAR and AccessorClient.JAR.
For more information on creating a Class-path entry, see the manifest section of the JAR Designer chapter in the online Tools Guide.
-
Make sure that any clients that call your EJB also include a reference to the JAR containing your accessor classes.
Writing the entity bean
The entity bean represents the database values passed (by the session bean to the accessor class for delivery) to the client. You write your entity bean as normal with only the differences described here.
The entity bean home interface and the entity bean primary key class do not contain anything specifically for accessor beans.
The entity bean remote interface should:
The entity bean class should:
-
Import com.examples.accessors.CompanyAccessor.
-
Include a createAccessor() method. This method is called by the session bean. It should set the accessor's fields to the entity bean's fields and return the accessor class to the session bean.
This code snippet shows an example of the createAccessor() method that populates the companyid and companyname data elements:
  try {
       CompanyAccessor companyAccessor = new CompanyAccessor();
       companyAccessor.m_companyid = m_companyid;
         if (m_companyname != null)
           companyAccessor.m_companyname = m_companyname;
  return companyAccessor;
  }
  catch ...
Writing the session bean
The session bean manages the entity bean's transactions and is called by the client programs. It acts as the intermediary between any client/entity bean access. The session bean is written like any other session bean with the differences described here.
You can write a single session bean to manage access to multiple entity beans or one session bean per entity bean.
The session bean home interface has no special requirements.
The session bean remote interface should:
-
Import com.sssw.accessor.common.*
-
Extend javax.ejb.EJBObject (as usual) plus com.sssw.accessor.common.AccessorSessionBean
-
Include the method signature for the query() method:
public Collection query(String psCriteria) throws RemoteException, AgoUnrecoverableSystemException;
-
Include the method signature for the updateRows() method:
public UpdateLog updateRows(UpdateLog pUpdateLog) throws RemoteException, AgoUnrecoverableSystemException;
The session bean class should:
-
Manage the access to the entity bean
-
Include code that starts, commits, and rolls back the entity bean's transactions as necessary
-
Import com.sssw.accessor.common.*
-
Include a query() method. The query() method should return a Collection of accessors retrieved from the entity bean. This is all performed within the scope of a transaction.
-
Include an updateRows() method that:
-
Starts a transaction. For example:
  UserTransaction utx = null;
  try
    {
  // Start a transaction
     utx = m_context.getUserTransaction();
     utx.begin();
  .
  .
  .
-
Gets the changes from the change log by calling the log's getChanges() method.
ArrayList logChanges = pUpdateLog.getChanges();
-
Loops through the changes in the change log and performs the appropriate function depending on the record's disposition, which can be accessorRow.m_modified, accessorRow.m_new, or accessorRow.m_deleted:
  // Loop through all the changes and do the right thing
  for (int i=0; i<size; i++)
  {
  //add if then skeleton...
  ...process the row
-
For new records, creates a new entity bean instance and writes it to the database.
-
For updates and deletes, uses the primary key to find the bean. If it finds the bean and it is a delete, it deletes the bean. If it finds the bean and it is an update, it compares the fields and does the update.
-
When everything is done, commits the transaction and returns the update log to the page or form, then returns the UpdateLog to the client.
Writing the accessor class
You use the Business Object Designer to create the accessor class.
The accessor class must:
The class should also contain:
-
A variable for each column in the entity bean that the accessor will provide to the client. For example, to supply a companyid and a companyname column, you would add variables like these:
  public String m_companyid;
  public String m_companyname;
-
A constructor. For example:
  public CompanyAccessor()
  {
     super(g_descriptor);
  }
-
A getter method for each property (or data column). For example:
  public String getCompanyID()
  {
     return m_companyid;
  }
-
A setter method for each property (or data column). For example:
  public void setCompanyID(String psValue)
  {
     this.m_companyid = psValue;
  }
-
A method that returns a list of the column names. For example:
  public String[] getPropertyNames()
  {
     return new String[]{"companyid", "companyname"};
  }
-
A static variable that defines each property, its get/set methods, and the parameter type for the set method. For example:
  private static final String g_descriptor[] =
  {
  "companyid","getCompanyID","setCompanyID","java.lang.String",
  "companyname","getCompanyName","setCompanyName",
  "java.lang.String"
  };
Writing the accessor client
Before you can access your server-side components from SilverStream clients, you must:
-
Package your EJBs in an EJB JAR file on the SilverStream server. (This EJB JAR must include a Class-path entry in the manifest file that references the JAR containing your accessor classes and the AccessorCommon.JAR and the AccessorClient.JAR described
Using Accessor3 classes in your own application database.)
For more information on creating EJB JARs, see the chapter on the JAR Designer in the online Tools Guide.
-
Package the accessor class in a standard JAR.
The JAR containing the accessor class must include the AccessorCommon.JAR and the AccessorClient.JAR.
For more information on creating standard JAR files, see the chapter on the JAR Designer in the online Tools Guide.
NOTE You must add the AccessorCommon.JAR file to the AgClassPath (for development only).
-
Create a form or page. The form or page must:
Writing a form or page that uses accessors
 To bind form or page controls to accessors:
-
Access a new or existing SilverStream form or page.
It can be bound or unbound.
-
Add the following JARs to your form or page:
-
The JAR containing your accessor class.
-
The JAR containing the AccessorClient.JAR and the AccessorCommon.JAR.
-
The EJB Remote JAR containing the session and entity beans
-
From the Gallery, open Media.
-
Expand JavaBeans.
-
For forms, drag the AccessorRCFormBean onto the form.
-
For pages, drag the AccessorRCPageBean onto the page.
-
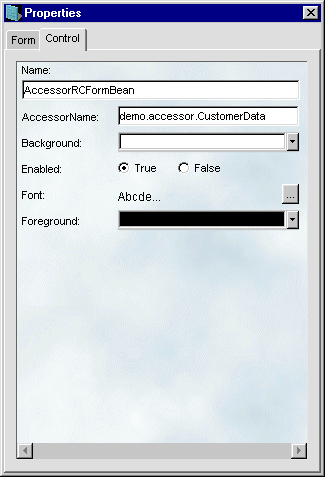
Choose the bean (either AccessorRCFormBean or AccessorRCPageBean) and open its Property Inspector.
-
Set the Accessor Name property to the fully qualified name of the server-side accessor object.
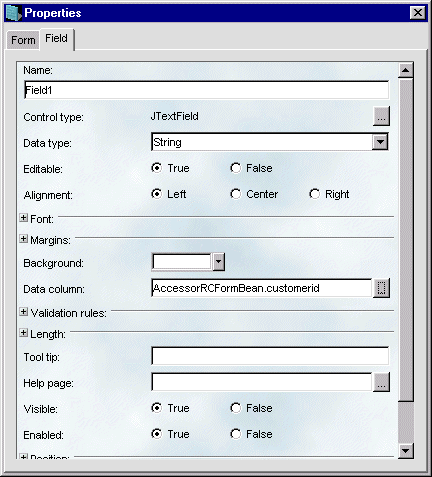
For example, the following Property Inspector shows how to bind the AccessorRCFormBean to the server-side object demo.accessor.CustomerData:
-
Add the other controls you want to the form or page.
-
Bind the data-aware controls to the entity bean fields represented by the AccessorRCFormBean or AccessorRCPageBean. To do this you:
-
Save the form or page.
To locate the session bean:
-
Choose an appropriate event (such as FormActivate) or write a custom method to locate the session bean.
-
Call the JNDI lookup() method to locate the session bean. For example:
  javax.naming.InitialContext initialContext = null;
  initialContext = new javax.naming.InitialContext();
  Object lookup =
     initialContext.lookup("/RMI/sssw/Accessor3/demo/sessionbeans
     /SBCustomerBean");
-
Narrow the object to the appropriate type. For example:
  m_customerHome = (SBCustomerHome)
     javax.rmi.PortableRemoteObject.narrow(lookup,
     demo.sessionbeans.SBCustomerHome.class);
-
Call the session bean's create() method. For example:
m_customer = m_customerHome.create();
where m_customer is an SBCustomer, which is the EJBObject for the session bean.
To access the correct UpdateLog and session bean:
-
Make sure the client-side data cache (the AccessorRCFormBean) knows which session bean it is using for data access by calling the setSessionBean() method. For example:
AccessorRCFormBean.setSessionBean(m_customer);
or
AccessorRCPageBean.setSessionBean(m_customer);
where m_customer is the remote reference to the session bean's EJBObject.
-
Make sure the client-side data cache knows which UpdateLog to write the changes to by calling the setChangeLog() method passing in the com.sssw.accessor.common.UpdateLog. For example:
AccessorRCFormBean.setChangeLog(new UpdateLog());
or
AccessorRCPageBean.setChangeLog(new UpdateLog());
To retrieve and manipulate data:
-
Accessor applications do not provide an automatic query capability. To get data from the entity beans to the client-side data cache, you have to call the AgiRowSetManager.query() method. You can pass any valid SilverStream query string. For example:
AccessorRCFormBean.query(query);
or
AccessorRCPageBean.query(query);
-
To load from the cache to the control, use one of the AgiRowCursor navigation methods. For example:
AccessorRCFormBean.gotoFirst();
or
AccessorRCPageBean.gotoFirst();
-
You can now use any of the AgiRowSetManager or AgiRowCursor methods to insert, remove, modify, and traverse the data. To pass the local changes to the server, call the updateRows() method as you do with any AgxData control.
Where to get more information
Accessors use several diverse SilverStream and Java technologies. Here are some recommended learning resources for various topics:
Copyright © 2000, SilverStream Software, Inc. All rights
reserved.