Process Manager User's Guide
CHAPTER 3
In this chapter, we'll take a look at how to construct a process, specify data mappings, apply logic to links, control joins, and animate (step through or execute) a process in the design-time environment.
If this is your first time using the Process Designer, you should read this chapter before building your first process.
So that you can see how quickly a process model can be built and tested using the Integration Manager Process Designer, we'll go step-by-step through the construction of a simple straight-through process, as represented by the graph shown below:
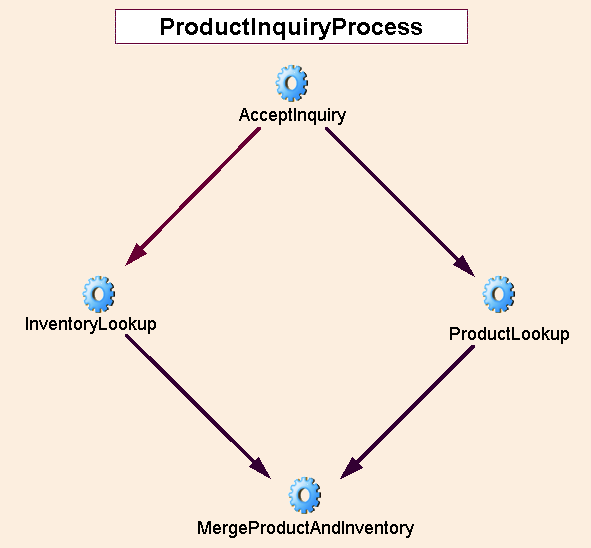

The ProductInquiryProcess model handles a request for product information. The input to the process is an XML DOM containing a SKU (product ID) number. The output of the process is an XML DOM containing detailed information about the product in question. The needed product information is pulled from two sources (two databases) via JDBC.
Our process uses four activities, all of them Integration Manager Components. The roles and responsibilities of the activities are as follows:
AcceptInquiry (XML Map Component)—Takes in an input DOM containing SKU information and simply writes that information straight to an output DOM, along with a tracking number.
InventoryLookup (JDBC Component)—Using the output of AcceptInquiry, this component performs a database lookup against an inventory control system to obtain Category and Status information about the product whose SKU number was passed in.
ProductLookup (JDBC Component)—Using the output of AcceptInquiry, this component performs a database lookup against a marketing database to obtain detailed product info, including price, color, text description, and so on.
MergeProductAndInventory (XML Map Component)—This component merges the incoming data from the two JDBC components. Its output constitutes the overall process output.
NOTE: If you are familiar with the Integration Manager Tutorial, the above components (except for AcceptInquiry, which is specific to this process) are the same ones that are used in the Integration Manager Tutorial.
Until you have gained familiarity with the Process Designer, we recommend that you construct your first process models following the steps shown below.
Optionally, create any Service Provider or Service Provider Type resources you may need.
Specify any link conditions that might apply at various points in the process.
Set any other attributes (Timeout/Retry values, Map Policy, etc.) that might apply to any activity in the process model.
Build, test, and debug all individual activity implementations (that is, the underlying Integration Manager Components, Web Services, or Subprocesses that constitute the executables for the activities), if you have not already done so.
If you have created Integration Manager Components and Services before, you will find the procedure for creating a new process quite familiar.
From the File menu, select New> xObject, then open the Process/Service tab, as shown below and select Process.
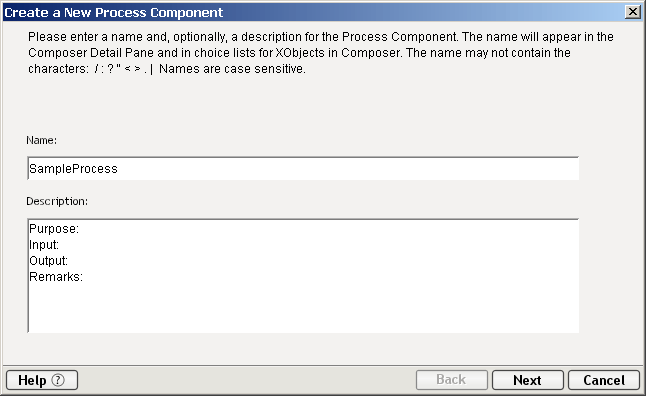
Enter a Name for the process. Optionally enter any additional descriptive info that you want to associate with this process.
As an aid to the design-time testing of your process, add whatever XML Templates you would like to use for process inputs and output. (These documents will not actually be used after deployment of the process to a server. They are design-time aids only.)
NOTE: XML Templates are used by almost every component type in Integration Manager. If you are not familiar with the creation and use of templates, consult the chapter on XML Templates in the Integration Manager User's Guide.
Usually, the template(s) you would specify here would be identical to the ones used by the start activity of your process (assuming that the start activity is a Integration Manager component). In this case, you want a template, or templates, that are capable of providing sample input data to the process.
Click Finish. The Process Designer window opens, with an empty canvas. See below.
A Service Provider is the party responsible for performing a particular activity within a business process. Integration Manager allows you to identify Servicer Providers for use with your process.
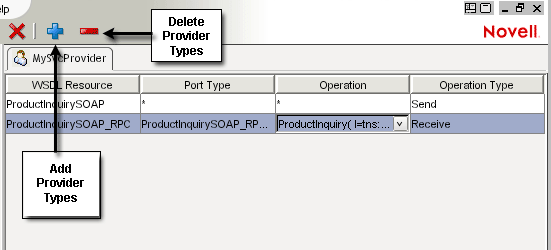
NOTE: You must have WSDL resources and Service Provider Types (see below) in place before creating new Service Provider Type Resources.
 To identify a new Service Provider:
From Integration Manager's File menu, select New, then xObject. From the Resource tab, select Service Provider.
Right-click on the Service Provider Resource icon in the Category pane, and choose New.
Provide a name and, optionally, a description to identify the Service Provider.
Click Finish to create the Service Provider and open it in the Editor pane.
Click on Add to create a new Service Provider, which causes the Service Provider Type Selector to appear.
Use the right and left arrows to select or deselect the appropriate Service Provider Types and click on OK when your selection is complete.
This will return you to the Editor pane, where the Service Provider Type will now appear, and the Name and Operations fields of the Operations tab will be completed.
Click on Mapped to Implementation and select the appropriate implementation. Choices include: WSDL, Component and Process. The dialog will differ depending on your choice. Below is an example of the dialog when WSDL has been chosen as the implementation method.
In all cases, you will need to provide fill in the Endpoint information:
If the implementation method is WSDL, the Authentication Tab must also be filled in.
Click OK when you have finished selecting the appropriate choices for each field to return to the editor pane.
Select File>Save, or click the Save button to save your Service Provider.
Service Providers can be classified into Types. Each Service Provider Type describes its interface(s) using WSDL. According to the WSFL specification (http://www-106.ibm.com/developerworks/webservices/library/ws-ref4/), "Service providers must properly implement the appropriate Web service interface in order to be classified as the appropriate type of service provider to handle a particular activity in the business process."
WSFL requires the process designer to explicitly specify the roles as part of the process implementation. Integration Managerallows you to do this by creating Service Provider Type Resources.
The serviceProviderType element identifies each type of role with the context of a given business process model and the specific Web service interfaces (in the form of WSDL-defined portTypes) that must be implemented by a Web service provider in order to fulfill that role.
NOTE: You must have WSDL resources in place to create new Service Provider Type Resources.
To create a new Service Provider type:
From Integration Manager's File menu, select New, then xObject. From the Resource tab, select Service Provider Type.
Right-click on the Service Provider Type Resource icon in the Category pane, and choose New.
This will cause the Create a New Service Provider Type dialog to appear.
Click on Finish to add the new Service Provider Type to the list and to open it in the Editor panel.
To add Service Provider Types in the Editor:
Even if your activity implementations (Integration Manager Components, Subprocesses, etc.) have not yet been built, you can begin laying down activity icons at any time. For this example, we will assume that the activities consist of prebuilt Integration Manager Components.
Choose the appropriate Activity Tool type from the toolbar. To see a flyout icon list, click the small triangle next to the current activity tool:
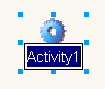
Click on the canvas. A new activity appears.
NOTE: To reposition the activity icon on the canvas, first choose the Pointer Tool, then click and drag the activity icon. You can control snap-to-grid behavior by using the Grid submenu under Integration Manager's View menu.
Repeat the preceding steps as necessary to create additional activities for the process model.
To associate an implementation with an Activity:
Under Integration Manager's View menu, choose Object Properties in order to bring the Object Properties panel into view. See graphic below.
Select the Activity tab (or Subprocess tab, etc., as applicable, depending on the type of activity) of the Object Properties panel.
Select the appropriate Activity Type (Integration Manager Component, Subprocess, etc.) from the pulldown menu provided, if the type that it showing is not what you expected.
NOTE: For purposes of this discussion, we will assume that the activity implementation is a Integration Manager Component.
Next to Component Type, select the desired type of component (JDBC, XML Map, or whatever applies).
Next to Component Name, use the pulldown menu to select among the already built components in the current project that match the Component Type specified in the previous step. (If your current Integration Manager project has four XML Map Components and you have selected XML Map as the Component Type in Step 4, you will see the names of your four XML Map Components in the pulldown menu.)
Select (click on) the activity with the Pointer Tool. Resize-handles (small blue squares) will appear around the activity icon, indicating that the icon has focus.
Click directly on the activity's name. A text-entry field will appear, with the activity name highlighted:
Click off to the side to deselect (remove focus from) the activity.
NOTE: Activities carry their own names, separate from their underlying implementations.
Once your activities have been placed on the canvas, you will want to connect them via control links. As explained in Chapter 1, control links control the flow of execution in a process. We will discuss data flow further below in the section on Message Mapping.
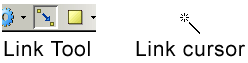
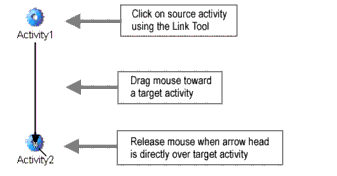
Click on an activity. Doing so will designate the activity as the source for the link.
Without letting up on the mouse button, drag the cursor from the source activity to any activity that you want to be the target activity. As you drag around the canvas, the link arrow will "rubber-band" out as it tracks the mouse.
With the cursor directly over the target activity, release the mouse button. The link will change color and redraw immediately to show the connection between the two activities' bounding boxes.
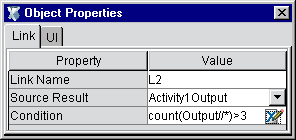
Because link conditions are specified in XPath and therefore require knowledge of the source activity's output message structure, it is usually best not to specify link conditions until after all data mappings have been specified. (See discussion further below.) Nevertheless, if you already understand the data relationships between source and target activities, you can specify a link condition at any time.
Bring the Object Properties panel into view if it is not already visible. (Toggle its visibility using the Object Properties command under Integration Manager's View menu.)
Next to Condition, type an XPath expression that will evaluate to a boolean value.
NOTE: If you enter nothing, the runtime engine will assume that the value of the link is true by default.
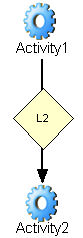
Close the Object Properties panel if desired. Notice that the link's onscreen representation has changed to include a diamond, indicating that XPath logic has been associated with the link.
If you attempt to draw a link connecting a target activity to one of its upstream sources (i.e., a backwards-facing link), you will get an error:

Cyclic graphic patterns (reentrant loops) are not supported by Integration Manager Process Manager. See discussion in Chapter 2 for details ("Looping", page 46).
The transfer of data from one activity to another occurs via data links. Unlike control links, data links are not "drawable." They have no visual symbology on a process graph. Instead, data links are established via message maps. These maps are simply XPath-to-XPath correlations between a source activity's output and a target activity's input. In other words, they are defined much the same way as Map Actions in an ordinary Integration Manager XML Map Component.
Integration Manager Process Manager uses a default naming scheme to label message sources and targets. When you place the first activity on a new canvas, Process Manager assigns a default name of Activity1 to the activity. (Subsequent activities are named Activity2, Activity3, etc.) Accordingly, Process Manager assigns a default name of Activity1Input to Activity1's input message and the name Activity1Output to the activity's output message. Even if you later change the name of Activity1 to CodeRedFireAlarm, the name of its input and output messages do not change, unless you change them manually (see procedure below). They continue to have the default names of Activity1Input and Activity1Output.
DOMs are associated with messages, and DOM names (Input, Input1, Temp, Output, etc.) are referenced off the message name. From there, normal XPath rules apply. For example:
Activity1Output/Output/PRODUCTREQUEST/SKU
means the XPath node /PRODUCTREQUEST/SKU on the Output DOM of the message named Activity1Output. You will see how this works in subsequent examples and screenshots.
To send data from a source activity to a target activity, you need to define at least one message map.
NOTE: All message maps are defined at the target activity (the "receiver" of incoming data), as described below.
Select (click on) an activity. This is the activity whose data source(s) you will specify.
Bring the Object Properties panel into view if it is not already visible. (Toggle its visibility using the Object Properties command under Integration Manager's View menu.)
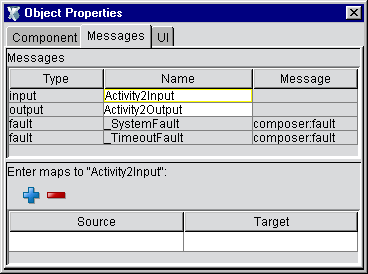
Select the Messages tab. The tab have an appearance similar to this:
In the upper half of the panel, you will see Type, Name, and Message information, with the default Names showing for input, output, and fault messages. You can enter a new Name for any message at this time if desired.
NOTE: Fault messages are discussed separately, later in this chapter.
In the lower half of the panel, you can define Source-to-Target message mappings using XPath. Click the Plus icon to add a mapping. A dialog appears.
Using the pulldown menu immediately under Source XPath Expression, select the message that you want to use as the data source for this mapping. The prepopulated list will contain output message names from all available (legal) data sources. (In other words, you can choose to map data from any activity that can be reached by back-traversal of links. This includes the ProcessInput message itself.)
In the Source XPath Expression text field area, enter any desired XPath statement to specify a source element, nodetree, whole DOM, etc., coming from the activity shown in the "from Activity" pulldown menu. (This menu will be greyed out if there is only one incoming link to the current activity. On join targets, this menu will be prepopulated with the names of all available incoming messages.)
NOTE: It is a common case to specify "Output" (the source activity's Output DOM) as the sole incoming message part, as shown here.
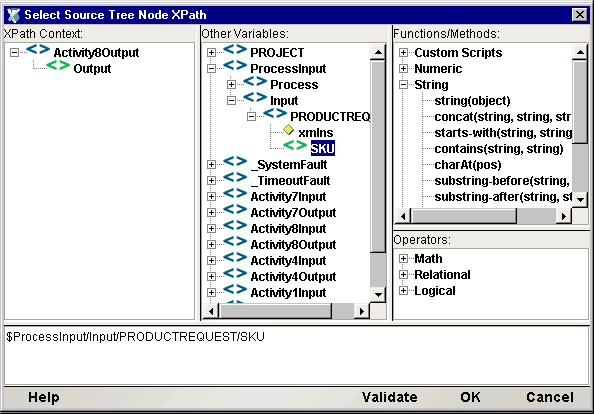
(Optional) If you would like to generate XPath using Integration Manager's Expression Builder, click the small "pencil and X" icon to the right of the text field. This will bring up the XPath Expression Builder window:
The upper panes of this editor window are prepopulated with message trees, XPath native script methods, etc., for your convenience in building XPath expressions. Doubleclick any node in any tree to make the correct sub-expression appear in the edit field. Click OK to go back to the Edit Map dialog.
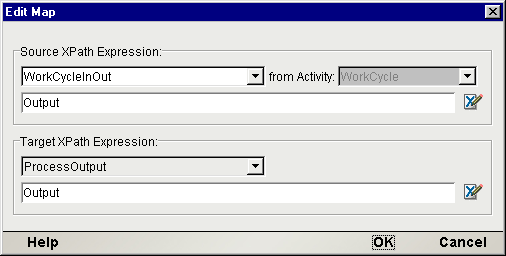
In the Target XPath Expression text field area, enter any desired XPath statement to specify a target to receive data from the input message.
NOTE: It is a common case to specify "Input" (the target activity's Input DOM) as the target message part. This is equivalent to mapping Source data to the Input DOM of the activity.
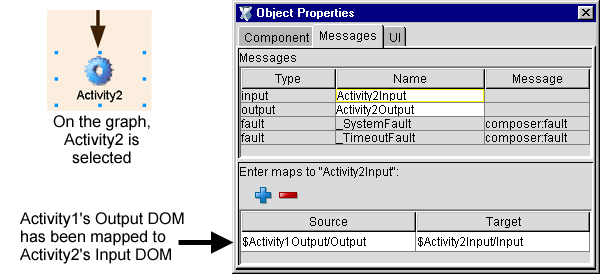
The Source and Target mapping information that you just specified are now visible in the Messages tab of the Object Properties window, as shown above. (A summary view of the info is also available in a rollover tooltip if you let the mouse loiter over these fields.)
Mappings of this sort continue throughout the chain of activities shown in the process graph. You will need to perform this mapping procedure at least once for every activity that receives data.
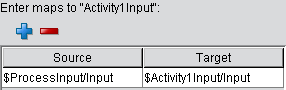
To specify the input to your process's start activity (or activities), simply click on the start activity, bring the Object Properties panel into view, and specify a mapping from ProcessInput to the start activity, using the procedure given above.
If your start activity is named Activity1, the resulting map specification might look like:
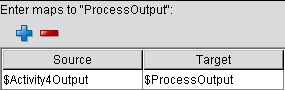
To specify a mapping from an end activity to ProcessOutput, click anywhere on bare canvas, bring the Object Properties panel into view, and specify a mapping from the end activity's output message to the ProcessOutput message. The result might look like:
As mentioned earlier (in the discussion of how to create a new process), you can specify an input template document for ProcessInput (for design-time testing purposes) during the initial creation of the process. If you did not specify any XML Templates at that time, or you now want to use a different template, simply go to the File menu and select the Properties... command. A dialog will appear. Select the Messages tab within that dialog. There, you will be able to add or remove templates as desired.
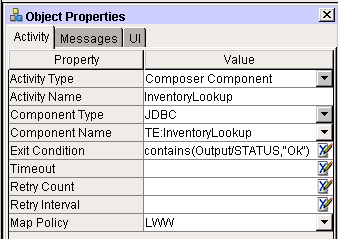
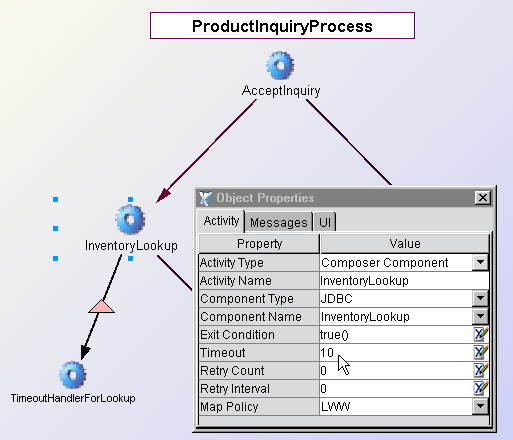
Activity flow logic (join conditions and exit conditions) can be specified in the Object Properties panel. These conditions are optional: By default, the runtime engine will assume that an empty condition is true.
Bring the Object Properties panel into view if it is not already visible. (Toggle its visibility using the Object Properties command under Integration Manager's View menu.)
Select the Activity tab (or Subprocess, etc., as applicable to the selected activity).
Next to Exit Condition, enter an XPath expression. This condition must evaluate to true or false at runtime. If it evaluates to false, the activity will execute again using the original input data. (See discussion in Chapter 2.) The activity will continue to reexecute until the exit condition is true or a timeout occurs.
Select (click on) a join activity—that is, any activity that has more than one incoming link.
Bring the Object Properties panel into view if it is not already visible. (Toggle its visibility using the Object Properties command under Integration Manager's View menu.)
Select the Activity tab (or Subprocess, etc., as applicable to the selected activity).
Next to Join Condition, enter a join expression based on the truth values of incoming links. This condition must evaluate to true or false at runtime. Optionally use the Expression Builder to build the join condition. Click the blue icon at the right edge of the text field. The Expression Builder dialog appears.
The Links tree in the upper left is prepopulated with the names of available incoming links. Link-expression syntax helpers are in the upper right. Doubleclick on any leaf node in any tree to build an expression in the text-edit field below. Then dismiss the dialog.
Recall that a join activity cannot fire until the join condition is true. In Deferred Mode (default), a join condition is evaluated exactly once, when the truth values of all incoming links are known. In Immediate Mode (which you can select on the Object Properties panel), the join condition is evaluated as truth values become known, and as soon as it is true, the join activity fires regardless of whether all source activities have finished executing.
NOTE: If, during a design session, you assign a join condition to an activity and later remove one or more incoming links, the join logic may no longer function as intended. Be sure to remember to update join conditions any time the input links to a join have been removed or replaced.
Timeout, Retry Count, and Retry Interval parameters are supported by Process Manager so as to allow for complex choreographies between partners involving timings and roundtrip interactions that are not addressed by simple Request/Response and Solicit/Response scenarios.
NOTE: It's important to keep in mind that Retry Count and Retry Interval come into play only when a Timeout value has been specified. Otherwise, Retry Count and Retry Interval are ignored.
See the discussion of fault trapping further below for a more detailed explanation of how and under what conditions timeout faults can occur.
To specify Timeout and Retry Parameters
Click on an activity for which you wish to set Timeout and Retry parameters.
Bring the Object Properties panel into view if it is not already visible. (Toggle its visibility using the Object Properties command under Integration Manager's View menu.)
Next to Timeout, enter a value in days, minutes, or seconds (suffix values `d','m', or `s', respectively). Example: To specify 7 days, enter "7d".
NOTE: If you use a unit specifier, you must enclose the entire value in quotation marks. If you enter a number without units (and without quotation marks) it will be interpreted as seconds.
If you entered a Timeout value, optionally enter a number in the text field next to Retry Count. This is the number of times the activity will be retried after the first try times out. If you do not enter a number, zero retries will be attempted.
In the text field next to Retry Interval, enter a value representing the wait time between retries (in seconds). The default is zero, meaning that as soon as the activity times out, it will be retried with no wait. If the Retry Interval is non-zero, Process Manager will wait the specified amount of time between the timeout and the retry.
Map Policy comes into play when multiple data sources (incoming messages) have parts that map to the same location in the target activity's input message(s). For example, consider a process in which Activity1 and Activity2 have links to a join activity, Activity3. If Output/ShipmentMode from Activity1Output maps to Activity3Input/Input/ShipVia, and Output/Carrier from Activity2Output also maps to Activity3Input/Input/ShipVia, the potential exists for a collision. The result depends on whether you want to keep the last-arriving data (allowing overwrites in time order, as they occur) or keep only the first-arriving data. To specify this, you must set the Map Policy to LWW (Last Writer Wins) or FWW (First Writer Wins), as appropriate.
NOTE: Recall that an activity does not have to be a join activity in order to receive data from multiple upstream sources. Therefore, it's possible for map policies to come into play even when there is only one incoming control link to a target activity.
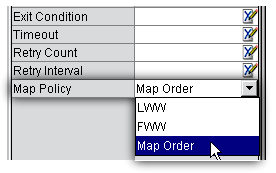
The choices for Map Policy are LWW (Last Writer Wins) or FWW (First Writer Wins), or Map Order. The meanings of the first two choices are self-evident. Map Order requires further explanation.
Map Order means that regardless of the timestamp on incoming messages, XPath-to-XPath mappings will occur in the order in which the mappings are specified in the Messages tab of the activity's property sheet, going top to bottom. Timestamps, in other words, are ignored. Messages are cached when they arrive, and then—when mapping takes place—every message part is mapped according to the literal order in which you have specified the mappings.
You would typically use this option as a way of dealing with overwrites when you care more about where messages are coming from than you do about their actual arrival order. For example, if several activities feed into a join, and one particular source activity should always have write-preference over other feeder activities, then you could use Map Order to give the preferred source a higher precedence (for overwrite) than the others.
Click on an activity for which you wish to set a Map Policy.
Bring the Object Properties panel into view if it is not already visible. (Toggle its visibility using the Object Properties command under Integration Manager's View menu.)
Use the pulldown menu next to Map Policy to specify Last Writer Wins (LWW), First Writer Wins (FWW), or Map Order.
Faults generated by Process Manager are of two general kinds: System and Timeout. Both are generated as special messages. The fault messages take the place of the Activity Output message for the activity that raised the fault. In other words, an activity implementation that faults out is not considered to produce Output. An activity will therefore either produce an Output message or Fault message, but not both.
The runtime engine raises a System fault under the following circumstances:
The runtime engine encounters a message or message type that it doesn't know how to handle
A Timeout fault occurred and was not handled by an activity designed for that purpose. (In this case, two faults are actually generated: one Timeout and one System.)
When a System fault occurs, the process instance produces a message called _SystemFault, with a part name called (also) _SystemFault. The DOM view of the message looks like:
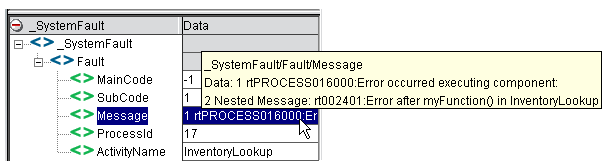
Every System fault contains MainCode, SubCode, Message, ProcessID, and ActivityName elements. The content of each element is visible in a rollover tooltip as shown above for the Message element. Notice that the Fault/Message element contains a Nested Message. The value of this Nested Message is whatever custom string value you put in any Log or Raise Error action (assuming the implementation is a Integration Manager service or component).
Regardless of the cause, a fault (of any kind) will result in termination of a running process, unless the fault is handled by an activity designed for that purpose. In this respect, faults are similar to exceptions. If no handler exists, the fault "bubbles up" to the process engine and the process simply allows the process instance to exit with a fault message. Any activity instances in existence at the time of the unhandled fault are aborted.
MainCode values currently implemented include:
|
SYSTEM_FAULT_MAINCODE |
-1 |
|---|---|
|
TIMEOUT_FAULT_MAINCODE |
-2 |
SubCode values currently implemented include:
|
COMPONENT_FAULT_SUBCODE |
1 |
|---|---|
|
UNHANDLED_MESSAGE_SUBCODE |
2 |
The runtime engine enforces the following behavior when a Timeout value exists on an activity:
If the activity completes with an exit value of true prior to the timeout period, control passes to outgoing link(s).
If the activity completes with an exit value of false prior to the timeout period, the activity is reexecuted immediately (which is the normal action for all activities that finish with a false exit condition).
If the activity hasn't finished running when the timeout is reached, the runtime engine halts the activity and consults the Retry Count parameter. If the Retry Count is non-zero, the Retry Interval parameter (if applicable) is consulted, and the runtime engine waits for the time specified in Retry Interval; then it resets the Timeout clock and reexecutes the activity using the original data mappings. This execute-wait-retry cycle is repeated until the Retry Count has been reached, at which point the engine raises a Timeout fault.
If a Timeout fault is not handled by an activity, it will cause the runtime engine to terminate the process.
The Timeout fault message has this appearance, in tree view:
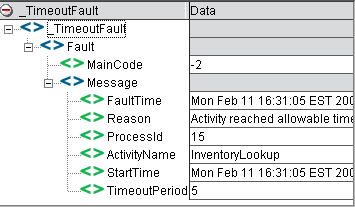
The message elements are self-explanatory. The MainCode value is -2 for Timeout (as explained above).
Because faults can be handled by custom-designed activities (which in turn can be implemented as Web Services, Integration Manager Components, etc.), fault logic can be as sophisticated as it needs to be. You can designate one fault handler activity for each activity that needs one (its implementation could even consist of the same Integration Manager component in each case); or you could have a single fault-handling activity that handles all faults for the entire process. An example of the latter is shown in the graph below. Every activity has a link to MyAllPurposeFaultHandler, which handles faults for the entire process.
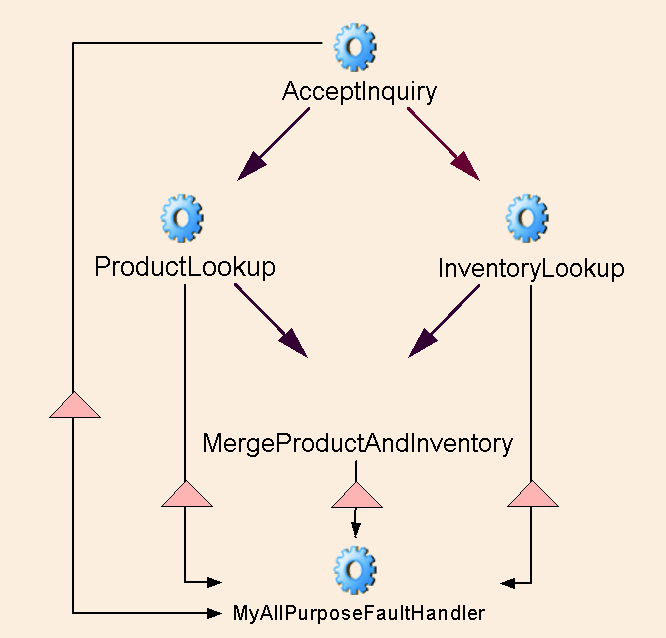
The triangle shape on each link signifiies that the link has been designed to handle fault flow. The procedure below tells how to create the necessary control and data links to handle faults.
To attach a fault handler to an activity:
Create the implementation of the fault handler activity, if you have not already done so. (Since this activity will generally be local to the app server, it usually makes sense to implement it as a Integration Manager Component.)
Place the activity icon for the fault handler on the process graph.
Draw a link from the appropriate source activity (the activity that generates the fault) to the fault-handler activity.
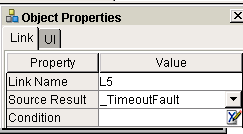
Bring the Object Properties panel into view, if it is not already visible.
Click the Link tab. You should now be looking at something similar to the following:
Next to Source Result, use the pulldown menu to select the appropriate fault type. In this case, _TimeoutFault was chosen.
NOTE: On the graph, the link will acquire a triangle icon at this point.
If a special condition applies to this link, enter an appropriate XPath expression.
To create data mappings into a fault handler:
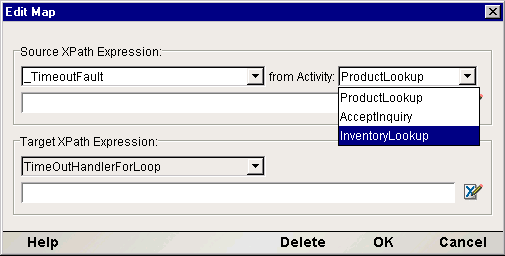
In the bottom portion of the tab, click the Plus-sign icon to add a message. The following dialog appears.
Select SystemFault or TimeoutFault, as appropriate, from the top left pulldown menu, under Source XPath Expression.
In the pulldown menu next to from Activity, select the source activity for this message.
NOTE: All possible source activities will be listed—that is, any upstream activity that is reachable by simple one-way back-traversal of links. When you select one of these activities, you are creating a data link from that activity to the fault handler. The source activity you choose from this list does not have to be directly connected to the target activity by a control link, but in most cases, you will want such a flow-control connection, since a data link, by itself, isn't enough to fire a fault handler. Bottom line: If you data-map a fault message to an activity input, be sure, also, to draw a control link from the source activity to the fault activity so that the fault activity will actually fire.
Repeat Steps 4 through 7 for each activity that will feed into this fault handler.
A unique and powerful feature of the Process Manager is that it allows you to run and debug processes (step into or over activities, etc.) in the design-time environment. And because Process Designer runs within Integration Manager itself, you can step directly into any Integration Manager Components that make up the implementation(s) of activities. Once inside the component, you can step through the action model just as you would during a component design session, watch DOMs change in real time, set breakpoints, etc. You can debug activities at the same time that you test and debug your process.
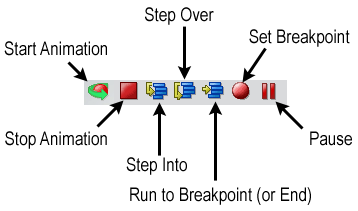
You can either animate or execute a process via the special toolbar buttons provided for this purpose:
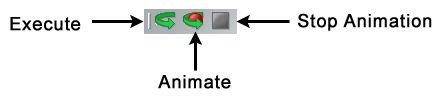
The difference between Execute and Animate is that Execute runs the process from start to finish without interruption, whereas Animate allows you to step through the process.
Process Designer gives valuable visual feedback during animation. Whether you Execute or Animate a process, you can see individual control links highlight (become thicker) as control passes from one highlighted activity to the next, and if a link cannot be followed (because its condition is false), that link's representation changes from a solid line to a dashed line. Therefore it's easy to see, at a glance, which links are being followed and which activities are executing.
(Optional) Clear the output pane (where system messages appear) at the bottom of the Integration Manager main window. To do this, click inside the pane, type Control-A (Select All), and hit Backspace.
If you have not already assigned a ProcessInput data template to the process for test purposes, select Properties from the File menu, then click the Messages tab. Otherwise, skip to Step 6 below.
Choose and/or Add an Input Message by selecting from available XML Templates using the pulldown menus in the upper half of the dialog. Likewise, choose an Output template if needed.
Create data mappings between ProcessInput and your start activity. (The procedure for this was discussed previously. See "Data Mapping for Start and End Activities" earlier in this chapter.)
Click the Animate button in the Process Designer toolbar. The start activity will highlight. (See below.) Also notice that a new toolbar appears at the bottom of the graph window. The icons, from left to right, are Animate (dimmed when active), Stop, Step Into, Step Over, Run to Breakpoint, Set Breakpoint, and Pause:
If you wish to step into the activity implementation, click the Step Into button. This will open the activity's underlying component in the appropriate component editor environment within Integration Manager. You can then step through the component's action list as you normally would in Integration Manager. After you step through the last action in the action list, the process graph window will reappear.
If you wish to step over the currently highlighted activity, click the Step Over button. The appropriate link(s) will be followed and links will change appearance either to a double-thickness solid line (for true links) or a dotted line (for false links). Execution will stop at the target activity (or activities). You can then use Step Over or Step Into again, and so on.
To run to the end of the process, click the Run to End icon. When the process is finished running, a small alert dialog will appear, explaining whether the process finished normally or errored out in some manner.
Note that as you step through the chain of control, various links will highlight and change appearance to reflect the actual path followed during execution. For example, in the graph shown below, animation has proceeded past the start activity to the next activity in the flow. One of the two outgoing links from the start activity has been followed (namely, the dark, solid link on the left); the other link (with a dotted line appearance; right) was not followed, because its transition condition was false.
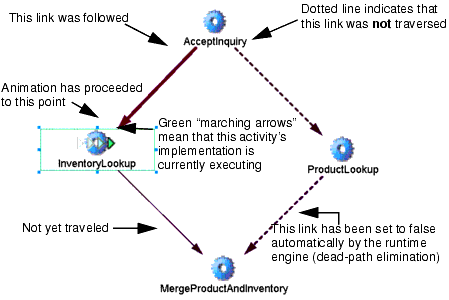
Notice that because the link from AcceptInquiry to ProductLookup was not followed, the link from ProductLookup to MergeProductAndInventory is also shown as a dotted line (even though execution has not proceeded to this point yet), through dead path elimination. The process engine knows that if the link from AcceptInquiry to ProductLookup is false, there is no way the link from ProductLookup to MergeProductAndInventory can ever be followed—hence this downstream link can be (and in fact must be) set to false as well. The reason this must occur is that the join condition at MergeProductAndInventory will never evaluate if it is waiting on the truth value of a feeder link that will never evaluate. (See the discussion of "Dead Links and Synchronization Failure", Chapter 1.)
Process Designer provides many ways to monitor the step-by-step execution of a process. For example, valuable realtime feedback is given (in plain text form) in the Log pane of the Integration Manager window, and you can look at any activity's input or output DOMs (or even the ProcessInput and ProcessOutput) along with DOM views of fault messages, to see exactly what data values were produced at various points in the flow.
Any time you execute or animate a process in Process Designer, system messages will appear in the Log pane at the bottom of the main Integration Manager window. See below.
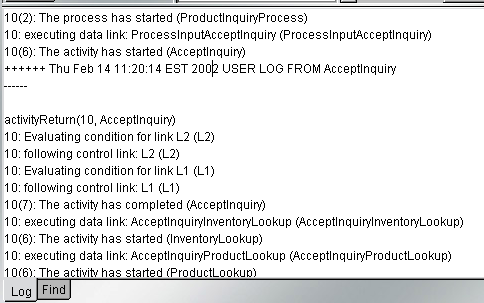
The information in this pane is quite detailed. Every activity startup, link evaluation, join evaluation, activity completion, activity error—every event—is logged so that you can go back through the chain of events and see exactly what executed and when, and what failed and why.
NOTE: Two numbers (one of them in parentheses) precede every message. The first number is the ProcessID for the current instance. The second number, in parens, is the event code for the event in question (6 for activity start, 7 for activity complete, and so on).
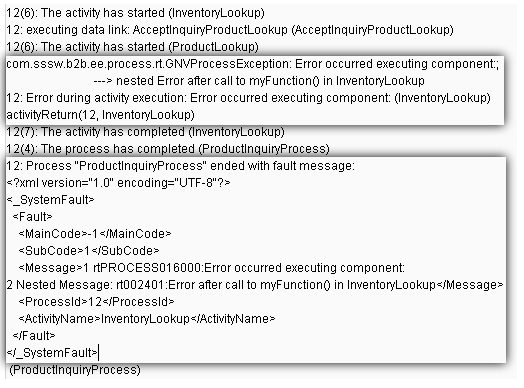
If a fault occurs, you can easily identify the offending activity; and you will also see the complete fault message (in XML form):
If an activity was implemented as a Integration Manager Component or Subprocess, you can doubleclick on the activity in question (right on the process graph), and the component will open in the appropriate component editor. You can then make changes to the component, save it, and return to the Process Designer for another animation session.
NOTE: When you have made changes to an action model, be sure to Save the component (save the changes) before reexecuting the process. Otherwise you will get the same error(s) again.
Any message produced at any point in a process can be displayed in DOM view, text view, or stylized view in its own pane. This includes ProcessInput, ProcessOutput, _TimeoutFault, and _SystemFault messages as well as all activity input and output messages.
To make a message visible (or to hide an existing one):
From the main menu bar, select View > XML Documents > Show/Hide:
In the dialog that appears, use the left-right arrow buttons to move messages to the Hide or Show columns as necessary.
NOTE: The prepopulated list on the right will contain the names of only those messages that were actually produced or used in the execution of the process. If a process terminates early, it is possible that some activities' messages won't be listed.
(Optional) Use the up-down arrow buttons to reorder the Show items as desired.
The messages that you designated under Show will now appear in their own data panes. See below.

Note that you can obtain different views of any DOM by doing a right-mouse-click on the DOM in question, then choosing View > As Text (or Tree, or Stylized) from the context menu, as shown above.
Copyright © 2004 Novell, Inc. All rights reserved. Copyright © 1997, 1998, 1999, 2000, 2001, 2002, 2003 SilverStream Software, LLC. All rights reserved. more ...