6.5 Troubleshooting the NetWare Server
This section provides troubleshooting suggestions for typical NetWare server problems such as the following:
6.5.1 Resolving Abends
The NetWare operating system is very resilient, but errors can occur. Serious problems are usually accompanied by abend (abnormal end) messages. When an abend message appears, either NetWare or the CPU has detected a critical error condition and started the NetWare fault handler. NetWare uses abends to ensure the integrity of operating system data.
When a server abends, users might not be able to log in to the server, workstations might not be to read from or write to the server, and an abend message usually appears on the System Console or Logger screen of the server console. If the NetWare auto-recovery mechanism is enabled (default), NetWare might restart the server automatically or suspend the offending process, depending on the nature of the abend.
If there is no abend message on the console, no abend.log file in sys:system, and no number in brackets within the System Console prompt, but users still can’t access the server, see Monitoring and Resolving Communication Problems. If there is no abend message but the console is frozen so that you cannot enter commands, see Server Console Hangs.
Understanding What Happens When You Get an Abend
When the server abends, it displays an abend message similar to the following:
ABEND: SERVER-5.xx-message_number message_string

ADDITIONAL INFORMATION: message
The Additional Information section states the probable cause of the abend. It indicates where the problem occurred and gives the name of any NLM associated with the abend. This information helps you determine how to resolve the abend.
The abend message, along with additional information, is saved in the abend.log file on drive c:. as soon as the server is restarted, the abend.log file is moved to sys:system.
You can respond to the abend manually or have the server respond automatically.
When you respond manually, the server determines the nature of the abend and displays the appropriate response option on the screen, along with additional options for bringing down the server or executing a core dump. You must execute an option to respond to the abend.
When the server responds automatically, it executes the appropriate response without intervention.
IMPORTANT:Sometimes an abend (or a faulty NLM program) can cause the server console to stop functioning. In this case, the abend message is not displayed and you cannot enter commands at the console prompt.
After a server failure, we recommend turning the power off of the computer and restarting it rather than just exiting to the DOS prompt, c:\nwserver, and entering server again.
Responding to the Abend Manually
The default method of responding to an abend is automatic. (See Responding to the Abend Automatically.)
To respond manually to abends, change the following Set parameter ( category) to the value shown:
AUTO RESTART AFTER ABEND = 0
This Set parameter controls what the server does after an abend. See the online help for a description of each value.
When an abend occurs, the server displays a short list of options appropriate to the nature of the abend. To respond to the abend, you must execute one of the options by typing the first letter of the option.
The following options could be displayed. Note that several of the options have the same first letter (such as R, S, or X). In a given abend situation, the option list will include only one option for any given first letter.
-
S=Suspend the running process, update ABEND.LOG, and attempt to down the server
This option appears if the abend was software-detected— that is, detected by the network operating system. It is important to save files, shut down the server, and try to solve the problem that caused the abend. Review the abend.log file to help determine the source of the problem.
When you execute this option, the server sends a message to users that the server is going down and advising them to save their files and log out. The server then stops the running process, updates the abend.log file, and attempts to shut down and restart the computer.
The amount of time before the server shuts down and restarts is determined by the Set parameter AUTO RESTART AFTER ABEND DELAY TIME. You can set this value from 2 to 60 minutes. The default is 2 minutes.
You can send the abend.log file to the a Novell Support provider to help you troubleshoot the abend or you can log the information to the Novell Support Discussion Forums. You can also download the ABENDLogFilter utility to convert the abend.log into a more readable and useful format.
-
R=Resume the running process, update ABEND.LOG, and attempt to down the server
This option appears if the abend has detected a hardware problem. Shut down the server, fix the hardware, run diagnostics, and contact the hardware manufacturer for additional assistance.
When you execute this option, the server sends a message to the users that the server is going down and advising them to save their files and log out. The server then resumes the running process, updates the abend.log file, and attempts to shut down and restart the computer.
The amount of time before the server shuts down and restarts is determined by the Set parameter AUTO RESTART AFTER ABEND DELAY TIME. You can set this value from 2 to 60 minutes.
-
S=Suspend the running process and update ABEND.LOG
This option appears if the abend was hardware-detected—that is, detected by the processor. All hardware-detected abends have the words processor exception in the abend message.
These abends include page faults, protection faults, and invalid op codes stack overflows, double faults, etc. When this option is available, the server has determined that it cannot return the process to a safe state, but it does not need to shut down the server immediately to resolve the problem. You might still need to shut down the operating system and restart it at a later time.
When you execute this option, the server suspends the currently running process and updates the abend.log file, but does not shut down the computer. Server performance might be poor, because a loaded NLM is probably malfunctioning.
Read the Additional Information part of the abend message to learn which NLM might be causing the problem. At a convenient time, shut down the server and restart it. Examine the abend.log file for more information about the source of the problem.
You can send the abend.log file to the a Novell Support provider to help you troubleshoot the abend or you can log the information to the Novell Support Discussion Forums.
-
S=Return the running process to a safe state and update the ABEND.LOG file
Like the previous option, this option appears if the abend was hardware-detected—that is, detected by the processor. All hardware-detected abends have the words processor exception in the abend message.
These abends include page faults, protection faults, and invalid op codes, stack overflows, double faults, etc. When this option is listed, the server has determined that it can return the process to a safe state.
When you execute this option, the server returns the running process to a safe state and updates the abend.log file, but it does not shut down the server. In most cases, the server completely recovers and no further action is necessary.
-
Y=Copy diagnostic image to disk
Execute this option to perform a core dump that can be examined to determine the cause of an abend. For information on core dumps, see Creating a Core Dump.
-
X=Restart
This option appears only if DOS has been removed. Execute this option if you want to restart the server.
If DOS has been removed, the server will not create or update an abend.log file.
-
X=Update ABEND.LOG and then exit
Execute this option if you want to shut down the server and exit to DOS. If you power off the server without first executing one of the S or R options to resolve the abend, the server will not update the abend.log file.
-
Otherwise, power off and back on to restart
If the console has been secured, you must power it off and then back on to restart the server. If you power off the server without first executing one of the S or R options to resolve the abend, the server will not update the abend.log file.
When the server restarts, it moves the abend.log file from the DOS partition to the sys:system directory.
Responding to the Abend Automatically
You can require the server to respond automatically to abends. Two automatic responses are possible.
-
When both of the following Set parameters ( category) are set to the values shown, the server responds to the abend automatically by evaluating the source of the abend and executing the appropriate S or R option described in the previous section.
AUTO RESTART AFTER ABEND = 1
DEVELOPER OPTION = OFF
Because these are the default values of the parameters, the default mode is to respond to abend automatically.
-
When both of the following Set parameters are set to the value shown, the server responds to the abend by shutting down the server and attempting to restart it.
AUTO RESTART AFTER ABEND = 2
DEVELOPER OPTION = OFF
Use the following Set parameter to specify how long the server waits after an abend before attempting to shut down and restart the computer:
AUTO RESTART AFTER ABEND DELAY TIME = minutes
To set the parameter values, use the SET command or Monitor at the server console or Novell Remote Manager from a workstation.
The Developer Option parameter is in the Miscellaneous category.
The and parameters are in the category.
All parameters can be set in the startup.ncf file.
Because the server responds to the abend automatically, you might not know when an abend has occurred. Therefore, you should periodically check the abend.log file or the Profiling and Debug Information screen in Novell Remote Manager (look for Suspended by Abend Recovery status).
6.5.2 Insufficient Packet Receive Buffers, No ECB Available Count Errors
The ECB (event control block) counter increments when a device sends a packet to your NetWare server but no packet receive buffer is available. This mean a packet has been dropped by the server.
The server allocates more packet receive buffers after each incident until it reaches its maximum limit (Maximum Packet Receiver Buffer setting).
If you are using an EISA busmaster board (such as the NE3200™ board), you will probably need to increase both the minimum and maximum number of packet receive buffers.
For procedures on setting the Minimum Packet Receive Buffers and Maximum Packet Receive Buffers parameters, see SET
> Communications Parameters
in the NW 6.5 SP8: Utilities Reference.
No ECB Available Count messages can also indicate that the driver is not configured correctly or that the Topology Specific Module (TSM) and the Hardware Specific Module (HSM) are incompatible. This value is maintained by the tsm.nlm program.
If the ECB count is increasing and all the packet receive buffers are in use, take a core dump (see Creating a Core Dump) and contact Novell Support.
6.5.3 Resolving Slow Server Response
To diagnose slow server response problems, identify whether the following conditions exist:
-
The workstation network board is slow or faulty.
-
Network cabling is faulty.
-
The server network board is slow or faulty.
-
Too many users are using the network.
-
The server hard disk is slow or faulty.
-
The server is low on memory.
-
The volume has too many deleted files that have not been purged.
-
Network traffic is extremely high.
-
The cabling system is experiencing too much interference.
-
Insufficient directory buffers, cache buffers, or packet receive buffers have been allocated.
-
An EISA controller board needs to be configured to use interrupts.
To resolve slow server response problems, perform the following actions:
-
If a workstation or the server seems slow, insert a new network board into the slow computer to check performance. If the speed is still below normal, reinstall the original network board and then replace the cable attaching the workstation or server to the network.
-
Check the status of packet receive buffers and service processes. Compare their values to the maximum allowable values.
To check the health of these values, use Novell Remote Manager. Click the link under the Diagnose Server heading in the navigation frame. Click the links for the , , and on the Server Health Monitoring page.
Packet receive buffers are used to transmit and receive packets. If the number of packet receive buffers is increasing, the server operating system will be sluggish. If the number of packet receive buffers reaches the maximum and no ECBs are available, the system will become very sluggish and might not recover.
If the current service process are approaching the maximum, you should consider increasing the Maximum Services Processes Set parameter value. If you have only a few available server processes, your server is probably very busy. You might consider increasing the Minimum and Maximum Service Process Set Parameter values.
To change the values for these parameters, access Novell Remote Manager. Click the link in the navigation frame. On the Set Parameter Categories page, click the following:
-
link > link for Minimum Packet Receive Buffers
-
link > link for Maximum Packet Receive Buffers
-
link > link for Minimum Service Processes
-
link > link for Maximum Service Processes
You can also use Monitor or the SET commands at the server console.
-
-
Check the Hot Fix™ status of all hard disks that use the Traditional file system.
To view the status, do the following:
-
Access Monitor.
-
From the Available Options menu, click .
-
-
Verify that all mirrored disks are still mirrored by entering the following command at the System Console prompt:
MIRROR STATUS
-
Purge deleted files.
-
Access Novell Remote Manager.
-
Click the link under the heading in the navigation frame.
-
Click the icon next the volume you want to delete files on.
-
Click the button.
You can also set the Purge attribute on files you want to be purged.
-
-
Check the LAN driver statistics.
-
Access Novell Remote Manager.
-
Click the link under the heading in the navigation frame.
-
Click the link for each network board on the Hardware Adapters page.
If you are using more than one network board in the server, compare the boards’ Total Packets Transmitted statistics. If one board is receiving most of the traffic, recable the network so that the boards have equal loads.
-
-
Check the CPU usage.
-
Access Novell Remote Manager.
-
Click the link under the heading in the navigation frame.
-
Click the link and look for unusually high CPU usage.
-
-
Check the cabling for interference from fluorescent lights, microwaves, radar, X-rays, and copy machines. Either move the cable or shield it from the source of interference.
-
Take a sniffer or LAN trace of the problem and analyze it.
-
As a last resort, perform a core dump (see Creating a Core Dump) and contact a Novell Support engineer.
6.5.4 Server Console Hangs
If the server console locks up so that you cannot enter commands, but there is no abend message on the System Console or Logger screen, follow these steps to troubleshoot the problem. If there is an abend message on the screen, see Resolving Abends.
-
Verify whether you can toggle among console screens.
If yes, the problem might be caused by high server utilization. See High Utilization Statistics. If no, continue with the following steps.
-
Verify whether the server console hangs when you unload a specific NLM.
If yes, the NLM is probably the source of the problem. Contact the NLM vendor.
-
Make sure you are using the latest disk and LAN drivers, BIOS, and firmware.
If not, update disk and LAN drivers. For information on NetWare drivers, see Keeping Your Servers Patched.
-
Verify whether the server console hangs after you mounted the last volume.
If yes, the network board might not be seated correctly or might not be configured correctly. Check the board and its configuration and correct any problems.
-
Verify whether you can you break into the debugger by pressing Shift+Shift+Alt+Esc on the system console keyboard.
-
If the console is locked, you can’t toggle among screens and you can’t enter the debugger, contact Novell Support or your computer vendor to learn how to generate a nonmaskable interrupt to shut down the server.
If the problem still occurs, follow the troubleshooting steps in Using a Troubleshooting Methodology; search the Novell Knowledgebase; and contact a Novell Support Provider.
6.5.5 High Utilization Statistics
Network performance is a key concern for network administrators and for Novell as well. Unfortunately, sometimes there is confusion about performance indicators and what their statistics mean.
For example, the idea that processor utilization is the key performance indicator for NetWare is much too simple. Some network administrators are concerned when the CPU Utilization health status in Novell Remote Manager or the Utilization value in Monitor’s General Information screen approaches 100%, on the assumption that the higher the percentage, the worse NetWare’s performance is. This is entirely false.
What Is Normal?
Consider first what the Utilization value represents: the average of the server’s total processing capacity that was used during the last second (update interval). The remainder of the capacity was spent in the idle loop process. In other words, it is an indication of how much of that time the processor had something to do. A high utilization value means that NetWare is using that percentage of the processor’s capacity and wastes less time doing nothing.
Some processes make efficient use of the processor and as a result might cause 100% utilization. This type of utilization is entirely appropriate. Most of the time, when utilization moves up to 100%, it means that the thread is using the processor efficiently. It might stay at 100% for a couple of minutes; this is normal.
It is not normal, however, when the utilization is at 100% for 15 to 20 minutes or more, when connections are dropped, or when server performance deteriorates noticeably. High utilization with these conditions indicates a problem. If you’re not seeing these conditions, your utilization might be normal, even when it’s at 100%.
How do you know what is normal for your server? You will recognize problems if you “baseline” your server. Know what is normal and know the difference between a cosmetic problem and a true performance problem. (You can test for a cosmetic problem by loading or unloading any NLM; this will cause the processor information to be recalculated.)
What Are the Most Common Solutions?
Before troubleshooting high utilization problems, make sure that you have followed the steps in Using a Troubleshooting Methodology. Check the Novell Support Web site for NetWare patches or updated NLM programs. Available patches will contain fixes for reported high utilization problems related to the actual code of the operating system and eDirectory.
However, a number of high utilization conditions can still result from problems with configuration, levels of NLM programs, and tuning issues.
One of the first things you might want to do is discover the NLM program and threads that are using the CPU. To do this, complete the following steps:
-
Access Novell Remote Manager.
-
Click the link under the Diagnose Server heading in the navigation frame.
-
Click the link.
-
Note the parent NLM program and threads that are taking the longest execution time.
-
If possible, unload the offending NLM program to see if the problem disappears.
You can also use the following list of issues to help you resolve problems.
The items in the list are categorized, but are otherwise in no particular order. The list represents the collective experience of Novell Support representatives. We recommend that you review each item, using each to carefully analyze your system. Except for problems new to NetWare 6.5, you will be able to resolve the problem on your own in almost every case.
Operating System Issues
-
Server resources. Server resources can be divided into LAN, disk, and processor resources. LAN and disk resources are the number of buffers available. Processor resources are the number of service processes available. When a network packet arrives or when a disk read or write is performed, a buffer should be available to hold the data until a service process is available to service it. Running low on either buffers or service processes for even a brief period can cause high utilization on the server and delay for the users.
To understand how server parameters work together to control the allocation of server resources, see Monitoring Allocated Services.
For the procedure to configure the allocation of packet receive buffers (communication buffers), see
Increasing Maximum and Minimum Packet Receive Buffers
in the NW 6.5 SP8: Novell Server Communications Administration Guide and SET >Communications Parameters
in the NW 6.5 SP8: Utilities Reference for parameter descriptions.For information on controlling the allocation of directory cache, see
Tuning Directory Cache for the Traditional File System
in the NW 6.5 SP8: Server Memory Administration Guide and SET >Directory Caching Parameters for the Traditional File System
in the NW 6.5 SP8: Utilities Reference.For setting up and tuning cache buffers in the NSS file system, see
Tuning NSS Performance on NetWare
in the NW 6.5 SP8: NSS File System Administration Guide.For parameter descriptions, see also the service processes parameters in SET >
Miscellaneous Parameters
in the NW 6.5 SP8: Utilities Reference.We suggest that the server parameters in the Table 6-5 be set as indicated to avoid running low on server resources. This is especially important if you have 100 or more users. To change the following parameters, you can use Novell Remote Manager at the workstation or SET commands or Monitor at the server console.
In Novell Remote Manager, click the link under the heading in the navigation frame > Category > current value for parameter. Enter the new value and then click .
In Monitor, from the Available Options menu, select server > Category > current_value_for_parameter, then press Enter. Enter the new value, then do the applicable action.
Table 6-5 Server SET Parameters for Server Resources
-
Processor hog. Determine whether one thread is hogging the processor. In Novell Remote Manager, click the link under the heading in the navigation frame. View the data in the table.
In Monitor, from the Available Options menu, select > , and then press Enter.
You can set the CPU Hog Timeout Amount to a value lower than the default. Specify the amount of time in seconds to wait before terminating a thread that has not relinquished control of the processor. See SET >
Miscellaneous Parameters
in the NW 6.5 SP8: Utilities Reference.IMPORTANT:Use caution when changing this value. You must understand the impact of what you are changing.
Storage Devices and Adapter Issues
-
Drivers. See Keeping Your Servers Patched. For a brief explanation of NetWare Peripheral Architecture (NWPA), see
Drivers for Host Adapters and Storage Devices
in the NW6.5 SP8: Server Disks and Storage Devices. -
Free blocks. When using the Traditional file system, adequate free blocks are essential. A free block is a disk block that has no salvageable files stored there. A file that has been both deleted and purged becomes free space. Maintain a minimum of 1000 free blocks on each NetWare volume that has suballocation enabled.
Suballocation, normally a low priority process, uses free blocks to perform its function. When free blocks are low, suballocation can go into an “aggressive” mode. Maintaining over 1000 free blocks will usually avoid this problem.
To check how many free blocks you have on a volume, do either of the following:
-
In Novell Remote Manager, click link under the heading in the navigation frame, then click the icon.
-
In Monitor, from the menu, select > the specific volume. Press Tab to view the free blocks information on the Volume Information screen.
If there are not at least 1000 free blocks on the volume, access Novell Remote Manager, click in the navigation frame, click the icon for the applicable volume, and then click the button.
This removes all deleted files from the directories and subdirectories and increases your free disk space.
If you have applications that create large numbers of temporary files, you might want to set the P (Purge) flag on the directories where these files are stored. Every temporary file that is created will be put on the deleted file list. These files are kept on the disk until PURGE is run. You could also run SET Immediate Purge of Deleted Files=On at the System Console prompt.
-
-
Suballocation. The Traditional file system uses a disk block size of 64 KB. It is very important to monitor the disk space. Novell Support recommends keeping 10% to 20% of the volume space free to avoid suballocation problems. Suballocation does not have any server parameters to adjust.
To view disk space usage with Novell Remote Manager, click the link under the heading in the navigation frame and then the link on the page. Print the Volume Information page for your records.
-
Compression. When using compression in the NSS file system, see
Managing Compression on NSS Volumes
in the NW 6.5 SP8: NSS File System Administration Guide.When using compression with the Traditional file system, it is essential to have the server patched. Because it takes processor cycles to compress and decompress files, compression needs to be monitored carefully to avoid utilization problems. The default SET
File Parameters for the Traditional File System
for compression takes this into consideration.For example, file compression is set by default to occur during off hours or periods of low server usage. Make sure that change have not been made that are causing high utilization problems.
File decompression occurs on the fly. However, a very large file, such as 100 MB, can take a noticeable amount of time even with a Pentium processor.
SET Deleted Files Compression Option=2 causes the immediate compression of files that have been deleted. This can cause high utilization because the processor immediately compresses files upon their deletion.
Directories that are flagged IC (Immediate Compression) can cause excessive decompression during work hours. Users with disk space restrictions might flag their home directories to IC in an attempt to save disk space. This can affect server performance.
To ensure that frequently used files are not compressed, you can specify an appropriate value for the SET Days Untouched Before Compression parameter.
To proactively eliminate compression as a possible problem, use Set Enable File Compression=Off parameter (Common File System category). This causes files to be queued for compression but the files are not compressed. However, accessing compressed files causes them to be decompressed.
Memory Issues
-
Insufficient RAM. Memory resources are critical in a server environment.
To view buffer cache statistics for the NSS file system, enter the following command at the System Console prompt:
NSS CACHESTATS
The best indicator for assessing server RAM in a Traditional file system is displayed in the following ways:
-
In Novell Remote Manager, click the link under the heading in the navigation frame, then click the link, and view the in the table.
-
In Monitor, from the menu, select and view the .
The value of this field should be a minimum of 15 to 20 minutes. A number lower than this indicates that the server’s memory resources might be low. Another good indicator, , is displayed on the same page or screen in either utility.
-
-
Also see Resolving Server Memory Problems.
Novell eDirectory Issues
-
eDirectory partitions. We recommend having no more than three replicas of each partition in the tree. Efficient tree design is essential to avoid utilization problems. Because Novell eDirectory needs to maintain synchronization among all servers in the replica ring, the more replicas there are of any partition, the more traffic will be on the wire. Three replicas are enough to provide fault tolerance and to allow for eDirectory if a database were to become corrupt.
-
eDirectory synchronization. To test the possibility that eDirectory synchronization is the problem, turn off inbound and outbound synchronization for an hour by setting dstrace=!D60.
After turning synchronization off, wait 5 to 15 minutes to allow the server to catch up with queued work. Cancel the test by setting dstrace=!E.
-
eDirectory errors. To test for other errors, run SET dstrace=On.
Client Issues
-
Hung connections. Check for them and clear them. See Clearing a Workstation Connection.
-
Client software. You can identify client problems by changing the NCP Set parameter. For more information, see
NCP Parameters
in the NW 6.5 SP8: Utilities Reference.By setting these server parameters to On, the server displays a warning each time a bad packet is received at the server. The warning message also includes the MAC (Media Access Control) addresses of devices where the packets originated.
These parameters are in the NCP category:
-
Display NCP Bad Component Warnings=On
-
Reject NCP Packets With Bad Components=On
-
Display NCP Bad Length Warnings=On
-
Reject NCP Packets With Bad Length=On
Update client software.
-
-
Cabling. If you have installed high-speed 100 MB network boards, you might need to upgrade your cabling, too.
If the problem still occurs, follow the troubleshooting steps in Using a Troubleshooting Methodology; review tips in TID 3790791 “Troubleshooting High Utilization On A NetWare Server:”; search the Novell Knowledgebase for High Utilization; and contact a Novell Support Provider.
6.5.6 Disk Errors
To resolve disk I/O, disk space, and mirroring problems, see the following sections:
Resolving General Server Disk I/O Errors
To resolve a general disk I/O error on the server, try one or more of the following remedies:
-
Check the disk subsystems to make sure that the power is on and the cables are correctly connected between the controller and the subsystems.
-
Make sure that the subsystem cables are terminated correctly.
-
Make sure that the hardware and disks are installed correctly.
-
Make sure that the current disk drivers loaded are certified for NetWare 6.5. Many drivers can be found on the NetWare 6.5 Operating System CD or on the master diskettes. Updated drivers might also be available from third-party disk driver manufacturers.
-
Make sure that the interrupt parameters, I/O port settings, slot settings, etc., for the driver match those for the hardware. Also, make sure that the custom parameters have been set correctly for your hardware.
-
Make sure all devices are recognized.
-
Make sure that the device is visible and has a valid Hot Fix partition.
If you have tried all the preceding suggestions without success, contact your Novell Support Provider or the drive manufacturer.
Resolving Server Disk Space Problems
To resolve an insufficient disk space error, do one or more of the following:
-
Delete unnecessary files and directories from the volume.
-
Change the Minimum File Delete Wait Time Set parameter in your server’s autoexec.ncf file equal to 0 so that files can be removed immediately rather than being retained in a salvageable state on the volume.
-
Purge deleted files if they cannot be purged automatically. (The deleted files are using up directory table space.)
-
Increase the volume size and/or add more disks to the volume.
-
Increase the percentage of disk space that can be used by a directory.
-
If the disk or volume does have space available, check the disk drives and disk channel to see if a failure has occurred.
-
Delete NLM programs that you no longer use.
-
Check and adjust or remove any volume restrictions placed upon users.
-
Check the size of error or log files and delete any that are unnecessary.
Mirrored Partitions Do Not Remirror Automatically
When mirrored partitions become unsynchronized, they should resynchronize automatically. If partitions do not resynchronize, complete the following steps:
-
In ConsoleOne, browse and select the tree you want to manage, then click the icon.
-
Enter the eDirectory tree and context and server information.
-
Click > > > .
-
If the partitions still do not resynchronize, you must re-create the mirrored set.
-
Determine which disk partition has the data you want to save and mirror.
-
Delete the other disk partitions.
-
Recreate new partitions in place of the ones you deleted.
-
Mirror the partition containing data to the new partitions.
For information about mirroring, see
Managing NSS Software RAID Devices
in the NW 6.5 SP8: NSS File System Administration Guide.
-
If the problem still occurs, follow the troubleshooting steps in Using a Troubleshooting Methodology, search the Novell Knowledgebase, and contact a Novell Support Provider.
Mirroring Takes a Long Time
If partitions are very large, mirroring can sometimes take several hours to complete; this is normal. The following might help to speed the mirroring process:
-
Make sure you are using the latest disk drivers.
-
Make sure there are no problems related with the hard disks or drivers you are using.
For known problems with specific hard disks or drivers, contact the drive vendor to ask if there are ways to speed drive mirroring. For example, some drivers can be loaded with parameters that speed the mirroring process.
-
Make sure the Enable Disk Read After Write Verify (Disk category) Set parameter is set to Off.
Most disk drives provide their own form of read-after-write verification; therefore, NetWare’s read-after-write-verify feature is not needed and can increase the time required to mirror partitions.
-
If the Maximum Concurrent Disk Cache Writes (Traditional File System category) parameter is set at the default value or lower, try increasing the setting.
IMPORTANT:Increasing the value too much can cause some disk controllers or drivers to fail. You must experiment to see if a larger value speeds the mirroring process.
If the problem still occurs, follow the troubleshooting steps in Using a Troubleshooting Methodology, search the Novell Knowledgebase, and contact a Novell Support Provider.
Mirroring Stops Just Before It Is Finished
Sometimes, the mirroring process proceeds without error but stops at 99% completion. To troubleshoot the problem, do the following:
-
Check whether any faulty disk blocks exist.
If there are faulty disk blocks, troubleshoot and replace the disk if necessary.
-
Make sure you are using the latest disk drivers.
-
Make sure there are no problems related with the hard disks or drivers you are using.
For known problems with specific hard disks or drivers, contact the drive vendor.
-
If the Maximum Concurrent Disk Cache Writes (Traditional File System category) parameter is set at its highest value, try reducing the setting.
If the problem still occurs, follow the troubleshooting steps in Using a Troubleshooting Methodology, search the Novell Knowledgebase, and contact a Novell Support Provider.
Resolving Disk Error Problems When a Traditional Volume Is Mounting
To diagnose problems when disk errors occur while a Traditional volume is mounting, identify whether the following conditions exist:
-
The server does not have enough memory to mount the volume.
-
The operating system is experiencing directory sector mismatching. This mismatching can be caused if the media is defective or if the server is turned off without the DOWN command.
To resolve problems when disk errors while a volume is mounting, do the following:
-
Load Monitor and check the status of the available cache buffers. If the cache buffers are fewer than 20%, add more memory to your server.
-
Minor errors usually correct themselves through normal network use. For example, if a FAT entry is wrong, the entry is updated and corrected the next time it is written to. If errors do not correct themselves, run VREPAIR.
-
Some problems might be corrected automatically by TTS™ (Transaction Tracking System™) software.
6.5.7 Resolving Server Memory Problems
To troubleshoot different kinds of server memory problems, to resolve memory leaks, and to resolve memory problems by freeing memory, see the following sections:
NetWare Doesn't Recognize All the Memory in the Server
Use the following steps to find the source of the problem.
-
Verify whether you are using the NetWare memory manager or an external memory manager. Does config.sys or autoexec.bat include a DOS=HIGH statement or commands to load memory managers or DOS device drivers? For example, is there a command to load himem.sys or emm386.exe? Both are memory managers.
Comment out these statements from config.sys or delete config.sys altogether. Comment out these statements from autoexec.bat. (To comment out a command, type REM and a space at the beginning of the command line.)
If there is a memory manager in the server, NetWare relies upon the memory manager to determine the amount of available memory instead of registering the memory itself. Some memory managers in older computers cannot recognize more than 64 MB of memory. DOS device drivers take memory away from the NetWare memory pool.
Make sure Windows 95 is not being used to boot the server. Windows 95 autoloads memory managers.
-
Make sure the server BIOS is current.
An out-of-date BIOS might be reporting the wrong amount of memory. If a newer version is available, update the BIOS.
If the problem still occurs, follow the troubleshooting steps in Using a Troubleshooting Methodology, search the Novell Knowledgebase, and contact a Novell Support Provider.
Resolving Server Memory Leaks
A memory leak means that an NLM or set of NLM programs has requested memory from the server, but has not returned the memory when finished with it. Over time, the amount of available memory decreases until eventually the server generates memory error messages. The memory leak might be slow or fast depending on the amount of memory requested each time.
If you reboot the server, the memory is returned to the memory pool, and the low memory error messages stop temporarily, until the memory leak ties up enough memory to generate the error messages again.
To see if the server has a memory leak, restart the server and then monitor memory statistics (Total Cache Buffers) over time. When traffic hasn’t increased and no new applications are installed on the server and the statistics change, use the following steps to find the source of the problem.
-
Load all the latest patches on the server.
Server patches are available from Patch Download Information for All Products and other locations. See Applying Patches for a list of sources.
-
Restart the server to free memory and establish a baseline for memory use.
-
View the memory statistics for the module:
-
Access Novell Remote Manager.
-
Click the link under the heading in the navigation frame.
-
Sort the list for memory usage by clicking the button.
-
Click the value link for allocated memory for each module name you suspect might be the source of the leak.
Under normal conditions, modules such as server.nlm, nss.nlm and ds.nlm are usually at the top of the list.
-
Print this page and use it as a the baseline as you monitor the module’s memory use over time.
-
-
Repeat Step 3 for each NLM program you suspect might be the source of a memory leak.
-
(Conditional) If the memory error messages occur again, repeat Step 3 to view the memory statistics for each suspected NLM program. Note whether memory use increased substantially for any of the modules.
If there is a memory leak, one or more modules will show a large increase in the Bytes in Use value.
-
When you discover the source of the memory leak, contact the module vendor to tell them about the problem. If possible, update the module or remove the module from the server.
Freeing Server Memory Temporarily
To free server memory temporarily (until you can add more memory to the server), do one or more of the following:
-
On Traditional volumes, delete unused files and directories and purge them.
-
Shorten the time period before deleted files are purged.
-
Lower the value of the Minimum File Delete Wait Time Set parameter (Common File System category).
-
Change the setting to On for the Immediate Purge of Deleted Files Set parameter (Common File System category).
-
-
Unload any NLM, such as NWCONFIG, Monitor, backup software, virus scanners, that is not currently needed.
-
Dismount Traditional volumes that are not being used and reduce the size or number of volumes that the server supports.
-
Streamline the directory structure. Every subdirectory in the Traditional file system takes at least one directory block (by default, a 4 KB block of memory). Therefore, subdirectories with only one file require as much memory as directories with 32 files.
If you combine directories so that most directories have about 32 files, and then purge the deleted subdirectories and files, you will free up memory.
-
Try converting volumes from the Traditional file system to the NSS file system. It requires less memory to mount NSS volumes. For procedures, see
Copying and Upgrading Legacy Volumes with Volume Copy Upgrade
in the NW 6.5 SP8: NSS File System Administration Guide. -
If you are using the Traditional file system, remove name space support.
WARNING:This is a destructive step that destroys all the extended file information. Before taking this step, try to free up enough memory so that the volume mounts and you can back up the data.
Have all users log out, and then unload all modules except the volume’s disk drivers. Dismount any mounted volumes.
To remove the name space, load VREPAIR, select and then select two options: and . Then run VREPAIR > on the volume that would not mount.
-
As a last resort, back up all files in the volume, bring down the server, and reinitialize the volume. Specify a block size of 64 KB and turn the Block Suballocation option to Off.
(This setting uses a lot of disk space but increases the amount of memory available.)
-
Check the autoexec.bat and config.sys files to make sure no memory managers, such as himem.sys or emm386.exe, are being loaded and that there is no DOS=HIGH statement in either file. Make sure no DOS device drivers are being loaded.
-
On NSS volumes, monitor and adjust the cache statistics. For more information, see
Tuning NSS Performance on NetWare
in the NW 6.5 SP8: NSS File System Administration Guide.
Resolving Memory Errors When a Traditional Volume Is Mounting
To diagnose problems when memory errors while a volume is mounting, identify whether the following conditions exist:
-
Traditional volumes take more memory to mount than they require after being mounted because the mounting process performs consistency checks (for example, the duplicate copies of all the tables are checked).
-
Traditional volumes and directory entries grow dynamically. Therefore, if your server is using most of the RAM (file cache buffers are close to 20% of the memory) and you dismount a volume, you might not be able to remount the volume unless additional memory is available.
-
Each additional name space support that you add to a Traditional volume increases the size of the FATs and DETs. Adding name space support can cause the tables to grow so large that the server does not have enough RAM to mount the volume.
To resolve problems when memory errors while a volume is mounting, perform the following actions or ensure that the following conditions exist:
-
Check the status of the available cache buffers. If the cache buffers are fewer than 20%, add more RAM to your server.
-
Free up memory by unloading resources.
-
Streamline the directory structure on Traditional volumes. Every subdirectory takes at least one directory block (by default, a 4 KB block of memory). Thus, subdirectories with only one file require as much memory as directories with 32 files.
If you combine directories so that most directories have about 32 files, and then purge the deleted subdirectories and files, you will free up memory.
-
Calculate how much memory you need and add memory to the server.
-
Note the Cache Buffers settings in the Server Memory Statistics.
If the percentage is below 20%, add more memory.
-
Remove the recently added name space support.
WARNING:This is a destructive step that destroys all the extended file information. Before taking this step, try to free up enough memory so that the volume mounts and you can back up the data.
Have all users log out, and then unload all modules except the server’s disk drivers. Dismount any mounted volumes.
To remove the name space, load VREPAIR, select and select two options: and . Then on the volume that would not mount, run VREPAIR, select .
Server Displays Memory Error Messages
Typical memory error messages include the following:
-
Cache memory allocator out of available memory
-
Cache memory allocator out of available memory, size requested was x bites by NLM_name.
-
Short term memory allocator is out of memory
-
Cache memory allocator exceeded the minimum cache buffer limit
If any of these conditions exist, use the following steps to find the source of the problem:
-
Make sure the server is not loading a memory manager or a DOS device drivers.
Check the autoexec.bat and config.sys files to make sure no memory managers, such as himem.sys or emm386.exe, are being loaded, and that there is no DOS=HIGH statement in either file. Make sure no DOS device drivers are being loaded.
Comment out these statements from config.sys or delete config.sys altogether. Comment out these statements from autoexec.bat. (To comment out a command, type rem and a space at the beginning of the command line.)
If there is a memory manager in the server, NetWare relies upon the memory manager to determine the amount of available memory instead of registering the memory itself. Some memory managers cannot recognize more than 64 MB of memory. DOS device drivers take memory away from NetWare’s memory pool.
Make sure Windows 95 is not being used to boot the server. Windows 95 autoloads memory managers.
-
Make sure the server BIOS is current.
An out-of-date BIOS might be reporting the wrong amount of memory. Update the BIOS if a newer version is available.
-
Verify that the setting for the Reserved Buffers Below 16 MB Set parameter (Memory category) is set at 300 or higher.
For older drivers, increase the value to 300 or higher, especially if there is a CD or tape device that needs memory below 16 MB.
-
Make sure memory is being registered automatically.
Manually registering memory can cause memory fragmentation. Some old system boards might require you to register memory manually, but the better solution is to upgrade to a newer board so that NetWare will register the memory automatically.
If memory has been registered manually, reboot the server to free memory and do not manually register memory again. Upgrade the system board if necessary.
-
Verify whether memory errors occur when a Traditional volume is mounting.
If yes, the server might be low on memory.
To free memory temporarily, see Freeing Server Memory Temporarily. To solve the problem, add more RAM.
-
Verify whether the LRU Sitting Time (in Novell Remote Manager or Monitor) average is more than 15 minutes during peak work hours.
If no, the server might be low on memory.
To free memory temporarily, see Freeing Server Memory Temporarily. To use the LRU Sitting Time to tune memory, see
Tuning File Cache
in the NW 6.5 SP8: Server Memory Administration Guide. To solve the problem, add more RAM. -
Check for memory leaks.
Do the LRU Sitting Time and Long Term Cache Hits gradually decline over time, even when network traffic has not increased and no new applications have been installed on the server?
If yes, the server might have a memory leak. See Resolving Server Memory Leaks.
If the problem still occurs, follow the troubleshooting steps in Using a Troubleshooting Methodology, search the Novell Knowledgebase, and contact a Novell Support Provider.
6.5.8 Resolving Locked Device Errors
To resolve a locked device error, try one or more of the following:
-
Wait for a while (sometimes a few hours); the task in process might complete and free the device.
-
Retry the action that resulted in the error.
-
Delete all user connections and disable logins.
-
For a disk device error, unload NLM programs (other than the device driver) that might be using the disk. Dismount all volumes on the disk.
If you have tried all of the above without success, contact a Novell Support Provider or the drive manufacturer.
6.5.9 Resolving Event Control Block Allocation Errors
Event control block allocation system messages can occur when you first start the server or after the server has been running for some time.
These messages indicate that the server was unable to acquire sufficient packet receive buffers, usually called event control blocks (ECBs). Running out of ECBs is not a fatal condition. However, it can indicate either a LAN or server problem.
Servers that run for several days where high loads occur in peaks might exceed the set maximum number of ECBs, causing the system to generate ECB system messages.
If these situations are caused by occasional peaks in the memory demand, you should probably maintain your current maximum ECB allocation and allow the message to be generated at those times.
Otherwise, if your server memory load is very high and you receive frequent ECB allocation errors, try setting your maximum ECB allocation higher. Use the following SET command in the startup.ncf file:
SET MAXIMUM PACKET RECEIVE BUFFERS=number
Memory allocated for ECBs cannot be used for other purposes.
The minimum number of buffers available for the server can also be set in the startup.ncf file with the following command:
SET MINIMUM PACKET RECEIVE BUFFERS=number
6.5.10 Resolving Server Console Command Problems
To diagnose server console command problems, identify whether the following conditions exist:
-
Some Set parameters can only be set in the startup.ncf file.
-
You are not at the System Console screen prompt. Press Alt+Esc to toggle through the screens.
-
The server has been shut down.
-
The server has failed (hung).
-
The server.exe file is corrupted.
-
The network operating system has been configured incorrectly.
To resolve server console command problems, do the following:
-
Enter the Set parameter in the startup.ncf file and then shut down and restart the server.
-
Make sure that all cables are fastened securely to all network boards and network connectors. Make sure that terminating resistors are installed correctly.
-
From a backup, or from the NetWare 6.5 Operating System CD, copy a new version of server.exe to the server boot directory. Have all users close their files and log out.
Shut down the server, if possible. If not, wait a few minutes after all users have logged out, and then reboot the server.
-
Check the hardware configuration on each network board in the server to make sure that the configuration is correct.
-
If you recorded network board configurations and they do not agree with the actual hardware configurations, reload the LAN driver with the correct parameters or change the hardware settings to match the LAN driver parameters.
-
Check all network board settings for possible interrupt and I/O port conflicts. The server can boot up initially even if the interrupt on a network board is set incorrectly.
The most common conflict occurs when a network board is set to interrupt 4 and a printer is connected to the server’s serial port, which also uses interrupt 4.
-
Run a virus scan on the DOS partition.
6.5.11 Resolving Keyboard Locking Problems When Copying Files from CD-ROM
To diagnose keyboard locking problems when copying files from CD-ROM, identify whether the following conditions exist.
If you have a CD device that shares a SCSI bus with a disk subsystem containing volumes that network operating system installation files are copied to (typically volume sys:), your keyboard might lock while loading drivers or copying files to the volume. The following figure shows possible configuration conflicts.
Figure 6-1 Possible SCSI channel conflicts during a NetWare installation
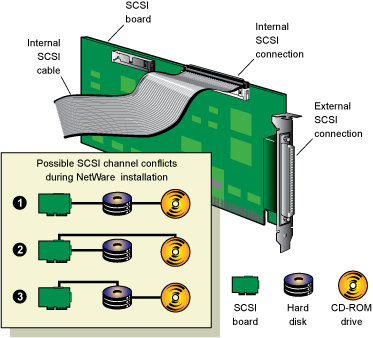
Remove the CD device drivers that you used to set up the CD drive as a DOS device from your config.sys file. This will avoid possible conflicts when the Operating System CD is mounted as a NetWare volume.
To resolve keyboard locking problems when copying files from the CD, use the following procedure:
-
Press Alt+Esc until you are at the System Console prompt.
-
Enter DOWN.
-
Using a text editor, remove the CD device drivers from your config.sys file.
-
Save the updated config.sys file.
-
Using a text editor, remove any references to the CD drivers from your autoexec.bat file.
-
Save the updated autoexec.bat file.
-
Reboot the server by pressing Ctrl+Alt+Del.
-
(Conditional) If the server doesn’t boot automatically from the autoexec.bat file, change to the subdirectory where the server.exe file and other boot files are located (the default is c:\nwserver), and enter the following at the DOS prompt:
SERVER
-
(Conditional) If you are using ASPI device drivers (for example, for an Adaptec* controller), you need to enter one of the following commands:
AHAxxxx
where xxxx specifies the Adaptec board number
or
ASPICD
or
CDNASPI
-
At the System Console prompt, enter
nwpa
-
(Optional) At the System Console prompt, enter cd device list.
A list appears with numbers associated with all the devices on your network. Determine which number is the volume number.
-
At the System Console prompt, enter
cddvd.nss cd mount volume_name|number
-
At the System Console prompt, enter
nwconfig