Path: Retain Reporting and Monitoring ServerReport or Scheduled Report drop-down
Reports and Scheduled reports have the same titles and contain the same information. Reports are generated one time as requested; Scheduled reports are generated at specified intervals.
Table 4-7 outlines the main differences between the Reports and Scheduled Reports.
Table 4-7 Reports vs.Schedule Reports
Feature or Item |
Report |
Schedule Report |
|
---|---|---|---|
Reports Available |
All summarized in Retain’s Reports. |
Reports not available as scheduled reports include:
|
|
Output Format Availability: |
|
|
|
|
HTML |
Yes (In-browser only) |
No |
|
|
Yes |
Yes |
|
XLS |
Yes |
Yes |
|
CSV (for Audit User Activity, Export Audit Table, and Device Management reports only) |
Yes |
Yes |
In-browser Delivery |
Yes |
No |
|
Email Delivery |
Yes |
Yes |
|
Automatic Report Generation |
No |
Yes |
|
Report Date Range |
Generated reports include the Start Date thru the End Date specified. |
The result of the specified Use Data from Last range of time counted back from each report generation specified by the Send Report value. For example, if the R&M server uses data from the last 1 day and sends a report Daily, each report covers exactly one day. Obviously it is possible to specify reports that either overlap or miss periods of time. |
|
Report Start and End Dates |
One report only is generated for each request made. |
Report generation starts on the date specified for the Schedule Start Date field. If the Schedule End Date field is blank, reports are generated until specifications change. If a Schedule End Date is set, report generation ceases on the specified date. |
|
Report Size and Multiple Pages |
Settings vary by report. Some let you limit the number of errors reported or set other limitations. If you select an output other than HTML, some reports let you limit the file size, number of pages, etc. |
Generally, the same settings available for the Report version are also available for the Schedule Report version of the same report. |
The process for creating scheduled reports is illustrated and briefly explained in the following graphic and table.
Figure 4-1 Reports Scheduling Overview
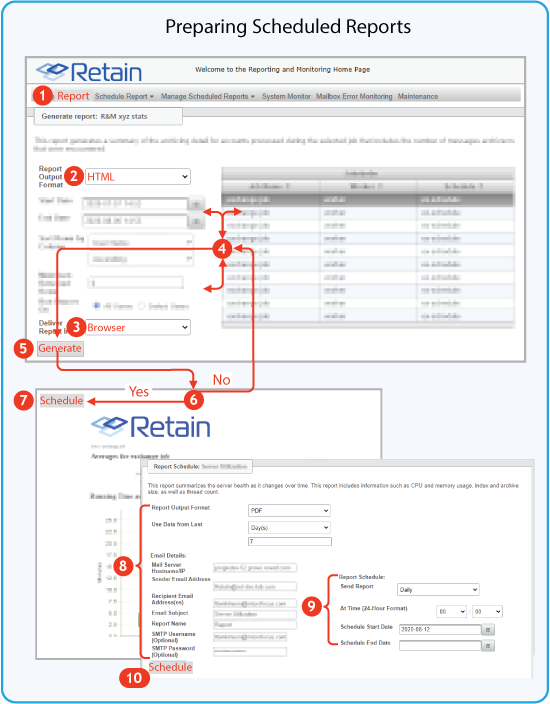
Table 4-8 Setting up a Scheduled Report
Number |
Details |
---|---|
In the R&M server console, click the Report tab and select a report that you want to schedule for regular generation. IMPORTANT:The Job Run Summary and Job Run Mailbox Summary reports are not available for scheduling. |
|
Select HTML as the report output format. |
|
Specify Browser delivery for the report you are setting up. This lets you quickly view in your browser what is being reported. |
|
Adjust the report parameters as needed for the data that you want included in the report. |
|
Click Generate. An HTML rendition of the report displays. |
|
Review the report contents. Then if you want to adjust the output, return to Step 4 and adjust the parameters. |
|
When the generated report meets your needs, click Schedule. The Schedule dialog opens. |
|
Specify the output format you want (PDF or XLS) and the SMTP settings for delivery of the generated report as an email attachment. |
|
Specify the schedule for when, how often, and how long you want the report generated. |
|
Click Schedule. Retain generates and sends regular reports according to the schedule you have specified. |
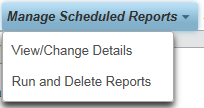
If you choose to deliver an R&M server report in email, the Email Details panel displays for specifying the SMTP server to use.
By default the R&M server is configured with the same SMTP configuration as you specified for Retain in SMTP Notifications
in the Retain 4.9.2: Installation and Upgrade guide.
You can specify a different configuration here if needed.
Table 4-9 Specifying R&M Report Delivery through Email
Email Details Panel |
||||
|
||||
|
Mail Server Hostname/IP |
The DNS hostname (preferred) or IP address of the SMTP server that the R&M server uses for emailing notifications. |
||
|
Sender Email Address |
The From address shown on the messages that the R&M server sends. |
||
|
Recipient Email Addresses |
The email addresses of report recipients. |
||
|
Email Subject |
The Subject line on the sent email. |
||
|
Report Name |
The reports filename. |
||
|
SMTP Username (Optional) |
A username on the SMTP server. Optional if the SMTP server doesn’t require authentication. |
||
|
SMTP Password (Optional) |
The password of the user. |
You can modify, manually run, or delete scheduled reports by using the Manage Scheduled Reports drop-down options.
Path: Retain Reporting and Monitoring Server > Manage Scheduled Reports Drop-down
Path: Retain Reporting and Monitoring Server > Manage Scheduled Reports Drop-down > View/Change Details
To modify or view a report’s settings, select a report in the list, then click View/Change Details.
The report’s configuration dialog opens.
Adjust the report’s settings as needed.
Click Update to save your changes or Cancel to leave the settings unchanged.
Path: Retain Reporting and Monitoring Server > Manage Scheduled Reports Drop-down > Run and Delete Reports
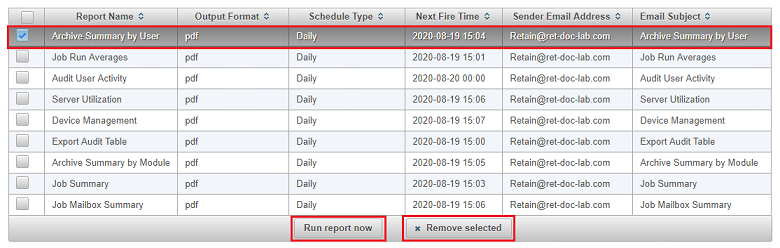
To run a listed report, select its checkbox in the list, then click Run Report Now.
To delete one or more reports, select the checkboxes for the reports you want to delete.
Click Remove Selected.
The selected reports are removed.