4.5 Retain’s Reports
The following sections detail the content of each R&M report.
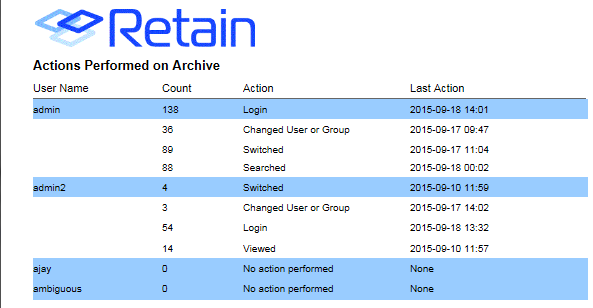
4.5.1 Audit User Activity
Report Contents: A summary of all specified auditable actions by each user.
See Table 2-20 for instructions on specifying which actions are logged and therefore available for reporting.
Path: Retain Reporting and Monitoring Server or >
Table 4-10 Configuring an Audit User Activity Report
|
Section or Item |
Information or Action |
|||
|---|---|---|---|---|
|
Report Parameters |
||||
|
There are no report-specific parameters to set for this report. For help with setting standard report parameters, such as email delivery and schedule settings, see Defining, Scheduling, and Managing Retain Reports. |
||||
Figure 4-2 Sample Audit User Activity Report
4.5.2 Export Audit Table
Report Contents: A customized view of the Audit Log, showing the users and events that you specify, with report contents organized by the column that you specify.
Path: Retain Reporting and Monitoring Server or >
Table 4-11 Configuring an Audit Table Report
|
Section or Item |
Information or Action |
|||
|---|---|---|---|---|
|
Report Parameters |
||||
|
For help with setting standard report parameters, such as email delivery and schedule settings, see Defining, Scheduling, and Managing Retain Reports. |
||||
|
Sort Rows by Column |
|
||
|
Action |
|
||
|
Run Report on |
|
|||
Figure 4-3 Sample Export Audit Table Report
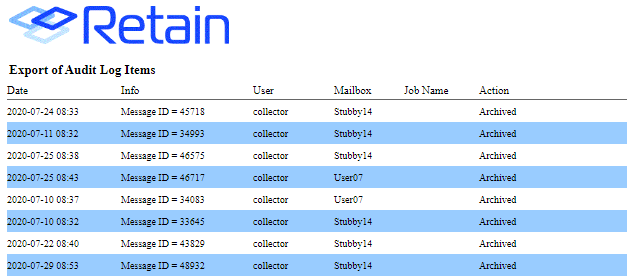
This report is also available on systems without a Retain Reporting and Monitoring Server installed. For help, see Auditing Option (Overview).
4.5.3 Job Run Averages
Report Contents: A.chart for one or more selected jobs, showing and comparing the jobs’ effectiveness, overall load, and performance.
Path: Retain Reporting and Monitoring Server or >
Table 4-12 Configuring a Job Run Averages Report
|
Section or Item |
Information or Action |
|||
|---|---|---|---|---|
|
Report Parameters |
||||
|
For help with setting standard report parameters, such as email delivery and schedule settings, see Defining, Scheduling, and Managing Retain Reports. |
||||
|
Jobs |
|
||
Figure 4-4 Sample Job Run Averages
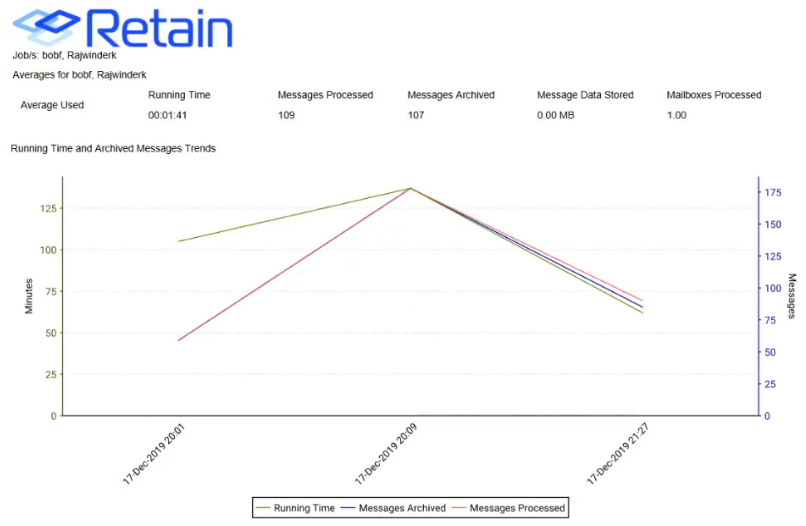
You can see performance trends when you compare run time with message counts over a time period. The averages used to create the graph are listed above the graph; the legend is below.
4.5.4 Job Run Summary
The Job Run Summary report covers one job run in detail.
Table 4-13 Configuring a Job Run Summary Report
|
Section or Item |
Information or Action |
|||
|---|---|---|---|---|
|
Report Parameters |
||||
|
For help with setting standard report parameters, such as email delivery and schedule settings, see Defining, Scheduling, and Managing Retain Reports. |
||||
|
Job Run Summary |
|
|||
|
Job Name > Select a Value drop-down |
|
|||
Figure 4-5 A Sample Job Run Summary Report
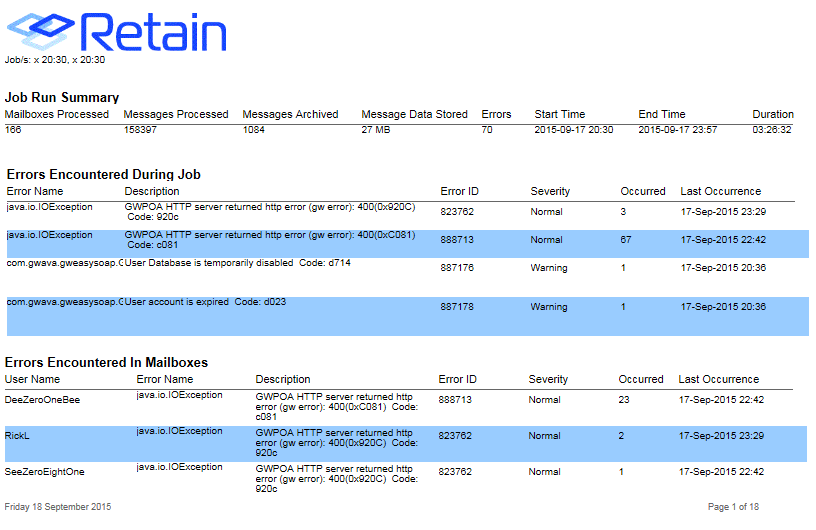
The summary displays the total mailboxes, messages, data store, errors, and running time of the job. Afterwards, this information is broken down by each mailbox the job covers.
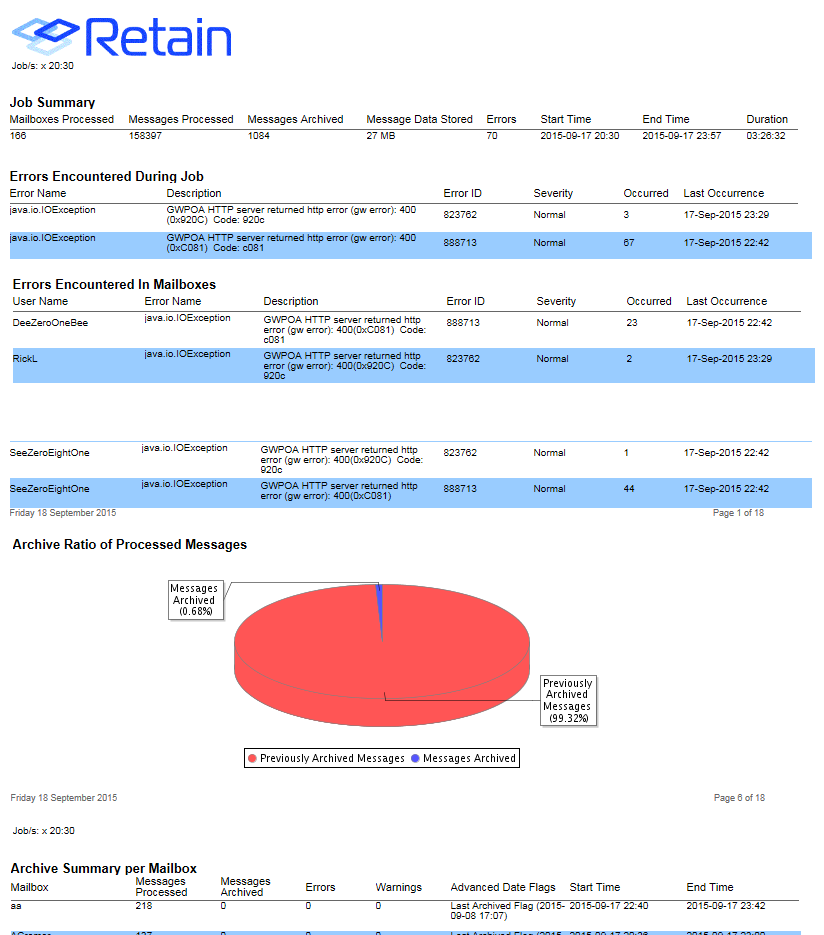
4.5.5 Job Summary
The Job Summary reports on the same statistics as the Job Run Summary report, but it summarizes the complete history for all runs of a given job rather than a single run.
Path: Retain Reporting and Monitoring Server or >
Table 4-14 Configuring a Job Summary Report
|
Section or Item |
Information or Action |
|||
|---|---|---|---|---|
|
Report Parameters |
||||
|
For help with setting standard report parameters, such as email delivery and schedule settings, see Defining, Scheduling, and Managing Retain Reports. |
||||
|
Job Summary |
|
|||
|
Job Name |
|
||
Figure 4-6 A Sample Job Summary Report
4.5.6 Archive Summary by User
This report summarizes the archive history for selected users, including pertinent information for each mailbox over the previous 3 months.
While the report cannot be sorted after it is generated, it may be sorted at generation through the ‘Sort Rows by Column’ feature. The columns may be sorted by either descending or ascending order. Select ‘Generate’ to create the report.
Path: Retain Reporting and Monitoring Server or >
Table 4-15 Configuring an Archive Summary by User Report
|
Section or Item |
Information or Action |
|||
|---|---|---|---|---|
|
Report Parameters |
||||
|
For help with setting standard report parameters, such as email delivery and schedule settings, see Defining, Scheduling, and Managing Retain Reports. |
||||
|
Sort Rows by Column |
|
|||
|
Maximum Returned Rows |
|
||
|
Run Report On |
|
||
The report displays the total information for every mailbox selected, including: User name, the time stamps and their advanced dates, and the message store for the associated user.
Figure 4-7 A Sample Archive Summary by User Report
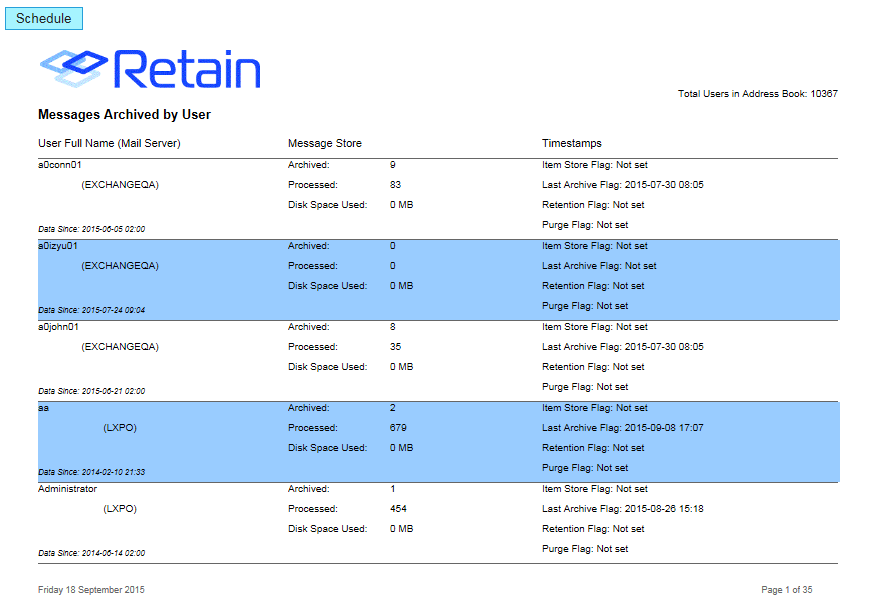
Administrators often use this report to monitor disk space usage and messages processed and stored on a user-by-user basis.
4.5.8 Server Utilization
The Server Utilization report shows the memory, CPU utilization, archive size, thread usage, index size, heap memory, and non-heap memory usage for the Retain server.
Path: Retain Reporting and Monitoring Server or >
Table 4-17 Configuring an Archive Summary by Module Report
|
Section or Item |
Information or Action |
|||
|---|---|---|---|---|
|
Report Parameters |
||||
|
For help with setting standard report parameters, such as email delivery and schedule settings, see Defining, Scheduling, and Managing Retain Reports. |
||||
|
Module |
|
|||
Figure 4-8 A Sample Server Utilization Report

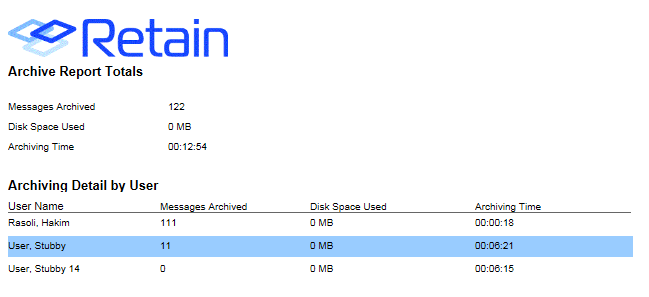
4.5.9 Job Run Mailbox Summary
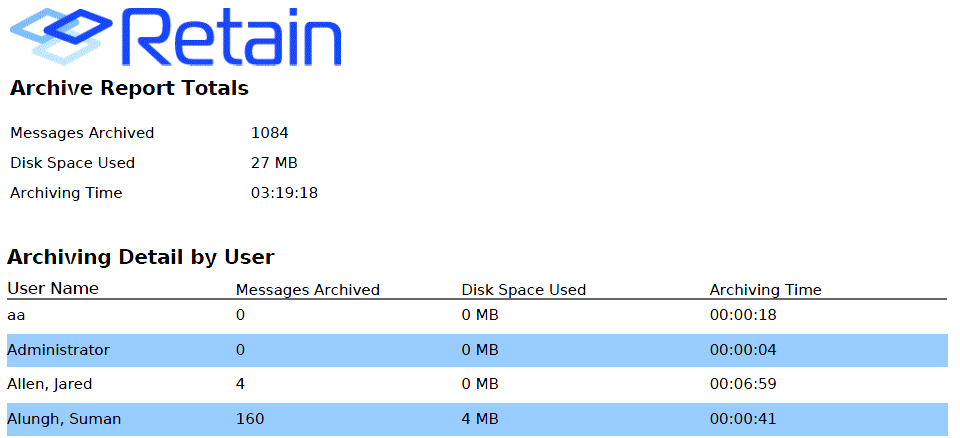
The report shows the user name, messages archived, disk space used, and archiving time for each mailbox as well as for the total job run.
Table 4-18 Configuring a Job Run Mailbox Summary Report
|
Section or Item |
Information or Action |
|||
|---|---|---|---|---|
|
Report Parameters |
||||
|
For help with setting standard report parameters, such as email delivery and schedule settings, see Defining, Scheduling, and Managing Retain Reports. |
||||
|
Job Runs List |
|
|||
|
Job Name > Select a Value drop-down |
|
|||
|
Run Report on |
|
|||
Figure 4-9 A Sample Job Run Mailbox Summary Report
This report cannot be scheduled.
4.5.10 Job Mailbox Summary
The Job Mailbox Summary report displays the number of messages archived, the disk space used, and the time the job took, by individual, specified mailboxes (users).
Path: Retain Reporting and Monitoring Server or >
Table 4-19 Configuring a Job Mailbox Summary Report
|
Section or Item |
Information or Action |
|||
|---|---|---|---|---|
|
Report Parameters |
||||
|
For help with setting standard report parameters, such as email delivery and schedule settings, see Defining, Scheduling, and Managing Retain Reports. |
||||
|
Jobs List |
|
|||
|
Sort Rows by Column |
|
|||
|
Job Name > Select a Value drop-down |
|
|||
|
Run Report on |
|
|||
Figure 4-10 A Sample Job Mailbox Summary Report
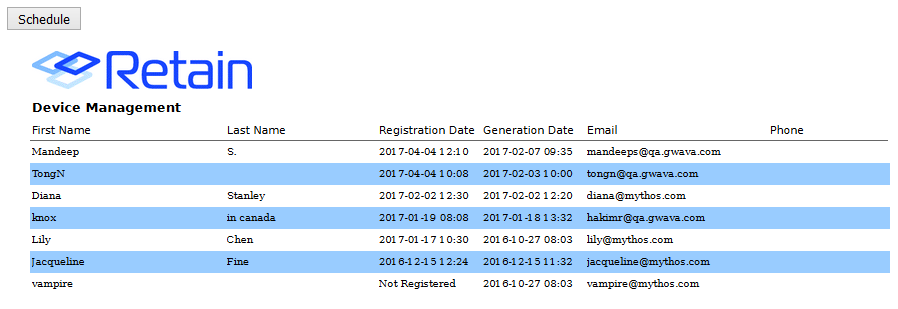
4.5.11 Device Management
The device management report generates the device registration details by user, generation time, registration time.
Path: Retain Reporting and Monitoring Server or >
Table 4-20 Configuring a Device Management Report
|
Section or Item |
Information or Action |
|||
|---|---|---|---|---|
|
Report Parameters |
||||
|
For help with setting standard report parameters, such as email delivery and schedule settings, see Defining, Scheduling, and Managing Retain Reports. |
||||
|
Sort Rows by Column |
|
|||
|
Actions |
|
|||
|
Email Details |
|
|||
|
Report Schedule |
|
|||
Figure 4-11 A Sample Device Management Report