3.3 Authentication

By default, users with archived content can authenticate to Retain using their messaging system credentials. Retain automatically adds the users when their messages and other content is archived.

You can also create Retain-specific user accounts and, for example, assign them administrative or auditing capabilities.

The Server Configuration > Accounts tab lets you control the creation and functionality of all Retain user accounts, as outlined in the following sections:

3.3.1 General Account Control

The Account Management Panel, lets you control when new accounts are created, manage account expiration, prevent specific users from logging in, and set password strength (except where overridden by associated messaging systems).

3.3.2 Understanding Retain’s Multi-factor Authentication

Through an integration with NetIQ Advanced Authentication, Retain supports multi-factor authentication (MFA) for users originating on GroupWise and on-premise Exchange systems. Other users are not currently supported.

Figure 3-1 Determining When Multi-factor Authentication Applies

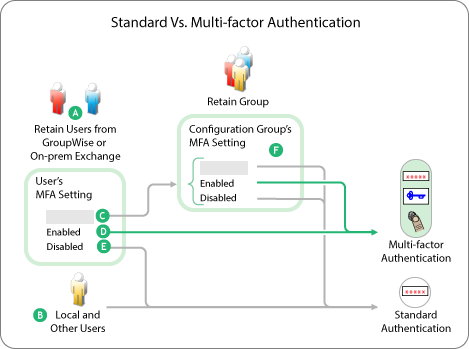
Table 3-3 Standard Vs. Multi-factor Authentication

Letter

Explanation

Only GroupWise and On-prem Exchange Users are supported for Multi-factor Authentication.

Local and other users authenticate using their username and password.


Multi-factor Authentication settings are available at the user and group levels as explained in User Settings Tab and Group Settings Tab. User settings always override group settings.

If a user’s MFA setting Is Blank (not set): Retain uses the user’s Configuration Group’s MFA setting. (See F.)

If a user’s MFA setting is Enabled: Retain displays the MFA prompts defined in the applicable NetIQ Advanced Authentication configuration. For more information about configuring Retain to interface with NetIQ Advanced Authentication, see Multi-factor Authentication Setup.

If a user’s MFA setting is disabled: Retain displays the standard authentication prompt.

If a user’s MFA setting is blank (see C), Retain uses the User’s Configuration Group’s setting as follows:

  • If the Group’s Setting Is Blank or Disabled: Retain displays the standard authentication prompt.

  • If the Group’s Setting Is Enabled: Retain displays the MFA prompts defined in the applicable NetIQ Advanced Authentication configuration.

Other Information about Multi-factor Authentication in Retain

  • Authentication is persistent: Credentials need only be entered once and last until the browser’s associated cookies have expired.

  • MFA can still work when the GroupWise or Exchange systems are offline: If a GroupWise or an on-prem Exchange user has previously connected to Retain using MFA, they can still log in to Retain using MFA, provided that the LDAP repository configured in Advanced Authentication is still accessible.

3.3.3 Multi-factor Authentication Setup

You are responsible to set up and configure MFA prior to implementing it in Retain. For help with setting up MFA on your email systems, refer to the NetIQ Advanced Authentication 6.3 Administration Guide (or to the guides for your version of the Advanced Authentication product).

To set up Multi-factor authentication support in Retain, do the following:

  1. Using your management browser, open the Retain Administrative Console and access the Accounts Tab > NetIQ Advanced Authentication Configuration Panel. See Figure 2-1, The NetIQ Advanced Authentication Configuration Panel.

  2. Select the option to enable Multi-factor Authentication.

  3. In the Server URL ... field, type the URL that you use to access the NetIQ Advanced Authentication server.

  4. In the configuration panel > Redirect URI field, modify the displayed URI as follows:

    1. Specify the protocol (HTTP or HTTPS) used for connections to this Retain server.

    2. Replace localhost with the DNS name or IP address of the Retain server.

    3. (Optional) If an alternate port is used for connections to the Retain server, modify the port number accordingly.

    4. Leave the rest of the URI intact.

      You copy this to the Advanced Authentication server in <step> below.

  5. Open a new tab in your management browser.

  6. Access the NetIQ Advanced Authentication administrative console as described in the Advanced Authentication Administration Guide.

  7. Create an "OAuth2 event" for the Retain server by following the steps in Creating an OAuth2.0/ OpenID Connect Event.

  8. Copy the generated OAuth2 Client ID and OAuth2 Client Secret from the AA admin console to their respective fields in the Retain console,

  9. While still in the Retain console, copy the modified URI (Step 4) in the Redirect URI field to the clipboard, then paste it in the Redirect URIs field in the OAuth2 event configuration dialog in the Advanced Authentication console.

    IMPORTANT:The URI on the Retain and AA servers must match exactly.

  10. Save the configurations in both consoles.

  11. Enable Multi-factor authentication on an individual user basis, or by including users in a Configuration Group and enabling MFA for the group.

    For information on enabling individual users, see Inheritable Settings from Group Panel (User context).

    For information on enabling multiple users, see Inheritable Settings from Group Panel (Group context).

  12. Using the Test Login with Advanced Authentication button, sign in as one of the users you have enabled for MFA.