3.1 Users
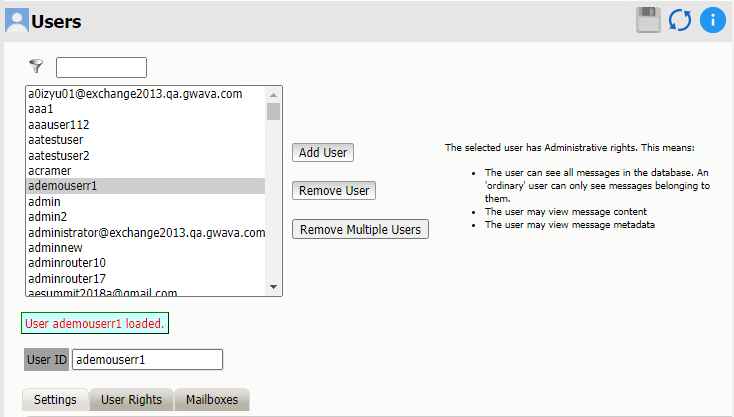
Path: Retain Server Manager >
User and Groups Management requires the Manage users and groups or the Assign Rights administrative right.
3.1.2 User Rights Tab
When an administrator-level right is granted to a user, that user will see that right in the management console when they log into Retain. If a right that the full Administrator can view is missing from the menu of that user, they are missing that right. To view and have access to that option, they must have the missing right granted to that user. If you have performed an upgrade and are missing options, check for a missing administrator right.
-
Control what rights you grant to the user here. Check the box to enable the right
-
These are extra rights
-
You don't need any of them for the user to access their mailboxes
-
You do need them to do “special things”. The first admin account gets them all
-
-
Retain first checks your assigned group and you start with the Group Rights
-
The rights you explicitly set here are added to the group rights for the user’s effective rights
-
This way, you can control users as a group and give different rights to different groups
-
If you don’t have rights to an administrative option, it won’t appear on the left
It should be clear from this screen that there is no such thing as an Administrator per se in Retain. Instead, some users simply have more rights to do more things than others. A distinction is made between Administrator level rights (which allow a user global system wide power) and User level rights, but any user can have zero or more rights in either category. The Administrator you created in the setup wizard was simply a user account with all of the Administrator level rights granted by default.
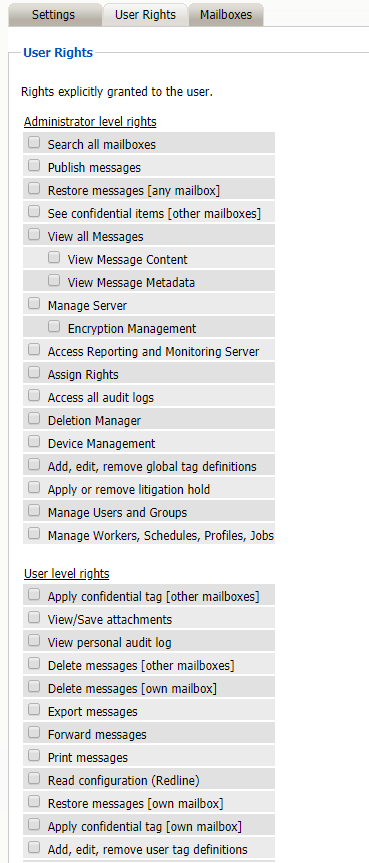
Administrator-level Rights
-
Search all mailboxes: also grants View all Messages rights.
-
Publish messages: allows user to connect to Retain with the Publisher tool.
-
Restore messages [any mailbox]: returns message to live mailbox in Exchange, adds stub to GroupWise mailbox.
-
See confidential items [other mailboxes]: Allows users to view items which others have tagged as confidential
-
View all messages: All messages and content in Search Messages.
-
View Message Content: Only the message body and attachments.
-
View Message Metadata: Only the properties of the message.
-
-
Manage Server: Allows user access to the Configuration section of the Retain Server and access diagnostic utilities.
-
Encryption Management: Generate and revoke storage encryption keys under Server Configuration | Storage.
-
-
Access Reporting and Monitoring Server
-
Assign Rights: Can assign rights to other users.
-
Access all audit logs: Enables access to the audit logs.
-
Deletion Manager: Access to Item and Mailbox Deletion.
-
Device Management: May add, remove, and edit devices.
-
Add, edit, remove global tag definitions: Allows manipulation of global tags in the view messages interface.
-
Apply or remove litigation hold: On individual users or groups.
-
Manage Users and Groups: Create users and groups and modify rights.
-
Manage Workers, Schedules, Profiles, Jobs: Control archive jobs.
NOTE:Only users with administrative rights will see the administrator’s screen on login. Non-admin users are simply forwarded to the Search Interface.
User-level Rights
All user level rights are strictly optional, and add functionality. None are needed to access your own mailbox and other mailboxes assigned to you. The "Default" group grants Forwarding, View Attachment, and Printing rights. Note: There is no way to perfectly block printing in a web browser, so using this feature should not be taken as a 100% guarantee that users won’t be able to print. Nonetheless, for most users, it is effective. Rights marked [other mailbox] refers to other mailboxes the user has been granted rights to as explained below for the Mailboxes tab.
-
Apply confidential tag [other mailboxes]
-
View/Save attachments
-
View personal audit log
-
Delete messages [other mailboxes]
-
Delete messages [own mailbox]
-
Export messages: Enables the export to PDF button.
-
Forward messages
-
Print messages
-
Read configuration (Redline)
-
Restore messages [own mailbox]
-
Apply confidential tag [own mailbox]
-
Add, edit, remove user tag definitions
The Read Configuration right (GroupWise Reporting and Monitoring Integration)
If you are integrating with GroupWise Reporting and Monitoring (GWRM) product, you will need to create a user account so that GWRM can log in and retrieve monitoring information. We recommend the following settings:
-
Account Never Expires
-
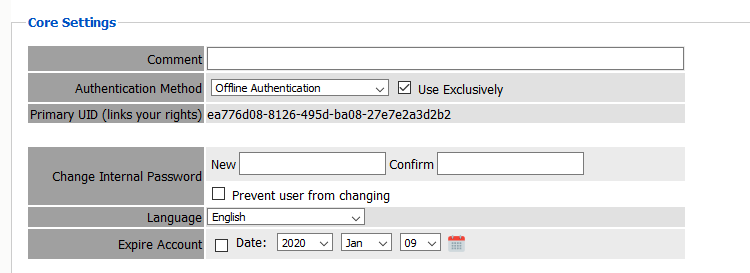
Offline Password Authentication is required. (use exclusively) (be sure to set the password)
-
Read Configuration (Redline) right.
3.1.3 Mailboxes Tab
Select the mailboxes this user will be able to access in addition to their own. This allows one user to access another user’s mailbox.

Granting Rights to All Mailboxes
You may want some users to be able to search through more than just their own mailbox. Administrators have the “Search All Mailboxes” under User Rights as a right which gives them access to everything. If that is too much access for that user you can grant rights to individual mailboxes.
Granting Rights to Individual Mailboxes
You may grant rights to some users so they can access just certain mailboxes. For example we can give the facilities manager rights to two of his workers.
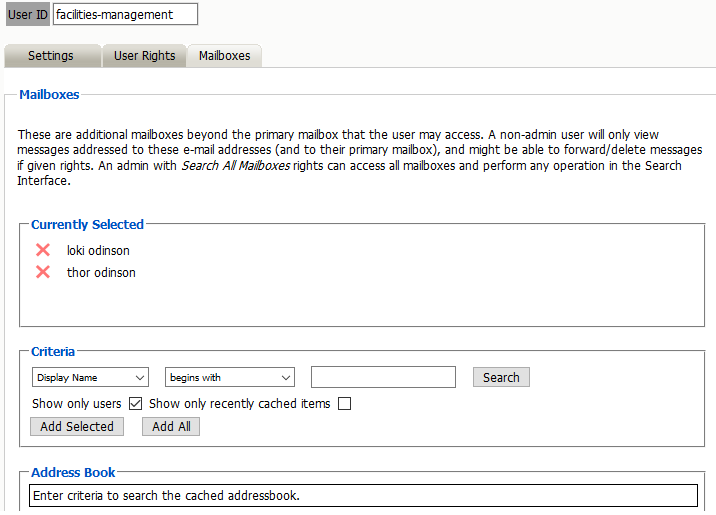
In the example above, the user has explicit rights to two mailboxes. These mailboxes can be taken away from the user simply by clicking on the red ‘X’.
Address Book Selector
Adding users to the list is done using the Address Book selector. In the criteria section, you may enter information to search for a mailbox or a set of mailboxes. The search results will appear in the Address Book section. Each listed entry has a check box you can use to select that mailbox for addition to the list. Once you are done selecting, click Add Selected Items to add those mailboxes to your list of searchable mailboxes.
This interface is utilized in various other areas, but is described here.
It shows the currently selected items at the top, and lets you delete an item by clicking the red X.
(The New Mailbox selector in the Search Interface is an exception; just choose another item)
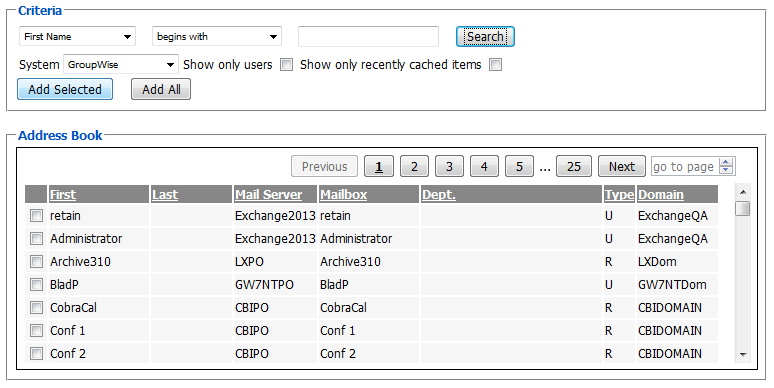
Adding Mailboxes
-
Choose between the configured module systems
-
Fill out basic criteria to narrow your search results (or no criteria for the first 100)
-
Click Search
-
The results up to a maximum of 100 are displayed
-
The user can then page back and forth among the first 5 pages of results
-
Choose which of the results you want to add to the selected list
-
Click Add Selected Items
Notes: You can restrict to just Users (skipping Resources). You can show only recently cached items (last 10 days). The search is not case sensitive.
About “Show only recently cached items”
This option restricts the list of items shown in the selector to those with items stored within the last 10 days. In user/group management, it restricts the list to users who have logged in to the live Mail system within the last 10 days. The idea is to show only current items. If you DO want to see all items regardless of whether they’ve shown activity within the last 10 days, just uncheck this option.
3.1.6 Creating a Retain Only User
-
Click the “Add User” button.
-
Enter a new user name and then fill out the options under each tab.
-
When you are done, click the save changes disk icon at the upper right