Before installing SecureLogin on workstations, review supported platforms, determine a type of installation, and complete pre-installation tasks.
Supported Platforms
Novell SecureLogin 3.0 supports the following platforms. Latest support packs are recommended for all platforms.
Servers
Novell Directory Services (NDS) on NetWare® 4.2 or NetWare 5.x or later
Novell eDirectory on NetWare, Windows* NT*, or Windows 2000
In the non-SecretStore mode, SecureLogin runs against eDirectory on any platform.
SecureLogin 3.0 only supports ConsoleOne® 1.3.2 or later.
Browsers: Internet Explorer 5.01 or later or Netscape* 4.7.x
Depending on workstation configurations, the browsers might behave differently.
Workstations: Windows 95 OSR2B, Windows 98 SE, Windows 2000, Windows XP, or Windows NT 4.0 or later
Windows 95 and Windows 98 workstations should have Novell ClientTM 3.21 or later.
Windows 2000 workstations must have Novell Client 4.71 or later.
The SecureLogin snap-in to ConsoleOne requires ConsoleOne 1.3.2 or later. The installation program can install version 1.3.3.
Types of SecureLogin Installations
When you install SecureLogin on a workstation, you must select one of the following installations:
Novell eDirectory with SecretStore
Novell eDirectory
LDAP v3.0 Compatible Directory
Other
Before installing on a workstation, complete necessary pre-installation tasks.
Novell eDirectory with SecretStore
The Novell eDirectory with SecretStore option installs SecureLogin onto networks that are running one of the following:
eDirectory on NetWare 5.1, NetWare 6, or Windows NT/2000 servers
NDS (NetWare 5.1 or later)
This option uses Novell's patented SecretStore client/server system to provide the highest possible level of security for user login data. SecretStore requires server components on the eDirectory server and SecureLogin client software on workstations.
Before Installing SecureLogin with SecretStore
If you plan to use SecureLogin with SecretStore, complete the following tasks before installing SecureLogin on a workstation:
Migrate earlier versions of Novell Single Sign-On or Novell SecureLogin.
Ensure that the workstation's current primary tree and server connections are set to the tree in which the SecretStore service has been installed.
Novell eDirectory
The Novell eDirectory option installs SecureLogin onto networks that are running NDS® (NetWare 4.2 or later) or eDirectory. This option provides secure, centralized storage of user login data by performing encryption once on the workstation before the data is saved to eDirectory. No server components are installed for this option. The first installation of client software must be done by an eDirectory administrator to extend the schema and assign user rights.
Before Installing SecureLogin with eDirectory
If you plan to use SecureLogin with eDirectory, complete the following tasks before installing SecureLogin on a workstation:
Before LDAP client support can be used, you must map NDS or eDirectory attribute names to LDAP names.
The LDAP v3.0 client option supports servers that have the following:
Novell eDirectory 85.0.1 or later.
LDAP support installed and running.
Establish a Novell Client connection to the NDS or eDirectory server where you want to run LDAP compatibility mode.
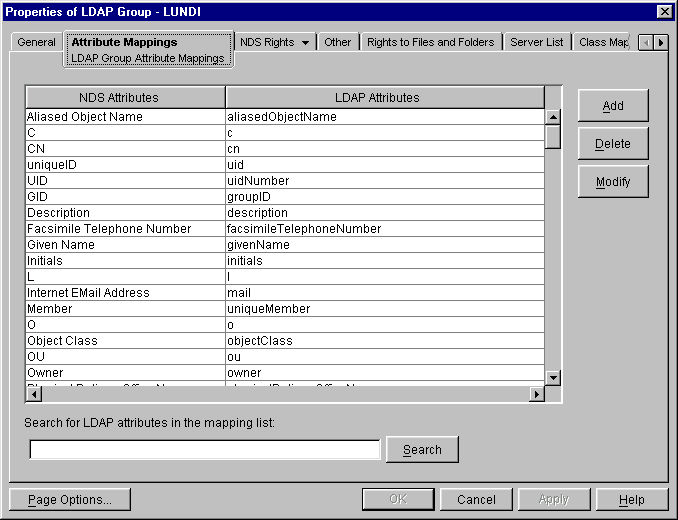
From that client connection, launch ConsoleOne.
Select the LDAP Group object for your server.
Display the Attribute Mappings tab by clicking Properties > Attribute Mappings.
If you can't locate this tab, you must install the LDAP snap-in to ConsoleOne. Download the snap-in from http://download.novell.com. Select ConsoleOne Snap-ins > On NetWare > NDS eDirectory 8.5 Snap-in.
Click Add.
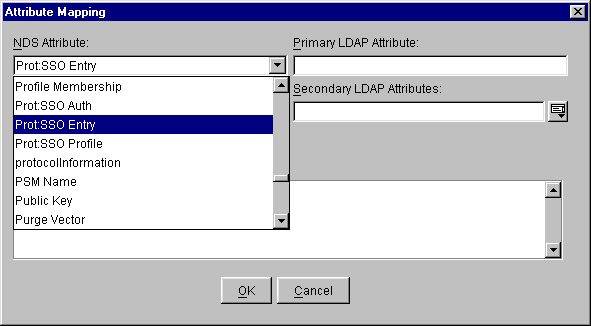
From the NDS Attribute drop-down list, select the Prot:SSO Entry attribute.
If the Prot:SSO Entry attribute is unavailable, run NDSSchema.exe or LDAPSchema.exe. These files are in the securelogin\tools directory.
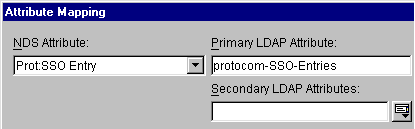
Map the Prot:SSO Entry attribute to protocom-SSO-Entries, as indicated in the following figure.
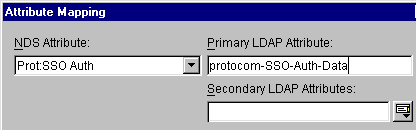
Similarly, map the Prot:SSO Auth attribute to protocom-SSO-Auth-Data.
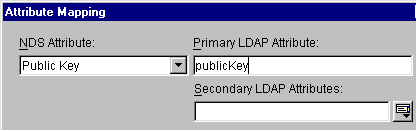
Similarly, map the Public Key attribute to publicKey.
Click Apply and then click Close.
Refresh the LDAP server.
If you are using ConsoleOne, right-click the LDAP Server object, click Properties, and then click Refresh NLDAP Server Now.
If you are using Novell iManager, click LDAP Management, click LDAP Overview, click View LDAP Servers, select the LDAP server, and then click Refresh.
Install a Trusted Root certificate by copying RootCert.der from sys:\public to c:\Program Files\novell\securelogin.
After you select the LDAP option during a SecureLogin installation, the installation program copies the RootCert.der file to the c:\program files\novell\securelogin directory. This is a placeholder file. You must replace RootCert.der with an actual Trusted Root certificate file. Users must browse to this file and use it for an SSL LDP bind on their client workstations.
When eDirectory is installed on NetWare, RootCert.der is exported to the sys:\public directory. When eDirectory is installed on Windows NT or Windows 2000, RootCert.der is exported to the winnt\profiles\administrator\recent directory.
If sys:\public or winnt\profiles\administrator\ recent is unavailable, you can create, export, and copy a TrustedRootCert.der file:
1. Create and export TrustedRootCert.der from the certificate by using the PKI snap-ins in ConsoleOne. (TrustedRootCert.der is the default name for the exported copy of the RootCert.der file.)
2. Copy TrustedRootCert.der from the location you put it into the \securelogin\client\Program Files\novell\securelogin directory (in a copy of the CD image).
3. Run setup.exe from the \securelogin\client directory.
Provide information for users.
When using the LDAP connectivity option, the user must provide LDAP server information during the first login. For subsequent logins, this information is automatically saved and entered into the login dialog box.
You must provide users with the following:
The registered DNS name or IP Address
The IP Port for secure LDAP
By default, this is port 636. When entered, it is saved in the workstation's registry for subsequent logins.
To simplify the initial LDAP login, you can preconfigure these registry values as part of an automated client deployment. To do this, modify the HKEY_CURRENT_USER registry key.
The following lines contain a sample registry entry:
For SecureLogin to be able to save user single sign-on information, the eDirectory schema must be extended. Therefore, for the first installation of SecureLogin into an eDirectory tree, run NDSSchema.exe. (You only extend the eDirectory tree schema once for SecureLogin.)
NDSschema.exe also grants existing users rights to the SecureLogin attributes on the User object. This file is in the securelogin\tools directory. You can run NDSSchema.exe multiple times to grant rights to users that you create after installing SecureLogin.
To extend the schema of a given tree, you must have sufficient rights over the [root] of the tree.
WARNING: Don't run NDSSchema.exe from a Windows 98 workstation. SecureLogin doesn't support using Windows 98 to run NDSSchema.exe.
At the securelogin\tools directory, run NDSSchema.exe.
The extension may take some time to filter throughout your network, depending on the size of your network and the speed of the links.
Enter an eDirectory context so that SecureLogin can assign rights to User objects.
You will be prompted to define a context where you want the User objects' rights to be updated, allowing users access to their own single sign-on credentials. The following figure illustrates this prompt:
If the installation program displays a message similar to -601 No Such Attribute, you have probably entered an incorrect context or included a leading dot in the context.
Preparing the Workstation
For Windows 95/98, Windows NT/2000, and Windows XP Pro workstations, install required software as listed in the following table:
Type of Installation
Required Software
eDirectory with SecretStore
Novell International Cryptographic Infrastructure (NICI) Client 2.02 or later
The latest Novell Client
eDirectory
The latest Novell Client
LDAP
Standalone
Other
None
None
SP6A for NT 4
To enable support for NMAS NDS Password disconnected login, set the registry key "NMAS required for disconnected mode" (a DWORD value) to 1. This key resides under HKEY_CURRENT_USER\Software\Protocom\SecureLogin.
To disable support, delete the DWORD value or set it to 0.