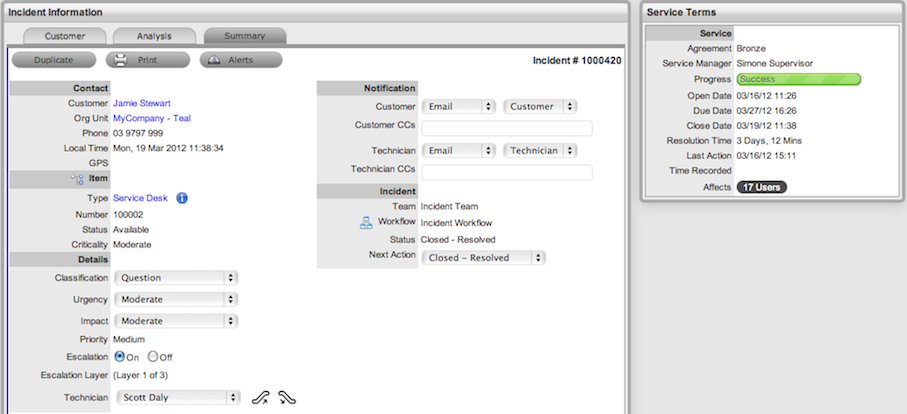
The Summary tab provides comprehensive details related to an Incident
and gives access to the tabs required to work on the Incident. To view
the details of a Customer select the Customer name link within the Incident
Information screen. The Customer and Item assigned to the Incident can
be updated within the Customer tab by selecting ![]() ,
when in Edit mode.
,
when in Edit mode.
The Incident Information Summary tab includes the following:
Summary Tab |
Description |
|---|---|
Contact |
Displays the Customer assigned to the Incident and their contact information. Click on the Customer Name or Org.Unit link for more details relating to Customer and Org Unit.
To update the Customer details assigned to the request, click on the Customer tab and ensure the Request is in edit mode. |
Send Survey |
This field is displayed when a Serviced Customer Survey is active in the system. The envelope icon allows the survey to be manually sent to the Customer. |
Item |
Displays the Item assigned
to the Incident. Scroll over Click
To update the Item details assigned to the request, click on the Customer tab and ensure the Request is in edit mode, or use the Update Item facility in the Relationships filter view of the impact tab. |
Details |
|
Classification |
Displays the Incident Classification that was selected when the Incident was created. This can be updated, if required. |
Priority |
Shows the priority of the Incident, which determines the Service Level triggers applied to the Incident. If the Derived option is enabled in the applications Setup, then the Urgency and Impact drop-down lists are displayed. The User is required to select the corresponding Urgency and Impact for the Incident to alter the Priority assigned. See Priority. |
Escalation |
This is visible if the Escalation Control option is enabled in the application Setup. This is only available to the Supervisor and allows them to disable the escalation timers. See Escalation. |
Escalation Layer |
Shows the number of levels of Escalation that exist in the Team assigned to the Incident, and at which level the Incident is currently assigned. |
Technician |
The name of the Technician assigned to the Incident.
When an Incident is assigned to the Queue, the name applied in the Technician field is System User. See: Queues. |
Notification |
|
Customer |
Shows how updates regarding the Incident are sent to the Customer who logged the Incident, or to all Owners of the Item associated with the Request. Customer CCs is a free text field for any additional notification recipients, these can be divided into Customer and Technician CC lists. See: Notification. |
Technician |
Allows the User to adjust the default Technician notification between None, Email or SMS for updating the assigned Technician, all Technicians in the Team or Layer of Escalation assigned to the Incident. Technician CCsis a free text field for any additional notification recipients, these can be divided into Customer and Technician CC lists. See: Notification. |
Alternate Team |
Is visible if the Notify Alternate Team option is enabled in the Admin>Email>Setup tab and another Team within the same Process is included in the system. This allows the User to define another Team to be notified about updates regarding the Incident. |
Incident |
|
Team |
Displays the default support Team assigned to the Incident. This can be changed by selecting another option within the drop-down list. The Team list is derived from the Workflow and Workflow State. |
Workflow |
Displays the default Workflow assigned to the Incident. This can be changed by selecting another option within the drop-down list. The Workflow list is derived from the SLA assigned to the Incident. Select |
Status |
Shows the current Workflow State of the Incident. See Status. |
Next Action |
Lists all the States available after the current Incident State. This is based on the Workflow assigned to the Incident. To move the Incident through the Workflow, select a Status included in the list displayed. |
Status Due |
Details the expiry time for the current Workflow State if the State has an OLA assigned. |
Service Terms |
|
Agreement |
Displays the Service Level Agreement assigned to the Incident. The SLA is derived from either the Item, Customer or Organizational Unit. |
Service Manager |
Displays the name of the Service Level Manager responsible for overseeing Incidents related to the assigned service agreement. |
Progress |
Visually displays how the Incident is tracking against the assigned SLA and displays the percentage of SLA used when greater than 10%. The grey progress bar is gradually filled in based on the status of the SLA:
|
Dates |
Summarizes the important date details for the Incident. The due date is automatically calculated based on the Service Level assigned to the Incident. See: Request Details. |
Time Recorded |
Displays the amount of time the Incident has been open and worked on. See: Time Recorded. |
Affects |
Displays the number of Users assigned to the Item. |
Only Technicians assigned to the Team can edit the Incident.
For each Incident additional details and options are available within the Summary tab. These allow Users to add Notes, analyze the Incident and view its history. The options include:
Summary Tab Buttons |
|
|
Edit opens the Incident in edit mode. This allows the Incident details to be amended, Notes to be added and time is automatically recorded against the Incident whilst in edit mode. |
|
Opens the Incident in edit mode and moves directly to the New Note editor. See: New Note |
|
Duplicate creates a copy of the Incident and links the copy to the original Incident. The User can then amend the Customer or Item details, if required. |
|
Print opens a summary of the Incident in a Print View window. This includes a Description and all Notes added to the Incident. It is a good alternative for viewing Incident information within one window when adding a new Note.
|
|
Allows the User to create or view reminders related to the Incident. When published it will be displayed like the normal alert icon. |
|
The escalation buttons allow the User to escalate the Incident to next layer within the Team, or de-escalate the Incident to the lower level, if required. |
After an Incident has been created, it may be necessary to change the assigned Customer or Item. This may be the case when the Unknown Item is associated with a request, or a Service Item has been assigned to the Incident and the relevant hardware, software or network Item needs to be associated with the Incident. When the "Allow Unknown" option is disabled in the Setup>Privileges>Requests tab and a Incident that is assigned to the Unknown Item is opened in Edit mode, the User will be prompted to update the Item assigned to the Incident before the Save button action can successfully record changes to the Incident.
This option is required when an Incident is created through Email, as the Item assigned may be the system's default Unknown Item or the Org Unit's default Item.
To change the Item:
Click the Incident's Edit button
Select the Incident's Customer tab
Click the Item
Number ![]()
The Find Item option appears.
Search and select a new Item
Click ![]()
Select the Summary tab to continue working on the Incident, or click Cancel and Done to close the Incident with the newly assigned Item.
Technicians do not have the ability to delete Incidents or Customers.
To change the Customer:
Click the Incident's Edit button
Select the Incident's Customer tab
Click ![]() next to the Customer Name
next to the Customer Name
Search and select a Customer
Click ![]()
If the Incident's Item needs to be altered as a result of the Customer
change the Find Item field appears. Search and select the appropriate
Item using the Find Item search.
Select the Summary tab, to continue working on the request
Click Save.
An Incident that has been logged against a Service Item, can be converted to a Service Request within the Analysis tab. This action results in the Service Request maintaining the same request identification number and audit trail, which records the conversion.
To convert an Incident logged against a Service Item to a Service Request:
Select Edit within the Analysis tab
Select the Convert to
Service Request option.
The Incident ID # is associated with a new Service Request and the
Request is assigned the Entry State of a relevant Service Request
Workflow. The audit trail of the Service Request records the conversion
time and date. The customer is not notified about the Process amendment.
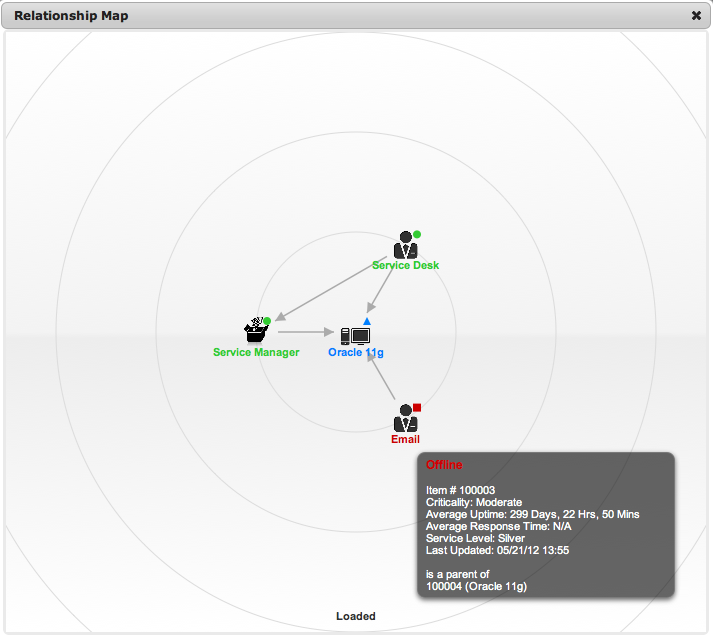
Selecting ![]() opens a pop-up window that displays a map of Items that are related to
the Request Item that can be navigated by clicking on the icons within
the map. To view related Item information, scroll over the relevant Item
icon.
opens a pop-up window that displays a map of Items that are related to
the Request Item that can be navigated by clicking on the icons within
the map. To view related Item information, scroll over the relevant Item
icon.
The Item associated with the request can be updated when in the request is in Edit mode:
Select ![]()
Navigate the map to move the relevant Item
icon to the central point of the map
Select the Item icon label in the Map to move it to the central node.
Click the icon label when it is in the middle
of the map
A warning message is displayed, prompting the confirmation of the Item
change.
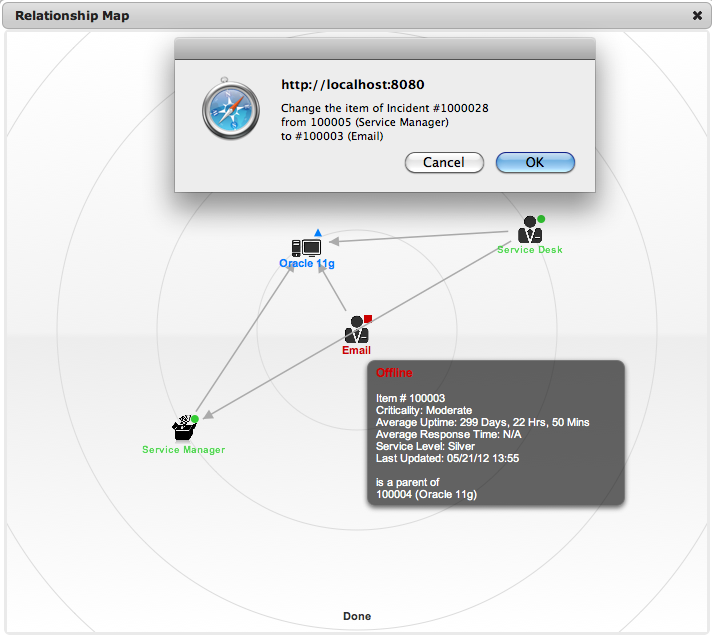
Select OK and the Item association will be
updated
(If the Enable Item Shadow option is enabled by the Administrator in
the Setup>Privileges>Customer tab, the change of Item information
will not be visible on the Customer Portal.)
Select ![]() to close the window.
to close the window.
The Item assignment change is recorded in the Audit tab.
See: Item Relationships