25.4 Upgrading Vibe on Linux
This section is organized as presented in the overview graphic below.
For your tracking convenience, the numbers at the beginning of the listed sections correspond with the numbers in the graphic.
25.4.1 Overview–The Linux Upgrade Process
The platform requirements of Vibe 3.4 and Vibe 4.0.5 or later on Linux don’t overlap.
Therefore, it’s not possible to upgrade from Vibe 3.4 to Vibe 4.0.5 or later on the same server hardware. Upgrading from 3.4 to 4.0.5 or later requires the installation of a new SLES 15 (or SLES 12) server along with the specific upgrade and migration processes that are outlined in Figure 25-1 and Table 25-1 and detailed in the sections referenced.
Figure 25-1 Graphical Overview–Upgrading from Vibe 3.4 to Vibe 4.0.5 or later
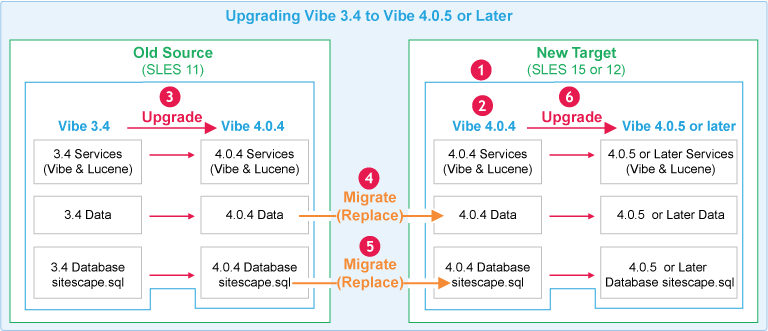
Table 25-1 Upgrade Process Explanation
|
Step |
Explanation |
|---|---|
|
|
|
|
|
|
|
|
|
|
|
|
|
|
|
|
|
|


25.4.3 3: Upgrading All Vibe Services to Version 4.0.4
(Conditional) Upgrading a Separate Lucene Server to 4.0.4
IMPORTANT:If your Lucene search index is running on the same server as the Vibe software, you do not need to upgrade it separately. Skip to Upgrading the Vibe Service to 4.0.4.
You have the following options when upgrading your Lucene search index to version 4.0.4:
-
Create a new search index (Recommended)
Because a full re-index is required after upgrading to Vibe 4, creating a new search index is less time-consuming than upgrading your existing search index. The benefit to creating a new Lucene search index is that you are able to maintain the original search index in the unlikely case of an emergency rollback.
-
Upgrade your existing Lucene search index
If you choose to upgrade your existing Lucene search index, you must perform a re-index after the upgrade, as described in Resetting the Search Index.
These options are described in the following sections:
Creating a New Search Index
-
On the Vibe server at a terminal prompt, stop Vibe by entering /etc/init.d/teaming stop.
-
On the Lucene server, stop the Lucene search index by entering /etc/init.d/indexserver stop.
-
Ensure that no application (such as a command prompt) is running on the Vibe 3.4 system.
-
On a different server than where your original search index was running, create a new search index, as described in Installing the Lucene Software.
Upgrading an Existing Search Index
The Vibe installation program cannot upgrade the Lucene search index when it is running on a separate server. To upgrade your search index from Novell Vibe 3.4 to OpenText Vibe 4.0.4, you need to run the Lucene Server installation program:
-
On the Vibe server at a terminal prompt, stop Vibe by entering /etc/init.d/teaming stop.
-
On the Lucene server, stop the Lucene search index by entering /etc/init.d/indexserver stop.
-
Ensure that no application (such as a command prompt) is running on the Vibe 3.4 system.
-
Copy the Vibe 4 Lucene Server Installation program–lucene-installer.linux–from the directory where the Vibe 4 Installation program is located to a convenient directory on the server where the Lucene search index is located.
-
Start the Vibe 4 Lucene Server installation program.
-
Accept the License Agreement, then click .
-
Select .
-
Click to continue.
-
Click to accept the installation location.
-
Click to accept the Java JDK location.
-
In the field, specify the hostname where you are installing the Lucene Index Server.
-
Change Lucene configuration settings as needed, then click .
For information about Lucene configuration settings, see Changing Lucene Configuration Settings.
-
Click to install the upgraded Lucene search index software.
-
Click when the upgrade is complete.
-
(Conditional) If memcached is running on the Lucene search index server, reboot the server where it is running to ensure that the 3.4 cache is cleared.
-
On the Lucene server, start the Lucene Index Server by entering systemctl start indexserver.service.
-
Ensure that the index server is running.
/etc/init.d/indexserver status
-
Now that the separate Lucene server has been upgraded, follow the instructions in Upgrading the Vibe Service to 4.0.4.
Upgrading the Vibe Service to 4.0.4
Complete the following steps for each server in your Vibe system that is running the Vibe software:
-
Ensure that you have a current backup of your Vibe 3.4 system.
-
On the Vibe server, stop Vibe by entering /etc/init.d/teaming stop.
-
Ensure that no application (such as a command prompt) is running on the Vibe 3.4 system.
-
Copy the installer.xml file from the directory where the Vibe 3.4 Installation program is located to the directory where you have extracted the Vibe 4 software.
The installer.xml file provides default values when you run the Vibe 3.4 Installation program.
-
Obtain a new license key from the location where you downloaded the Vibe 4 software, then place it in the same directory with the Vibe software. (The Vibe installation program does not start without a license file in the same directory.) Rename the license to license-key.xml.
Vibe 4 requires an updated license. If you use a license from a previous version, not all features are available.
-
Make sure that your server platform meets the requirements outlined for the Vibe 4.0.4 release. See the Vibe 4.0.4 documentation available for download from the Vibe 4.0.8 documentation site.
-
Start the Vibe 4 installation program.
If you need assistance with this task, see the detailed installation instructions in Running the Linux Vibe Installation Program.
-
Accept the License Agreement, then click .
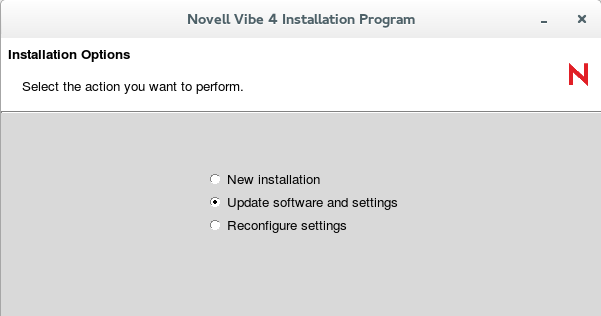
Because you provided your Vibe 3.4 installer.xml file in the directory with the Vibe 4.0.4 installation program, the installation option is selected by default.
-
Click to continue.
-
Click to let the Installation program know that you have stopped Vibe.
-
Select the check box to let the installation program know that you have backed up all of your data, then click .
-
Select or , depending on the type of Vibe installation you are upgrading, then click .
For more information about the differences between basic and advanced installations, see What Is a Basic Vibe Installation? and What Is an Advanced Installation?.
-
Continue through the installation process, retaining or changing configuration information depending on the needs of your Vibe 4 system.
-
Click when you are ready to perform the upgrade.
-
Click when the upgrade is complete.
-
(Conditional) If memcached is running on the Vibe server, reboot the server to ensure that the 3.4 cache is cleared.
-
Continue with Upgrading the Database to Support Version 4.0.4.
Upgrading the Database to Support Version 4.0.4
IMPORTANT:Make sure you do the following:
-
Upgrade the Vibe software (as described in Upgrading the Vibe Service to 4.0.4) before upgrading the Vibe database.
-
Because the Vibe 4 upgrade process does not update the database as part of the Vibe software upgrade, you must
-
Ensure that the 3.4 system is in UTF-8 format before updating the database.
-
Manually update the database before you start Vibe.
-
The following example outlines the process for MySQL. Refer to the documentation for your database type as needed.
-
(Conditional) When upgrading a MySQL database, ensure that the Vibe database character set for the Vibe 3.4 system is in UTF-8 format.
-
To view the character set format, run the following command:
SELECT default_character_set_name FROM information_schema.SCHEMATA S WHERE schema_name = 'sitescape';
In this command sitescape is the name of the Vibe database. Replace sitescape with the name of your database.
-
If the character set format is anything other than UTF-8, run the following command to change it:
In the following command, sitescape is the name of the Vibe database. Replace sitescape with the name of your database.
ALTER DATABASE sitescape CHARACTER SET utf8;
-
-
Change to the db directory in the Vibe installation:
cd /vibe_installation/temp-installer/db
This directory contains the following properties files:
-
mysql-liquibase.properties
-
Oracle-liquibase.properties
-
sqlserver-liquibase.properties
-
-
In a text editor, open the properties file that corresponds with your database type and make the applicable changes in both the Driver and referenceDriver sections. Save and close the text editor when you are finished making changes.
-
Change the database user name and password for accessing the database.
-
(Conditional) Specify the IP address for the database if it is running on a separate server.
You need to replace localhost with the IP address of the server.
-
(Optional) Change the name of the Vibe database (the default name of the Vibe database is sitescape, the name of the company that previously developed the Vibe software).
-
-
Save your changes and close the properties file.
-
In the same directory (/vibe_installation/temp-installer/db), execute the following commands to update the database schema:
PATH=/path_to_java_used_by_vibe/bin:$PATH (if not already set) (the path is /opt/novell/teaming/jre/bin starting with Vibe 4.0.5)
./manage-database.sh databaseType mark33DatabaseAsUpdated
./manage-database.sh databaseType updateDatabase
Possible database types (databaseType) are mysql, oracle, or sqlserver, depending on your type of database.
NOTE:Ensure that the manage-database.sh file is executable.
NOTE:You can safely ignore the following Liquibase log messages:
-
Warning: modifyDataType will lose primary key/autoincrement/not null settings for mysql
-
Any messages that contain the words info: failure or info: failed, as long as they are associated with a type INFO message
-
-
Start Vibe 4 in the same way that you have been starting Vibe 3.4 (/etc/init.d/teaming start).
When you start Vibe for the first time after the upgrade, it takes longer to start than usual because data in the Vibe database must be upgraded before the Vibe site is ready to use.
-
(Recommended) For security reasons, delete the password that you specified in Step 7 in Creating the Vibe Database.
-
Change to the db directory in the Vibe installation:
cd /vibe_installation/temp-installer/db
This directory contains the following properties files:
-
mysql-liquibase.properties
-
Oracle-liquibase.properties
-
sqlserver-liquibase.properties
-
-
In a text editor, open the database_type-liquibase.properties file that corresponds with your database type, then delete the password.
-
Save and close the properties file.
-
-
Continue with Verifying Success and Completing the Upgrade to 4.0.4.
Verifying Success and Completing the Upgrade to 4.0.4
After you start OpenText Vibe 4 on your old server, you can access your Vibe site as usual. However, you need to reset some aspects of the interface before you allow users to access the upgraded site. The interface reset affects only those definitions and templates that are included with the Vibe product. If you have created custom definitions and templates, they are unaffected by the interface reset.
Resetting the Search Index
In order for an upgraded search index to be compatible with Vibe 4, you need to re-index the search index. Until you reset the search index, the search index and the vibe server are not in a compatible state. The catalina.out and appserver.log files show errors until the search index is reset.
The steps to reset the search index differ depending on whether you have multiple Lucene Index servers. For more information about multiple search indexes, see Section 22.0, Running Multiple Lucene Index Servers.
Depending on the size of your Vibe site, this can be a very time-consuming process.
Resetting a Single Search Index
-
Log in to the Vibe site as the Vibe administrator.
-
Click your linked name in the upper right corner of the page, then click the icon
 .
. -
In the section, click .
-
Select .
-
Click , then click .
Users can still access the Vibe site during the indexing process, but search results might not be accurate until the index has been completely rebuilt.
A message notifies you when indexing is complete.
-
After the index server has been reset, ensure that no errors are contained in the following log files:
-
/opt/novell/teaming/apache-tomcat/logs/catalina.out
-
/opt/novell/teaming/apache-tomcat/logs/appserver.log
-
Resetting the Search Index with Multiple Index Servers
-
Log in to the Vibe site as the Vibe administrator.
-
Click your linked name in the upper right corner of the page, then click the icon
. -
In the section, click .
-
Select .
-
Select each node that you want to re-index.
-
Click , then click .
Users can still access the Vibe site during the indexing process, but search results might not be accurate until the index has been completely rebuilt.
A message notifies you when indexing is complete.
-
After the index server has been reset, ensure that no errors are contained in the following log files:
-
/opt/novell/teaming/apache-tomcat/logs/catalina.out
-
/opt/novell/teaming/apache-tomcat/logs/appserver.log
-
Resetting Your Definitions
Various aspects of the Vibe interface have been redesigned and enhanced since Vibe 3.4. Some of these enhancements affect entries, folders, user profiles, and user workspaces. If you have made customizations to these areas of Vibe, you must reset these definitions in order to see the enhancements, as described in this section.
WARNING:The following procedure deletes any custom modifications that you have previously made to the default Vibe definitions. If you want to save any modified definitions before proceeding, you can export the modified definitions. Also, you might want to document exactly what changes you have made in order to make it easier to reconstruct the definition after you reset it. This applies only to definitions that you have modified; definitions that you have created are not affected.
To reset your Vibe definitions:
-
Log in to the Vibe site as the Vibe administrator.
-
Click your linked name in the upper right corner of the page, then click the icon
. -
In the section, click to display the Form and View Designers page.
-
Click .
The Reset Definitions page is displayed.
-
Click .
You can expand each definition to ensure that all definitions have been selected.
-
Click .
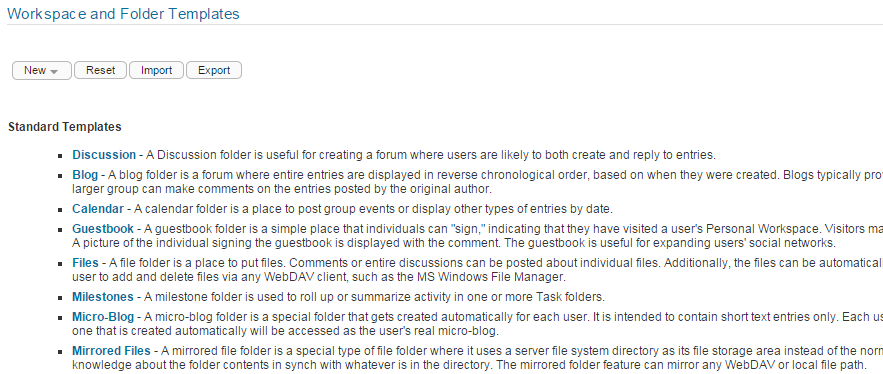
Resetting the Standard Templates
IMPORTANT:The following procedure deletes any custom modifications that you have previously made to the default Vibe templates. If you have manually customized any default Vibe templates, back up the files you have modified before performing the interface reset. This applies only to default templates that you have modified; templates that you have created are not affected.
-
Log in to the Vibe site as the Vibe administrator.
-
Click your linked name in the upper right corner of the page, then click the icon
. -
In the section, click .
-
Click .
-
Click to confirm, then click .
-
Verify that the 4.0.4 site is working as expected before proceeding with the migration to your new 4.0.4 server.
Updating the Server.xml File When Using Secure HTTP
The server.xml Tomcat configuration file is overwritten during the upgrade to Vibe 4. If you set up secure HTTP browser connections to the Vibe server, and if you changed the password for the .keystore file to something other than the default changeit, you need to update the server.xml file after upgrading to Vibe 4.
For information about how to update the .keystore password in the server.xml file, see Do Not Change the Password for the Keystore File
in theOpenText Vibe 4.0.8 Administration Guide.
Now that the server is upgraded and performing well, it is time to shift your focus to the new target server.