4.3 Configuring Server Policies
You can configure server policies for containers, servers, and service locations. The policies allow you to automate use of NetWare functionality. See your NetWare documentation for specific information.
To configure server policies, review the instructions in the following sections:
For information on scheduling server policies, see Section 4.7, Scheduling Policies.
4.3.1 Compiling Zentrap.mib
The SNMP Community Strings and SNMP Trap Targets policies utilize SNMP. Zentrap.mib is located on the Program CD under \zfs\tedpol\sfiles\mibs.
To receive SNMP traps on your SNMP management console, you must copy the zentrap.mib file from the ZENworks 7 Server Management with Support Pack 1 Program CD to the location that your management console uses to manage MIBs, then compile it. Your SNMP management console can then receive and interpret SNMP traps from Server Management.
4.3.2 Configuring the Container Package Policy
The Search policy is used by the Distributor for information on how to read the eDirectory tree when the Distributor has been refreshed.
IMPORTANT:If you do not use the Search policy, Server Management searches up to [Root] and reads the objects every hour. Be sure to configure and enable the Search policy to limit unnecessary search traffic.
To configure the Search policy:
-
In ConsoleOne, right-click the , click .
-
Select the tab, select the check box for , click , then select the tab.
If the box under the column is not selected for the Search policy, select it before clicking . A policy must be enabled to activate the button.
-
To determine the upper limits of the search policy, select one of the following:
If you chose , browse to select the container.
To determine searching limits in either direction of the item selected, enter a number. For example:
-
To determine the search order, select the tab.
Use the arrow keys to change the order. You can also click or to change which object types are used.
-
(Optional) Because policies are refreshed when they are received at the Subscriber, specify a refresh frequency.
The default is once every hour.
If you leave both time increments at zero (days and hours), policies are not refreshed from eDirectory, even if you have selected.
Changes made to enabled policies are not enforced until they are refreshed at the given refresh interval. However, you can manually refresh all policies using the POLICY REFRESH command at the server console. The refresh rate is listed in seconds at the server console (1 hour = 3600 seconds).
-
Click to close the policy.
If you click , none of the Search policy changes made on any of the tabs are saved.
-
To associate the policy package so that the Search policy is enforced on the Distributor, select the tab, then click .
-
Browse to select the container where the Distributor object resides (or any container above it), then click .
If you click , the association you made is not saved.
4.3.3 Configuring Service Location Package Policies
Because the Distributor does not receive Distributions, policies for a Distributor must be associated with the container where its object resides. The Service Location Package contains policies used by the Distributor.
To configure Service Location Package policies, review the following sections:
SMTP Host
Sets the TCP/IP address of the SMTP relay host that processes outbound Internet e‑mail. This policy must be enabled if you select the E‑Mail option for notifying or logging messages for the Distributor.
To configure the SMTP Host policy:
-
In ConsoleOne, right-click the Service Location Package, then click .
-
Select the SMTP Host policy’s check box, then click .
If the box under the column is not selected for the SMTP Host policy, select it before clicking . A policy must be enabled to activate the button.
-
Provide the TCP/IP address or DNS name of the relay host server, then click .
-
To associate the policy package so that the SMTP Host policy is enforced on the Distributor, select the tab, then click .
-
Browse to select the container where the Distributor object resides (or any container above it), then click .
If you click , the association you made is not saved.
SNMP Trap Targets
Use this property page to establish the targets (or locations) where you want SNMP traps sent from the Distributor. Each target must be a valid TCP/IP address or DNS name.
Make sure that you have compiled zentrap.mib (see Section 4.3.1, Compiling Zentrap.mib).
To configure the SNMP Trap Targets policy:
-
In ConsoleOne, right-click the , then click .
-
Select the SNMP Trap Targets policy, then click .
If the box under the column is not selected for the SNMP Trap Targets policy, select it before clicking . A policy must be enabled to activate the button.
-
To add items to the list on the tab, click .
-
On the SNMP Target dialog box, provide valid a TCP/IP address or DNS name, then click .
-
To schedule the policy, select the tab, select a type in the field, then configure the schedule:
-
Click when finished.
-
To associate the policy package so that the SNMP Trap Targets policy is enforced on the Distributor, select the tab, then click .
-
Browse to select the container where the Distributor object resides (or any container above it), then click .
If you click , the association you made is not saved.
Tiered Electronic Distribution
This policy allows you to set default values for the attributes of Distributors and Subscribers.
How the Policy Works
The default values set in the Tiered Electronic Distribution policy become effective when you associate the Service Location Package that contains this policy to a container above where the Distributor and Subscriber objects reside, or to the container where Subscriber objects reside.
The values in the attributes of the Tiered Electronic Distribution policy automatically replace the similar values for the Distributor and Subscriber objects, but only if the default values of those attributes have never been changed in the object’s properties.
After you have changed the values of the attributes in the Distributor or Subscriber objects and you want to use the values in the Tiered Electronic Distribution policy, then you must edit the Distributor or Subscriber object’s properties and select the Use Policy check box at the top of each tab in the object’s properties that contains the check box. Then the Tiered Electronic Distribution policy values will appear in the Distributor or Subscriber object’s attributes.
Cumulative Policies
Tiered Electronic Distribution policies are not cumulative, meaning:
-
One at a time: You cannot have more than one Service Location Package (containing the Tiered Electronic Distribution policy) associated to the same container.
-
Closest wins: If the Subscriber’s container is associated with a Tiered Electronic Distribution policy (in the Service Location Package) and a parent container also has a Tiered Electronic Distribution policy (in the Service Location Package) associated with it, the Tiered Electronic Distribution policy of the closest container (the Subscriber’s own container) prevails.
Replacing, Adding, or Losing Property Values
The following information applies only where the Tiered Electronic Distribution policy is in effect:
-
You can add the Variables defined in the Tiered Electronic Distribution policy to the Distributor or Subscriber’s list of variables. They do not replace the variables already defined in the Distributor or Subscriber object.
-
For all other policy fields that coincide with values in a Distributor’s or Subscriber’s properties, the Tiered Electronic Distribution policy replaces, not supplements, them, including the possibility of replacing property values with empty fields. Therefore, if you create a Tiered Electronic Distribution policy, make sure you fill in all of the fields on every tab in the policy that you want to be applied to the affected Distributors or Subscribers.
For example, if your Subscriber has a working directory entered in its object’s properties, and you do not provide a working directory in the Tiered Electronic Distribution policy, then later apply the policy by selecting the Use Policy check box on the Subscriber’s properties, the Subscriber will no longer have a working directory available to it.
Multiple Policies for Platform Configurations
You can have multiple instances of the Tiered Electronic Distribution policy for your Subscriber objects for the purpose of defining different policy settings for different server platforms. To do this, you must have created the Subscriber objects in different containers representing their respective operating systems.
Subscriber attributes that could require operating system-specific values are:
- working directories
- messaging settings
- variables definitions
Configuring the Tiered Electronic Distribution Policy
-
In ConsoleOne, right-click the , then click .
-
Select the Tiered Electronic Distribution policy, then click .
If the box under the column is not selected for the Tiered Electronic Distribution policy, select it before clicking . A policy must be enabled to activate the button.
-
Click > and fill in the fields:
Input rate: Sets the default input rate to minimize network traffic for Tiered Electronic Distribution objects. This determines the receive rate for Subscribers and Distributors. The default value is the maximum that the connection can handle. You can use this rate to control the use of narrow bandwidth links.
Output rate: Sets the default output rate to minimize network traffic for Tiered Electronic Distribution objects. This determines the send rate for Distributors and parent Subscribers. The default value is the maximum that the connection can handle. Blank means that bandwidth is taken from third-party applications.
There are three output priorities where you can specify a rate:
-
High priority: These Distributions are sent before any Medium or Low priority Distributions.
-
Medium priority: These Distributions are sent after all High priority and before any Low priority Distributions.
-
Low priority: These Distributions are sent after all High and Medium priority Distributions.
For more information, see Section 3.4.5, Prioritizing Distributions.
Maximum concurrent Distributions to build: Specifies the maximum number of distribution threads that can be running concurrently for building Distributions. The default value is 5. Valid values are from 1 to 10.
This number can help in load-balancing a Distributor’s building activity.
Maximum concurrent Distributions to send: Specifies the maximum number of distribution threads that can be running concurrently for sending Distributions. The default value is unlimited (a blank field).
This number can help in load-balancing a Distributor’s sending activity and spread network traffic over an entire scheduling window.
Connection time-out: Specifies a default number of seconds before the Distributor times out when connecting to another node, or specifies the number of seconds a Subscriber waits for a response from a Distributor (receiving) or a Subscriber (sending) before ending the connection.
After the time has transpired, a Distributor ends the connection and does not retry until the Channel’s Send schedule starts again. If a connection is ended during sending or receiving, a Subscriber does not start again until the next time the Channel’s Send schedule starts.
The default value is 300 seconds (five minutes). The available range in seconds is 1 to 60,000. You should select a reasonable time to wait for a response from one node to another.
IMPORTANT:This interval must be increased on slow or busy links where longer delays are frequent.
Working directory: Provide a default Tiered Electronic Distribution directory to store Distributions, persistent status, and temporary files on a server. The directory needs to be located where there is enough free space to handle processing of Distributions.
The Working Directory field allows the use of variables to specify the volume/drive and directory names. However, variables only work with Subscribers.
IMPORTANT:Distributors are not able to resolve variables and use exactly what is specified in the Working Directory field. For example, if the value was %VOL%ted1\working, the Distributor would create a working directory on the sys: volume named sys:\%VOL%\ted\working, because it could not resolve %VOL%.
For more information, see Section 3.12, Working Directories.
Parent Subscriber: Subscribers should generally not receive their Distributions directly from a Distributor. You can browse for a Subscriber to be the default parent Subscriber for your whole network, which passes on Distributions when a Subscriber object might not have a parent Subscriber defined in its properties.
Disk space desired to be left free: Use this as the default value to ensure there is enough free disk space for receiving Distributions where you might not have this value defined in a Subscriber object’s properties. A Subscriber does not attempt to receive a Distribution if the disk space value set here is insufficient.
-
-
Click > and fill in the fields:
Server console: Procedure to follow when displaying messages at the server console. The default is Level 4 (Information & Level 3 Messages).
SNMP trap: Procedure to follow when sending SNMP traps. The default is Level 0 (No Messages).
Log file: Procedure to follow when recording information to a log file. The default is Level 5 (Trace Information & Level 4 Messages).
Filename: By default, this field is blank. Whatever log filename you select, it replaces ted.log for the servers where this policy is enforced.
To create a log file, specify the log file’s filename using the following format:
installation_path\directory_path\filename.filename_extension
The installation_path is not required for ZENworks to locate the log file, but it is easier for you to locate the file if the path is included.
IMPORTANT:Because the log file can become quite large, for NetWare servers we recommend that you do not use the sys: volume.
Use filename extensions such as .log or .txt.
Delete log entries older than __ days: Controls disk space usage. For log files, it is important to set the message levels at minimal detail and to purge entries older than six days (the default).
E-mail: Procedure to follow when sending e‑mail messages. None or Errors Only are recommended to minimize unnecessary e‑mail traffic. The default is Level 0 (No Messages).
Users: Add users, groups, or e‑mail addresses.
Address attribute: Displays the attribute of the associated user or group. You can change the attribute from the drop-down list, which displays over three dozen options.
Following are some of these options:
-
To assign default values to variables used by the Subscriber, select the tab, click , then fill in the fields:
Variable: Name of the variable. It should indicate how the variable is used. For example, WORKINGVOL.
The variable name can be derived from predefined and user-defined variables.
Value: The value that the Subscriber uses when this variable is specified. For example, data:.
A value can be another variable name. You can nest variables using this method.
To ensure that extraction takes place, provide an absolute path to the Subscriber. For example, if the path is only the data: volume, make sure the colon (:) is included, because it is a necessary part of the full path.
Description: Describes how the variable is used. For example:
Volume for the working directory.
If a variable defined here does not exist in a Subscriber’s variables list, it is automatically added. However, if the variable does exist in the Subscriber’s variables list, the definition in the Subscriber prevails.
-
To assign a default refresh schedule for all Distributors, select the tab, click , select a schedule in the field, then configure the schedule:
- Section B.1, Daily
- Section B.3, Interval
- Section B.4, Monthly
- Section B.5, Never
- Section B.9, Time
- Section B.11, Yearly
For information on the refresh schedule, see Scheduling.
IMPORTANT:We recommend the Distributor’s Refresh schedule be daily, unless changes to Distributions warrant a more frequent refresh. However, do not refresh the Distributor more often than every five minutes. The following can need up to five minutes to complete their processes: Distribution building, eDirectory replication, and tree walking (when no Search policy is defined).
-
To assign a default extraction schedule for all Subscribers, select the tab, click , select a schedule in the field, then configure the schedule:
- Section B.1, Daily
- Section B.3, Interval
- Section B.4, Monthly
- Section B.5, Never
- Section B.8, Run Immediately
- Section B.9, Time
- Section B.11, Yearly
For information on the extraction schedule, see Scheduling.
-
Click to close the policy.
-
To associate the policy package so that the Tiered Electronic Distribution policy is enforced on the Distributor, select the tab, then click .
-
Browse to select the container where the Distributor object resides (or any container above it), then click .
If you click , the association you made is not saved.
-
To associate the policy package so that the Tiered Electronic Distribution policy is enforced on a Subscriber, select the tab, then click .
-
Browse to select the container where Subscriber objects reside (or any container above it), then click .
This should be the Subscribers where you want the Tiered Electronic Distribution policy’s default information to be available.
If you are creating this policy for a particular operating system, make sure you select the correct platform-specific container, and the policy applies only to the Subscribers under that container.
If you click , the association you made is not saved.
-
Repeat Step 12 for each container where Subscribers exist that you want to use this policy.
ZENworks Database
Sets the DN for locating a ZENworks Database object. If you did not establish this information when installing Policy and Distribution Services, you can create this policy to enable Server Management to locate a database file for logging successes and failures that are used in creating reports. You can also create this policy to override the information established during installation.
Use this property page to select the database object to be associated with the current ZENworks Database policy. The policy is not in effect until you have distributed the policy to the Subscribers, or associated the policy with the Distributor.
The Server Management database is used to store reporting information for Distributions and Server Policies.
To configure the ZENworks Database policy:
-
In ConsoleOne, right-click the , then click .
-
Select the ZENworks Database policy, then click .
If the box under the column is not selected for the ZENworks Database policy, select it before clicking . A policy must be enabled to activate the button.
-
Select the tab.
-
In the field, browse for the ZENworks Database object that represents the database for this policy, then click .
-
To associate the policy package so that the ZENworks Database policy is enforced on the Distributor, select the tab, then click .
-
Browse to select the container where the Distributor object resides (or any container above it), then click .
If you click , the association you made is not saved.
4.3.4 Configuring Distributed Server Package Policies
You can configure Distributed Server Package policies to automate control of various server behaviors and processes and to automate control of SMTP Host TCP/IP addresses, SNMP Trap Targets, and the ZENworks Database object’s DN.
There are several Policies tab options for server policies, one for each supported operating system. The policies that are available on the General tab apply to servers on all platforms. The policies available on the specific platform tabs apply only to the servers for those platforms.
Platform-specific policies, such as those on the NetWare tab, always override similar policies on the General tab for a particular policy package.
All policies are contained in the NetWare policies. Therefore, only the NetWare policies are documented here. The information applies equally to each platform.
To configure Distributed Server Package policies, review the following sections:
Copy Files
The Copy Files policy enables copying of files on a server from one location to another by using policy configurations. You can either copy or move the files.
To configure the Copy Files policy:
-
In ConsoleOne, select the Distributed Server Package’s container, right-click the , then click .
-
Select the tab, then select the platform from:
- General
- Windows
- NetWare
- Linux
- Solaris
-
Click , click , provide a policy name, then click .
-
Click .
The tab displays.
-
Click .
Local File Copy #1 defaults. You can edit that name.
-
Fill in the fields:
Source path: Provide the full path where the files to be copied are located.
You can use wildcards in the path:
- * = any number of characters
- ? = any single character in that position
- ??? = any characters in those positions
Target path: Provide the full path where the copied files are to be placed.
You can use wildcards in this path. This path does not need to mirror the source path. However, you could mirror an existing target path.
Include subdirectories: Includes all subdirectories and their files beginning from the directory at the end of the path; otherwise, only the files in the directory at the end of the path are copied.
Maintain attributes: Maintains the file attributes in the target’s file system that exist in the source’s file system.
Overwrite destination files: Overwrites files of the same name in the destination directories, regardless of differences in file dates. If you do not select this option, files of the same name is not replaced.
Maintain trustees: Maintains the file’s trustee attributes.
When a file is locked: Select one or both:
-
Retry __ times: Retries overwriting a locked file the number of times you select before failing to replace the file. Leave this check box deselected to not replace locked files on the target file system.
-
Kill connection of open files: (NetWare only) Attempts to kill the connection of locked files so they can be overwritten. This applies only to files being extracted, not to files being accessed to build the Distribution. If a file belonging to a Distribution is locked when the Distribution is being built, the build fails. Server and NLM connections cannot be killed.
Error processing: Fail On Error is selected by default. This stops the file copying process when an error is encountered in copying. To continue file copying when an error is encountered, select Continue On Error.
Operation: Sets whether to copy or move the files identified in the Source Path.
-
Select the tab, then schedule the policy (see Section 4.7, Scheduling Policies).
-
Click to close the policy.
NetWare SET Parameters
You can automate the use of SET parameters by your servers.
To configure NetWare SET parameters:
-
In ConsoleOne, select the Distributed Server Package’s container, right-click the , then click .
-
Click > (or ).
-
Click , then select .
-
Provide a name for this SET parameters policy, then click .
Because the policies selected from this dialog box are plural, you can have multiple SET parameter policies listed on the Policies tab. Therefore, provide a unique name for this policy.
When you click OK after naming the SET parameters policy, it is selected on the Policies tab.
-
Click .
The tab displays.
-
Click .
The NetWare Server SET Command Wizard opens.
-
Select the server containing the SET parameters, then click .
IMPORTANT:The Policy/Package Agent must be running.
-
Select all of the commands you want to configure in the policy.
You can select whole categories by selecting the check box for the category, or clicking the plus sign to expand a SET command category and selecting the check boxes for individual commands to be included.
WARNING:Do not select the Set Developer Option SET command and change the default of Off to On. This parameter is meant to help developers debug server abends. It disables some of the operating system checking to prevent certain abends from occurring. Also, if the Set Developer Option is enabled, running NCP™ scripts that require keyboard entry could abend the server.
-
Click when you are finished selecting the commands.
The selected commands are now displayed in the Set Commands tab for the policy.
-
To edit a SET command, click its plus sign to expand its attributes.
-
To edit an attribute, select the attribute, then click .
A dialog box is displayed in which you can make changes to the attribute.
-
Repeat Step 11 for each attribute to edit for a given SET command.
-
Repeat Step 10 through Step 12 to edit another SET command’s attributes.
-
Schedule the policy (see Section 4.7, Scheduling Policies).
-
Click to close the policy.
If you click , neither the schedule or the SET parameter changes are saved.
Prohibited File
This policy allows you to monitor and enforce the deletion or moving of unauthorized files from a specified volume/drive or directory/folder. For example, you can automate deletion of .jpg, .mp3, and .avi files from a server.
All platforms are supported (NetWare®, Windows, Linux, and Solaris), including the use of the General tab.
With this policy, you can:
-
Specify one or more volumes/drives or directories to monitor. You have the option to include all subdirectories.
-
Specify which file types to monitor using wildcard combinations.
-
Specify the action for all encountered files as follows:
-
Delete
-
Move to specified location
-
-
Specify a schedule for enforcement of the policy.
To configure a policy to manage prohibited files:
-
In ConsoleOne, right-click the , then click .
-
Click > (or other platform).
-
Click , then select .
-
Provide a unique name for the policy, then click .
The following property page is displayed:
-
Fill in the fields:
Directories to monitor: For this instance of the policy, you can specify the paths to be monitored:
-
Path: This can be a volume, drive, or directory name. It must be the full path when a directory is given.
You can add multiple paths. For each path that you enter, files matching the file types that you define in the File Type field are either deleted or moved according to which Action button you select.
Variables are supported in the paths.
-
Subdirectory: Select the check box to specify that all subdirectories be included.
If you want only a certain subdirectory, you should create another policy just for that subdirectory by giving its full path in the Path field. However, you cannot move files to a directory that is being monitored, or to any of its subdirectories.
-
Add: Opens a dialog box where you can select a path. This field cannot be browsed, so you must know the full path to the files to be moved or deleted.
-
Edit: Allows you to edit the selected path.
-
Remove: Removes the selected path entry from the list.
Files to manage: You can specify the type of files you want to monitor:
-
Add: Opens a dialog box where you specify a file type. You can use wildcards in the path:
- * = any number of characters
- ? = any single character in that position
- ??? = any multiple characters in those positions
This field cannot be browsed, so you must specify the correct information to identify the files to be moved or deleted.
IMPORTANT:The ? wildcard acts differently in ZENworks than in DOS. For example, the search string *.htm? finds only files that end in .html, whereas DOS finds files that end in both .htm and .html. In other words, use of the ? wildcard in ZENworks means that you expect a character to occupy its position in the filename.
-
Edit: Allows you to edit the selected file type.
-
Remove: Removes the selected file type from the list.
Action: You have two options for how to handle the files you’ve specified in the Directories to Monitor and the Files to Manage boxes:
-
Delete files: Select the option to delete the specified files from the locations you have identified.
-
Move files to: Select the option to move the specified files to the path that you specify in this field. This field cannot be browsed, so you must know the full path to where you want the files to be moved.
If you move files:
-
The full paths of the files are preserved (meaning if the path doesn’t exist at the target, it is created there)
-
Files are overwritten if they exist in the same path
-
File or directory attributes and trustees are not transferred
-
File ownership is preserved
IMPORTANT:If a directory is being monitored, you cannot move files into it or any of its subdirectories.
-
When a file is locked: Occasionally, files you might be trying to delete or move might be open. For these files, you can specify one of the following resolutions:
-
Retry ___ times: Select the check box and enter a number for how many times you want to retry deleting or moving the file before continuing with the next file. Valid entries are from 1 to 10. The time used by each increment depends on the various hardware and software speeds involved in your system.
Use this field to allow enough time for a temporarily opened file to be closed, such as a file that is only opened long enough for the application to either obtain a copy for editing or write a new copy of the file.
-
Kill connection of open files: (NetWare only) Kills the connection that is holding the file open so that the file can be deleted or moved, even if opened by a user at the time.
IMPORTANT:You can only kill connections to files on workstations. Server files cannot be disconnected from the process that has them open.
-
-
Click to close the policy.
Scheduled Down
You can automate when and how you want a server to go down, and whether it should be automatically brought back up.
To configure a scheduled downing for a server:
-
In ConsoleOne, right-click Distributed Server Package, then click .
-
Click > (or other platform).
-
Click , then select .
-
Provide a unique name for the policy, then click .
Because the policies selected from this dialog box are plural, you can have multiple Scheduled Down policies listed on the tab. Therefore, provide a unique name for this policy.
When you click after naming the Scheduled Down policy, the policy is selected on the tab.
-
Click .
The tab displays.
-
Select the downing method:
-
Schedule the policy (see Section 4.7, Scheduling Policies).
-
Click to close the policy.
If you click , neither schedule for your newly scheduled Down policy is saved.
Scheduled Load/Unload
You can automate scheduled loading and unloading of NLM files and Java Class processes, and Linux and Solaris executables.
To configure the schedules:
-
In ConsoleOne, select the Distributed Server Package’s container, right-click the , then click .
-
Click > (or other platform).
-
Click , then select .
-
Provide a name for this Load/Unload policy, then click .
Because the policies selected from this dialog box are plural, you can have multiple Load/Unload policies listed on the tab. Therefore, provide a unique name for this policy.
When you click after naming the Load/Unload policy, it is selected on the tab.
-
Click .
The tab displays.
-
Click .
-
Select one of the following options:
- Section D.1, Load NLM/Process
- Section D.2, Load Java Class
- Section D.3, Unload Process
- Section D.4, Start Service
- Section D.5, Stop Service
Select an item for further instructions on configuring it.
-
Repeat Step 6 and Step 7 for each NLM or process to be included.
-
To rearrange the order, use the arrow keys.
-
Schedule the policy (see Section 4.7, Scheduling Policies).
-
Click to close the policy.
If you click , your newly scheduled Load/Unload policy is not saved.
Server Down Process
You can automate the procedures your servers use when they are downed.
IMPORTANT:For the Windows, Linux, and Solaris platforms, if you down the server from its console, this policy is not recognized. Instead, you must down the server using the option in in iManager so that this policy can be applied.
To configure the downing process for a server:
-
In ConsoleOne, select the Distributed Server Package’s container, right-click the , then click .
-
Click > (or other platform).
-
Select the Server Down Process policy, then click .
If the box under the column is not selected for the Server Down Process policy, select it before clicking . A policy must be enabled to activate the button.
-
To configure procedures for downing, select the tab, then click .
-
To enable the policy’s options, select the check box labeled , then enter the number of minutes to wait before downing the server.
-
To disable login before downing, select the check box, then enter the number of minutes before downing to disable login.
-
To drop connections before downing, select the check box, then enter the number of minutes before downing the server to drop connections.
-
To configure an order for unloading, select the tab, then click .
-
To include NLM files and processes, select the check box.
-
Click .
-
Select either or , provide the name, then click .
-
To change the order, use the arrow keys.
-
-
To configure reporting, select the tab, then click .
-
To have another server send an SNMP alert if the server is not up after a specified time, select the check box, then enter the number of minutes.
For information about displaying SNMP traps on your management console, see Section 4.3.1, Compiling Zentrap.mib.
-
To specify which servers can watch for the restart and send the alert in case of failure, click to display an ordered list of candidate servers.
Policy and Distribution Services starts at the top of the list to communicate with the first server and use it for the alert notification. If Policy and Distribution Services cannot communicate with a server, the next one on the list is tried. The first server that can be used is the one that is scheduled to send the alert.
-
Browse to select a server.
-
To change the order, use the arrow keys.
-
-
To configure broadcast messages, select the tab, click , then click .
-
Enter the number of times to send the message.
-
To broadcast custom text, enter it in the box.
-
To include the predefined message containing a time as the last line of your broadcast, select the check box.
The x minutes is derived from dividing the number of times from Step 10.a into the number of minutes remaining before the server can be downed, then subtracting that amount (in whole minutes) for the amount to display in each broadcast. For example, if there are 10 minutes remaining and you select 5 in Step 10.a, the message is broadcast every two minutes. The number of minutes remaining after each broadcast will be two minutes less than at the last broadcast.
-
-
To configure targeted messages, select the tab, click , then click .
-
To configure the conditions for downing a server, select the tab, then click .
-
To specify the conditions, click .
-
Select from the following conditions to specify when not to bring the server down:
Some of these conditions require you to enter valid names. Others use the Select Object dialog box to browse for them.
File open: If the files that you specified are open. For example, a .exe.
NLM loaded: If the NLM files that you specified are running.
Server connected: If the server that you specified is connected.
User connected: If the users that you specified are connected.
Number of user connections: If the number of users connected exceeds the number you specify. In other words, don’t bring the server down if too many users would be affected.
Workstation connected: If the workstations that you specified are connected.
-
Repeat Step 12.a and Step 12.b for each condition to add to the list.
-
To change the order, use the arrow keys.
-
-
Click to close the policy.
If you click , none of the Server Down Process policy changes made on any of the tabs are saved.
Server Scripts
You can automate script usage by your NetWare servers.
To configure server scripts:
-
In ConsoleOne, select the Distributed Server Package’s container, right-click the , then click .
-
Click > (or other platform).
-
Click , then select .
-
Provide a unique name for the policy.
Because the policies selected from this dialog box are plural, you can have multiple Script policies listed on the tab. Therefore, provide a unique name for this policy.
When you click after naming the Script policy, it is selected on the tab.
-
Click .
The tab displays.
-
Click , then select .
-
Provide a script name.
Script #1 displays.
-
Select the script type (NCF, NetBasic*, PERL).
IMPORTANT:NetBasic is not supported on NetWare 6.5 servers.
-
Enter the script text.
-
Use the arrow keys to arrange the order to execute the scripts.
-
Schedule the policy (see Section 4.7, Scheduling Policies).
-
Click to close the policy.
If you click , neither the schedule or any of the scripts entered are saved.
SMTP Host
You can set the TCP/IP address of the relay host that processes outbound Internet e‑mail.
To configure the SMTP Host policy:
-
In ConsoleOne, right-click the , then click .
-
Select the SMTP Host policy, then click .
If the box under the column is not selected for the SMTP Host policy, select it before clicking . A policy must be enabled to activate the button.
The tab defaults.
-
Provide the TCP/IP address or DNS name (such as mail.novell.com), then click to close the policy.
If you click , the TCP/IP address is not saved.
SNMP Community Strings
This policy provides configuration and scheduling of SNMP community strings.
Make sure that you have compiled zentrap.mib (see Section 4.3.1, Compiling Zentrap.mib).
IMPORTANT:Running INETCFG does not show that the policy has been applied to the server. Instead, use TCPCON to verify. See Verifying Community String Changes.
To configure the SNMP Community Strings policy:
-
In ConsoleOne, select the Distributed Server Package’s container, right-click the , then click .
-
Click > (or other platform).
-
Select the SNMP Community Strings policy, then click .
If the box under the column is not selected for the SNMP Community Strings policy, select it before clicking . A policy must be enabled to activate the button.
The tab displays.
-
Fill in the fields:
- Monitor
- Control
- Trap
Community strings are case sensitive. Enter a string for each field as needed.
-
Select the tab, then schedule the policy (see Section 4.7, Scheduling Policies).
-
Click to close the policy.
Verifying Community String Changes
To confirm that the SNMP Community Strings policy has been successfully applied to a server, do the following on any NetWare server:
-
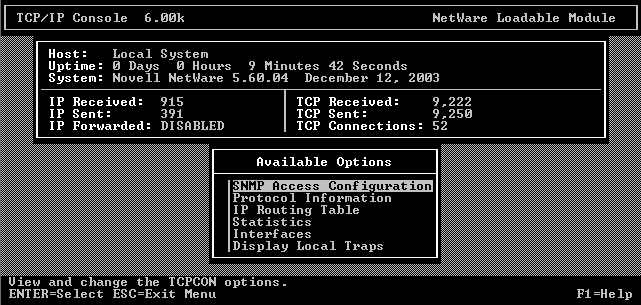
At the server’s main command prompt, enter tcpcon to display the following menu:
-
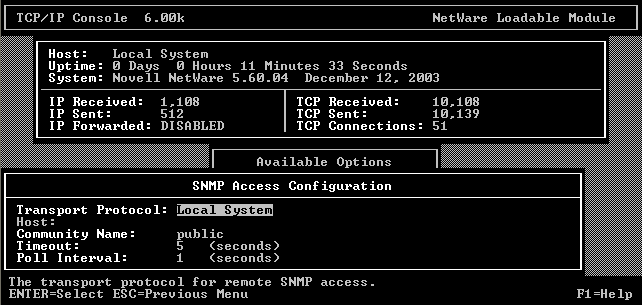
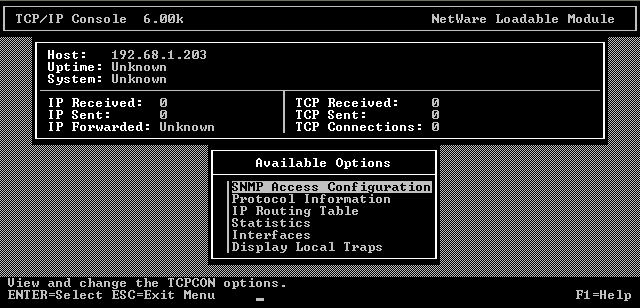
Select to display “Local System” in the field:
-
Press Enter to display the options:
-
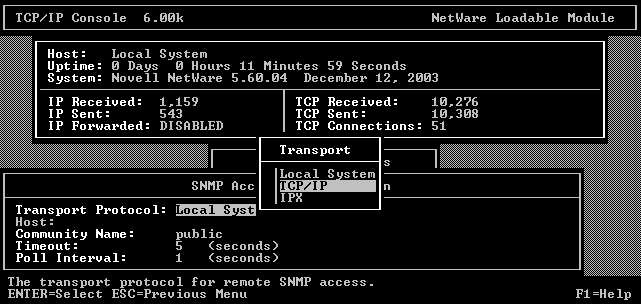
Select the option to display the TCP/IP transport protocol information:
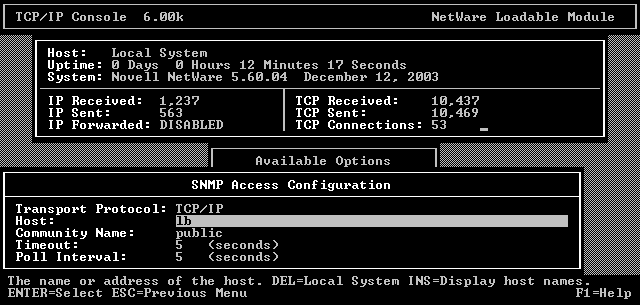
-
Replace lb with the IP address of the NetWare server where you want to verify the string changes, and replace public with a valid monitor read string:
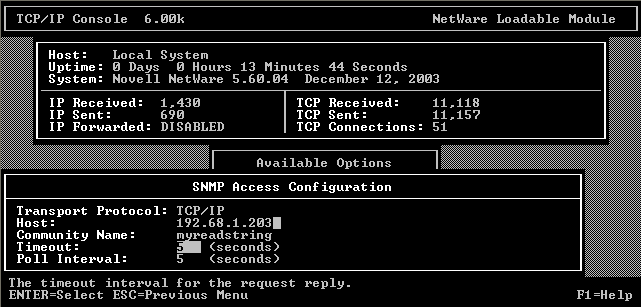
-
Press Esc to display the menu, then select to continue:
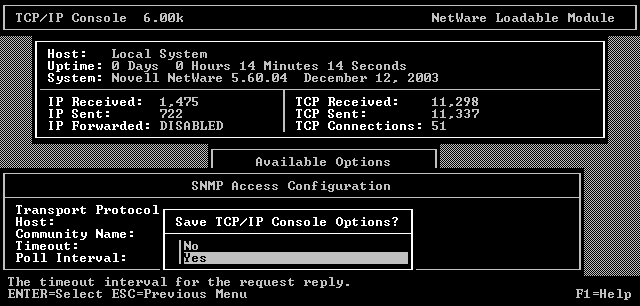
-
At this point, you should see the statistics being updated; however, if the community string changes are not displayed (as depicted below), make sure that the correct monitor string was entered in Step 5.
-
Another way to see that the policy is actually applied when the policy is deployed is to change the messaging level for the server’s Subscriber object to Level 4 or Level 5 (see the field in Step 3 under Section 3.6.3, Configuring Subscribers), then view the new and old string values in the TCP/IP Console screen as the changes occur.
SNMP Trap Targets
You can set targets for SNMP traps for the Policy/Package Agent.
For information about displaying SNMP traps on your management console, see Section 4.3.1, Compiling Zentrap.mib.
Understanding How the Windows Trap Target Policy Enforcer Behaves
The following abbreviations are used in this section to represent these Windows registry locations:
-
AGENT_KEY: HKEY_LOCAL_MACHINE\System\CurrentControlSet\Services\SNMP\Parameters
-
ZFS_KEY: HKEY_LOCAL_MACHINE\SOFTWARE\Novell\Zenworks\ZfS
The Windows SNMP trap target policy enforcer performs in the following sequence:
-
The policy enforcer first verifies an installation of an SNMP agent. This is done by checking if AGENT_KEY exists. If it exists, the enforcer assumes that an SNMP agent is installed and continues with the following steps. Otherwise, an error is returned and the processing stops.
-
The enforcer keeps track of all trap targets added by the ZENworks Server Management policy by placing the trap targets in ZFS_KEY. The trap targets are organized like the trap targets in AGENT_KEY with a subkey of TrapConfiguration. The subkey TrapConfiguration contains community strings that are represented as registry subkeys. These community strings contain the trap target values associated with each community string.
-
Each trap target in the ZENworks Server Management policy is put into AGENT_KEY, unless it already exists. The policy enforcer ensures that each Server Management trap target is found, or is added to each community string. If no community strings exist in AGENT_KEY, a community string named “public” is created.
-
Any previously added trap targets found in ZFS_KEY that are removed from the ZENworks Server Management policy are removed from AGENT_KEY. Trap targets not added by Server Management are not removed.
-
If Microsoft’s SNMP agent is installed, the agent’s trap targets are automatically updated with registry changes.
Configuring the SNMP Trap Target Policy
To configure the SNMP Trap Targets policy:
-
In ConsoleOne, right-click the Service Location Package, then click .
-
Select the SNMP Trap Targets policy, then click .
If the box under the column is not selected for the SNMP Trap Targets policy, select it before clicking . A policy must be enabled to activate the button.
-
Click .
-
Provide a new target, then click .
HINT:Provide the TCP/IP address or DNS name of the target server. IPX addresses are not supported.
-
Select the tab, then schedule the policy (see Section 4.7, Scheduling Policies).
-
Click to close the policy.
If you click , none of the targets that you provided are saved.
Text File Changes
You can automate changes to text files on your servers.
To configure text file changes:
-
In ConsoleOne, select the Distributed Server Package’s container, right-click the , then click .
-
Click > (or other platform).
-
Click , then select .
-
Provide a unique name for the policy.
Because the policies selected from this dialog box are plural, you can have multiple text file policies listed on the Policies tab. Therefore, provide a unique name for this policy.
When you click after naming the text file policy, it is selected on the tab.
-
Click .
The tab defaults.
-
Click .
After one text file has been added, you are given the opportunity to select whether you are adding another text file or another change item for the selected text file.
To add another text file, select . It does not matter which text file or change item is selected in the left pane—the text file is added to the far left level.
To add another change to a text file, in the left pane select the text file for the change, click , then select . The change item is added under the selected text file.
-
If you are adding a text file, provide the name of the text file.
-
Accept the default name (such as Change #1) or rename it; if you are adding a text file, click .
-
Click the down-arrow for the field, then select the change mode from the drop-down list.
-
Click the down-arrow for the field, then select the search type from the drop-down list.
-
Enter the exact search string.
-
Select the check box if you want the string search to be case sensitive.
-
To find all occurrences of the search string, make sure the box is selected, or deselect the box to find only the first occurrence.
-
Click the down-arrow for the field, then select the action from the drop-down list that should result if a string is matched.
-
If you are replacing a string or entering a new one, enter the text in the text box.
-
Repeat Step 6 through Step 15 for each text file to add or each change to be made.
-
To reorder the text files and change items, use the arrow keys.
-
Schedule the policy (see Section 4.7, Scheduling Policies).
-
Click to close the policy.
If you click , neither the schedule or any of the text files entered are saved.
ZENworks Database
If you installed the Server Management database during installation, but the database file is not associated with a Database object, you can set its object’s DN so that the server this policy is associated with can find the database file for logging information.
To configure the ZENworks Database policy:
-
In ConsoleOne, right-click the , then click .
-
Select the ZENworks Database policy, then click .
If the box under the column is not selected for the ZENworks Database policy, select it before clicking . A policy must be enabled to activate the button.
-
Select the tab.
The tab defaults. Make sure you are using the correct tab.
-
Provide the DN of your ZENworks Database object, or browse to select the DN, then click to close the policy.
If you click , the DN is not saved.
ZENworks Server Management
This policy provides basic configuration parameters for Policy and Distribution Services.
To configure the ZENworks Server Management policy:
-
In ConsoleOne, select the Distributed Server Package’s container, right-click the then click .
-
Click > (or other platform).
-
Select the ZENworks Server Management policy, then click .
If the box under the column is not selected for the ZENworks Server Management policy, select it before clicking . A policy must be enabled to activate the button.
The tab displays.
-
To determine the policy’s general status:
-
Select the procedure to follow when displaying messages at the server console.
-
Select the procedure to follow when sending SNMP traps.
For information about displaying SNMP traps on your management console, see Section 4.3.1, Compiling Zentrap.mib.
-
Select the procedure to follow when recording information to a log file.
IMPORTANT:Set the E‑Mail Messages option to either None or Errors Only. If you set this to a more detailed level, performance degrades because of the extra e‑mail messages that are created.
-
-
To determine the policy’s configuration, select the tab, then click .
-
Provide a console prompt.
You can customize the prompt using plain text and variables. The default is:
%SERVER_DN% - ZENworks Server Management >
You can use any of the predefined or user-defined variables (for more information, see Section 9.2, Types of Variables).
-
Provide a working path.
This is for Policy and Distribution Services temporary and backup files. The default directory is \zenworks\pds\smanager\working.
-
To determine how old database information should be before purging, enter the number of days.
All policy-related information older than the number of days entered is purged when Server Management is started on the same server where zfslog.db resides.
IMPORTANT:The database can only be purged if Server Management is running on the same server where zfslog.db is located.
Tiered Electronic Distribution information is purged manually from the database. For more information, see Section 10.5, Purging the Database.
-
-
To set a port number for the ZENworks Web Server, select the tab and select or enter a port number.
-
Click to close the policy.
If you click , none of the policy changes on any of the tabs are saved.
4.3.5 Creating Custom Log Files Using Policies
If you want to create custom log files, you can use either the Tiered Electronic Distribution policy (Service Location Package) or the ZENworks Server Management policy (Distributed Server Package):
-
Tiered Electronic Distribution policy: With this policy, you associate its Service Location Package to an eDirectory container, and all Distributor and Subscriber objects under it can use this policy. The Use Policy check box that is displayed in each of the object’s properties allows you to individually select whether that Distributor or Subscriber should use the policy. The check box is disabled by default.
Using this policy, the Distribution Agent logs Tiered Electronic Distribution information to your custom log file for the selected Distributors and Subscribers.
-
ZENworks Server Management policy: With this policy, you distribute its Distributed Server Package to the servers where you want the policy enforced.
Using this policy, the Policy/Package Agents for these servers log policy and software package information to your custom log file.
When you are creating and configuring one of these policies, the Path and Filename field for the log file is blank by default.
For information on how to create and configure these policies, see: