3.4 Distributions
The following sections provide concepts and instructions for the Distribution object:
3.4.1 Understanding Distributions
The Distribution (TED Distribution) object contains a list of data packages or data grouping information.
Functional Relationship with Other Tiered Electronic Distribution Objects
Figure 3-13 illustrates a Distribution’s relationship with its Distributor and the Channels:
Figure 3-13 Distributor with a Distribution Listed in Multiple Channels
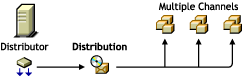
The Distributor associates its Distributions with the Channels.
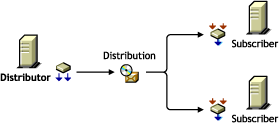
Figure 3-14 illustrates that a Distributor sends Distributions to Subscriber servers:
Figure 3-14 A Distributor Sends Its Distribution to Two Subscribers.
Distribution Description
A Distribution is a compilation of software and/or files, or a policy package, that the various servers in your network might need.
A Distribution is owned by only one Distributor. A Distribution keeps a list of its Channel associations, and you can place the Distribution in multiple Channels.
When a Distribution is built, it is built according to its type. There are seven types of Distributions:
- Desktop Application 1
- File
- FTP
- HTTP
- MSI
- Policy Package
- RPM
- Software Package
1 The Desktop Application Distribution is only available when Desktop Management is installed.
For information on the different Distribution types, see The Distribution Types.
Scheduling
A Distribution has a Build schedule that notifies its Distributor how often the Distribution needs to be built. If a Distribution has changed since the last time it was built, a new one is created.
Distributions can also be made active or inactive to control whether they should be built.
For information on scheduling, see Section 8.0, Scheduling.
How New Versions of Existing Distributions are Created and Distributed
After you have configured a Distribution object and set the various distribution schedules, newer versions of existing Distributions are automatically created and distributed according to the following parameters:
-
Refresh schedule: This schedule determines when a Distributor reads eDirectory for changes to any of its Distributions. If changes are detected for a particular Distribution, it is rebuilt according to that Distribution’s Build schedule.
For more information on the Refresh schedule, see Distributor Object’s Refresh Schedule.
-
Build schedule: This schedule is set independently for each Distribution. When the schedule starts for a Distribution that has been determined to have had changes to it, the Distributor proceeds to rebuild that Distribution.
For more information on the Build schedule, see Distribution Object’s Build Schedule.
-
Maximum revisions: This field (in the Distribution object’s properties, click General > Settings), determines how many versions of a Distribution are kept on the Distributor and Subscriber servers’ file systems. For some Distribution types, this field determines whether a partial Distribution (delta) or complete Distribution is rebuilt. Otherwise, this field is used mainly to control disk space usage.
When the maximum number of revisions is being approached, an SMTP e‑mail notification is sent, if SMTP notifications have been configured.
For more information on the Maximum Revisions field schedule, see Maximum Revisions.
These parameters determine when a Distribution needs to be rebuilt. The other schedules (Send and Extract) determine when the rebuilt Distribution file is sent and extracted.
Distribution Security
Policy and Distribution Services provides several means for securing Distributions:
Certificates
A certificate is a security mechanism used by Policy and Distribution Services to ensure that the Distribution received by a Subscriber was actually sent by the Distributor owning that Distribution. Without a matching certificate, a Subscriber cannot receive Distributions from the Distributor.
For more information, see Section 7.1, Distribution Security Using Signed Certificates and Digests.
Encryption
You can encrypt Distributions for when you send them outside your secure network.
For more information, see Section 7.2, Distribution Security Using Encryption.
Inter-Server Communications
You can secure communications between Tiered Electronic Distribution components residing inside and outside your secure network by installing inter-server communications security where needed.
For more information, see Section 7.3, Security for Inter-Server Communication Across Non‑Secured Connections.
Distribution Deletions
When a Distribution is built, any deletions in the Distribution object or on the Distributor server’s file system, such as deleting files or directories, causes those files or directories to also be deleted from the Distribution when it is rebuilt. However, synchronization must be enabled in order for the files and folders to also be removed from the Subscriber server’s file system.
For more information, see Section 3.11.1, Directory Sync Granularity for File Distributions.
Clean Up of Temporary Distribution Files
To reduce the amount of disk space taken up by temporary Distribution files, those files are now automatically cleaned up. Previously, after a Subscriber server extracts a Distribution, the distfile.ted file is left in the Subscriber server’s working directory.
With the clean-up feature, you can have the distfile.ted file and other temporary Distribution files automatically deleted after the Distribution has been successfully extracted. However, so that the Subscriber is not sent the Distribution again, the status file is left in the Subscriber’s working directory to indicate that the Distribution has been extracted and cleaned up.
IMPORTANT:The Distribution clean-up feature works only for Distributions that have been both sent and received by ZENworks 7 Server Management Distributors and Subscribers. Distributions sent or received by Distributors or Subscribers running prior versions of Server Management software cannot be cleaned up.
Parent Subscribers
For parent Subscribers who might need to forward the Distribution, the files are not cleaned up on the parent Subscriber’s server, so that it can still forward the Distribution.
A parent Subscriber that has had a Distribution cleaned up which it is not forwarding, and then receives the same Distribution for forwarding, will receive the Distribution again, even though its status file indicates that it does not need it.
Distribution Types and Clean-Up
The FTP, HTTP, RPM, MSI, Software Package, and Policy Package types of Distributions are always cleaned up. The Maximum Revisions field is not available for those types of Distributions.
The File and Desktop Application types of Distributions can have their temporary files cleaned up after the Distribution has been extracted when the Maximum Revisions field is set to 1. However, for File Distributions, if the Verify Distributions check box is selected, the Distribution is not cleaned up, even if the Maximum Revisions field is set to 1.
Deleting Clean-Up Statuses in iManager
Deleting the status file using the iManager’s remote console forces a Subscriber to receive a Distribution that has been cleaned up.
Clean-Up Is Not Rollback
Cleaning up the temporary files does not cause any roll back of extracted Distributions. Clean-up is simply removing the temporary files.
Clean Up of Reassigned Distributions
The working directories for a Distribution that is reassigned from an old Distributor to a new Distributor are not automatically cleaned up on the old Distributor’s server. You need to manually clean up that Distribution’s temporary files on the old Distributor server.
3.4.2 Distribution Issues
Consider the following in determining your Distributions:
-
File sizes and their potential for compression (.jpg files won’t benefit as much from compression as text files)
-
The bandwidth of WAN links
-
The frequency of file changes
-
Network resource constraints, such as low disk space or extra bandwidth availability
The better you can determine this type of information, the better you can balance resource usage and minimize the use of resources.
You can configure Distributions to copy only files that are different than the target, or copy all files in their original state.
The following sections provide information about other issues with Distributions:
Maximum Number of Concurrent Distributions
This is an attribute found in the Distributor and Subscriber objects. It is used to control the number of Subscribers that can be serviced concurrently when sending Distributions. This is helpful if the Distributor or parent Subscriber is servicing a large number of Subscribers. It prevents the Distributor from spreading itself very thin and sending the Distribution to all of the Subscribers at once.
For example, if a Distributor or parent Subscriber sends to 100 Subscribers and the number of concurrent Distributions is set to 10, then the sender starts with 10 connections. As one connected Subscriber finishes receiving the Distribution, another Subscriber is added in its place in the list of 10. This continues until all 100 have been serviced.
Maximum Revisions
Each Distribution allows you to determine how many versions of the Distribution are kept by the Distributor and Subscribers in their working directories. The default is infinite for all Distribution types, whether the Distribution is created in ConsoleOne or iManager; however, the File and Desktop Application types of Distributions have a default of 10 if they are created in ConsoleOne. Make sure that you fill in the Maximum Revisions field attribute when creating Distributions. Consider disk space availability when calculating the maximum number of revisions.
If you select to limit the revisions, the e‑mail fields are available, where you can specify a trigger to notify e‑mail recipients when your maximum number is approached, as well as define who the e‑mail recipients are. If you select to allow unlimited revisions, the e‑mail fields are not available.
The File Distribution only builds a complete Distribution the first time it creates the Distribution. All subsequent versions are just the differences (deltas) between a current version and its previous version. However, when the File Distribution reaches its maximum number of revisions, it deletes all previous versions and build an entirely new Distribution (called a baseline), and starts from 1 in counting the number of revisions.
When the maximum number of revisions is met for FTP, HTTP, and Server Software Package Distribution types, the agent deletes the oldest version of the Distribution and adds the current version to the revisions. Therefore, it never exceeds the maximum number entered in the Distribution object.
When the maximum number of revisions is being approached, an SMTP e‑mail notification is sent if SMTP notification has been configured.
I/O Rate (Bytes per Second)
This is an attribute found in the Distributor and Subscriber objects. It is used to control the amount of bandwidth used by the Distributor or parent Subscriber when sending Distributions. The default is unlimited, meaning the sender uses all the bandwidth available in sending Distributions.
Updating the Distributor’s eDirectory Information
The Distributor must be updated with the configuration information contained in the Tiered Electronic Distribution objects in eDirectory.
Configuration changes include any changes made to the attributes of the Distributor object, Distribution objects belonging to that Distributor object, or Channel objects to which the Distributor object is associated.
The Distributor has a schedule that determines how often it reads eDirectory for configuration information. Set this schedule to coincide with the frequency at which Tiered Electronic Distribution objects are modified in eDirectory.
You can also force an eDirectory refresh by right-clicking a Distributor object and selecting the Refresh menu option, or by using the ZENworks Server Management role in iManager (see Forcing Policy and Distribution Services Agent Actions).
Checking the Distribution Package Changes
The Distribution’s Build schedule tells the Distributor the frequency at which the Distribution should be checked for changes.
For example, the Distribution schedule might specify a weekly build. The Distributor rebuilds that package and compares it to the previous version to see if there have been any changes.
MSI Distribution Extraction Errors
Some MSI Distributions can fail to extract on Windows 2000 servers (usually displaying error 1603), but not on Windows Server 2003 servers. The difference is in how the two operating systems differently handle the rights needed to install the MSI packages.
This can be solved for Windows 2000 servers by editing the properties in the MSI Distribution:
-
In ConsoleOne, access the MSI Distribution’s properties.
-
On the tab, select the MSI package listed under .
-
Click to open the Edit Parameters dialog box.
-
In the field, enter:
ALLUSERS=1
-
Click to save the change.
-
Repeat Step 2 through Step 5 for each MSI package listed under .
-
Click to save the updated MSI Distribution properties.
3.4.3 Determining the Distributions
You can distribute whatever you can represent on the file system. This includes server applications and files. For example, the applications or files could fulfill one of the following purposes:
-
Installing server software (such as virus protection software)
-
Updating server software (such as a NetWare support pack)
-
Updating files (such as virus patterns) on servers
-
Enforcing standardization of server files or configurations (such as replacing the autoexec.ncf file on a NetWare server with an updated version)
Use a descriptive method for naming the Distributions. You can also use these names for naming the Channels associated with the Distributions. For example:
   VirusProtect
   VProtectPatterns
   NW51patch4
   NW6patch1
   AUTOEXECNCF000326
The following sections explain the different Distribution types and issues related to determining your Distributions:
The Distribution Types
There are several Distribution types. Each type has unique features that tailor it for specific needs.
For information on how to configure each Distribution type, see Section 3.4.4, Creating a Distribution (specifically, Step 6).
For the File and FTP types of Distributions, a Distribution Wizard is available for automating the process of creating them. For more information, see Section 3.4.12, Using the Distribution Wizard.
Desktop Application
Distributes the Application objects (that are created in Desktop Management) and the application’s associated files to specified locations on the eDirectory tree and target Subscriber servers. This Distribution type allows you to solve geographic, workload, and redundancy issues for applications distributed by Novell Application Launcher that otherwise might require much of your time in manual configuration work in Desktop Management. For more information, see Section 6.0, Desktop Application Distribution.
The Desktop Application Distribution type is not supported for Linux and Solaris servers.
This Distribution type automatically distributes a modified copy of the original Application object to a context in the eDirectory tree (a Subscriber’s working context), and automatically copies the application’s files to the Subscriber server that can locally service its users and workstations. It performs all of the appropriate hookups to the modified Application object to render it fully functional.
For the Desktop Application Distribution, you can set the maximum number of revisions in the Distribution object. When the version number reaches the number that you set, the Distributor rebuilds the entire Distribution. By default, this number is 10.
You can send Desktop Application Distributions to Subscriber servers on a tree that is different from the Distributor server’s. However, the recipient server’s Subscriber object must reside in the same tree as the modified Application objects that are created by the Distribution. The External Subscriber object is used on the Distributor’s tree to send a Desktop Application Distribution to a server on another tree.
File
With this type you can select files and/or directories from the Distributor server’s file system for distribution, and select a destination location for extraction on the Subscriber.
The File type is sequential, meaning it controls the order for the building and extraction of Distributions. This prevents the building and extracting processes from being performed out of sync.
IMPORTANT:Linux and Solaris file systems are case sensitive to allow paths and filenames that are identical except for case differences. However, if you select two such files, only the first file selected during extraction is distributed, because the File type is not case sensitive. Therefore, do not place two files into a File Distribution where their paths and filenames are identical except for case differences.
Also, if a NetWare server is the target for a File Distribution, you might encounter an error due to code page differences where extended characters are used (such as ê, ë, ì, or í). The information in Extended Characters in Directory Paths in the Desktop Application Distribution section is also applicable to File Distributions.
By default, Cache and Forward is used. This process allows a parent Subscriber to begin sending a Distribution to subordinate Subscribers before it has finished receiving the Distribution. This allows entire Distributions to be sent more quickly through a chain of parent Subscribers in the Distributor’s routing hierarchy than if they each had to wait until each Subscriber had completed receiving the Distribution before it started sending.
The File Distribution is useful for distributing large Distributions that change often, thus requiring updates that need to be distributed frequently.
For the first version of a Distribution, the Distributor builds the entire Distribution (creating a baseline). A unique feature of the File type is that for all subsequent versions it calculates the differences at build time and only builds a delta of the Distribution.
The File type does this by keeping a list of the files and directories contained in a Distribution on the source machine (the Distributor or a parent Subscriber). If a source file changes, a new Distribution is built the next time its Build schedule starts. However, this new Distribution only contains the files that are different between the previous version and the current version. This is known as a delta of the original Distribution.
This delta of the Distribution file is what is distributed to the Subscribers-not the entire Distribution.
The File type is also effective when changes are frequent because it can build much smaller deltas.
There is no option to send the entire File Distribution. However, after the maximum number of revisions has been met, the Distribution is completely rebuilt and all deltas and previous revisions are deleted. Therefore, if you set the maximum number of revisions to 1, deltas are not used and the entire Distribution is built and sent every time.
For example, the first build is the baseline Distribution (version 1), the first update (Delta 1) is version number 2, the second update (Delta 2) is version number 3, and so on until the number of revisions you set is reached, which triggers a new baseline rebuild. By default, this number is 10.
Pre and Post actions can be set for File Distributions. For more information, see Section 3.4.6, Pre and Post Processing for Distributions.
You can set the maximum number of revisions in the Distribution object.
If synchronization is enabled, you can use the File type for removing files and directories from the Subscriber server’s file system upon extraction of the Distribution in one of two ways:
-
Edit the Distribution object: Remove files from the list of files and directories in the Distribution object. When the Distribution is built again, those files and directories are not included.
-
Remove files from the Distributor’s file system: Remove files from the Distributor’s file system that were part of the Distribution. When the Distributor is refreshed, it rebuilds the Distribution without those files and directories.
In both cases, upon extraction of the Distribution, and with synchronization enabled, those files and directories are removed from the Subscriber server’s file system. For more information on synchronization, see Section 3.11.1, Directory Sync Granularity for File Distributions.
To manually force a Distribution to be built, you can use iManager (see Forcing Policy and Distribution Services Agent Actions).
FTP
With this type you can create a Distribution consisting of files from one or more FTP sources. Each source can contain one or more directories and/or files.
When an FTP site directory entry is a directory, all of its files and subdirectories are built for the Distribution.
Server Management now supports retrieval of symbolic link files. This allows the Linux or Solaris environments to receive FTP files that would be considered invalid on other platforms.
Whenever a Distribution’s Build schedule starts:
-
The FTP type creates a new Distribution only if the new version would be different than the previous version.
-
The Distributor builds the entire new Distribution.
-
The Distributor sends each new version of the Distribution to the appropriate Subscribers.
You can set a maximum number of revisions in the Distribution object to conserve disk space. By default, the number is unlimited.
HTTP
With this type you can create a Distribution consisting of one or more HTTP sources. Each source can contain one or more target entries.
Whenever a Distribution’s Build schedule starts:
-
The HTTP type creates a new Distribution only if the new version would be different than the previous version.
-
The Distributor builds the entire new Distribution.
-
The Distributor sends each new version of the Distribution to the appropriate Subscribers.
You can set a maximum number of revisions in the Distribution object to conserve disk space. By default, the number is unlimited.
MSI
Distributes Microsoft Software Installer (MSI) packages to Windows servers, where the MSI engine is used to install the Windows-specific software included in an MSI Distribution. Any vendor can create MSI packages for their software for installing in a Windows environment.
The AdminStudio ZENworks Edition software for creating .mst files is available on its own CD that is provided with the ZENworks 7 product.
MSI 3 is supported as a version that can be distributed. However, ZENworks 7 does not individually support any of MSI 3’s new features.
The components of an MSI Distribution consist of .msi, .msp, and .mst files:
-
.msi file: An MSI package containing Microsoft software to be installed by the MSI engine.
An MSI package can include just the .msi file, or the .msi file with the other files in its folder and all of the files contained in any subfolders.
-
.mst file: A file that adds, deletes, or changes the properties in an MSI package to enable customizing of the installation for different groups of users.
-
.msp file: An MSP package that provides a patch to an MSI package.
MSI-based patch files might have filename extensions other than .msp.
An MSI Distribution might contain:
-
One or more MSI packages
-
One or more MSI packages with one or more .mst files applied to each MSI package
-
One or more MSI packages with one or more MSP packages
-
One or more MSI packages with one or more MSP packages and one or more .mst files applied to each MSI package
-
One or more MSP packages only, because .msp files contain the information necessary for identifying the MSI packages’ applications that they are to patch
Patching can include modifying the settings of a machine, as well as updating files.
You can determine the application order of the .mst files for each MSI package, and you can determine the execution order of the MSI and MSP packages listed in the Distribution.
When an MSI Distribution includes both of the MSI and MSP components, post-installation actions are added by the Distributor to the Distribution to ensure the correct order of completion.
Because an MSP is designed to modify a specific MSI package, you need to make sure that you have the correct order of execution.
Some MSI Distributions can fail to extract on Windows 2000 servers. To solve this problem, see MSI Distribution Extraction Errors.
IMPORTANT:Because an MSI Distribution recursively gathers all of the files from the MSI file’s location, if you have multiple .msi files in a given location, all other files and subdirectories contained therein are gathered once for each .msi file. The distribution gathering process cannot determine which other files or subdirectories belong to each .msi file, so you can end up with a much larger MSI Distribution file than is necessary. Therefore, instead of storing your .msi files in one directory, place each into its own subdirectory with its own supporting files and subdirectories.
Policy Package
This type provides the mechanism for applying policies to servers. In previous versions of Policy and Distribution Services, all policies were enforced through eDirectory object and container associations. With ZENworks 7 Server Management, policies are now distributed Subscriber servers for enforcement using the Distributed Policy Package. However, policies for Distributors continue to be enforced through context associations using the Container Package or Service Location Package.
With the Policy Package Distribution, you send policies directly to servers as Distributions, which are extracted on the receiving Subscriber server. The contained policies are then enforced on that server.
You can set a maximum number of revisions in the Distribution object to conserve disk space. By default, the number is unlimited.
To send a Policy Package Distribution to a Subscriber using an External Subscriber object, you must edit the agentinfo.properties file to prevent trusted tree errors. For more information, see Preventing Trusted Tree Errors for Policy Package Distributions.
For more information on each policy, see Section 4.1.6, Server Policy Descriptions.
RPM
You can distribute any Red Hat Package Manager (RPM) packages that you have previously created to your Linux and Solaris servers using the RPM Distribution.
For Solaris, RPM must first be installed on the server, because it is not installed with Solaris software by default. Solaris’ equivalent is PKG.
Whenever a Distribution’s Build schedule starts:
-
The Distributor builds the entire new Distribution.
-
The Distributor sends each new version of the Distribution to the appropriate Subscribers.
You can set a maximum number of revisions in the Distribution object to conserve disk space. By default, the number is unlimited.
Software Package
A Server Software Package is created in ConsoleOne in the Server Software Package namespace. For more information, see Section 5.0, Server Software Packages.
Software Package is the most robust type of Distribution. It includes installation prerequisites, pre-installation instructions, post-installation instructions, and the ability to modify text fields, SET parameters, registry settings, and the products.dat file.
With the Software Package Distribution you can select .cpk files for distribution. This allows you to place a software product into a Distribution for automatic installation on the receiving server. This can include software updates to existing server software on the server.
You can select multiple .cpk files for one Distribution. Then, individual .cpk files are applied on the Subscriber, depending on whether the .cpk file’s prerequisites are met.
IMPORTANT:The order that the .cpk files are applied on a server is not guaranteed, and .cpk files contained in one Distribution that might start in a certain order might not all finish in that same order. Therefore, place each .cpk file in its own Distribution if you want them to be installed in a particular order and use Distribution scheduling to determine the order. For more information, see Forcing the Software Package Distribution Order Using Multiple Distributions.
Determining the Sizes and Frequencies for Distribution Packages
A Distribution’s size and frequency of being built and sent depends on the following:
-
The size and number of files being distributed. Knowing this helps in determining the amount of disk space to be used on Distributor, Subscriber, and parent Subscriber servers.
-
A Software Package Distribution (.cpk) always builds an entirely new version of the Distribution each time the source changes.
-
HTTP and FTP Distributions always build an entirely new version of the Distribution whether the source has changed or not.
-
How often the packages change and need updating. Knowing this helps determine how frequently new versions of the package are created. Servers required to rebuild large Distribution packages on a regular basis should have the processing power to perform this work. The creation of many versions of a package also affects the amount of disk space used in the Distributor’s working directory.
-
The number of versions of a Distribution package that are retained. This also affects disk space usage on the Distributor’s and Subscribers’ servers.
-
The File Distribution creates a delta file for each new version of the Distribution until it reaches the number you have specified in the Maximum Number of Revisions field (10 is the default). Then it begins a new baseline Distribution. The delta file contains only the differences between the last and current versions of the Distribution.
3.4.4 Creating a Distribution
-
In ConsoleOne, select the container where you want the Distribution to be created, click > > , select the type, then click .
-
Specify a Distribution name.
IMPORTANT:Periods (.) are not allowed in Distribution names. Instead, use dashes (-) or underscores (_) as word separators. If you use a period in the Distribution name, the Distribution is not sent, and the Distributor is not reloaded after it has been exited.
-
To give the Distributor ownership of the Distribution, browse to select the Distributor object, select , then click .
The Distribution object’s properties are displayed.
Each Distribution belongs to a single Distributor that builds and sends the Distribution.
-
Click > and fill in the fields:
Active: Required. In order to make a Distribution available to Subscribers, it needs to be active.
Use digests: Digests are used by Distributors and Subscribers to verify that Distributions have not been tampered with while in transit. The digest provides an MD5 checksum for the Subscriber to compare.
Creating a digest takes more time on larger Distributions. The number of minutes per megabyte is dependent on the hardware configuration of the server where the digest is being created.
Digests also detect corruption in a Distribution’s package. In the case of corruption, the Subscriber renames the distfile.ted Distribution file to distfile.corrupt and the Distribution is rebuilt and sent the next time the Channel’s schedule fires.
Encrypt: You can have the Distribution encrypted if you are sending it across non-secured connections. Encryption provides security for the Distribution during transit between the Distributor and Subscriber when they are not within the same firewall. Select either Strong or Weak encryption. You also must have the same version of NICI 2.6.4 installed to each of these servers for encryption to work (see Installing NICI 2.6.4). However, if you already have NICI 2.4.6 installed, it is optional whether you upgrade to NICI 2.6.4, because these versions are compatible with each other.
Maximum revisions: This number helps you to control disk space usage by determining how many versions of a particular Distribution are kept in the Distributors’ and Subscribers’ working directories. The default is 10. Select and enter a number.
Increase the number if data is changing often and the changes are minimal (smaller delta files). Decrease the number if data is not changing very often, or if a significant amount of data is changing (larger delta files).
The following e‑mail options are available if you set a maximum number. If you select , these options are dimmed.
-
Approaching maximum revision email notification list: Contains the e‑mail addresses of anyone who is to be notified when a Distribution is approaching the maximum revisions set in the field. Here, you can either remove a single or all displayed addresses.
-
Email address (maximum revision notification): You can add e‑mail addresses to the list in . Just enter an e‑mail address and click and it is displayed in the listing.
-
Send notifications when Distribution revision is ___ or less of reaching maximum revisions: Enter a number to indicate how close “approaching” is. When the current revision number of Distribution plus this number equal the maximum revisions, an SMTP notification is sent to the listed addressees.
SMTP must be configured and its e‑mail server address listed in the next field.
-
Email server address: The SMTP server used to send the e‑mail notifications. For example, mail.novell.com.
For information on configuring SMTP e‑mail notifications, see SMTP Host.
Priority: You can give the Distribution a priority that determines how it is sent in relation to other Distributions. A High priority means it is sent before Medium or Low priority Distributions. For information on prioritizing Distributions, see Section 3.4.5, Prioritizing Distributions.
Distributor: The DN of the Distributor object that builds and sends this Distribution.This attribute cannot be modified. You selected the Distributor when you created the Distribution object.
Description: Provide useful details about the Distribution, such as the name of the desktop application, the files and directories it contains, intended user groups, and so on.
-
-
Click > and select a platform restriction:
Platform restrictions: If you want to select specific operating system versions as a prerequisite to receiving this Distribution, deselect No Restrictions and select the desired operating system version. You can select from the following:
No Restrictions NetWare All NetWare 4.x (earlier versions of ZfS supported these platforms) NetWare 5.0 (earlier versions of ZfS supported this platform) NetWare 5.1 NetWare 5.x NetWare 6.x Windows Server Solaris Linux
Selecting the No Restrictions check box means that the Distribution can be sent to any platform.
If you select NetWare All, you do not need to select any of the individual NetWare platforms.
-
Select the tab and use the drop-down box to choose a Distribution type in the field:
- Section A.1, Desktop Application
- Section A.2, File
- Section A.3, FTP
- Section A.4, HTTP
- Section A.5, MSI
- Section A.6, Policy Package
- Section A.7, RPM
- Section A.8, Software Package
For some Distribution types, when entering information into a field, such as a directory name, be sure to press Enter or the change is not saved.
IMPORTANT:For the FTP, HTTP, RPM, Software Package, and Desktop Application types of Distributions, if a target file is found to be locked during extraction, the Subscriber throws an exception stating that the file could not be copied. The Distributor receives this information from the Subscriber and logs the failure in the reporting database.
-
Select the tab and select a schedule:
The Build schedule determines how often the Distributor builds a new version of the Distribution.
Two options allow you to override the Channel’s Send and Subscriber’s Extract schedules:
-
Send Distribution immediately after building: Overrides the Channel’s Send schedule, allowing you to immediately send the Distribution, rather than wait for the Send schedule to start. However, the Subscriber’s Extract schedule determines when it is extracted for use.
-
Extract Distribution immediately after receiving: Overrides the Subscriber’s Extract schedule, allowing the Distribution to be immediately extracted, rather than wait for the Extract schedule to start. This is useful for Distributions that need to be extracted immediately, such as a Distribution that provides virus patterns.
Build schedule for File Distributions: This type builds a new Distribution and compares it with the previous version for changes. If there are changes, the File type builds a file consisting of the differences between the current version and the previous version. When the maximum number of versions is reached, the type builds a complete Distribution (not just a file containing the differences) and deletes all previous versions.
Build schedule for HTTP, FTP, and Software Package Distributions: These types build new versions of the Distribution each time the Build schedule starts, regardless of whether the Distribution has changed. It sends this new version to all Subscribers.
When sending a Distribution, the sender retries every 2 minutes for 30 minutes, then stops. It does not begin sending again until the Channel schedule starts again.
-
-
Select the tab and fill in the field:
Channels: Each Distribution must be associated with at least one Channel in order for it to be sent to a Subscriber. A Distribution is be sent to all Subscribers of the selected Channel or Channels.
-
If you want to set pre or post actions for the Distribution, see Section 3.4.6, Pre and Post Processing for Distributions for the steps.
-
Click , then select to resolve the certificates.
For NetWare and Windows servers, this copies the security certificates from the Distributor to Subscriber subscribed to the Channel. For Linux and Solaris servers (if you do not have drives mapped to them), you may need to resolve the certificates manually.
For information, see Section 7.1.6, Resolving Certificates.
3.4.5 Prioritizing Distributions
Distributions can be prioritized in two ways:
-
Send queue: You can prioritize the order in which Distributions are sent: High, Medium, or Low. For example, in a given Channel, all High priority Distributions are sent first, then the Medium priority Distributions are sent, and then the Low priority Distributions are sent.
Because Distributions with mixed priorities cannot be sent concurrently, you can control the order in which Distributions are sent by the priorities that you assign them.
-
Output rate: You can configure different output rate settings for a Distribution, based on a priority: High, Medium, or Low. This allows you to control the bandwidth a Distribution uses. For example, if you want your High priority Distributions to utilize the most bandwidth, you should configure their output rates with the High priority. Blank means that bandwidth is taken from third-party applications.
The Maximum Number of Concurrent Distributions value is affected by prioritizing. This value is subordinate to the priorities set for the Distributions. For example:
-
You have the concurrent Distribution number set to 10.
-
There are 3 High priority Distributions.
-
There are 6 Medium priority Distributions.
-
There are 20 Low priority Distributions.
-
Initially, only the 3 High priority Distributions are sent concurrently.
-
After all 3 of the High priority Distributions are sent, the 6 Medium priority Distributions are sent concurrently.
-
After all 6 of the Medium priority Distributions are sent, 10 of the 20 Low priority Distributions are sent concurrently, and so on.
3.4.6 Pre and Post Processing for Distributions
Pre and post processing actions are new features for Distributions in ZENworks 7 Server Management:
Pre and Post Processing Actions Now Available in Distributions
To apply execution logic to a Distribution, pre and post actions are now available for the following Distribution types:
- File
- FTP
- HTTP
- MSI
- RPM
- Software Package 1
1 Previously, only a Server Software Package had this functionality. Now both the software package and its Software Package Distribution can have pre and post actions defined.
The benefit of having pre and post actions in these Distribution types is that you are no longer restricted to using only Server Software Packages to perform those actions.
The pre and post processing actions are not available for the following Distribution types:
- Desktop Application
- Policy Package
Pre and Post Actions in Software Packages versus Distributions
In Server Software Packages, the pre and post features are contained in two different tabs: Pre-Installation and Post-Installation, with Script and Load/Unload tabs for accessing the various options.
For the Distribution types that now have this feature, a Pre/Post Actions tab has been added to their Distribution object’s properties (with Pre-Distribution Actions and Post-Distribution Actions tabs).
The following options are available from the Pre/Post Actions tab:
- Load Java Class
- Script
- Start Process
- Stop Process
- Start Windows Service
- Stop Windows Service
For more information on these options, see Pre and Post Distribution Processing Actions.
The Pre and Post Feature Enhances Software Package Distribution Processing
When either a pre or post action is defined for a Software Package Distribution, the following is done:
-
A list of .cpk files contained in the Distribution is created in the Type tab of the Distribution object.
-
All pre actions are processed according to the order you defined for them.
-
The .cpk files are processed serially.
-
All post actions are processed according to the order you defined for them.
You can use Pre and Post Actions in a Distribution object containing multiple software packages to ensure pre and post actions are performed before and after the software packages listed in the Distribution are processed. However, pre and post processing only guarantees the order on ZENworks 7 Server Management Subscribers, because this functionality is not backwards compatible with ZENworks for Servers 3.x Subscribers.
Error Messages Given When Valid Distribution Types Are Not Selected
There are some instances when the Pre/Post Actions tab display only a message:
-
In a Distribution object’s properties, if you have not yet selected a Distribution type, the following message is displayed on the Pre/Post Actions tab:
You must select a Distribution type before you can configure pre or post actions.
However, you must not only select a Distribution type, you must also “save” it by clicking Apply. Then the Pre or Post page recognizes the Distribution and the Pre or Post actions can be applied.
-
If the Distribution type you have selected is either Policy Package or Desktop Application, the following message is displayed on the Pre/Post Actions tab, because pre/post actions are not supported for those types of Distributions:
This Distribution type does not support pre or post distribution actions.
Pre and Post Distribution Processing Actions
In each of the following sections, the information provided applies to both the Pre-Distribution Actions and Post-Distribution Actions subtabs of the Pre/Post Actions tab. The difference is that Pre-Distribution Actions occur before the main Distribution is extracted and Post-Distribution Actions occur after the Distribution has completed extracting.
Start Process Action
This action works for Windows services, Java processes, and NLM processes.
The Start Process action is similar to the Load NLM/Process action in Server Software Packages, as illustrated in Figure 3-15:
Figure 3-15 Properties of Distribution to See MSI Type Dialog Box
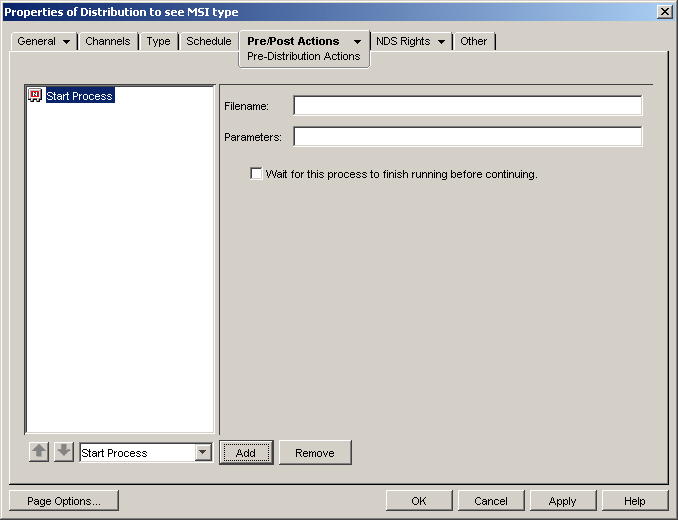
To add a Start Process action, select the option in the drop-down box and click the Add button. Then fill in the fields:
-
Filename: This must be the exact name. For NetWare, include the .nlm extension.
For Linux and Solaris, you must include the full path.
-
Parameters: Include any command line parameters for the NLM™ or process being run.
-
Wait for this process to finish running before continuing: You can select this option for an NLM or process that terminates itself. It must terminate within 10 minutes, or the whole loading process fails. By default, this option is deselected.
If you select an NLM to be loaded by the Distribution, and the NLM is already running on the target server, the package installation fails and is rolled back (if rollback is enabled).
You can make sure that an NLM is not already loaded when you are including it in the Distribution by adding a Stop Process option for that NLM before adding the Start Process option-but only if this NLM does not require user input from the keyboard to unload it.
Stop Process Action
This action works for Windows services, Java processes, and NLM processes.
The Stop Process action is similar to the Unload NLM action in Server Software Packages, as illustrated in Figure 3-16:
Figure 3-16 Properties of Distribution to See MSI Type Dialog Box
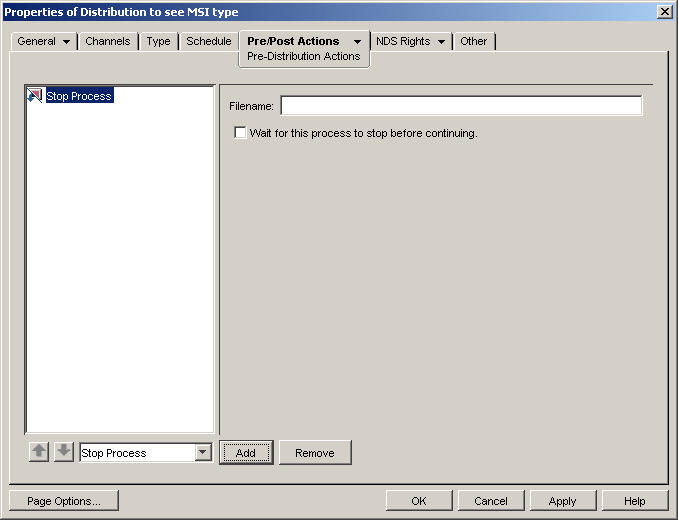
To add a Stop Process action, select the option in the drop-down box and click the Add button. Then fill in the fields:
-
Filename: This must be the exact name, including the extension if it is an NLM. Because many NLM files require user input to unload, their unloading cannot be automated.
For Linux and Solaris, only enter the name of the process; you should not enter any path information. All processes running on the machine by that name will be stopped.
-
Wait for this process to finish running before continuing: You can select this option for a process that unloads itself. By default, this option is deselected.
If an NLM requires intervention to unload, you must remember to unload it manually before trying to install the Distribution.
Start/Stop Windows Service Action
This action works for Windows services only, as illustrated in Figure 3-17 and Figure 3-18::
Figure 3-17 Properties of Distribution to See MSI Type Dialog Box
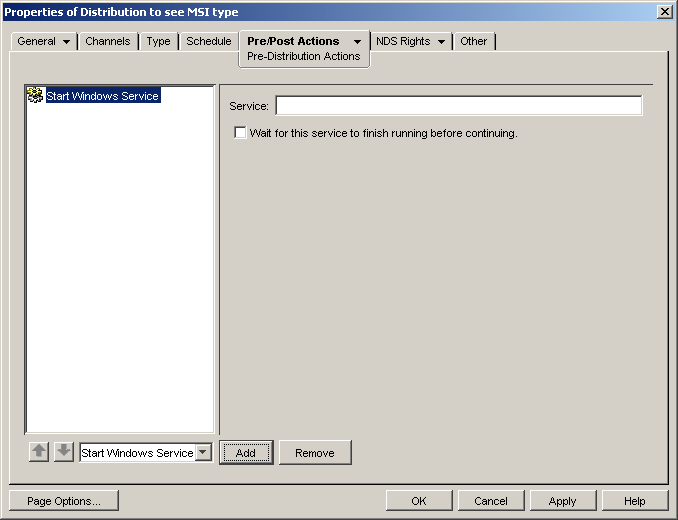
Figure 3-18 Properties of Distribution to See MSI Type Dialog Box
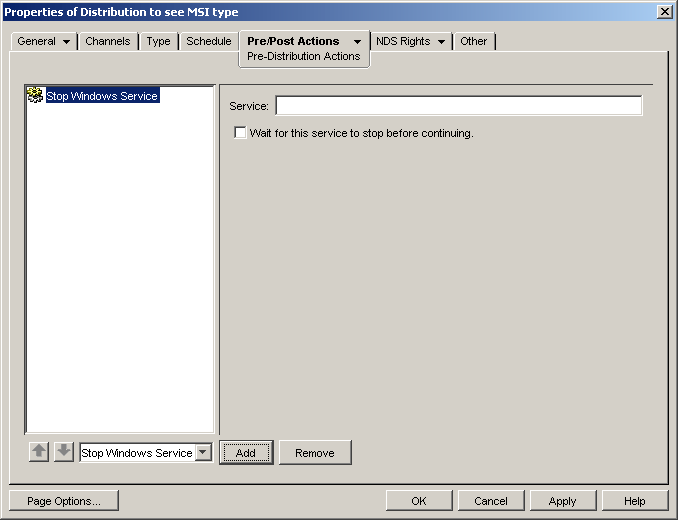
To add a Start/Stop Service action, select the option in the drop-down box and click the Add button. Then fill in the fields:
-
Service: This must be the exact service name.
-
Wait for this service to finish running before continuing: You can select this option for a service that starts or stops itself. By default, this option is deselected.
Script Action
This action works for Windows services, Java processes, and NLM processes.
You can run server scripts before installing the main Distribution files. Use the arrows to arrange the scripts’ execution order.
Figure 3-19 Properties of Distribution to See MSI Type Dialog Box

To add a Script action, select the option in the drop-down box and click the Add button. The word “Script” defaults, which you must change to the script filename, including its full path. (Without the path, the script cannot be found to run it.)
Then fill in the fields:
-
Script type: There are three script types: System, NetBasic, and PERL. The text you enter in the Script box must match the type you select.
IMPORTANT:NetBasic is not supported on NetWare 6.5 servers.
-
Script: Enter the text of the script.
WARNING:If a Distribution executes the script, processing done by the script cannot be undone by rollback.
Load Java Class Action
Figure 3-20 Properties of Distribution to See MSI Type Dialog Box

This action works for NetWare only.
To add a Load Java Class action, select the option in the drop-down box and click the Add button. Then fill in the fields:
-
Class name: This must be the exact name. The .class extension is not necessary.
IMPORTANT:In order to load a Java class, java.exe or jre.exe must already be in the path on the server receiving the Distribution. Or, in this field, you can include the full path to the file.
-
Parameters: Include any command line parameters for the Java application being run.
-
JVM parameters: Include any parameters for the Java machine.
-
Wait for this process to finish running before continuing: You can select this option for a Java application that terminates itself. It must terminate within 10 minutes, or the whole loading process fails. By default, this option is deselected.
3.4.7 Reassigning a Distribution to Another Distributor
A single Distributor can service many Distributions, which could cause performance degradation on that Distributor’s server. In version 7, there is a way to reassign a Distribution from one Distributor to another to balance the work load without needing to re‑create the Distribution.
You can select one or more Distributions and reassign them to another Distributor.
If you delete a Distributor object in ConsoleOne, you are asked if you want to reassign the Distributions that it services.
If you choose to move the distributions from Netware to OES 2 server, ensure that the full path and filenames of both of the Distributor servers’ file system match. If the path or the filename does not match, edit the Application object’s properties to modify the distribution source path.
To reassign a Distribution to another Distributor:
-
Determine which Distributions you want to reassign to another Distributor.
-
In ConsoleOne, do one of the following:
-
Select one or more Distribution objects, click , click , then click .
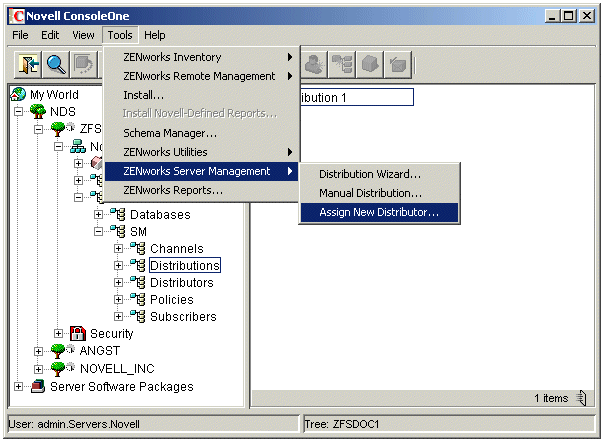
-
Select one or more Distribution objects, right-click the selected objects, then click .
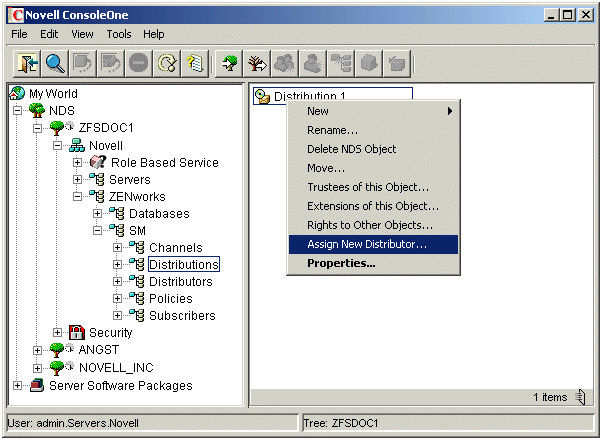
The following dialog box is opened when using either of the above options:
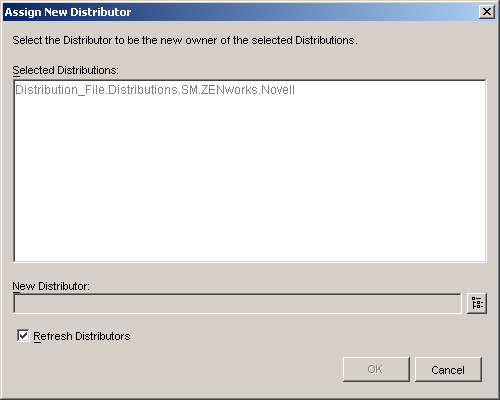
The Distributions you selected are listed in the list.
If you want to change the list, you must click and reselect the Distribution objects.
-
-
In the field, browse for the Distributor object that you want to be the new owner of these Distributions.
IMPORTANT:Any files on the current Distributor server’s file system that belong in the Distribution must be copied or moved to the new Distributor server’s file system, using the identical full path. This is covered in Step 7.
-
If you want the Distributions to be built by the new Distributor owner as soon as you’ve finished reassigning them, select the check box.
The new Distributor is refreshed upon exiting this process (see Step 5), so that it immediately recognizes its new Distributions.
IMPORTANT:If you have files to copy, such as for the File, MSI, and Desktop Application types of Distributions, you should wait to refresh the new Distributor until after you have copied or moved the files for those Distributions to the new Distributor server’s file system, this task is accomplished in Step 7 through Step 12.
-
Click to transition the Distribution objects to the new owner.
-
To make the old Distributor aware that it no longer has the Distributions that were reassigned, right-click the old Distributor’s object, then click .
IMPORTANT:The reassignment tool in ConsoleOne only reassigns the eDirectory objects. Therefore, for File or MSI Distributions, the files contained in those Distributions reside on the old Distributor’s file system. These files need to be moved to the new Distributor’s file system so that the new Distributor has access to them for building these File or MSI types of Distributions. This is covered in Step 7.
For Desktop Application Distributions, you need to review the Application objects to determine which files contained on the old Distributor’s file system need to be moved to the new Distributor’s file system. This is covered in Step 10.
-
If a Distribution is a File or MSI type, do the following:
-
In ConsoleOne, right-click the Distribution object for the Distribution that you want to reassign, then click .
-
Select the tab.
-
In the list, note all of the files or directories to be distributed, including their full paths.
-
Exit the Distribution object.
-
-
Using your file location notes and file management software (such as Windows Explorer), copy or move all of the Distribution’s files from the current Distributor server’s file system to the file system of the Distributor server that is the new owner of the Distribution.
The full paths and filenames must exactly match between both of the Distributor servers’ file systems. If you do not make the paths identical between the old and new Distributor servers, you need to edit the Distribution’s properties to match the newer paths.
-
Repeat Step 7 and Step 8 for each Distribution to be reassigned.
-
If a Distribution is a Desktop Application type, do the following:
-
In ConsoleOne, right-click the Distribution object for the Distribution that you want to reassign, then click .
-
Select the tab.
-
Note which Application objects are in the Distribution, then note the .fil files for each Application object, including their full paths.
-
Exit the Distribution object.
-
-
Using your file location notes and file management software (such as Windows Explorer), copy or move all of the Distribution’s Application object files from the current Distributor server’s file system to the file system of the Distributor server that is the new owner of the Distribution.
The full paths and filenames must exactly match between both of the Distributor servers’ file systems. If you do not make the paths identical between the old and new Distributor servers, you need to edit the Application object’s properties to match the newer paths.
IMPORTANT:Although you normally have automatic temporary file clean-up for this Distribution, the temporary files for the Distribution being reassigned must be cleaned up manually from the old Distributor’s server.
-
Repeat Step 10 and Step 11 for each Distribution to be reassigned.
-
If you did not elect to refresh the Distributors immediately, and you want the new Distributor to now recognize its new Distributions, right-click the new Distributor’s object, click .
The previous Distributor no longer attempts to build the transitioned Distributions. The Distributor that now owns the Distributions is the one to build and send them, according to the Build and Send schedules.
3.4.8 Deleting a Distribution
If you delete a Distribution object, you must immediately refresh the Distributor that owned the Distribution; otherwise, the following can happen:
-
When the Build schedule fires, the Distributor tries to build a Distribution that it thinks still exists, causing an error.
-
In iManager, if you select the Distribution Information option for the deleted Distribution, the Distributor receives a 601 null-pointer error.
By immediately refreshing the Distributor, you prevent both of these errors from occurring, because:
-
The Distributor reads eDirectory when it is refreshed and no longer knows of the deleted Distribution.
-
The Distribution Information option for the deleted Distribution is no longer available in iManager.
3.4.9 Removing a Distribution Object - Auto Removal of Temporary Files
Previously, when you deleted a Distribution or Channel object, removed a Distribution or Subscriber from a Channel, or in some way caused one or more Distributions to no longer be associated with one or more Subscribers, the Distributions’ temporary files remained on the Subscriber servers, and you had to find them and delete them manually to recover disk space.
In version 7, when a Distributor refreshes, the temporary files of the Distributions that have been removed (either deleted or removed from a Channel) are automatically deleted from Subscribers to free up disk space.
What Causes Temporary Distribution Files To Be Cleaned Up
A Distribution’s temporary files are removed from a Subscriber server’s file system when:
-
The Distribution object is deleted
-
The Channel object hosting the Distribution is deleted
-
The Distribution is removed from the Channel
-
The Subscriber is unsubscribed from the Channel
What the Distributor Does
When a Distributor refreshes, it determines whether any servers (including parent Subscribers in its routing hierarchy) still need to receive any of its Distributions. Where it is found that a Distribution is no longer needed, the Distributor notifies the Subscribers (including parent Subscribers) to clean up that Distribution’s temporary files.
If a Distributor cannot contact a Subscriber or has not received a successful deletion reply, it sends another notification to that Subscriber the next time the Distributor refreshes. Therefore, the Refresh schedule determines how often a Subscriber is notified to clean up a deleted Distribution’s temporary files.
A Distributor tries five times to notify a Subscriber to clean up a Distribution. If unsuccessful, the Distributor ceases notifying the Subscriber. Then, the temporary files on the Subscriber server can only be cleaned up manually.
What the Subscriber Does
When a Subscriber receives a notification to remove a Distribution’s temporary files, it first determines whether the Distribution to be cleaned up is in the process of being received, sent, or extracted by the Subscriber server. If it is not, the Subscriber removes any forwarding or extraction events that are pending and deletes the Distribution’s directory containing the temporary files. Then, the Subscriber notifies the Distributor of the removal so that the Distributor can keep track of which Subscribers have successfully complied.
Parent Subscribers are treated the same as end-node Subscribers for cleaning up Distribution files.
Clean Up of Temporary Distribution Files on the Distributor Server
When the Distributor determines that a Distribution object is deleted from eDirectory, the Distribution’s version directories (not the Distribution’s directory) are automatically deleted from the Distributor’s working directory.
After the Distributor has determined that all notified Subscribers have successfully deleted the Distribution directories from their file systems, the Distributor then deletes the Distribution’s directory from its file system.
When Subscribers Must Wait to Clean Up Temporary Distribution Files
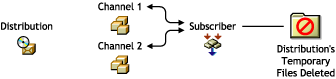
Temporary Distribution files cannot be deleted from a Subscriber’s file system until the association between the Distribution and the Subscriber is broken. For example:
-
When a Distribution is listed in the Channel where the Subscriber is subscribed, the Distribution’s files can be received and extracted on the Subscriber server:
Figure 3-21 Temporary Distribution File Cleanup: A

-
If the Subscriber is no longer subscribed to the Channel, or the Distribution is no longer listed in the Channel, the Distribution’s temporary files can be deleted from the Subscriber server:
Figure 3-22 Temporary Distribution File Cleanup: B
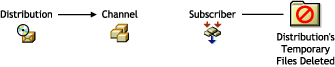
Figure 3-23 Temporary Distribution File Cleanup: C

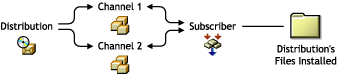
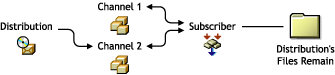
However, if a Distribution and a Subscriber are associated through multiple Channels, the Distribution’s temporary files are not deleted from the Subscriber’s file system until both the Distribution and Subscriber objects are no longer associated through any Channel. For example:
-
When a Distribution is listed in two different Channels and the Subscriber is subscribed to both Channels, the Distribution’s files can be received and extracted on the Subscriber server:
Figure 3-24 Temporary Distribution File Cleanup: D
-
When the Distribution is removed from one of the Channels, the Distribution’s files can still be received and extracted on the Subscriber server:
Figure 3-25 Temporary Distribution File Cleanup: E
-
When the Distribution is removed from both Channels, the Distribution’s temporary files can be deleted from the Subscriber server:
Figure 3-26 Temporary Distribution File Cleanup: F
When a Parent Subscriber Can Remove the Temporary Distribution Files
There are two possibilities for when a parent Subscriber can have Distribution files on its server:
-
When both the parent Subscriber and the end-node Subscriber are subscribed to the same Channel to receive its Distributions. The parent Subscriber passes on the Distributions and also extracts them for itself.
-
When the parent Subscriber is not subscribed to the Channel that the end-node Subscriber is. The parent Subscriber only passes on the Channel’s Distributions.
In both cases, the following rules apply to when Distribution files can be cleaned up from a parent Subscriber’s server:
-
If the parent Subscriber unsubscribes to the Channel, the Distributions’ files are not deleted from the parent Subscriber’s server, so that it can continue to forward those Distributions to the end-node Subscriber server.
-
Only after the end-node Subscriber unsubscribes from the Channel is the parent Subscriber able to clean up the Distributions’ files from its server.
3.4.10 Handling Orphaned Distributions
The following sections explain how to handle the Distributions of a deleted Distributor object:
Orphaned Distributions
Because Distributions belong exclusively to their Distributors, you cannot build and send those Distributions if you delete a Distributor object from eDirectory. The Distributions associated with the deleted Distributor become orphaned and are no longer usable.
Any orphaned Distributions that have already been sent and extracted before you delete the Distributor object are usable by the Subscriber servers where they were extracted. However, these servers no longer receive updated versions of the orphaned Distributions.
You can still see the orphaned Distribution objects in eDirectory, but no current or future Distributor object can be associated with these orphaned Distribution objects.
Cleaning Up Orphaned Distributions
For all Distribution types, you can delete the Distribution’s directories on the Subscriber servers’ file systems for all orphaned Distributions. We recommend that you delete the Distribution’s directories for any Distributions that you intend to re-create.
For most Distribution types, deleting the orphaned Distributions’ directories is all you need to do in order to clean up for management and disk space conservation purposes. These Distribution types are:
- Desktop Application
- File
- FTP
- HTTP
- RPM
However, for the Policy Package and Software Package Distribution types, you might need to undo the processes that the Distributions initiated when they were extracted and installed.
For example, a Policy Package Distribution might require that you use iManager to remove the policies that the Distribution set for the server. For more information, see Step 5 under Section 2.4.3, Managing the Policy/Package Agent.
Re-creating Deleted Distributions
You need to re‑create each orphaned Distribution that you want to continue to use. You can do this using an existing Distributor object, or after you install a new Distributor.
After you have re‑created a Distribution, all Channels previously associated with the orphaned Distribution need to be associated with the newly created Distribution.
In re‑creating the Distributions, you can use the configuration information from the orphaned Distribution objects. When you no longer need the orphaned Distribution objects, you can delete them and they no longer display on the Distributions tab of the Channel object.
3.4.11 Manually Importing and Exporting Distributions
Exporting and importing are useful for:
-
Sending a large Distribution to Subscriber servers that are across a slow WAN link from the Distributor server.
-
Sending a large Distribution to a parent Subscriber server that is across a slow WAN link, then having that parent pass the Distribution on to its subordinate Subscribers on its side of the WAN.
-
Archiving Distributions, and later importing them when and where they are needed again.
The following sections provide information on exporting and importing Distributions:
Understanding the Exporting and Importing Processes
You can manually export a Distribution from a Distributor server by writing to a media source, such as a floppy disk, ZIP disk, CD, or DVD, then you can import it from that media to a Subscriber server.
The export process copies Distribution information to a UNC path or drive mapping, such as a hard drive, floppy disk, or ZIP disk. From the copy on the hard drive, you can then burn the information onto a CD or DVD.
The Distribution information includes the Channel and Distribution data from their eDirectory objects, and the content of the Distribution’s file (including all deltas). The Distribution information is copied to a filename.ted file that you name when running the Manual Distribution Wizard. You should use the .ted extension with the filename. You should also use a descriptive filename so that you can recognize the Distribution when reviewing the media content.
When the exported .ted file is imported, the eDirectory object information and the Distribution’s content are used to create the Distribution on the Subscriber server’s file system. Thereafter, deltas of the Distribution can be sent over the wire, because they are usually much smaller than the original Distribution that was exported and imported.
Distributions can only be exported and imported within the same tree where the associated Channels are known to all Distributors and Subscribers involved.
Setting Up Specialized Schedules
Depending on when you want imported Distributions to be extracted, you might want a different set of schedules set up before exporting the Distribution.
For example, if you want the exported Distribution to be extracted at different times by different Subscribers where it is imported, then:
-
Set the build schedule for the Distribution to be exported to .
-
Add the Distribution to a Channel with a Send schedule set to .
This prevents Subscribers that have not yet had the Distribution manually imported to them from receiving a Channel’s notice to trigger extraction of the yet-to-be-received Distribution.
-
Add all of the Subscribers where the Distribution is to be imported to the Channel you used in Step 2.
-
Refresh the Distributor that owns the Distribution to be exported.
-
After the Distribution has been built, continue with Exporting a Distribution.
If you do not need a specialized schedule, you can just follow the instructions in the next two sections, which assume that existing schedules are acceptable.
Exporting a Distribution
-
In ConsoleOne, click , then click to start the Manual Distribution Wizard.
-
Click , then click .
-
Select a Channel, select one Distribution from that Channel, then click .
This Channel’s ID is retained in the .ted file for use when importing the Distribution.
-
For the Distribution, provide a path (UNC or drive mapping) and filename (descriptive for identifying which Distribution is on the media), then click .
The filename should have .ted as its extension.
-
If you are satisfied with the summary, click .
The full Distribution is saved as a .ted file to the path that you specified.
-
If your path was to a hard drive, you can now burn the .ted file to a CD or DVD.
Importing a Distribution
-
In ConsoleOne, click , then click to start the Manual Distribution Wizard.
-
Click , then click .
-
Provide the path and filename to the .ted file, then click .
This is the .ted file that you exported to a media source.
-
Select parent Subscribers in the top box and individual Subscribers in the bottom box, then click .
If you select a parent Subscriber that is in the routing hierarchy, all of the Subscribers below it in the hierarchy have the imported Distribution passed on to them, but only if they are already subscribed to the Distribution’s Channel.
The Subscribers displayed in the bottom box are those who are currently subscribed to the Distribution’s Channel. The heading displays the Channel that is associated with the Distribution being imported. This information is contained in the .ted file being imported.
External Subscribers are not listed in the bottom box because they cannot receive manual Distributions.
-
If you are satisfied with the summary, click .
The Distribution is copied from the media source you specified and placed in the working directories of the selected Subscribers. The Channel and Distribution objects’ information is written to eDirectory.
At this point, imported Distributions are viewable in Remote Web Console in iManager, but not in Tiered Distribution View or Subscriber Distribution View. The next two steps take care of this.
-
If you set up specialized schedules for the imported Distribution (see Setting Up Specialized Schedules), restart the Server Management process on each Subscriber server where it was imported; otherwise, skip to Step 7.
The Distribution is extracted on the Subscriber servers according to their individual Extract schedules. After extraction, you can view the Distribution’s information in iManager.
-
To make Distributors recognize that their Subscribers have manually received a new Distribution:
-
Under the ZENworks Server Management role in iManager, click .
-
Identify the Distributor owning the imported Distribution in either of the following fields:
- IP Address or DNS Name
- Distributor, Subscriber, or Server Object Name
-
Click .
-
In the field, select .
-
Click the tab, then select .
-
Click the Channel associated with the imported Distribution, then click .
The Distributor begins to send the Distribution listed in the Channel to the Subscribers, but the Subscribers reply that they already have the Distribution, then begin to extract the imported Distribution.
If a Subscriber is a parent Subscriber that needs to pass the imported Distribution on to subordinate Subscribers, it does so when the Distribution’s Channel starts.
-
3.4.12 Using the Distribution Wizard
Server Management provides the Distribution Wizard to help you learn the process involved in creating and sending a Distribution. You can use this wizard to create and send either a File or FTP Distribution.
To use the Distribution Wizard:
-
In ConsoleOne, select the container where you want the Distribution object created, click , then select .
-
Review the information on the Introduction page, then click .
-
On the Distributor Selection page, browse for and select the Distributor that owns this File or FTP Distribution, then click .
-
On the Subscriber Selection page, click , browse for the Subscribers to receive this Distribution, click , click , then click .
-
On the File Source page, select the file source (the Distributor’s file system, or a remote FTP site), then click .
-
On the Destination Volume or Drive page, select an option and fill in its field, then click .
Use the same volume or drive for all Subscribers: If each target Subscriber is to have the exact same volume or drive available, select this option and provide the volume label or drive letter.
Use a variable for the volume or drive: If your target Subscribers are using different paths (for example you have NetWare, Windows, Linux, and Solaris Subscriber servers), you can provide a variable value. This value must be defined on each Subscriber in order to receive the Distribution.
-
On the Additional Destination Directories page, provide any additional path information for the target Subscriber servers, then click .
Your path information is displayed under the heading as you enter it. Use this information to verify that the path is valid before continuing.
-
On the File Selection From Distributor Server page, click , browse for the files or directories to be included, click , click , then click .
You are browsing the Distributor’s file system, not the local machine’s.
Repeat clicking until you have all of the files and directories you want in this Distribution.
-
On the Distribution Name and Context page, fill in the fields, then click .
Distribution name: Provide a unique name for the Distribution.
Context: Browse for and select the container where you want the Distribution object to be created.
-
On the Additional Options page, select or deselect the options as applicable, then click .
The following options are all selected by default:
Copy the Distributor’s security certificate to all Subscribers: This is necessary for the Subscriber to be able to receive and extract this Distribution. This might not be necessary if you run the wizard again with the same Distributor and Subscribers.
Verify that all Subscribers are up and running: If you want to make sure your target Subscribers can receive this Distribution, select this option.
Notify the Distributor to read eDirectory for new information: This causes the Distribution to be built immediately.
-
On the Summary page, review the steps that are take by the Distribution Wizard, then click to create the Distribution.
Information is displayed as the Distribution is created and sent.
-
To review the log file, select when prompted.
If you select , you can review the log file. Click to exit the log window and the Distribution Wizard.
If you select , the Distribution Wizard is exited.