Report Development Guide
REPORT PREVIEWS
Previewing Reports in iReport
Although the SDK itself is fairly well configured out of the box, there are some additional steps required to enable the ability to preview reports directly in iReport. This feature is useful as it saves time; you don't have to build and deploy the report into Sentinel to see what it will look like.
Previewing directly in iReport requires three things:
- A library or driver that can communicate with the exposed Sentinel data endpoints. For SQL-based reports, this is just a JDBC driver; for Lucene-based reports, this is a set of Sentinel-specific library files.
- Connection information that will configure the library to communicate to your backend Sentinel server. This will require credentials to the remote Sentinel server.
- An iReport "data source" that talks to the driver to get data from Sentinel.
Some of these items are configured automatically by the SDK, after prompting you for relevant information. In addition to these items, RDD-based reports require some additional configuration because they need to query a table that has an auto-generated name.
The easiest way to configure the components above is to simply start editing a report. The SDK will prompt you for much of the required information.
- In Eclipse, open the Sentinel perspective and locate the reports group at left.
- Browse to find a report you'd like to edit. You'll need to drill down past the report category, name, and platform to find the template version.
- Right-click on the template version number and select Edit Report
- If prompted, you may need to point Eclipse to your installation of iReport - browse to the directory where you unpacked iReport.
- The next dialog allows you to select an existing defined connection to a Sentinel system, or to create a new one. You'll be prompted for this each time you edit a report; you can switch which Sentinel systems you use for previewing at will here.
- Select Create New Connection to set up a new connection for previewing.
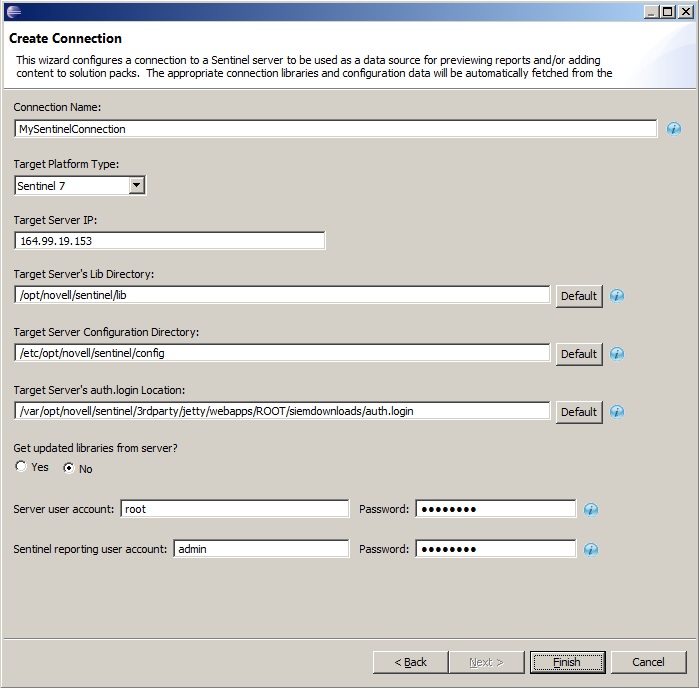 Specify the requested details in the Create Connection dialog (entries have help popups if you have questions);
if you don't wish to use the
Specify the requested details in the Create Connection dialog (entries have help popups if you have questions);
if you don't wish to use the rootuser to fetch the connection credentials, refer to Footnote 2.- Once you've created the connection, select Finish, read the next dialog, then select OK.
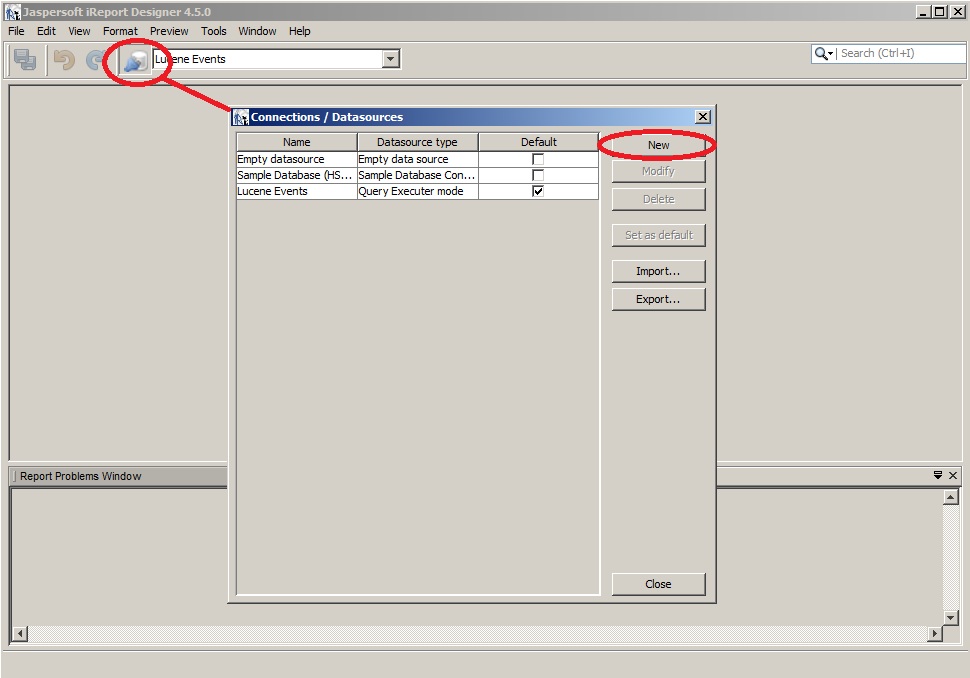 In iReport, select the Report Datasources toolbar button to display the Connections/Datasources dialog
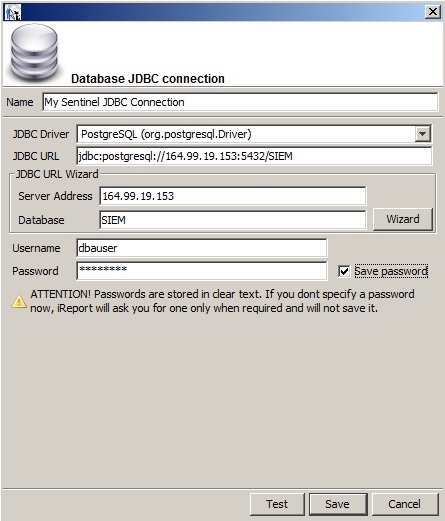 Select New > Database JDBC Connection to display the Database JDB Connection configuration UI.
- Fill in the dialog as shown, replacing the IP address and credentials with information for your environment
- Test then save your new datasource1
Setting Up Previewing for RDD-based Reports
Reports that use new Sentinel 7 Report Data Definitions (RDDs) are a bit trickier because of some of the magic that happens within Sentinel itself. In essence, the report uses a parameter to refer to a table/view that is created by the RDD; that parameter is set by Sentinel at runtime. Since iReport doesn't have that capability, we need to do something special to make this work:
- The first step to set this up is to identify the reference name by which the RDD table/view will be known. To discover this, you will need access to the
RDD plug-in - you should be able to find the common ones in the SDK, or export them from Sentinel.
- If you have the RDD you want in the SDK, look in the table.properties or view.properties file and find the ReferenceName property.
- If you don't have the source, export the plug-in, unzip it, and examine the XML definition (not package.xml). There should be an entry like /EventDataSyncInfo/SyncLuceneToTable/ReferenceName. The ReferenceName is what you'll need to refer to the table. Similarly, there should be one or more entries for /EventDataSyncInfo/SyncTableToView/ReferenceName, again you'll need the ReferenceName to address the view.
- The next step requires you to determine the table/view name used by the RDD. Since this is autogenerated by Sentinel, you must have previously installed the RDD into the Sentinel system against which you are trying to preview.
- Next, log in to the Sentinel UI and select Storage (menu bar) > Data Synchronization (tab). Find the RDD of interest in the list and select Edit.
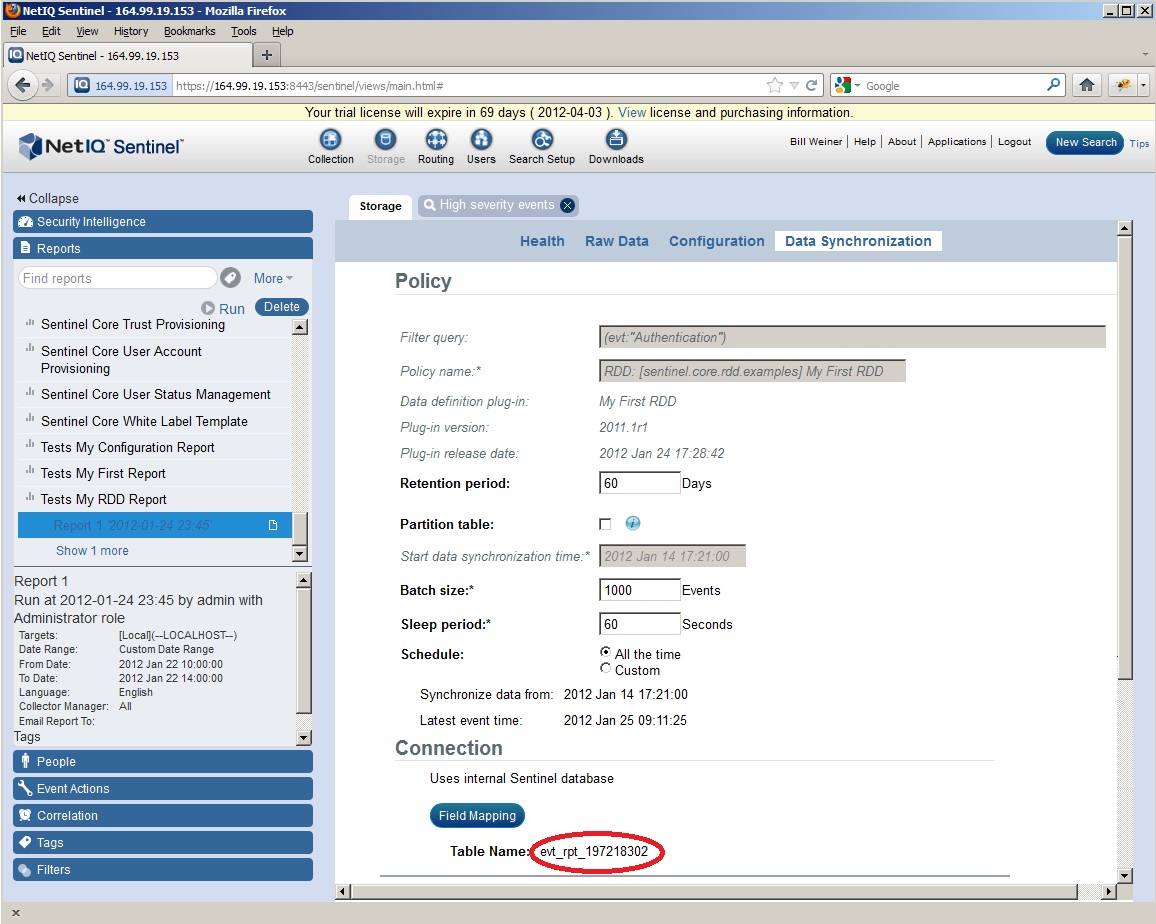 Locate the auto-generated table name at the bottom of the RDD details.
- On your SDK system, locate the sentinelreport.properties file for this connection; this will be located somewhere in your home directory like /home/myname/.netiq/pluginsdk/connections/MySentinelConnection/config. The /home/myname part should of course be your own personal home directory, which might be something more like C:\Users\myname on Windows, and make sure to match up the MySentinelConnection part with the connection you created for the Sentinel system you wish to preview against. Open this file with a text editor like gedit or WordPad.
- Append a line to the end of the file as follows:
sentinel.RDD ReferenceName=RDD table/view- The RDD ReferenceName comes from the RDD which you discovered in the first step above.
- The RDD table/view comes from the name you discovered in the Sentinel UI as described above.
- An example might look like
sentinel.AuthEventSyncTable=evt_rpt_197391951
Once you've set up properties to describe each table and/or view for RDDs that you are interested in using in your reports, report previewing should work through iReport.
Troubleshooting
- 1
- If your JDBC datasource connection does not work, you may need to modify the networking:
- On your Sentinel/SLM box, go to the /var/opt/novell/sentinel/data/3rdparty/postgresql/data directory (or your custom location)
- Edit the postgresql.conf file, uncomment and change the line:
#listen_addresses = 'localhost'
tolisten_addresses = '*'
- Edit the pg_hba.conf file and add the line:
host all all 0.0.0.0/0 md5
(you can specify something more restrictive for the allowed IPs in CIDR notation if you like) - Restart the Sentinel database using the /opt/novell/sentinel/bin/server.sh
stopdbstartdb commands - If the firewall is enabled on the Sentinel server (which it is by default on the Sentinel Log Manager Appliance), you will also need to modify the firewall
configuration to allow connections on port 5432. This can be done using
yast2under Security and Users > Firewall > Allowed Services > Advanced... and add 5432 to the list of allowed TCP Ports
- 1
- When creating a new connection to a Sentinel server, the default user fetching the credentials is the
rootuser. Since therootuser has sensitive access to the entire system, you can also use a non-administrative user to fetch the credentials. The credentials, by default, are owned by thenovellaccount, but also by default thenovelluser does not have a password set, and hence cannot log in interactively. The solution is simply to set a password for thenovelluser: log in to the Sentinel server asroot, and type the commandpasswd novellto set the password. After this is done thenovelluser can be specified in the Create Connection dialog and the credentials will be fetched correctly.
Report Development Guide