2.5 Using the Folder List
GroupWise WebAccess provides folders to help store and organize the items you send and receive. For example, you can group all items related to a particular task or subject together. All folders are subfolders of your user folder. The user folder represents your user’s home view, and contains all of your GroupWise information.
The Folder List lets you select which folder you want to open. The contents of the currently opened folder are displayed in the Item List.
Click and to expand and collapse personal folders.
For information about the individual folders you might have in your Folder List, see the following:
For more information, see the following:
-
Using Folders in your Folder List, see Section 1.3.3, Folder List.
-
Making folders public by sharing them, see Section 2.6, Working with Shared Folders.
-
Storing unfinished items in a predefined folder called Work In Progress, see Section 2.9.3, Saving an Unfinished Item.
-
Using rules to sort items into folders, see Section 7.3, Using Rules.
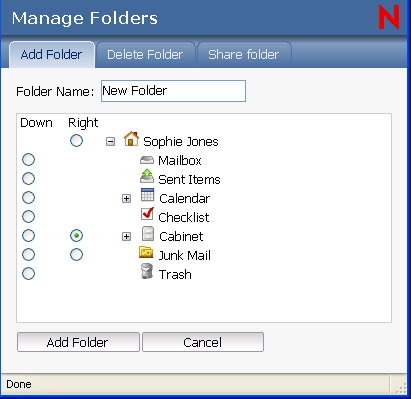
2.5.1 Creating a Folder
-
In the Folder List click or right-click a folder, then select
-
Type a name for your new folder in the field.
-
Select the place in the Folder List where you want to add the folder. By default, the folder is added as the first folder in the Cabinet.
For example, to add a folder at the same level as the Mailbox folder, select the button next to the Mailbox folder. To add a folder to the Mailbox folder, select the button next to the Mailbox folder.
-
Click .
If you create a folder, then decide you want it in a different position, use the icon in the toolbar to move the folder to a new position in the Folder List.
2.5.2 Deleting Folders
You cannot delete system folders, including the Mailbox, Unopened Items, Sent Items, Calendar, Checklist, Cabinet, Work In Progress, Junk Mail, and Trash folders.
-
Right-click the folder you want to delete, then click .
-
Click to confirm that you want to delete the folder and all of its messages.
You can also use the icon in the toolbar to delete folders.
-
In the Folder List, click or right-click a folder > and click .
-
Click the folder you want to delete, then click to confirm that you want to delete the folder and all its contents.
For more information, see Section 1.3.3, Folder List.
2.5.3 Sharing a Folder
-
In the toolbar, click the s icon.
-
Select , then select the folder to share.
-
In the field, type the name of the user you want to share the folder with.
or
Select the to search and select user names.
-
When the user's name appears in the field, click to move the user into the List.
-
Select the access options you want for each user.
-
Repeat Steps 3-5 for each user you want to share the folder with.
-
Click .
-
When you're done, close the window.
For more information about shared folders, see Section 2.6, Working with Shared Folders.
2.5.4 Moving an Item to a Folder
-
To move an item you received, click the icon in the Folder List.
or
To move an appointment, task, or note you already accepted, click the icon in the Folder List or on the Nav Bar.
-
Locate the item in the Item List.
-
Select the item, then click at the top of the Item List.
or
Click the item to open it, then click .
or
Right-click the item > click .
-
Click the folder where you want to move the item. If you are moving the item to a folder in the Cabinet, you might need to click the plus sign (+) next to the Cabinet to display the Cabinet folders.
You can also move items to the Checklist folder to create a checklist. For more information, see Section 2.5.7, Using the Checklist Folder.
To view archived items, you must use a different GroupWise client. You cannot access your archived files using the GroupWise WebAccess client.
2.5.5 Moving an Item to Another Folder
You can drag and drop items from folder to folder. You can select more than one item at a time.
-
To move an item you received, click the icon in the Folder List or Nav Bar.
or
To move an appointment, task, or note you have already accepted, then click the Calendar icon in the Folder List or Nav Bar.
or
To move an item you sent, click the icon in the Folder List.
-
Locate the item in the Item List.
-
Select the item, then click at the top of the Item List.
or
Click the item to open it, then click .
or
Right-click an item > click .
-
Click the folder where you want to move the item. If you are moving the item to a folder in the Cabinet, you might need to click the plus sign (+) next to the Cabinet to display the Cabinet folders.
2.5.6 Viewing Items in a Find Results Folder
A Find Results folder is a folder that displays the results of a query. When the folder is opened, GroupWise examines the search criteria defined for the folder, searches for everything specified, then displays everything it finds in the Item List. You can act on items in a Find Results folder the same way you act on items in any folder, such as opening, forwarding, printing, copying, moving, or deleting them, but the original item remains stored in the folder where the search found it. This means that if you move or delete an item from a Find Results folder, the item is deleted from the Item List, but not from the original location. The next time you open the Find Results folder, the search is performed again and the item is once again displayed.
Although you cannot create new Find Results folders using WebAccess, you can use folders you created using the GroupWise Client for Windows. However, to ensure that you are viewing the most recent information in the folder and not a cached copy, you should click before opening a Find Results folder.
2.5.7 Using the Checklist Folder
Use the
 Checklist folder to create a task list. You can move any items (mail messages, phone messages, notes, tasks, or appointments) to this folder and arrange them in the order you want. You can mark items Complete. You can assign items a due date, but the items do not display in your Calendar. The Checklist folder is a system folder.
In the Windows version of GroupWise, you can mark items to display in the Checklist folder without actually moving them. You cannot do this in GroupWise WebAccess. However, if you marked items to display in the Checklist folder in the Windows version of GroupWise, GroupWise WebAccess lets you view the items in the Checklist folder.
In the Windows version of GroupWise, you can create a checklist area at the top of any folder if you have selected the Checklist display setting for the folder. This checklist displays in its original folder and in the Checklist folder. You cannot do this in GroupWise WebAccess. However, if you have created checklists in multiple folders in the Windows version of GroupWise, GroupWise WebAccess lets you view the items in the Checklist folder.
In the previous version of GroupWise WebAccess, a Task List folder listed all the task items in your Mailbox and Calendar. The Checklist folder replaces the Task List folder.
This section contains the following topics:
Creating a Checklist in the Checklist Folder
-
Move items to the Checklist folder.
For information, see Moving an Item to the Checklist Folder.
-
To arrange the items in the order you want, click an item, then click the toolbar icons to move the item up, down, or to the top or bottom of the checklist.
-
To assign a due date to an item, open the item, click > > select a due date > > .
The due date displays in the column in the Item List.
Moving an Item to the Checklist Folder
-
To move an item you received, click the icon in the Folder List or Nav Bar.
or
To move an appointment, task, or note you have already accepted, click the icon in the Folder List.
-
Locate the item in the Item List.
-
Select the item, then click at the top of the Item List.
or
Click the item to open it, then click .
or
Drag the item and drop it on the folder.
or
Right-click the item > click .
-
Click the folder.
Assigning a Due Date to an Item in the Checklist Folder
-
Click the folder.
-
Locate the item in the Item List.
-
Click the item to open it, or right-click the item > click
-
Click select a due date, then click
Marking a Checklist Item Complete
-
Click the folder.
-
Locate the item in the Item List.
-
Click the check box to the left of the item, then click at the top of the Item List.
or
Right-click the item and click .
Items that have been marked Complete have a check mark next to them.
Unmarking a Checklist Item
-
Click the item to open it.
-
Click .
-
Deselect .
-
Click , then click .