4.2 Preparing Your GroupWise System for the Migration
Your GroupWise system must be set up and prepared to receive in incoming Exchange data.
4.2.1 Setting Up eDirectory for Your GroupWise System
eDirectory™ must be set up and container objects created before you can create your GroupWise system for the migration.
-
If necessary, download eDirectory from the Novell Download page and install it according to the instructions provided in Novell eDirectory Installation Guide.
-
Create the containers where you plan to create Post Office objects and Domain objects (system worksheet item 7).
-
Create the containers where you plan to create User objects and Distribution List objects (system worksheet item 8).
-
Continue with Setting Up Your GroupWise System.
4.2.2 Setting Up Your GroupWise System
You need to set up your full GroupWise system before you start the migration from Exchange. You can create your GroupWise system on any GroupWise platform supported for migration (NetWare®, Linux, or Windows).
IMPORTANT:Make sure you have the latest GroupWise 7 Support Pack.
-
Install a basic GroupWise system, as described in
Installing a Basic GroupWise System
in the GroupWise 7 Installation Guide.This includes installing the GroupWise Administrator snap-in to ConsoleOne®, creating a domain and post office, and installing the Message Transfer Agent (MTA) and the Post Office Agent (POA).
-
During installation, create a software distribution directory with at least the GroupWise client software.
-
In ConsoleOne, create the GroupWise domains (system worksheet item 5) that will house the post offices for the migrated Exchange users, as described in
Creating a New Domain
inDomains
in the GroupWise 7 Administration Guide. -
At each domain server, install and start the MTA for the domain, as described in
Installing GroupWise Agents
GroupWise 7 Installation Guide. -
In ConsoleOne, create the GroupWise post offices (system worksheet item 5) for the migrated Exchange users, as described in
Creating a New Post Office
inPost Offices
in the GroupWise 7 Administration Guide.IMPORTANT:Leave the post office security level set to the default of until you have finished migrating users into the post office.
-
At each post office server, install and start the POA for post office, as described in
Installing GroupWise Agents
GroupWise 7 Installation Guide. -
Continue with Establishing Internet Connectivity.
4.2.3 Establishing Internet Connectivity
If you are migrating to a GroupWise system on Linux, some preparation is required for the Internet Agent. If you are migrating to a GroupWise system on NetWare or Windows, skip to Installing the GroupWise Internet Agent.
Preparing a Linux Server for the GroupWise Internet Agent
By default, Linux servers run the Postfix mail program. It typically uses an IP address of 127.0.0.1 and listens on port 25, which is the default for SMTP communication. By default, the Internet Agent binds to all IP addresses on the server and it also uses port 25. As a result, if Postfix is running on the Linux server, the Internet Agent cannot start because port 25 is already in use.
Occasionally, Postfix might be configured to listen on a different IP address. This would also cause a conflict if the Internet Agent is configured to use the same IP address. On the Linux server, use the following command to test for conflicts:
telnet IP_address 25
If you receive a response, then something is already listening on the specified IP address.
To resolve the conflict, you can bind the Internet Agent to a specific IP address that is not the address used by Postfix. See Binding the Internet Agent to a Specific IP Address
in Internet Agent
in the GroupWise 7 Administration Guide.
As an alternative, you can disable Postfix. Disabling Postfix is not the preferred solution, because Postfix is responsible for sending system messages to the administrator, but steps are provided below.
-
In a terminal window at the Linux server, log in as root.
-
Enter the following commands:
/etc/init.d/postfix stop
chkconfig postfix off
-
To ensure that Postfix is not running, enter the following command:
ps -eaf | grep postfix
You should see no Postfix processes running. The server is now ready for the Internet Agent to run on it.
-
Continue with Installing the GroupWise Internet Agent.
Installing the GroupWise Internet Agent
-
Install and start the Internet Agent, as described in
Installing the GroupWise Internet Agent
GroupWise 7 Installation Guide. -
Enable Internet addressing and set up the permanent Internet domain name for your GroupWise system, as described in
Enabling Internet Addressing
inInternet Agent
in the GroupWise 7 Administration Guide. -
Set the preferred address format to .
This is the format that most easily ensures uniqueness of users’ Internet addresses. You can choose other alternatives, though, as described in
Preferred Address Format
inInternet Agent
in the GroupWise 7 Administration Guide. -
If you are performing a single-stage migration, skip to Section 4.2.5, Setting Up GroupWise Name Servers.
or
If you are performing a multi-stage migration, continue with Setting Up Message Forwarding.
4.2.4 Setting Up Message Forwarding
If you are performing a multi-stage migration, the Migration Utility can set up message forwarding. Incoming messages are forwarded to the appropriate e-mail system and internal messages flow back and forth between the GroupWise system and the Exchange system as if they were a single e-mail system. Some advance setup is required.
Forwarding Incoming Mail
In order for incoming mail to be correctly forwarded, you need a mechanism for messages to be sorted according to whether they need to go to GroupWise or to Exchange.
-
In DNS, set up the temporary Internet domain names (server work sheet item 4) for the GroupWise system and the Exchange system.
-
Set up an SMTP router, relay server, or smart host that can resolve e-mail addresses and forward messages to the appropriate e-mail system.
Forwarding Internal Mail
In order for internal mail to be correctly forwarded, you need a mechanism in each e-mail system that knows what to do with undeliverable mail. The Migration Utility helps set this up. When it migrates an Exchange user, it places a forwarding address on that user’s e-mail account. This tells the Exchange system to forward the message.
The Migration Utility also creates a GroupWise external domain named Exchange_ExtDomain. This external domain represents the Exchange system, and the Migration Utility creates External User objects in it for all Exchange users that have not yet been migrated to GroupWise. This enables Exchange users to appear in the GroupWise Address Book as if they were part of the GroupWise system.
After you have set up internal forwarding, continue with Section 4.2.5, Setting Up GroupWise Name Servers.
Setting Up Forwarding in GroupWise
In ConsoleOne, you configure the Internet Agent to forward messages that are undeliverable in the GroupWise system over to the Exchange system for delivery.
-
Browse to and right-click the Internet Agent object, then click .
-
Click .
-
In the field, specify the hostname of an Exchange server where the SMTP connector is running.
-
Click to save the setting.
Setting Up Forwarding in Exchange
In Exchange System Manager, you configure the SMTP connector to forward messages that are undeliverable in the Exchange system over to the GroupWise system for delivery.
-
Expand .
-
Expand .
-
Expand .
-
Right-click .
-
Click the tab.
-
In the field, specify the hostname of the server where the GroupWise Internet Agent is running.
-
Click to save the setting.
4.2.5 Setting Up GroupWise Name Servers
To simplify users’ access to their new GroupWise mailboxes, set up two GroupWise name servers, as described in Simplifying Client/Server Access with a GroupWise Name Server
in Post Office Agent
in the GroupWise 7 Administration Guide.
If you are migrating Exchange users into an existing GroupWise system, continue with Handling Password Issues in an Existing GroupWise System.
If not, you are ready to start your migration. Skip to Section 5.0, Installing the Exchange Migration Utility.
4.2.6 Handling Password Issues in an Existing GroupWise System
If you are migrating Exchange users into an existing GroupWise system, care must be taken with existing User objects and existing GroupWise accounts.
After understanding and taking care of these issues, continue with Section 5.0, Installing the Exchange Migration Utility.
Handling Existing eDirectory User Objects with Personal Passwords
If the Exchange users whose mailboxes are being migrated to GroupWise already have eDirectory User objects with personal passwords already set, the security level on the post office to which the users are being migrated is important. You can check the security setting in ConsoleOne:
-
Browse to and right-click the Post Office object, then click .
-
Click .
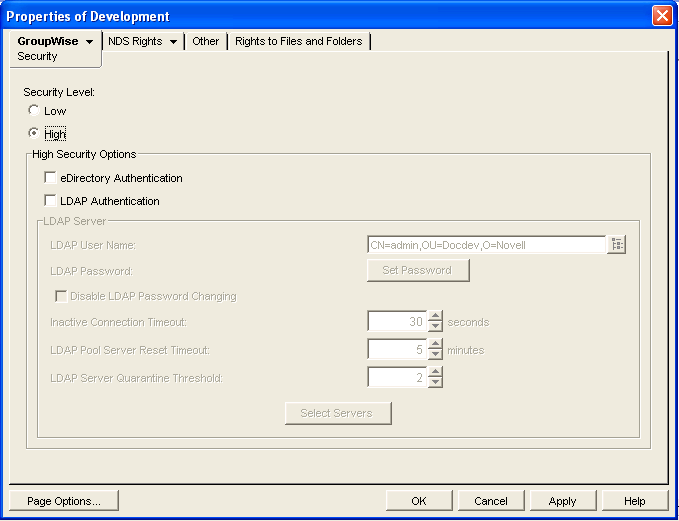
If is set to or , or if is selected, the Migration Utility can add GroupWise accounts to existing User objects as they are added to the post office. However, if is selected, the Migration Utility cannot add GroupWise accounts because the Migration Utility cannot perform LDAP authentication.
-
If is selected, select a different security option, then click to save your change.
-
After all Exchange users have been migrated to the post office, return to ConsoleOne and select again.
Handling Existing GroupWise Accounts with Personal Passwords
You cannot use the Migration Utility to migrate data from an Exchange mailbox into an existing GroupWise mailbox because the existing password does not match the randomly generated password provided by the Migration Utility. To accomplish this task, the user can use Microsoft Outlook to save all data from the Exchange mailbox into a PST file, then use the GroupWise Import Utility for Microsoft Outlook to import the Exchange data into the existing GroupWise mailbox. For instructions, see the GroupWise Import Utility for Microsoft Exchange Quick Start.