

| |
As auditor, it is your responsibility to review your organization's auditing requirements and identify an auditing strategy for your network. This can range from auditing nothing to auditing all events for all users. It all depends on what you want to accomplish with auditing.
One advantage of auditing, even if you audit only a few events (for example, logins), is that it can help deter browsing and probing by logged in users.
This section describes how you can use AUDITCON's audit configuration menu to
If the audit file is configured for level 2 passwords, and you don't have access through NDS rights, then you must have the level 2 password to modify the auditing configuration. If you've logged in with a level 1 password, AUDITCON prompts for the level 2 password after each operation. See Controlling Access to Online Audit Data for more information.
Choose Auditing Configuration from the Available audit options menu (101).
AUDITCON displays menu 497, 498, or 499, which list more configuration options, depending on the setting of the ALLOW AUDIT PASSWORDS option and whether you have sufficient rights to the Audit File object. See Top-Level Menus for the definition of sufficient rights.
Table 7 summarizes the algorithm AUDITCON uses to determine which menu it will display, based on the above two variables.
Table 7. Volume Audit Configuration Menu Selection
| Allow Audit Passwords = ON | Sufficient Rights | Menu |
|---|---|---|
Yes |
Yes |
497 |
Yes |
No |
498 |
No |
Yes |
499 |
No |
No |
499 |
Figure 17
Menu 497: Auditing Configuration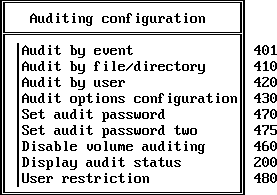
Figure 18
Menu 498: Auditing Configuration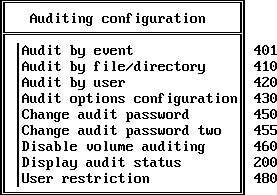
Figure 19
Menu 499: Auditing Configuration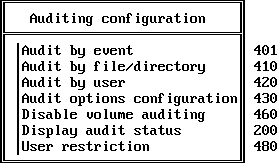
Choose the desired configuration option, and press Enter.
The first three entries (audit by event, file/directory, and user) allow you to preselect the events that the server will record in the audit file.
Other entries allow you to define how the server manages audit files, to set passwords, to disable auditing, and to display the current audit status. These submenus are addressed in the following sections.
WARNING: When you make changes to the volume audit configuration, you may receive a message that AUDITCON was unable to update the Audit File object. If this occurs, your configuration changes could be lost.
This section describes how you preselect file, queue management, server, and user audit events.
Preselection is the operation of telling the server, in advance, which types of audit events you want the server to record in an audit file. The server records the events you have preselected and ignores other events.
By preselecting the events that are important in your organization, you conserve the disk space and processor cycles required to record the other potential audit events.
Ten of the file system events described in this section permit options for user and/or file preselection as part of event selection. For example, file open-user and file will cause the server to record file opens only for selected users and only for selected files. For the remaining volume events, the default is that events you select will be recorded for all users of the volume. If you want to audit only certain specific users, you should
You cannot subsequently generate audit reports for events or users that were not preselected for auditing when the event occurred. For example, if you want to review logins made by a user two weeks ago, but you did not have logins preselected at that time, you will not be able to generate an audit report for these events.
You must balance your anticipated need of certain audit information with the resources required to audit those events.
Choose Audit by event from the Auditing configuration menu (497, 498, or 499).
AUDITCON displays menu 401, which lists the classes of audit events that you can preselect for auditing.
Figure 20
Menu 401: Audit by Event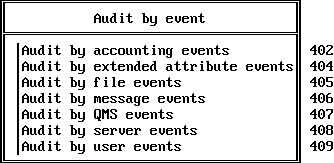
The following list introduces these seven classes of events and gives examples of the types of events that are included in each class.
These events are usually associated with user actions performed at client workstations, and the audit record includes the identity of the user that requested the service.
| Event Class | Description |
|---|---|
Accounting events |
Accounting events include operations to get and set account charges. Accounting events are always stored in the audit trail of volume SYS:. For instructions, see Audit by Accounting Events. |
Extended attribute events |
Extended attribute events include operations to get and set file extended attributes. For instructions, see Audit by Extended Attribute Events. |
File events |
File events include operations by network users on files or directories in the current volume. These include activities such as creating or deleting a directory, and creating, opening, closing, reading, writing to, and salvaging files. For instructions, see Audit by File Events. |
Message events |
Message events include operations to read and write interconnection messages. Message events are always stored in the audit trail of volume SYS:. For instructions, see Audit by Message Events. |
QMS events |
Queue Management Services (QMS) events include operations on the server's queues, such as requests to create or destroy a print queue. QMS events are always stored in the audit trail of volume SYS:. For instructions, see Audit by QMS Events. |
Server events |
This class of events includes actions performed at a specific server, such as server console commands, mounting a volume, or shutting down a server. For instructions, see Audit by Server Events. |
User events |
User events include activities such as bindery logins and logouts and trustee assignment changes. For instructions, see Audit by User Events. |
NOTE: If you are configuring a volume other than SYS:, the menu items Accounting Events, Message Events, and QMS events will not be present.
After preselecting events to be audited, press Esc to return to the Auditing configuration menu (497, 498, or 499).
From the Audit by event menu (401), choose Audit by accounting events and press Enter to edit the list of preselected accounting events.
AUDITCON displays menu 402, which lists the four accounting events.
Figure 21
Menu 402: Audit by Accounting Events
Move the cursor to each event and press F10 to toggle it to the desired state (for example, OFF to ON).
When you have set and reviewed the audit event configuration, press Esc to save the configuration.
AUDITCON asks you to confirm the changes.
Choose Yes to save the changes and return to menu 497, 498, or 499, or choose No to leave the audit events unchanged.
If level 2 passwords are enabled, the user does not have NDS access, and the Allow Audit Passwords option is set to ON, AUDITCON will prompt for the level 2 password before making the change.
Choose Audit by extended attribute events from the Audit by event menu (401) and press Enter to edit the list of preselected extended attribute events.
AUDITCON displays menu 404, which lists the four extended attribute events.
Figure 22
Menu 404: Audit by Extended Attribute Events
Move the cursor to each event and press F10 to toggle it to the desired state (for example, OFF to ON).
When you have set and reviewed the audit event configuration, press Esc to save the configuration.
AUDITCON asks you to confirm the changes.
Choose Yes to save the changes and return to menu 497, 498, or 499, or choose No to leave the audit events unchanged.
WARNING: After you select file events, you must also go to the Audit by File/Directory menu shown in Figure 28 and/or the Audit by User menu shown in Figure 29 and in Figure 78 if you chose any file and user or file or user events. Selecting file and user or file or user events without selecting any files or users will not cause the recording of any audit events.
Choose Audit by file events from the Audit by event menu (401) and press Enter to edit the list of preselected file events.
AUDITCON displays menu 405, which lists basic file events, basic directory events, and assorted other events. Because of the screen size, only 16 events are shown at one time, with the remainder of the events available using the Page Up, Page Down, and arrow keys.
Figure 23
Menu 405: Audit by File Events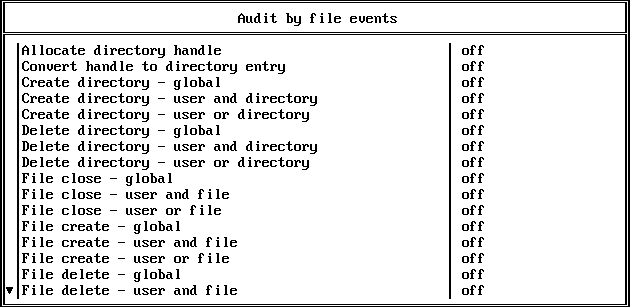
The following events can be displayed by scrolling the Audit by file events screen:
For file and directory auditing, the server provides a highly flexible selection mechanism that you can use to preselect specific file system events, generated by specific users, for accesses to specific files or directories. These preselection options (global, user and file, user or file) are described in the following list:
Global. When you choose a global event (for example, File open-global), the server will audit all instances of that event (for example, file opens) in the current volume, for all users, for all files. Thus, when any user opens any file, the server will append an audit record to the volume audit trail that identifies the file open, the user, and the file.
To cause global auditing of a file system event, you only need to choose the global event, for example, File open - global). You do not need to select specific files or users.
User and File. When you choose a user and file event (for example, File open - user and event), the server audits the event only when it was performed by an audited user to an audited file or directory.
Table 8 shows the audit events that will be recorded if you select the File open - user and file event, users ANN and BOB, and file FOO.EXE and BAR.DAT for auditing.
Table 8. Examples of User and File Preselection
| User Open | Of File | Audited? |
|---|---|---|
ANN |
FOO.EXE |
Yes |
ANN |
BAR.EXE |
No |
BOB |
BAR.XXX |
No |
BOB |
BAR.DAT |
Yes |
CHARLES |
FOO.EXE |
No |
CHARLES |
BAR.XXX |
No |
To configure user and file auditing, (1) preselect the user and file event, (2) preselect the list of files and directories to be audited (Audit by File/Directory ), and (3) preselect the list of users to be audited (Audit by User in this section or Audit by User.
User or File. When you select a user or file event (for example, File open - user or file), the server will audit the event when it is performed by an audited user or is performed to an audited file.
For example, Table 9 shows examples of the audit events that will be recorded if the File open - user or file event, users ANN and BOB, and file FOO.EXE and BAR.DAT are selected for auditing.
Table 9. Examples of User or File Preselection
| User Open | Of File | Audited? |
|---|---|---|
ANN |
FOO.EXE |
Yes |
ANN |
BAR.EXE |
Yes |
BOB |
BAR.XXX |
Yes |
BOB |
BAR.DAT |
Yes |
CHARLES |
FOO.EXE |
Yes |
CHARLES |
BAR.XXX |
No |
To configure user or file auditing, (1) preselect the user or file event, (2) preselect the list of files and directories to be audited (Audit by File/Directory), and (3) preselect the list of users to be audited (Audit by User in this section or Audit by User.
WARNING: When using user and file or user or file events, see the cautions in Audit by User or Audit by User. The set of users you identify is global; that is, they will be audited on all volumes, containers, and servers in your Directory tree, not just on a particular volume.
Global auditing, particularly of common events such as file opens, can result in a high volume of audit events. Unless you closely monitor the status of the audit files that are collected by the server, this can cause the server to automatically take the volume offline when the audit files or volume are filled.
Move the cursor to each event and press F10 to toggle it to the desired state (for example, OFF to ON).
Enabling one event (for example, File open - user or file) will cause related events (for example, File open - global) to automatically change state.
When you have set and reviewed the audit event configuration, press Esc to save the configuration.
AUDITCON asks you to confirm the changes.
Choose Yes to save the changes and return to menu 497, 498, or 499, or choose No to leave the audit events unchanged.
Choose Audit by message events from the Audit by event menu (401) and press Enter to edit the list of preselected queue events.
AUDITCON displays menu 406, which lists the five message events.
Figure 24
Menu 406: Audit by Message Events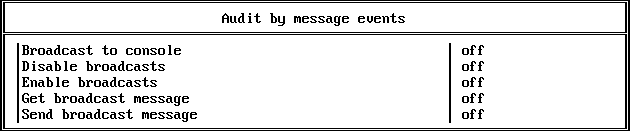
Move the cursor to each event and press F10 to toggle it to the desired state (for example, OFF to ON).
When you have set and reviewed the audit event configuration, press Esc to save the configuration.
AUDITCON asks you to confirm the changes.
Choose Yes to save the changes and return to menu 497, 498, or 499, or choose No to leave the audit events unchanged.
Choose Audit by QMS events from the Audit by event menu (401) and press Enter to edit the list of preselected queue events.
AUDITCON displays menu 407, which lists the events that are commonly used by network clients to submit and manage print queues.
Because of the screen size, only 16 events are shown at one time, with the remainder of the events available using the Page Up, Page Down, and arrow keys.
Figure 25
Menu 407: Audit by QMS Events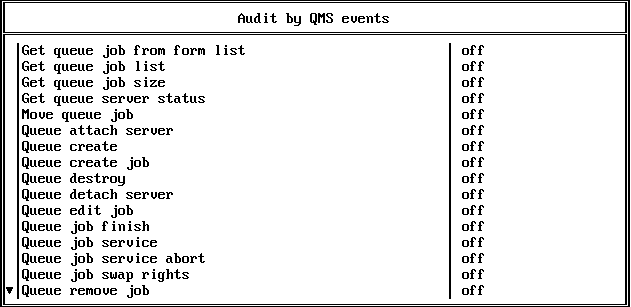
The following events can be displayed by scrolling the Audit by QMS events screen:
Move the cursor to each event and press F10 to toggle it to the desired state (for example, OFF to ON).
When you have set and reviewed the audit event configuration, press Esc to save the configuration.
AUDITCON asks you to confirm the changes.
Choose Yes to save the changes and return to menu 497, 498, or 499, or choose No to leave the audit events unchanged.
Choose Audit by server events and press Enter to edit the list of preselected queue events.
AUDITCON displays menu 408, which lists the server audit events. Because of the screen size, only 16 events are shown at one time, with the remainder of the events available using the Page Up, Page Down, and arrow keys.
Figure 26
Menu 408: Audit by Server Events
The following events can be displayed by scrolling the Auditing by server events screen:
Move the cursor to each event and press F10 to toggle it to the desired state (for example, OFF to ON).
When you have set and reviewed the audit event configuration, press Esc to save the configuration.
AUDITCON asks you to confirm the changes.
Choose Yes to save the changes and return to menu 497, 498, or 499, or choose No to leave the audit events unchanged.
Choose Audit by user events and press Enter to edit the list of preselected user events.
AUDITCON displays menu 409, which lists seven events associated with server-centric bindery login sessions.
Figure 27
Menu 409: Audit by User Events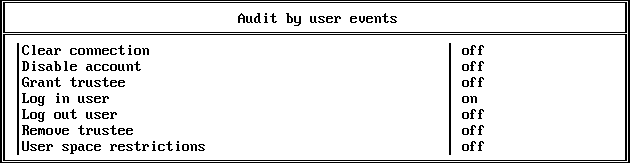
Move the cursor to each event and press F10 to toggle it to the desired state (for example, OFF to ON).
When you have set, and reviewed, the audit event configuration, press Esc to save the configuration.
AUDITCON then displays menu 403 (shown previously) to confirm that you want to make the changes.
Choose Yes to save the changes and return to menu 497, 498, or 499, or choose No to leave the audit events unchanged.
This section describes how to preselect files and directories in the volume for auditing.
NOTE: After you preselect a file or directory for auditing, you must also go to the Audit by event and Audit by file events menus shown in the Changing a Volume Audit Configuration), then choose the user and file or user or file events you want to audit. Selecting a file or directory without the associated events will not cause the file to be audited.
WARNING: The server keeps file and directory audit flags in the file system, but does not save that information when you back up the volume. If you ever restore files or directories from backup, the audit flags will be lost. Consequently, you must keep a manual record of all files and directories you've preselected for auditing in order to be able to restore that information.
Table 10 shows a sample form that you can use when recording which files and directories have been marked for auditing. You must keep a record of all such files and directories for recovery purposes. If the system is ever restored from a full backup, you will use this list to reconstruct your audit settings. In addition, if the administrator restores files or directories from a backup, you will want to use this record to reestablish your audit settings. Failure to keep and use such a record can result in loss of audit data.
Table 10. Sample Format for Recording File/Directory Settings
Choose Audit by file/directory from the Auditing configuration menu (497, 498, or 499).
AUDITCON displays menu 410, which lists the contents of the current directory of the current volume. The following menu shows an example of a display for the PUBLIC directory.
Figure 28
Menu 410: Audit by File/Directory
Accesses to a file are subject to auditing if either (a) the file itself is preselected for auditing or (b) the containing directory is preselected.
For example, accesses to the file AUDITCON.EXE are subject to auditing because the file itself is preselected. Accesses to files in BACKUP, for example, BACKUP\FILE1 and BACKUP\FILE2, are subject to auditing because the BACKUP subdirectory is preselected for auditing.
However, accesses to BACKUP\DIR1\FILE1 are not subject to auditing unless the BACKUP\DIR1 subdirectory is preselected. Thus, setting the audit preselection flag for a directory only affects the audit status of files that are immediately contained in that directory.
Auditing is also subject to the File and user and File or user criteria that were selected.
When you create a subdirectory, the new subdirectory inherits the value of the audit preselection flag from its parent directory. Thus, if you create the BACKUP\DIR2 and BACKUP\DIR2\DIR3 subdirectories, they inherit the audit flag from the BACKUP directory. Any files in these subdirectories are subject to auditing.
The inheritance of audit preselection flags applies only when a subdirectory is created. If you preselect the BACKUP directory for auditing, the audit flag does not flow down to existing subdirectories, such as BACKUP\DIR1.
WARNING: Because audit preselection flags are not saved when you back up a volume, and because audit flags are inherited when you create a subdirectory within an audited directory, you can end up auditing more directories than shown in your manual audit log.
For example, if you flag the directory \A\B for auditing and then create the \A\B\C subdirectory, \A\B\C will inherit the audit flag from \A\B. If the volume is then backed up and restored, your audit flag log only shows \A\B as being audited.
To prevent problems with this feature, log any important subdirectories that inherit audit flags. If you log enough information to manually restore the audit flags for all directories you want to audit, you don't need to be concerned about the loss of audit flags for other directories.
Move through the Directory tree by pressing Enter to browse a subdirectory in the current menu, choosing .. to browse the parent directory, or choosing \ to return to the root directory.
The AUDITCON window displays only 16 entries at a time, so you might need to use the arrow keys to scroll through a directory.
Move the cursor to a desired entry and press F10 to toggle it to the desired state (for example, OFF to ON).
When you have set and reviewed the audited files and directories, press Esc to save the configuration.
AUDITCON asks you to confirm the changes.
Choose Yes to save the changes and return to menu 410, or choose No to leave the audit events unchanged.
This section describes how you preselect specific users for volume auditing. When you preselect a user for auditing, the server associates this audit flag with the NDS User object. The server then consults this per-user audit flag as follows:
By default, the User restriction flag is not set, so selection by user only applies to the user or file and user and file events. If you want to preselect by user for all volume events, you must set the User restriction flag for the volume.
After you preselect a user for auditing, you must also perform the following tasks to ensure that the user's actions are recorded in the volume audit file:
When you select a user for volume auditing, the selection applies to all volumes and containers in the network where preselection is in effect. For example, selecting BOB for certain user or file events on volume SYS: also selects BOB for all user or file and user and file events selected for all other volumes on all other servers in the network. Similarly, selecting JANE for volume auditing will cause JANE to be audited on all containers where the User restriction flag is set to Yes.
A side effect of this is that you can select a user for auditing using either the Audit by user menu or the corresponding Audit by DS users menu under NDS auditing. Both have the same effect.
WARNING: The server keeps user audit flags in the associated User objects in NDS but does not save that information when you back up NDS. If you ever restore NDS from a backup, the audit flags will be lost. You must keep a manual record of all users you've preselected for auditing in order to restore that information.
If an auditor has rights to audit any volume or container in the network, that auditor can enable or disable auditing for any user in the NDS tree.
Table 11 shows a sample format for recording which users have been marked for auditing. You must keep a record of all such users for recovery purposes. If NDS is ever restored from a full backup, you will use this list to reconstruct your audit settings. Failure to keep such a record and use it can result in loss of audit data.
Table 11. Sample Format for User Settings
NOTE: Because NDS is a distributed system and some servers might be offline at any given time, selecting a user for auditing might involve a long delay before NDS can synchronize this information throughout the network.
Choose Audit by user from the Auditing configuration menu (497, 498, or 499).
AUDITCON displays menu 420, which lists the users on the server. The list of users displayed is those users in the default bindery context for the server where the volume is located.
The AUDITCON window shows only 16 entries at a time, so you might need to use the arrow keys to scroll through the list of users.
WARNING: The list of users shown is not the complete list of potential users of the volume. To see (and mark) users other than those listed here, see Audit by User. You will be working in the NDS auditing menu tree.
Figure 29
Menu 420: Audit by User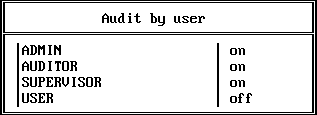
Move the cursor to a desired entry and press F10 to toggle it to the desired state (for example, OFF to ON).
When you have set and reviewed the list of audited users, press Esc to save the configuration.
AUDITCON asks you to confirm the changes.
Choose Yes to save the changes and return to menu 420, or choose No to leave the audit events unchanged.
NOTE: In addition to this method of preselecting users for auditing, you can also use an alternate method within the container auditing menu. See Audit by User.
Choose Audit options configuration from the Auditing configuration menu (497, 498, or 499).
AUDITCON displays menu 430, which defines the current audit configuration for the volume audit trail.
Figure 30
Menu 430: Audit Configuration
The line Force dual-level audit passwords is omitted if the ALLOW AUDIT PASSWORDS console parameter is OFF.
The following list describes the available configuration parameters. The server has two mechanisms for archiving the current audit file to an old audit file, and creating a new audit file. These are (1) automatic archiving, which causes the server to archive the audit file after a specified number of days, and (2) file overflow, which causes the server to archive the audit file when the current audit file exceeds the specified maximum size.
In either case, the server closes the current audit file, archives the contents to an old audit file, and opens a new current audit file.
The terms archive and archiving are used here to refer to a mechanism for rolling over the current audit file and starting a new current audit file. The process of saving copies of online audit files to removable media is referred to as backup.
The server provides three mutually exclusive options for handling full audit files and write errors caused by a full disk volume. The options are: Archive audit file, Disable auditable events, and Disable event recording. The default is Disable auditable events.
You can select only one of these options at a time. As soon as you select any one, the other two will be turned off. If you don't select any, then Disable auditable events will be selected for you.
These options are explained in the following table.
| Full Audit File Option | Description |
|---|---|
Archive audit file |
With this setting, the server archives the current audit file (that is, changes the current audit file to an old audit file) and creates a new audit file. If necessary (because the maximum number of old audit files already exists), the server deletes the oldest of the old online audit files. |
Disable auditable events |
This setting lets the server place the volume in an overflow state when (a) the current audit file has reached the Audit file maximum size or (b) it cannot write to the current audit file (for example, the volume is full). The server doesn't try to roll over to a new audit file, even if there is disk space for archiving the current audit file. When a volume is in an overflow state, any NCP request which is potentially auditable is not allowed, even if that event would not cause an audit record to be generated. For example, in an overflow state, the server won't permit users to perform any file open operations on the volume, even if the event is not preselected for auditing. The effect is essentially the same as if the overflowed volume had been dismounted. To recover, you must reset the current audit file (see Reset Audit Data File. If volume SYS: overflows, the server permits an audit administrator to perform a read-only login to the server to reset the audit file. Other users aren't permitted to log in while volume SYS: is in an overflow state. This is the only overflow option that guarantees that you will not lose audit data. Consequently, if collecting audit data is very important, you should use this setting, even though it might inconvenience users who need to access the volume. |
Disable event recording |
This setting lets the server turn off auditing and stop entering new audit records into the current audit file when it reaches the maximum size limit or when an unrecoverable write error occurs for the audit file. The server doesn't try to create a new audit file, even if there is disk space to archive the current audit file. You must reset the current audit file in order to re-enable event recording. Until you re-enable event recording, users can access the volume without any audit coverage. |
Minutes between warning messages |
The server sends warnings to the console at this frequency if (a) the audit file is full and (b) the overflow option is configured to either Disable auditable events or Disable event recording. If you have the Archive audit file option configured, then a warning message is sent when the audit file is almost full, but there is no additional message when the archive occurs. |
Move the cursor to the field you want to change and enter the new configuration value.
For numeric fields (for example, Audit file maximum size), type the new value into the field over the previous value, then press Enter. For Yes/No settings, type Y or N to change the value.
Depending on the context of your change, the server might modify other values on the configuration screen. For example, if you set Automatic audit file archiving to No, the server will blank out the entries for Days between audit archives and Hour of day to archive.
If you enable Force dual-level audit passwords and the ALLOW AUDIT PASSWORDS option is set to ON, AUDITCON will immediately prompt you (twice) to enter the new level 2 password.
Review the settings on the current screen, and change any settings as required.
Press Esc to exit the menu.
AUDITCON asks you to confirm the changes.
Choose Yes to save the changes and return to menu 497, 498, or 499, or choose No to leave the audit configuration unchanged.
NOTE: If you intend to back up audit files to high-density (1.44 MB) diskettes, set the maximum size of the audit file to approximately 1.3 MB to ensure that the audit file will fit on the disk.
WARNING: Audit files consume disk resources that might be needed by other users. Before you define the number and size of audit files, discuss your projected disk space requirements with an administrator for the server. If you set the audit file size too small, you risk shutting down the server volume or losing audit data, depending on the overflow option you've configured.
The server does not provide any locking mechanism to prevent multiple auditors from simultaneously attempting to change volume, container, or external audit configuration data. If this occurs, the last auditor to write the audit configuration might overwrite changes made by other auditors. If more than one auditor has rights to modify the audit configuration, you must institute procedural methods to control access to the Audit File object, such as selecting a single replica of the Audit File object and making all changes to that replica.
If you specify the Disable auditable events option, the server will stop processing auditable volume NCPTM requests when the current audit file fills up, even if there is sufficient disk space to roll over the audit file and start a new audit file. For example, you could have room for 15 online audit files, but the server will disable auditable NCP events when the current audit file fills up.
To prevent this disruption, configure automatic audit file archiving so that the current audit file will not overflow during routine operation. For example, if it normally takes two days to fill an audit file, set Automatic audit file archiving to ON, Days between audit archives to one day, and Number of old audit files to at least 7. To prevent audit loss, you should monitor the audit status on a regular basis, and you must clean out the old audit files before the last audit file is used.
If you configure both Automatic audit file archiving and the Archive audit file overflow option, the server will roll over the current audit file at both the appointed time and the specified file size. For example, if you're archiving audit files every Friday and the file becomes full on Thursday, the server will roll over the audit file on Thursday (overflow processing) and then again on Friday (automatic archival processing). Consequently, you might use up the configured number of old audit files (for example, 15) faster than anticipated. To prevent loss of audit data, you should monitor the audit status on a regular schedule and you must clean out the old audit files before the last file is used.
This section describes how the auditor can change level 1 audit passwords and level 2 audit passwords (if level 2 passwords are enabled). For information on using the password-based mechanism for accessing audit files, see Controlling Access to Online Audit Data.
To change the level 1 password, choose Change audit password from the Auditing configuration menu (498).
Enter the current (level 1) audit password.
AUDITCON does not echo any password information to the screen.
If dual-level passwords are enabled, AUDITCON prompts you to enter the level-2 password before you can change the level-1 password. AUDITCON allows you to change the level-2 password using the same procedure used to change the level-1 password.
Enter the new (level 1) audit password when prompted by AUDITCON.
AUDITCON prompts you twice for the new password. This ensures that the auditor did not make an error when entering the password.
AUDITCON doesn't check the password for length, alphanumeric characters, or other characteristics of strong passwords, nor does it ensure that it is different from the previous password. Uppercase and lowercase characters are treated identically.
This section describes how to set level 1 audit passwords and level 2 audit passwords (if level 2 passwords are enabled). This section is applicable only if the ALLOW AUDIT PASSWORDS option is set to ON. For more information on using the password-based mechanism for accessing audit files, see Controlling Access to Online Audit Data.
WARNING: The server's NetWare Enhanced Security configuration requires use of the NDS rights-based access control mechanism to protect audit data. For NetWare Enhanced Security networks, do not enable the password-based access control method (by setting ALLOW AUDIT PASSWORDS=ON at the server console) because this violates the assumptions under which the server was evaluated.
To set the level 1 password, choose Set audit password from the Auditing configuration menu (1497).
AUDITCON prompts you to enter the new (level 1) container password.
Enter the new password.
AUDITCON does not echo any password information to the screen
If dual-level passwords are enabled, AUDITCON prompts you to set the level 2 password before you can set the level 1 password. AUDITCON allows you to set the level 2 password using the same procedure used to change the level 1 password.
Reenter the new password.
The dual prompt ensures that the auditor did not make an error when entering the new password.
AUDITCON does not check the password for length, alphanumeric characters, or other characteristics of strong passwords, nor does it ensure that it is different from the previous password. Passwords are not case-sensitive.
WARNING: If you use audit passwords to control access to the audit file, do not use your server password as the audit password.
NOTE: If you use a password to control access to an audit file, and forget the audit password, then you must use the rights-based access, as described in Controlling Access to Online Audit Data. When you have access to the audit trail, you can reset the password as described in this procedure.
When you disable volume auditing, you stop the server from recording audit events to the volume audit file, but you do not delete the Audit File object for the volume audit trail. The Audit File object remains and is reused (to provide an initial configuration) if you re-enable auditing for the volume. After volume auditing has been disabled, it can be re-enabled using the Enable Volume Auditing menu (see Enabling Volume Auditing).
Choose Disable volume auditing from the Auditing configuration menu (497, 498, or 499).
AUDITCON asks you to confirm that you want to disable auditing for the volume.
Choose Yes and press Enter to disable auditing, or No to continue auditing.
AUDITCON returns to menu 497, 498, or 499.
This menu provides for setting the following audit control flags in the current volume's Audit File object Audit Policy.
User Restriction. The server provides two different methods for auditing the actions of specific users. It distinguishes between a set of ten file system events (those which permit user or file and user and file selection) and the remaining volume events.
By default, the remaining (non-user/file) events are audited for all users. However, if you set the User restriction flag, the server will audit only those users who have been specifically preselected for auditing. See Audit by User.
Audit NOT_LOGGED_IN. Before a user logs in to NDS, the server permits the user to access files in the \LOGIN directory. By default, the server does not audit these unauthenticated user events. However, if you set the Audit NOT_LOGGED_IN users flag, the server records these events in the current volume audit file.
These flags pertain only to the currently selected volume and do not affect other volume or container audit files. Unlike the per-user audit flag (which is global across the network), the User restriction and Audit NOT_LOGGED_IN users flags must be set individually for each volume and container. The two flags are independent of each other, so you can set either flag without affecting the other.
WARNING: If you set the User restrictions flag to Yes, you must also preselect those users you want audited, using the procedures shown in Audit by User or Audit by User. Setting the User restrictions flag to Yes without preselecting any users will mean that only User or File events (where the file is preselected) will be recorded in the audit trail.
If you set the User restrictions flag to Yes but leave the Audit NOT_LOGGED_IN users flag set as No, then actions of unauthenticated users will not be audited, unless they would otherwise be audited by selection of User or File events where the file is preselected.
Choose User restriction from the Auditing configuration menu (497, 498, or 499).
AUDITCON displays menu 480, which allows you to select the desired user restriction parameters for the volume.
Figure 31
Menu 480: User Restriction
Review the settings on the current screen, and change any settings as required. Press Y to set a value to Yes or press N to set the value to No.
When you are finished, press Esc to exit the menu.
AUDITCON asks you to confirm your changes.
Choose Yes to save the changes and return to menu 497, 498, or 499, or choose No to leave the user restrictions configuration unchanged.
| |