2.3 First Run Tutorial
The following provides a tutorial to familiarize you with the VM life cycle processes:
-
Section 2.3.1, Starting the ZENworks Orchestrator Management Environment
-
Section 2.3.2, Providing an Installation Source for installing a New Virtual Machine
-
Section 2.3.4, Installing the Orchestrator Agent on the Virtual Machine
-
Section 2.3.5, Installing Applications on the Virtual Machine
-
Section 2.3.6, Checking the Virtual Machine in to the VM Warehouse
2.3.1 Starting the ZENworks Orchestrator Management Environment
-
Make sure that the ZENworks Orchestrator Server is running.
For information, see
Installation and Configuration
in the Novell ZENworks Orchestrator 1.3 Installation and Getting Started Guide. -
(Conditional) Install both management consoles on your management workstation, if they have not yet been installed:
-
ZENworks Orchestrator Console:
Independent Installation of the Agent and Clients
-
ZENworks VM Management Console:
Installing the VM Management Console
Your management workstation can be running either Windows or Linux. Both consoles are available on these operating systems.
-
-
On your management workstation, open the ZENworks Orchestrator Console by using the instructions contained in Section A.1.1, Launching the ZENworks Orchestrator Console.
-
Right-click the grid that you created during installation of ZENworks Orchestrator, select , then provide your username and password for the grid.
-
On your management workstation, open the ZENworks VM Management Console using the instructions contained in Section A.2.1, Launching the ZENworks VM Management Console.
-
Continue with Section 2.3.2, Providing an Installation Source for installing a New Virtual Machine.
2.3.2 Providing an Installation Source for installing a New Virtual Machine
To create a new VM, you’ll need an installation source for the VM’s operating system installation.
-
To select a VM installation source, see Section B.0, VM Management Installation Sources.
-
Select a source that contains the necessary software for installing an operating system to the VM.
You might need to provide the software in your selected source. Select an operating system that you’ll likely use in your production environment, perferably one that won’t require a lot of configuration, which is done in the next section when you create the VM.
-
Continue with Section 2.3.3, Creating a New Virtual Machine.
2.3.3 Creating a New Virtual Machine
-
In the ZENworks VM Management Console, do one of the following actions to open the VM Builder Wizard:
-
Click the button (
 ) on the toolbar.
-
Click > .
-
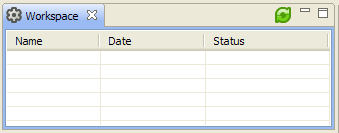
Right-click in the Workspace panel and select :
-
Double-click a blank space in the Workspace panel.
-
-
In the VM Build Wizard, fill in the necessary information on the wizard pages to define your VM, then click on any wizard page when finished configuring the VM.
For details on the wizard pages, see:
-
Description page: Description
-
Hardware page: Hardware
-
Storage Devices page: Storage Devices
-
Network page: Network
If you click , the wizard exits without starting the installation of the VM. Instead, the VM is listed in the Workspace panel as . To start the installation from there, simply right-click the VM name and select .
For other ways to start a defined VM’s installation, see Section 3.2.3, Installing a Defined Virtual Machine.
You can also edit an installed VM, but cannot edit as many fields as you can before the VM is installed. The option allows you to edit a defined VM, and the option allows you to create a copy of the VM that is put elsewhere on the drive, so you can open the VM Image and change its inherent metadata, processor architecture, initial hard disk properties, memory properties, and so forth. For more information, see Section 6.3.2, Modifying Virtual Machine Properties.
-
-
To monitor the installation process, do both of the following:
-
In the ZENworks VM Management Console, click > > to display the Progress panel.
-
In the ZENworks Orchestrator Console, click the tab.
-
-
To interact with the VM where the software is being installed, click the Show VNC icon (
 ) and provide your VNC password.
-
After the VM has been installed, continue with one of the following:
2.3.4 Installing the Orchestrator Agent on the Virtual Machine
If you want a VM to be used by the Orchestrator Server as a resource for high performance computing (HPC), you must install the Orchestrator Agent.
-
Follow the instructions contained in
Installing the Orchestrator Agent on VMs
in the Novell ZENworks Orchestrator 1.3 Installation and Getting Started Guide. -
Continue with Section 2.3.5, Installing Applications on the Virtual Machine.
2.3.5 Installing Applications on the Virtual Machine
To understand how to enhance the functionality of a VM that might be a basic operating system installation, install some applications on the VM. Choose the applications for a simple purpose so you can see whether the VM is behaving as desired after it has been deployed.
Do the following:
-
Start the VM on a VM Host outside of your production environment.
The VM can be left running after its installation if it is installed on a VM Host outside of your production environment.
-
Install a few selected applications on the running VM.
Do this by installing the software just as you would on a physical machine.
-
After you have installed the applications, stop the VM.
The applications remain installed the next time you start the VM.
-
Continue with Section 2.3.3, Creating a New Virtual Machine.
2.3.6 Checking the Virtual Machine in to the VM Warehouse
In order for the VM to be used, it must be checked in to the VM Warehouse.
-
In the ZENworks VM Management Console, do one of the following:
-
Right-click the VM and select .
-
Select the VM, then click > .
-
Select the VM and click the button.
-
-
To view the VM in the VM Warehouse, double-click a warehoused VM, or right-click the VM in the warehouse and select .
This displays a list of all the versions of that VM in an edit window on the right.
-
Continue with Section 2.3.7, Provisioning the Virtual Machine.
2.3.7 Provisioning the Virtual Machine
Provisioning is used to get a VM ready to start in a running state when deployed. For more information, see Section 4.0, Provisioning Virtual Machines.
For procedures and more information on provisioning of VMs, see Virtual Machine Job Development
in the Novell ZENworks Orchestrator 1.3 Developer Guide and Reference.
Continue with Section 2.3.8, Deploying the Virtual Machine.
2.3.8 Deploying the Virtual Machine
By default, the Xen and VMware server adapters create a local type Repository object for local VM images when ZENworks Orchestrator accomplishes the action.
For information on other deployment resources, see Section 5.0, Deploying Virtual Machines.
To deploy the VM:
-
In the ZENworks Orchestrator Console, create a job that deploys the VM to a VM Host where the VM can be used for a particular purpose of your choosing.
For information on creating deployment jobs, see Novell ZENworks Orchestrator 1.3 Developer Guide and Reference.
-
To deploy the job, go to the ZENworks Orchestrator Console, click > , then select the VM job that you created in Step 1.
-
Monitor the VM to see whether it is deployed and is working as designed.
-
Continue with Section 2.3.9, Cloning the Virtual Machine.
2.3.9 Cloning the Virtual Machine
A VM template is a special kind of VM that is not deployed separately. When the Orchestrator Server needs a VM of the template’s type to be used as a resource, it automatically clones a version of the VM and uses that clone as the VM. You can change cloned VMs into instances of VMs instead of clones.
-
To make a VM instance into a template, go to the ZENworks Orchestrator Console, right-click the VM, then select .
-
Do the following:
-
Name the template.
-
Specify a repository.
-
Specify a visible VM host.
-
Select a recommended host for the VMs to be launched on, if any are present.
-
-
Click OK when finished defining the template.
When the clone of the template VM is provisioned, it appears as a sub-branch of the template’s location in the resources tree, as in the following Linux and Windows examples:
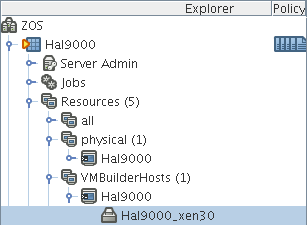
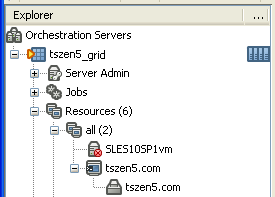
This clone functions as an instance of a VM and runs as though it were its own version with its own MAC address and other unique identifiers. The UUID is the only new information that is automatically generated for the clone. All the rest of the new information comes from autoprep, including the MAC address if an asterisk (*) is placed in the field in the section of the tab for the template (the default is a blank field, meaning no MAC address is created), and if the check box is enabled on the Create VM from Template dialog box.
When the Orchestrator Server no longer needs the clone, it deprovisions it and automatically deletes it from the data center.
-
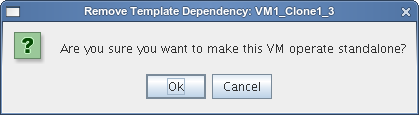
If you decide to keep a clone VM, go to the ZENworks Orchestrator Console, right-click the clone and select .
This brings up the Remove Template Dependency dialog box, shown in the following figure:
-
Click to retain the clone VM.
-
Continue with Section 2.3.10, Monitoring Your Virtual Machines.
2.3.10 Monitoring Your Virtual Machines
You can monitor your virtual machines from both management consoles.
-
Use the ZENworks VM Management Console to view your VMs.
This console can be used to influence decisions about machines to constrain to use specific joblets and be hosts to specific VMs. You can view the VM information in a text or graphical view.
For information, see Section 6.4.1, Using the ZENworks VM Management Console Monitoring View.
-
Use the ZENworks Orchestrator Console to view your VMs.
This console allows you to view the information by looking at the section, which provides feedback for jobs being executed by the Orchestrator Server.
For information on monitoring from the ZENworks Orchestrator Console, see Section 6.4.2, Monitoring Orchestrator Server Jobs.
-
Continue with Section 2.3.11, Destroying the Virtual Machine.
2.3.11 Destroying the Virtual Machine
When you want ZENworks Orchestrator to no longer use a VM, you can “destroy” it.
-
In the ZENworks Orchestrator Console, right-click the VM in the tree and select .
This action removes the VM from your resource list. However, the actual image of the VM is still stored in its directory. If the VM was stored in the VM Warehouse, it is retained there.
-
(Optional) If you deleted a VM from your resource tree, rediscover it by running a discovery job. Click > to rediscover any VMs in your data center with unique UUIDs.
-
To delete a VM from the VM Warehouse, right-click the VM in the ZENworks VM Management Console and select .
This completely deletes the VM and all its versions from your data center. You cannot restore any version of the VM after you delete it from the Warehouse. However, if you do have a checked-out instance of the VM, you can check that back into the Warehouse.
-
Continue with Section 2.4, What’s Next?.