2.2 Getting Ready to Use the Desktop Management Agent
This section includes information you need to know if you plan to deploy the Desktop Management Agent in your network environment:
2.2.1 Desktop Management Agent Installation Considerations
Make sure that the workstations where you install the Desktop Management Agent meet the minimum requirements for hardware and installed software. For more information, see User Workstation Requirements
in Preparation
in the Novell ZENworks 7 Desktop Management Installation Guide.
The Desktop Management Agent installation lets you install various Desktop Management components on a one-time basis; that is, if you want to add or delete any of the components installed by the Agent in an earlier installation, you can use the Modify option that is available in the maintenance dialog box of the Desktop Management Agent setup.
2.2.2 Upgrading the Desktop Management Agent
The version of the Desktop Management Agent that shipped with the original ZENworks for Desktops 4 Program CD (setup.exe) is no longer supported. You must not attempt to upgrade from that version of the Desktop Management Agent.
You can upgrade the ZENworks for Desktops 4.0.1 Desktop Management Agent (and its functionality) and the ZENworks 6.5 Desktop Management Agent by installing the ZENworks 7 Desktop Management Agent.
Installing version 7 of the agent uninstalls older versions of the agent and enables ZENworks 7 functionality on your managed workstations.
For more information, see Upgrading Workstations
in Upgrade
in the Novell ZENworks 7 Desktop Management Installation Guide.
2.2.3 Modifying the Desktop Management Agent Login
If you want to modify the Desktop Management Agent for your network users, you can do so when you create the Desktop Management Agent installation for the workstations and after you import the workstations. This section includes information for both options:
Modifying the Login Dialog
If the Novell Client is not present on the installing workstation when you are installing the Desktop Management Agent, the installation program displays the Workstation Manager Settings dialog box. This dialog box can be customized. For more information about the customization options, see Customizing the Agent Login
in Setting Up Authentication
in the Novell ZENworks 7 Desktop Management Installation Guide.
Creating Custom Bitmaps for the Graphical Interface
If you deploy the Desktop Management Agent in your network environment, you can customize the login GINA (that is, the graphical interface used for authentication) and the Welcome dialog box with your own company identity. To replace the Novell bitmaps on the Desktop Management Agent Login dialog box or the Resident Workstation Welcome dialog box, use the Workstation Policy Package > Desktop Management Agent policy. For more information, see Section 15.12, ZENworks Desktop Management Agent Policy (Workstation Package). The workstation must be imported into the eDirectory tree in order for these dialog boxes to access the customized bitmaps. When you change the bitmaps that are accessed through this policy, the new graphics are accessed when the scheduled system event occurs.The Login dialog box bitmap is sized at 390 x 75 pixels and the dialog box bitmap is sized at 320 x 195 pixels. The dialog box attribute is stored in the following registry key:
HKEY_LOCAL_MACHINE\SOFTWARE\Novell\NWGINA
The Login dialog box attribute is stored in the following registry key:
HKEY_LOCAL_MACHINE\SOFTWARE\Novell\LgnXtier
NOTE:You can also log in from the Application Explorer in the Windows system tray. The graphical interface of this login GINA cannot be customized. For more information, see Logging in Locally to the Workstation.
2.2.4 Using the ZENworks Agent Control Panel Applet To Modify Agent Settings
When the ZENworks Management Agent is installed on user workstations, a specialized Windows Control Panel applet, , is also installed.
Figure 2-1 The ZENworks Agent Options Applet in the Windows Control Panel
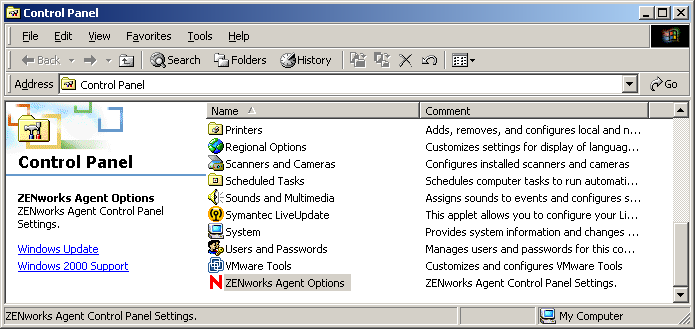
This applet provides an interface for advanced users to perform the following tasks:
-
View the Middle Tier IP address they use (if any) for access to ZENworks files
-
Change the eDirectory password
-
Enable or disable various Workstation Manager settings
When the user double-clicks the icon in the Control Panel, the ZENworks Agent Options dialog box is displayed:
Figure 2-2 ZENworks Agent Options Dialog Box

The dialog box lists the following information:
-
The eDirectory username and context of the individual logged into this workstation
-
The IP address or DNS name of the Middle Tier Server that this workstation uses for access through the firewall
-
The Windows username of the individual logged into this workstation
-
The Windows domain name to which this workstation belongs
The button and button open dialog boxes where agent options can be configured.
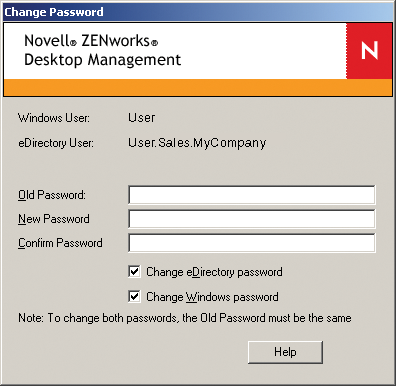
Change Password Dialog Box
The Change Password dialog box lists the eDirectory username and the Windows username of the individual who is logged in to this workstation, and includes fields where the user can change his or her password.
Figure 2-3 Change Password Dialog Box
The following fields in the dialog box accept user input:
Old Password: Users type their current password (Windows or eDirectory) in this field.
New Password: Users type their newly chosen password in this field.
Confirm Password: Users retype the new password in this field to confirm their choice.
The check box lets the user choose whether to synchronize the eDirectory password with the newly chosen local workstation password.
The check box lets the user choose whether to synchronize the local workstation password with the newly chosen eDirectory password.
The note in the dialog box indicates that if the user wants the same password for both eDirectory and Windows (indicated by selecting both check boxes), the current (or “old”) passwords for eDirectory and Windows must already be the same (that is, they use the identical password to authenticate both locally and to eDirectory).
NOTE:If an eDirectory user whose password has expired logs in to a workstation that has both Novell SecureLogin and the ZENworks Desktop Management Agent installed, the user is prompted to change the password. After changing the password, the user is prompted to enter credentials again to log in to the workstation. For more information, see Troubleshooting ZENworks Agent Issues
Workstation Manager Dialog Box
When the user clicks in the ZENworks Agent Options dialog box, the Workstation Manager dialog box displays.
Figure 2-4 Workstation Manager Dialog Box

The user can configure the following settings in this dialog box:
Enable Workstation Manager: The user selects this check box to enable Workstation Manager at the next reboot.
Tree: The user specifies the name of an eDirectory tree to designate the network location where ZENworks should search for Workstation Manager policies.
Refresh Rate (Minutes): The user specifies a value (in minutes) to set the refresh rate for eDirectory. The rate determines how often the agent looks for updated information (such as new or edited policies) in eDirectory.
Enable Volatile User Caching: The user selects this check box to enable the caching of volatile user information on the workstation for a specified number of days, so that volatile users are not created or removed at every login or logout. When this option is selected, volatile users can log in faster because NWGINA does not spend cycles re-creating the user desktop.
The Dynamic Local User (DLU) policy settings configure users created on Windows NT/2000/XP workstations after they have authenticated to eDirectory.
The cache makes it possible for a user to continue using the workstation even when the workstation is disconnected from the network and the user is not a registered user on the workstation.
This setting is also available in the Desktop Management Agent Policy. Because both the policy and the applet write to the same registry location, the last setting made (either in the policy or in this dialog box of the applet) before the cache flushes is the setting that takes effect.
For more information, see Section 15.12, ZENworks Desktop Management Agent Policy (Workstation Package).
Days to Cache: (Conditional) This option is available only if the check box is selected. Users specify the number of days for volatile user information to persist in the workstation’s cache. When the time limit expires, all volatile user information is removed from the workstation. If the user has not logged in within the specified time period, the countdown begins again according to the number of days specified here.
Enable Login Events: Selecting this check box enables Workstation Manager to notify its policies about eDirectory logins occurring after the initial Windows login. (Usually, Workstation Manager notifies its policies of user login only at initial Windows login, so if the user logs into eDirectory later, policies are not applied.)
Activating this setting lets a user in a VPN environment initially log in locally to his or her workstation; then, when that user's VPN is up and running, he or she can log into eDirectory and their policies are applied.
By default, this check box is not selected (off), which means that the Workstation Manager service applies policies only if the user initially logs into eDirectory.
NOTE:This option was added to the dialog box starting with ZENworks 7 Desktop Management Agent with Support Pack 1.
2.2.5 Setting Up AutoAdminLogon for Windows 2000/XP
You can automate the logon process for selected Windows 2000/XP users by using the Windows Registry Editor (regedit.exe) to enter user ID and password credentials in the Registry database. The result for the user is immediate access to the desktop and network resources without the need to pause to enter logon information.
NOTE:You can bypass the AutoAdminLogon process and log on as a different user by holding down the Shift key after a logout or after a workstation reboot.
Using AutoAdminLogon opens your network to a serious security risk. It exposes user IDs and passwords and it lets any user who starts the workstation use the embedded credentials to obtain access to the workstation and network files—even if the workstation is locked. We recommend that you review the Microsoft* recommendations regarding when to use AutoAdminLogon before you implement it. For more information, see TID 10052847 at the Novell Support Web site.
IMPORTANT:If you install the Novell Client 4.9 SP1a for Windows 2000/XP on a workstation that already has the Desktop Management Agent installed and then set up AutoAdminLogon, you receive a login error because of a conflict between AutoAdminLogon and Novell Modular Authentication Services (NMAS™), installed by default by Novell Client 4.9 SP1a.
To work around the problem after the Client is installed, right-click the red N icon in the desktop system tray > click > > deselect .
This section contains the following information:
General Procedure for Setting Up AutoAdminLogon
-
Start the Registry Editor (regedit.exe).
WARNING:Using the Registry Editor incorrectly can cause serious, system-wide problems that might require reinstalling Windows 2000/XP to correct them.
-
Locate the specified Registry keys and set the values as indicated.
If a value does not exist, click > > , type the name of the value, then press Enter. All the values should be string values except for AutoAdminQueryNDS, which must be a DWORD value instead of a string value.
IMPORTANT:For a Windows logon only, if no DefaultPassword string is specified, the value of the AutoAdminLogon key automatically changes from 1 (True) to 0 (False), disabling the AutoAdminLogon feature after the first autoadminlogon session has occurred.
-
Exit the Registry Editor and log out of Windows 2000/XP.
AutoAdminLogon Options
This section lists the options you can choose from when you set up AutoAdminLogon.
-
Logon to Workstation Only: Client Only, Agent Only, or Both Client and Agent Installed
-
Logon to Workstation and eDirectory: Client Only, or Both Client and Agent Installed
-
Logon to NetWare Only Using Dynamic Local User (DLU) for Windows: Agent Only Installed
-
Logon to Windows and Query for NetWare: Client Only Installed
In addition to these options for setting up AutoAdminLogon, you can also disable it. For more information, see Disable AutoAdminLogon. You should also be careful to use these options only for setting up user names and passwords if you want AutoAdminLogon to work properly. Be careful to caution users against resetting their own passwords. For more information, see Changing Passwords in NetWare Login with AutoAdminLogon.
Logon to Workstation Only: Client Only, Agent Only, or Both Client and Agent Installed
Use this option to allow users to go directly to the desktop when the workstation boots. Users are not authenticated to eDirectory. The effect is similar to the user authenticating by checking the check box in the Windows logon dialog box.
Table 2-1 Settings for Using AutoAdminLogon: Logging on to the Workstation Only
|
Registry Key |
String Name |
Enter This Value |
|---|---|---|
|
HKEY_LOCAL_MACHINE\SOFTWARE\Microsoft\ WindowsNT\CurrentVersion\Winlogon |
AutoAdminLogon |
1 |
|
DefaultDomain |
Name of Domain or Name of Local Workstation |
|
|
DefaultUserName |
Windows User Name |
|
|
DefaultPassword |
Windows Password for the DefaultUserName specified above |
|
|
HKEY_LOCAL_MACHINE\SOFTWARE\Novell\ Login |
AutoAdminLogon |
0 |
Logon to Workstation and eDirectory: Client Only, or Both Client and Agent Installed
Use this option to allow users to go directly to the desktop upon workstation bootup. No login prompts for Windows authentication or eDirectory authentication (Client or Agent) are displayed. Users are authenticated to eDirectory and to the Windows workstation. All Desktop Management policies and applications are delivered to the workstation.
Table 2-2 Settings for using AutoAdminLogon: Logging in to the Workstation and eDirectory with the Novell Client Only Installed or with the Novell Client and ZENworks Agent Installed
|
Registry Key |
String Name |
Enter This Value |
|---|---|---|
|
HKEY_LOCAL_MACHINE\SOFTWARE\Microsoft\ WindowsNT\CurrentVersion\Winlogon |
AutoAdminLogon |
1 |
|
DefaultDomain |
Name of Domain or Name of Local Workstation |
|
|
DefaultUserName |
Windows User Name |
|
|
DefaultPassword |
Windows Password for the DefaultUserName specified above |
|
|
HKEY_LOCAL_MACHINE\SOFTWARE\Novell\ Login |
AutoAdminLogon |
1 |
|
DefaultLocationProfile |
Name of the Location Profile that contains the information about the Novell User to log in to the NetWare network such as Username, Tree, Context, Server, etc. |
|
|
DefaultPassword |
Novell Password for the DefaultUserName specified in the Location Profile |
Location profiles let you save a user's specific login information. The profile automatically sets up login information such as the user's name, server, tree, context, login script, and other applicable information so that the user does not need to type this information.
NOTE:The NT Credential information in the Location Profile is not used. The NT user information in the registry is used instead.
Logon to Workstation and eDirectory: Agent Only Installed
Use this option to allow users to go directly to the desktop upon workstation bootup. No login prompts for Windows authentication or eDirectory authentication are displayed. Users are authenticated to eDirectory and to the Windows workstation. All Desktop Management policies and applications are delivered to the workstation.
Table 2-3 Settings for using AutoAdminLogon: Logging in to the Workstation and eDirectory with the ZENworks Agent Only Installed
|
Registry Key |
String Name |
Enter This Value |
|---|---|---|
|
HKEY_LOCAL_MACHINE\SOFTWARE\Microsoft\ WindowsNT\CurrentVersion\Winlogon |
AutoAdminLogon |
1 |
|
DefaultDomain |
Name of Domain or Name of Local Workstation |
|
|
DefaultUserName |
Windows User Name |
|
|
DefaultPassword |
Windows Password for the DefaultUserName specified above |
|
|
HKEY_LOCAL_MACHINE\SOFTWARE\Novell\ Login |
AutoAdminLogon |
1 |
|
DefaultUserName |
The fully-distinguished name (DN) or the common name (CN) portion of the DN that the Novell User uses to log in to eDirectory. Example: bjones or bjones.sales.novell |
|
|
DefaultPassword |
Novell Password for the DefaultUserName specified in the DefaultUserName string. |
Login to NetWare Only Using Dynamic Local User (DLU) for Windows: Client Only, or Both Client and Agent Installed
Use this option to allow users to go directly to the desktop upon workstation bootup. Users are authenticated to eDirectory according to the credentials entered in the registry, but they are authenticated to the Windows workstation according to the configuration of the DLU policy (no credentials for Windows are entered in the registry).
Table 2-4 Settings for using AutoAdminLogon: Logging in to NetWare Using DLU, Client Only or Both Client and Agent Installed
|
Registry Key |
String Name |
Enter This Value |
|---|---|---|
|
HKEY_LOCAL_MACHINE\SOFTWARE\Microsoft\ WindowsNT\CurrentVersion\Winlogon |
AutoAdminLogon |
0 |
|
HKEY_LOCAL_MACHINE\SOFTWARE\Novell\ Login |
AutoAdminLogon |
1 |
|
DefaultLocationProfile |
Name of the Location Profile that contains the information about the Novell User to log in to the NetWare network, such as Username, Tree, Context, Server. |
|
|
DefaultPassword |
Novell Password for the DefaultUserName specified in the Location Profile |
Location profiles allow you to save a user's specific login information. The profile automatically sets up login information such as the user's name, server, tree, context, login script, and other applicable information so that the user does not need to type this information. In this case, the location profile must specify an eDirectory user with Dynamic Local User (DLU) privileges on the Windows 2000 workstation.
Logon to NetWare Only Using Dynamic Local User (DLU) for Windows: Agent Only Installed
Use this option to allow users to go directly to the desktop upon workstation bootup. Users are authenticated to eDirectory according to the credentials entered in the registry, but they are authenticated to the Windows workstation according to the configuration of the DLU policy (no credentials for Windows are entered in the registry).
Table 2-5 Settings for using AutoAdminLogon: Logging in to NetWare Using DLU, Agent Only Installed
|
Registry Key |
String Name |
Enter This Value |
|---|---|---|
|
HKEY_LOCAL_MACHINE\SOFTWARE\Microsoft\ WindowsNT\CurrentVersion\Winlogon |
AutoAdminLogon |
0 |
|
HKEY_LOCAL_MACHINE\SOFTWARE\Novell\ Login |
AutoAdminLogon |
1 |
|
DefaultUserName |
The fully-distinguished name (DN) or the common name (CN) portion of the DN that the Novell User uses to log in to eDirectory. Example: bjones or bjones.sales.novell |
|
|
DefaultPassword |
Novell Password for the DefaultUserName specified in the DefaultUserName string. |
Logon to Windows and Query for NetWare: Client Only Installed
The following settings are applicable only if the workstation has only the Novell Client installed. They are not applicable if only the Desktop Management Agent is installed.
This option authenticates the user to the Windows workstation according to the credentials entered in the registry, but the login to NetWare requires the user to enter his or her eDirectory credentials.
Table 2-6 Settings for using AutoAdminLogon: Logging on to Windows, Client Only Installed
|
Registry Key |
String Name |
Enter This Value |
|---|---|---|
|
HKEY_LOCAL_MACHINE\SOFTWARE\Microsoft\ WindowsNT\CurrentVersion\Winlogon |
AutoAdminLogon |
1 |
|
DefaultDomain or Local WorkstationName |
Name of Domain or Name of Local Workstation |
|
|
DefaultUserName |
Windows User Name |
|
|
DefaultPassword |
Windows Password for the DefaultUserName specified above |
|
|
HKEY_LOCAL_MACHINE\SOFTWARE\Novell\ Login |
AutoAdminLogon |
0 |
|
AutoAdminQueryNDS |
1 IMPORTANT:AutoAdminQueryNDS must be a DWORD value instead of a string value. |
Disable AutoAdminLogon
This is the behavior setting for logon to the Windows workstation and to eDirectory. The user is prompted for Windows workstation credentials and eDirectory credentials in order to authenticate.
Table 2-7 Settings for using AutoAdminLogon: Disabling for Logon
|
Registry Key |
String Name |
Enter This Value |
|---|---|---|
|
HKEY_LOCAL_MACHINE\SOFTWARE\Microsoft\ WindowsNT\CurrentVersion\Winlogon |
AutoAdminLogon |
0 |
|
HKEY_LOCAL_MACHINE\SOFTWARE\Novell\ Login |
AutoAdminLogon |
0 |
Changing Passwords in NetWare Login with AutoAdminLogon
Novell Client Precautions
If AutoAdminLogon is enabled, be careful when running the NetWare Login utility from the icon in the NetWare (Common) group. When run as a standalone utility from the icon, NetWare Login does not recognize that the workstation is running AutoAdminLogon.
If the primary connection's password expires when running NetWare Login from the icon, the user is given the chance to synchronize all NetWare and Windows passwords. Make sure that users do not synchronize the Windows password, because NetWare Login does not update the Registry setting for AutoAdminLogon.
Desktop Management Agent Precautions
Although you can change the login password for the Desktop Management Agent using an applet in the Windows Control Panel, doing so doesn't affect the password setting in the Windows registry. If you change the password using the applet but you don't change it in the registry, AutoAdminLogon settings fail.
For information about changing the password with the applet, see Section 2.2.4, Using the ZENworks Agent Control Panel Applet To Modify Agent Settings.