30.2 Multicasting Images
ZENworks Linux Management’s Preboot Services includes a multicasting capability for its imaging software. You can perform multicasting of images either in the ZENworks Control Center or manually:
30.2.1 Multicasting in the ZENworks Control Center
Configuring Multicast Bundles
With Preboot Services, multicasting is an automated procedure. As described in Automatic Multicasting Example, you simply define a Multicast bundle and assign it to the devices. The multicast session starts when the trigger event that you configured occurs.
Using ZENworks Linux Management, you can install software using a bundle. Software included in a bundle that is assigned directly is considered mandatory; the software is installed on all assigned devices (the bundle is directly assigned to the devices, their groups, or their folders).
To configure a Multicast bundle and assign devices to the bundle:
-
In the ZENworks Control Center, click the tab.

-
Click > to start the Create New Bundle Wizard:
-
In the Create New Bundle Wizard, select , then click to display the Select Preboot Bundle Type page:
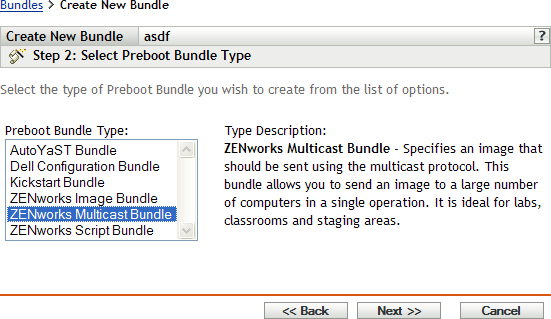
-
Select , then click to display the Set General Information page:
-
Fill in the fields:
Name: (Required) Although bundles can be identified in ZENworks Control Center by their type of icon, as well as the folder they are listed under, you should develop a naming scheme that differentiates the ZENworks Multicast bundles that are listed together in a folder.
For more information, see Section C.0, Naming Conventions in the ZENworks Control Center.
Folder: Browse for the location where you want the ZENworks Multicast bundle displayed in ZENworks Control Center. The folder must exist. You cannot specify a non-existent folder, because ZENworks does not create them from this wizard.
Description: Provide a description to help you later recognize the exact purpose of this ZENworks Multicast bundle.
If you are using subsets of an image, be sure to indicate which file set this bundle is configured for.
-
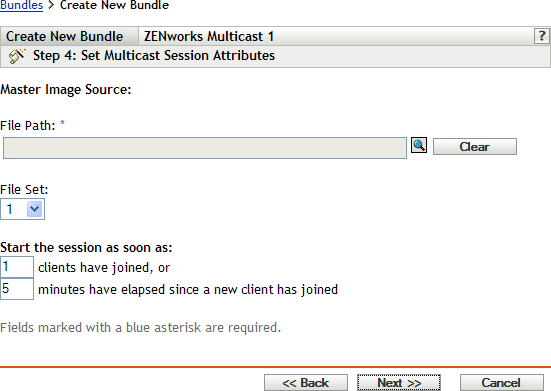
Click to display the Master Image Source page:
-
Fill in the fields:
ZENworks Multicast bundles use an image that is taken previously from a device and is stored on an imaging server. The image is sent to multiple devices at one time to re-image them, rather than sent one time for each device, thus saving on network bandwidth usage. For example, if you have 10 devices in the multicast session and the image is 3 GB in size, your network experiences 3 GB of network traffic to image all 10 devices. Without multicasting, the network experiences 30 GB of network traffic.
For multicasting to work properly, all routers and switches on the network must have their multicast features configured. Otherwise, multicast packets might not be routed properly.
File path: The location on the imaging server where the image file to be used by the ZENworks Multicast bundle is stored.
File set: File sets are assigned to the current ZENworks Image bundle using this field. File sets are defined on the imaging server from the base image using the Image Explorer utility, which can be run on a Windows device from a Linux server running Samba. The Image Explorer utility is located at /opt/novel/zenworks/zdm/winutils/ImgExp.exe on the Linux server.
When you define a file set using Image Explorer, you specify files and directories to be excluded from the image. Thus, a file set is a subset of the original image that excludes the files you select in Image Explorer. A separate image file is not created for the file set; instead, a file set contains internal attributes representing the excluded information. Therefore, even though a file set does not exist as a separate, physical image file, it is accessed as though it is, placing the image on the receiving device, minus the excluded files.
For example, device1image.zmg is the image file on your imaging server. You use Image Explorer to determine which data to exclude and assign this to a file set number, such as 2. When a device assigned to this ZENworks Image bundle boots, it is imaged with the smaller version (file set 2) of device1image.zmg.
The advantage file sets provide is that you can create a base image and modify it slightly for various devices, instead of creating separate, somewhat different base images for each device. However, because file sets only concern excluded files, if you add files to the base image using Image Explorer, all file sets will include those additional files. If you don’t want them included in a file set, you must use Image Explorer to exclude these new files from that file set.
There are a maximum of 10 file sets. Each of the ten file set numbers represents the original base image, until you use Image Explorer and assign the results to a file set number.
IMPORTANT:If you create 10 different file sets, then the original image can be lost. If you want to maintain the original image’s information, do not use Image Explorer to assign exclusions to file set 1, which is the default file set if you do not select a file set when using this wizard.
-
Fill in the fields:
There are two triggers that you can use to determine when to start the ZENworks Multicast session. The first trigger to be realized starts the session.
A session consists of all clients (devices) that are assigned to the ZENworks Multicast bundle that are booting (joining), but must wait for a start trigger. Therefore, the boot processes for the devices can be held up until one of the triggers is realized, even for as long as you specify in an elapsed time or number of clients entry.
After a session has started, if other devices boot that are assigned to this bundle, they do not become part of this session, but become part of the next session when it triggers.
Start the session as soon as: You have two choices:
-
____ clients have joined
This trigger, if met first, limits the session to the number of clients that you specify. The default is 1.
-
____ minutes have elapsed since a new client has joined
This trigger, if met first, causes the session to start, regardless of the number of clients that have joined, except that at least one client must have joined (otherwise there is no device to multicast to).
A “new client” means that it is the first device to boot that starts this round of waiting for a trigger to be realized. The default is 5.
These triggers are useful if you want economy of scale in multiple clients joining, but don’t want to stall the session too long from starting.
-
-
Click to display the Summary page.
-
Review the configuration, then click one of the following:
Back: Allows you to make changes after reviewing the summary.
Next: Click to perform the following tasks before creating the bundle:
-
Specify device assignments for this bundle
-
Specify groups for this bundle
Continue with Section 30.6, Assigning Unassigned Preboot Bundles to assign the bundle and complete the wizard.
Finish: Creates the Multicast bundle as configured per the settings listed on this Summary page.
-
This bundle is not assigned to any device or group after it is created, unless you click instead of to make that assignment.
IMPORTANT:If this Preboot bundle has been created on a management device inside the firewall and you are assigning it to a device outside the firewall, port 8089 must be open both ways (PUBLIC -> PRIVATE, and PUBLIC <- PRIVATE).
When the Multicast bundle’s trigger event occurs (configured in Step 8), the Multicast session begins.
Enabling a Multicast Session
A wizard allows you to cause each device assigned to the ZENworks Multicast bundle to be enabled for receiving the bundle when it reboots, even if the configuration for the device is to “do nothing” (see Step 5 through Step 7 in Section 30.7, Editing Preboot Services Work).
The wizard does not assign a bundle to any device, nor does it make it the effective bundle for any device. It only sets up a device to do ZENworks Multicast Bundle work for its effective bundle the next time it boots.
To enable a ZENworks Multicast bundle:
-
In the ZENworks Control Center, click the tab to display the Bundles page:
-
Select the check box next to a .
-
Click > to start the Enable Multicast Session Wizard:
-
Click to enable multicasting for the selected device.
-
Click to the message that indicates multicasting is successfully enabled.
The next time a device assigned to the multicast bundle boots, it can become part of that multicast session. For more information, see Section 30.2, Multicasting Images.
30.2.2 Multicasting Manually
If you want to perform a manual multicast session, you need to start the multicast session from the ZENworks imaging server and physically visit each participating device. Performing a manual multicast session is particularly useful in a lab environment in which a small number of devices participate.
The following sections contain step-by-step information about performing a manual multicast session. You must perform the steps in both of the following sections; however, the order in which you perform these tasks does not matter.
Initiating a Multicast Session from the ZENworks Imaging Server
On the ZENworks Linux Management imaging server, do the following to initiate the multicast session:
-
In the shell console, enter the following command to make sure the imaging software is running:
/etc/init.d/novell-pbserv -status
If it is not running, then enter:
/etc/init.d/novell-pbserv -start
-
In the shell console, enter the following command to enable a multicast session:
/opt/novell/zenworks/preboot/bin/novell-zmgmcast -mcast argumentswhere arguments represents the following that you can append to the command line:
Argument
Description
session_name
(Required) The session name is any string that uniquely identifies this multicast session from other multicast sessions that might be in progress on the network.
-p path
(Required) The path to the image to be multicast, which is located on the imaging server. This must be the full path.
-i IP_address
(Optional) The IP address of the imaging server.
-f file_set_number
(Optional) File sets are assigned to the current ZENworks Image bundle using this information. File sets are defined on the imaging server from the base image using the Image Explorer utility, which can be run on a Windows device from a Linux server running Samba. The Image Explorer utility is located at /opt/novel/zenworks/zdm/winutils/ImgExp.exe on the Linux server.
When you define a file set using Image Explorer, you specify files and directories to be excluded from the image. Thus, a file set is a subset of the original image that excludes the files you select in Image Explorer. A separate image file is not created for the file set; instead, a file set contains internal attributes representing the excluded information. Therefore, even though a file set does not exist as a separate, physical image file, it is accessed as though it is, placing the image on the receiving device, minus the excluded files.
For example, device1image.zmg is the image file on your imaging server. You use Image Explorer to determine which data to exclude and assign this to a file set number, such as 2. When a device assigned to this ZENworks Image bundle boots, it is imaged with the smaller version (file set 2) of device1image.zmg.
File sets provide an advantage because you can create a base image and modify it slightly for various devices, instead of creating separate, somewhat different base images for each device. However, because file sets only concern excluded files, if you add files to the base image using Image Explorer, all file sets include those additional files. If you don’t want them included in a file set, you must use Image Explorer to exclude these new files from that file set.
There are a maximum of 10 file sets. Each of the ten file set numbers represents the original base image, until you use Image Explorer and assign the results to a file set number.
IMPORTANT:If you create 10 different file sets, then the original image can be lost. If you want to maintain the original image’s information, do not use Image Explorer to assign exclusions to file set 1, which is the default file set if you don’t select a file set when using this wizard.
-t time_wait
(Optional) If not enough devices have booted to fulfill the Client Count requirement, the multicast session begins if a participating device boots and a certain amount of time passes without another participating device booting. Specify this amount of time. The default is 5 minutes.
-c client_count
(Optional) The number of participating devices you want to have booted before the multicast session begins. If you do not specify a number, the default is 1.
IMPORTANT:The image is sent to and put down on each participating device only after you initiate the multicast session from each participating client.
-
To view the status of the multicast session, enter:
/opt/novell/zenworks/preboot/bin/novell-zmgmcast -status -i proxy_IP_addressThe -i argument is optional.
-
To view the list of multicast sessions, enter:
/opt/novell/zenworks/preboot/bin/novell-zmgmcast -list -i proxy_IP_addressThe -i argument is optional.
-
To stop a multicast session, enter:
/opt/novell/zenworks/preboot/bin/novell-zmgmcast -stop session_name -i proxy_IP_address
The session_name is required and the -i argument is optional.
-
Continue with Initiating a Multicast Session from Each Client.
Initiating a Multicast Session from Each Client
You can use the bash prompt or the ZENworks Imaging Engine menu to perform the multicast session as you physically visit each device.
The following sections contain additional information:
Using the Bash Prompt to Perform the Multicast Session
-
(Optional) Install the Novell ZENworks Linux Management Imaging Agent (novell-zislnx) on each of the participating devices.
If you do not install the Imaging Agent on each participating device, the devices have duplicate network identities. For more information, see Limitations of Multicasting Images.
-
Create an imaging boot CD or DVD for each person who will assist with the multicast session, or enable PXE on the participating devices.
If you don’t know how to do this, see Section 29.2, Setting Up the Preboot Services Methods.
-
At each device, including the master device (unless you are starting the multicast session from the imaging server), access a Linux prompt by using the imaging boot CD or DVD, or if it is PXE-enabled, boot it.
-
Enter manual at the bash prompt.
-
To identify each participating device in the multicast session, enter the following command at the bash prompt of every device:
img session session_namewhere session_name is any string that uniquely identifies this multicast session from other multicast sessions that might be in progress on the network. Use the same session name on each of the participating devices in this multicast session. You can specify any multicast session, including one that originates from the imaging server (as long as you specify the session name used by the imaging server).
Example: img session mcast01
The img session command can take other parameters that allow you to designate the master device and the imaging start time beforehand. See ZENworks Imaging Engine Commands for details.
-
(Conditional) If you have not already done so, start the multicast session from the master device or from the imaging server.
Master device: To start the multicast session from the master device, after all of the other devices have registered as participants, click .
If you start the session from the master device, the session master must be a device. If you start the session from the imaging server, the session master must be an imaging server using a previously saved image file.
The ZENworks Imaging Engine begins creating the image of the master device and the image is sent to and put down on each participating device. Any problems are reported and displayed on the master device.
Imaging server: To start the multicast session from the imaging server, follow the steps under Initiating a Multicast Session from the ZENworks Imaging Server.
-
At each participating device, when the imaging is done, do the following to boot the device with the new operating system:
-
At the Linux prompt, type lilo.s, then press Enter.
-
Press Ctrl+Alt+Delete.
If the device doesn’t boot to the new operating system (that is, if the Linux prompt is displayed), enter lilo.s again and reboot the device a second time.
-
Using the ZENworks Imaging Engine Menu to Perform the Multicast Session
-
(Optional) Install the Novell ZENworks Linux Management Imaging Agent (novell-zislnx) on each of the participating devices.
If you do not install the Imaging Agent on each participating device, the devices have duplicate network identities. For more information, see Limitations of Multicasting Images.
-
Create an imaging boot CD or DVD for each person who will assist with the multicast session, or enable PXE on the participating devices.
If you don’t know how to do this, see Section 29.2, Setting Up the Preboot Services Methods.
-
At each device, including the master device (unless you are starting the multicast session from the imaging server), access a Linux prompt by using the imaging boot CD or DVD, or if it is PXE-enabled, boot it.
-
Enter manual at the bash prompt.
or
Select from the Preboot Services Menu.
-
To identify each participating device in the multicast session, type img at the bash prompt to display the ZENworks Imaging Engine screen.
-
Click , then click (or on the task bar, click ) to start the Multicast Wizard.
-
Enter a session name.
The session name is any string that uniquely identifies this multicast session from other multicast sessions that might be in progress on the network. Use the same session name on each of the participating devices in this multicast session. You can specify any multicast session, including one that originates from the imaging server (as long as you specify the session name used by the imaging server).
-
Select a option:
Master: Select this option if this is the session master.
Client: Select this option if this is a participating device.
-
(Optional) If you chose Master in Step 8, click , click , then fill in the fields:
Compression level: Specify the compression level you want to use for this multicast session:
-
None: No data compression is used. Data is sent immediately across the network to participating devices. You might use this option if the master device has a slow CPU; the amount of time to compress the data is eliminated and the data is immediately sent across the network. However, this option creates more network traffic than if you selected one of the other compression levels (, , or ).
-
Speed: Takes the least amount of time to compress the data before the data is sent across the network to participating devices. You might use this option if the master device has a slow CPU; the amount of time to compress the data is reduced before the data is sent across the network. With this option, however, the multicast session creates more network traffic than if you selected either the or compression level.
-
Balanced: Represents a compromise between data compression and the amount of network traffic that the multicast session creates.
-
Size: Takes the most amount of time to compress the data before sending it across the network to participating devices. You might use this option if the master device has a fast CPU. Using this option requires the most CPU resources to compress the data but creates less network traffic to transfer the data to the participating devices.
Automated session: Click to specify the number of participating devices (clients) that must register before starting the automated multicast session and to specify the amount of time, in minutes, that can expire without the number of participating devices to register before starting the automated multicast session. If you do not click the check box, you must manually start the multicast session.
-
-
Click , then click .
You can cancel the session by clicking > > > .
-
At each participating device, when the imaging is done, do the following to boot the device with the new operating system:
-
At the Linux prompt, type lilo.s, then press Enter.
-
Press Ctrl+Alt+Delete.
If the device doesn’t boot to the new operating system (that is, if the Linux prompt is displayed), enter lilo.s again and reboot the device a second time.
-