Solution Development Guide
GETTING STARTED
This section (and all following ones) assumes that you have already completed the setup steps detailed in SDK Installation and Configuration.
Creating a New Solution Pack
Naturally the first step in developing a Solution Pack is to create a new Solution Pack, based on the template, that you can start editing.
Here's the procedure to do so: 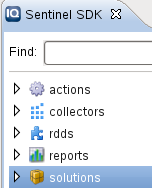
- Start Eclipse and make sure the Sentinel perspective is selected (Window > Open Perspective > Sentinel).
- In the Sentinel SDK pane at left, right click on the solutions entry and select New Solution Pack Plug-in.
- Fill in a name for your new Solution Pack (avoid '-' and '_') then select Finish. The SDK will create a new development area for your Solution Pack and populate it with the relevant files.
- After the process completes, if you expand the solutions section in the Sentinel SDK pane you should see your new Solution Pack. If you expand the name you specified, you will see a numbered directory (e.g. 2011.1) that holds the actual source for the Solution.
This procedure will clone the Solution Pack template to create a new Solution Pack in a development directory. You will edit this new Solution Pack plug-in to add code, meta-information, documentation, and other key features.
Building Your New Solution
One of the nice things about the default Solution Pack template, the one that was cloned to create your new Solution Pack plug-in, is that it is already a fully-functioning plug-in that you can build and deploy into Sentinel. This new Solution won't include any custom content, of course, but it does include some handy reports that show the deployment status of the Solution Pack itself. You might find it convenient to create a build now, before you start adding content, to familiarize yourself with the deployment process.
Before running a build, however, note that there are two types of builds:
- Development build
- This assembles the Solution Pack into a running state, but does not do things like build the documentation. It is intended to produce something you can quickly use for debugging and functional testing.
- Production build
- This does a complete build including documentation and so forth.
Obviously you should choose the build best suited for your current purpose, which at this stage is likely the development build.
Running either type of build is really easy:
- Start Eclipse and make sure you are in the Sentinel perspective.
- Expand the solutions section in the Sentinel SDK pane at left, then expand the directory for your Solution Pack.
- Right-click on the 2011.1 node for your Solution and select Create Development Build.
The above process will run a build on the current files that make up your new Solution Pack, which are stored under that 2011.1 node in the tree.
The resulting build output will be stored, by default, in the same tree under which you unpacked the SDK, e.g. /plugin-sdk/content/build/Solution Pack/<your name>.
Deploy the Solution
Once you've created a build of your Solution Pack, go ahead and deploy it into Sentinel to look at its contents:
- Log in to Sentinel's Web UI as a user with rights to manage Solution Packs.
- Select the Applications link in the upper-right header area.
- Launch the Control Center application and, when prompted, log in as the same user as before.
- Select the Configuration > Solution Packs menu item. Solution Pack Manager will start
- Select the green "plus" button then Next.
- Browse to and select your new Solution Pack plug-in, then select Next then Finish.
- After the Pack is imported, select your new Solution Pack in the list and then select the Open with Solution Manager "folder" icon in the menu area. Solution Manager will download the Pack from the Sentinel server to the local client application.
- Expand the categories and controls, examine the content, try installing, create the PDF, etc.
Add Content
At this point you should have a new Solution Pack and be ready to begin adding your own content. As you probably noticed, you can start the Solution Designer directly from Sentinel's Web UI — but this isn't the recommended way to work with Solution Packs when using the SDK. The preferred method is;
- Expand your Solution Pack directory.
- Right-click on the
2011.1directory and select Edit Solution Pack. - If desired, select an appropriate connection to a Sentinel server.
- Solution Designer will start and prompt you to log in. You can either do so or check the Work Offline checkbox.
- Add content to the Pack, write documentation, etc.
What's happening here behind the scenes is pretty important: when you trigger an edit through the SDK, the SDK will actually copy the Solution Pack sources and create a temporary Solution Pack for you. Then it invokes Solution Designer and tells it to automatically open that temporary Pack. Once your edits are complete, you must close Solution Designer; this will trigger the SDK to unpack your temporary Solution Pack and copy the modified content back into the source repository.
- Forward to Soution Packs and Reports
- Back up to Develop to Sentinel