2.10 Archiving GroupWise
2.10.1 Creating a GroupWise Module
The GroupWise module enables Retain to archive messages from GroupWise. The GroupWise module must be fully configured before Retain can archive or communicate with the GroupWise mail system.
Other tools that work with the GroupWise Module:
-
A Stubbing Server can be installed which allows users to search the Retain archive from their GroupWise client. (See
Performing Retain Searches Within The GroupWise Client
in Retain 4.9.2: Configuration and Administration.)
Prerequisites of the GroupWise Module
Before beginning you should gather the following information:
-
IP Address and SOAP port of a Post Office Agent (POA)
-
A Trusted Key Name and Trusted Application Key
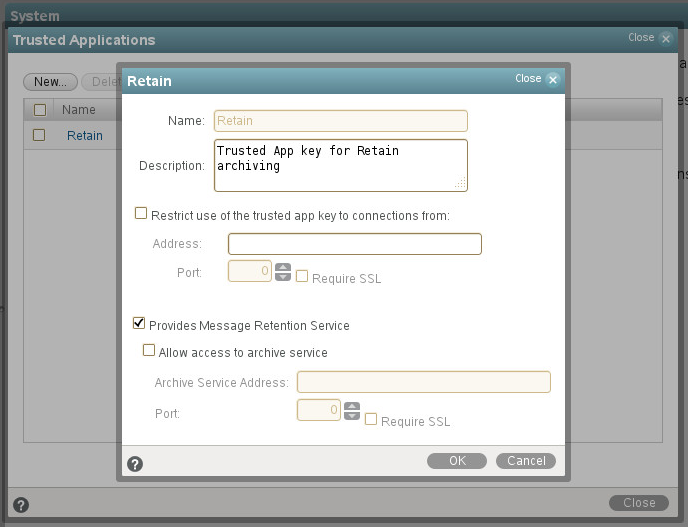
Browse to the GroupWise Administration page. Under System | Trusted Applications, create a key called Retain and export the key. You need this for the SOAP section below.
-
Enable Message Retention Services in GroupWise, so that users cannot delete messages before they are stored by Retain.
Setting up the GroupWise Module
The GroupWise module page opens first with the Core Settings.
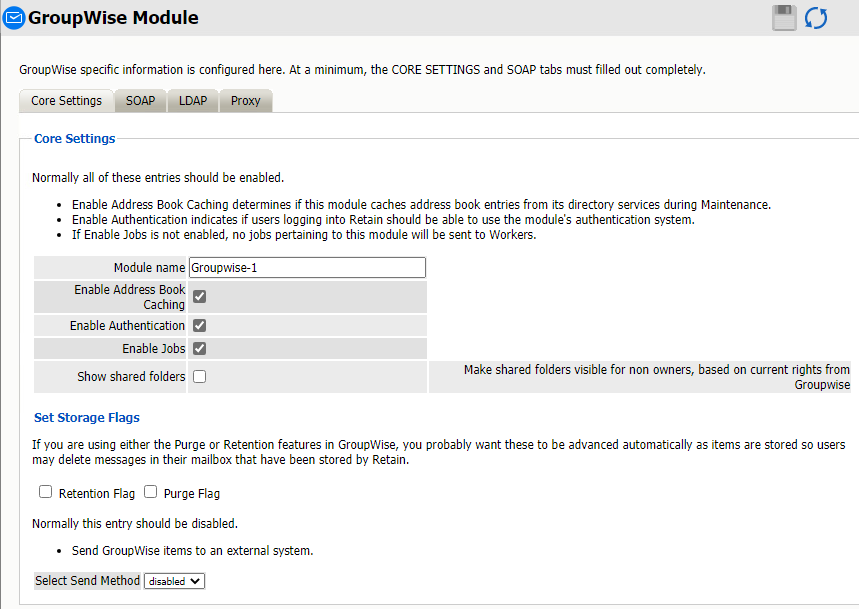
Core Settings Tab
Path: Retain Server Manager > > >
Normally all the checkbox options on this tab are enabled. It is rare that you would ever deselect any of them. Two cases where you might, would be: troubleshooting (as instructed by Technical Support), and retiring an old email system.
The module needs to be enabled on this page to make it active in the Retain system.
The module can be given a name.
The Send Method lets you send GroupWise items to an external system using FTP or SMTP. In most cases this should be disabled so that items are archived in Retain. To select the SMTP Forwarding or FTP features, you must first add and configure them in the Module Forwarding Tab on the Server Configuration page, otherwise the drop-down list is empty.
The Enable Address Book Caching function allows Retain to regularly cache the online email system’s address book and synchronize it with Retain. This is critical for administration, authentication, and archiving purposes. It is recommended to cache the Address Book once every 24 hours to keep the Retain storage system up to date. By default, maintenance is set to cache the Address Book once every 24 hours.
The Enable Authentication checkbox determines if end-user authentication is performed when the user logs into Retain. If it is deselected, the Retain system cannot authenticate the user against the email system and the user cannot log in unless another authentication method is enabled.
The Enable Jobs checkbox determines whether data can be retrieved and passed to the Worker. Even if the individual job is fully configured and enabled, if this option is disabled, no jobs configured for this module are run.
Set Storage Flags Section
If you have Retention Services enabled, which we highly recommend, you should keep the Retention and/or Purge flags updated, depending on what you are using. Generally, you would use the Retention flag for Retain and the Purge flag for your backup software, such as GroupWise Disaster Recovery.
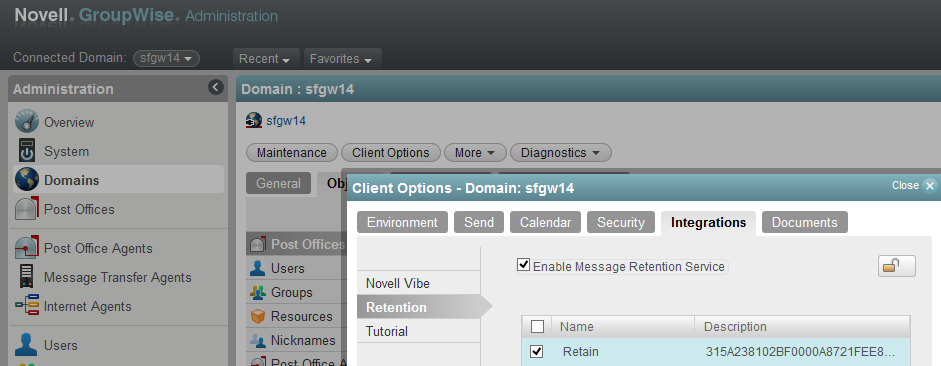
You would enable Retention Services in GroupWise Administration under Domain or Post Office. Then in Client Options, Integrations, Retention, and Enable Message Retention Service.
This would be used in conjunction with a Trusted App Key which the GroupWise module needs for the SOAP tab.
The Send Method lets you send GroupWise items to an external system using FTP or SMTP. In most cases this should be disabled so that items are archived in Retain. To select the SMTP Forwarding or FTP features, you must first add and configure them in the Module Forwarding Tab on the Server Configuration page, otherwise the drop-down list is empty.
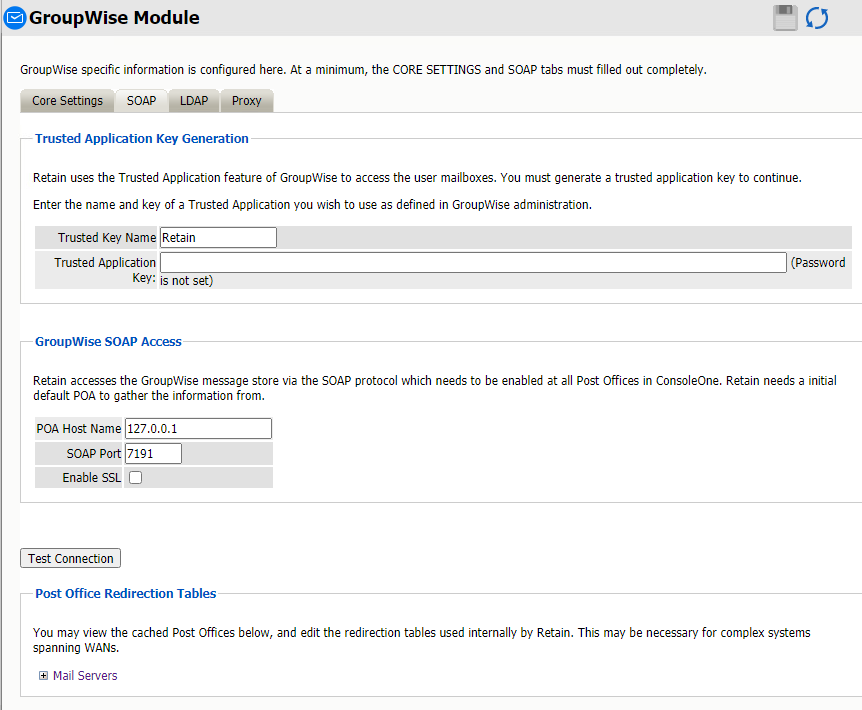
SOAP Tab
Path: Retain Server Manager > > >
Provide the POA Host Name and SOAP port. IP addresses are acceptable, but host names are preferred as IP addresses can change. SSL is supported, but it slows down the archiving process. Create a Trusted Application key for Retain, either manually from GroupWise Administration, System, Trusted Applications in GroupWise 2014 or above or Console One for GroupWise 2012 or earlier.
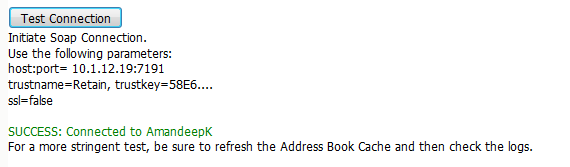
The SOAP access information must be provided, and the connection tested and verified before the system can connect. After providing the required information, click the 'Test Connection' button. The results are displayed. A connection is required for Retain to archive messages from GroupWise.
If mail server Redirection is required for mail servers which are not contained on the local WAN and must have the connection addresses manually specified, the appropriate information can be modified in the redirection table. Most installations do not require any modifications.
LDAP Tab
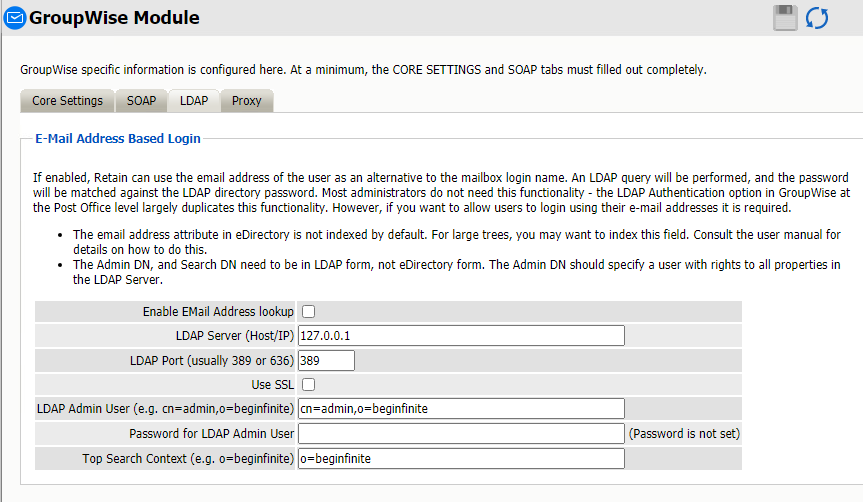
Path: Retain Server Manager > > >
LDAP can be used to authenticate users against other directory services such as eDirectory or Active Directory.
LDAP can be used for individual users wishing to access their respective archives. If LDAP is set up and desired to be used for Retain user authentication, it must be fully configured in the GroupWise module.
Utilizing LDAP allows users to log in to their respective archives using the user’s full email address. This authentication requires that the email attribute be marked indexed in GroupWise.
Using Active Directory Authentication
Before you use Active Directory Authentication, you must have LDAP Authentication configured in GroupWise and configure Retain to use Active Directory Authentication:
GroupWise Configuration for AD LDAP Authentication
-
Make sure you have Active Directory configured as an LDAP directory and an LDAP server in the GroupWise Admin Console. Also, make sure the following are set in the GroupWise Admin Console:
-
On the LDAP Directory, must be selected.
-
On the LDAP server > tab, select the Post Office that you are using for LDAP.
-
Go to > Select the Post Office that you are using for LDAP > . Select and make sure the LDAP server is listed in the column in the .
Follow the steps in LDAP Directories and Servers in Your GroupWise System in the GroupWise 18 Administration Guide if you need help setting up the LDAP directory or LDAP server.
-
-
Make sure that your GroupWise mailboxes are associated with their LDAP users by following the steps in Associating GroupWise Users with an LDAP Directory in the GroupWise 18 Administration Guide.
Retain Configuration for AD LDAP Authentication
-
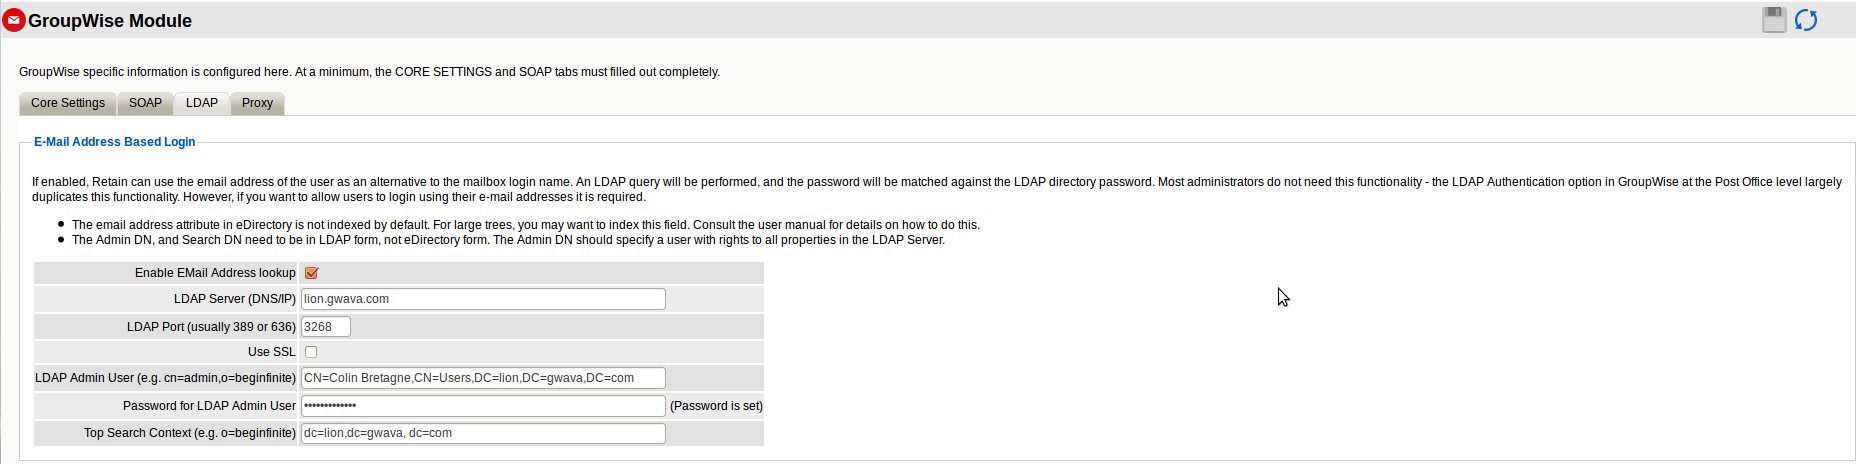
In the GroupWise Module > LDAP tab, enter in the information for your LDAP server. Make sure Enable EMail Address Lookup is selected.
NOTE:The LDAP Admin User must be entered using the following form:
CN=Administrator,CN=Users,DC=company,DC=com
The Top Search Context is usually the distinguished name of the domain and must be entered using the following form:
DC=company,DC=com
-
Edit the ~Beginfinite\Retain\RetainServer\WEB-INF\classes\config\misc.properties file on the server changing the following lines:
custom.ldap.enabled=1
custom.ldap.class=com.gwava.authenticate.gw.AlternativeGWLDAPAuthentication
-
Restart tomcat on the Retain server.
GroupWise Proxy Accounts
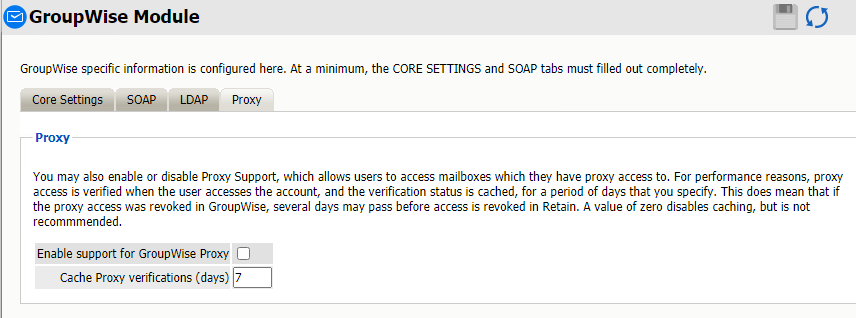
Path: Retain Server Manager > > >
Users who have been given proxy to another account in GroupWise may be granted access to proxy accounts in the Retain archive as well.
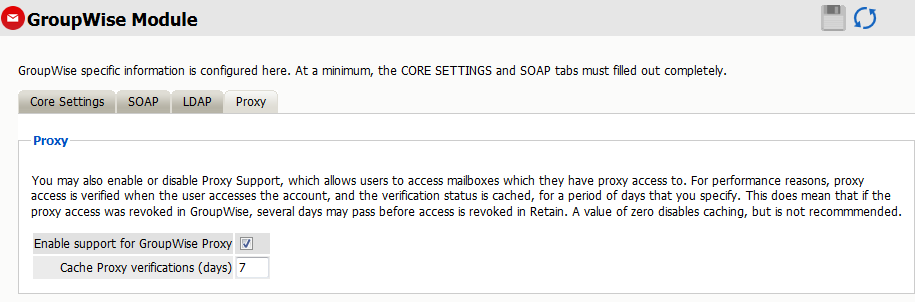
For performance reasons, Retain caches proxy verifications for a period of days (default is 7 days). Revocation of proxy access might not be reflected immediately in Retain. The caching period may be reduced or even disabled, (a value of ‘0’ disables caching), but this is not recommended.
Next Step
Configure a Setting a GroupWise Schedule.
2.10.3 Specifying a GroupWise Profile
The Profile lets you set what is to be dredged from your GroupWise system.
This requires that the module be configured Creating a GroupWise Module.
Click on “Add Profile” and provide a profile name, or select an already existing profile to access the configuration tabs. All changes made on this page must be saved by selecting the “save changes”, disk icon, at the top right of the page. Tabs may be changed and navigated through without affecting new settings, but any move to another page will require saving, or abandoning the changes made.
Core Settings Tab
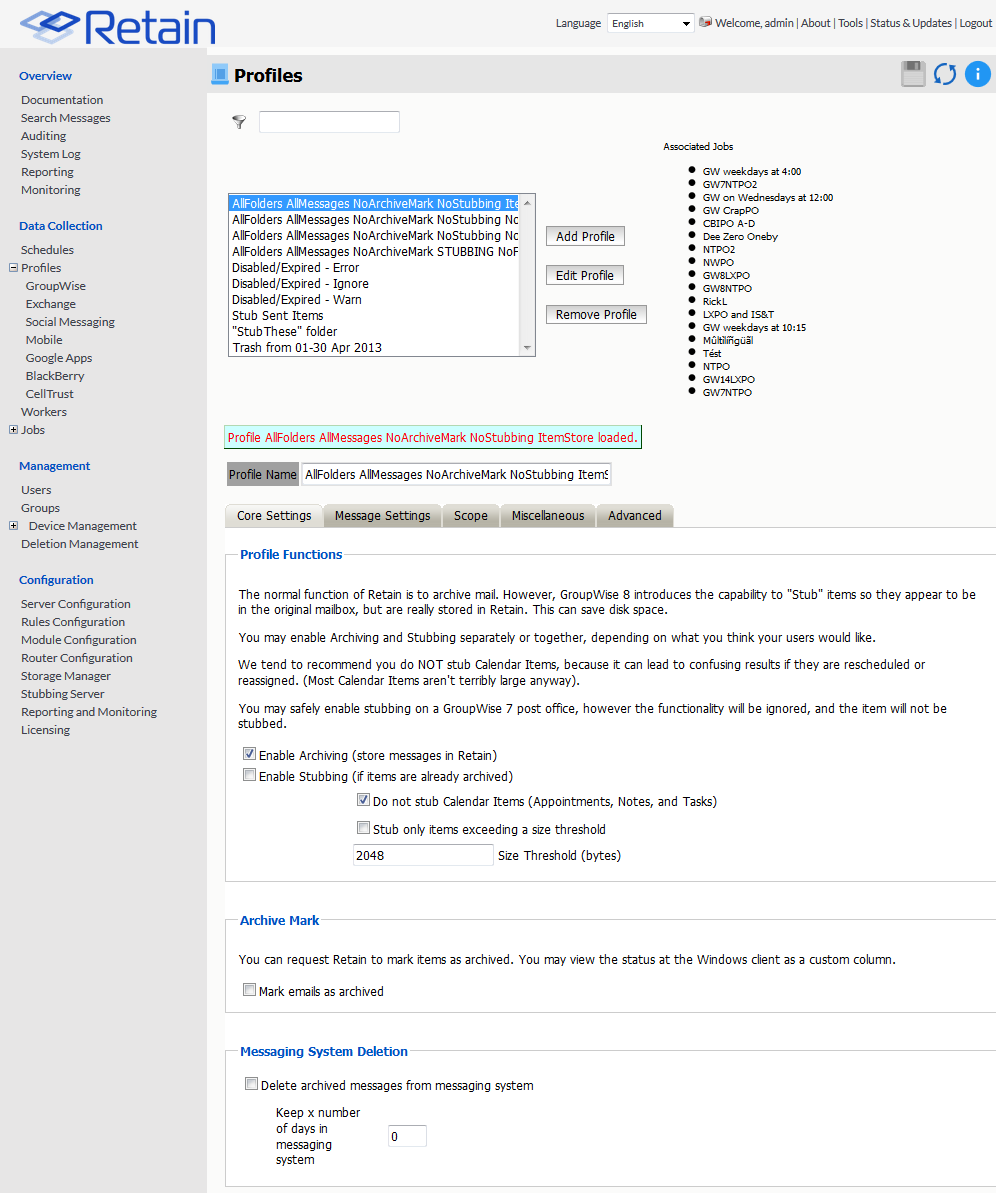
Profile Functions
The Profile Functions tell the Retain Server what to do with the mail it archives from the GroupWise system. If Archiving is not enabled, mail will not be archived by any Retain jobs using this profile.
Stubbing
Before enabling stubbing, make sure you understand the way stubbing works and how that will work in your system, because, once enabled, the stubbing process cannot be reversed. Stubbing, which requires GroupWise 8.02HP1 or above, allows Retain to replace archived messages and items in the GroupWise Post office with ‘stubs’ that link back to the full message or item in the Retain Archive. End users should not notice a difference as they have transparent access to the stubbed item through the GroupWise Post office, if they only use the client. The stub behaves much like the native item is still in the GroupWise system.
Stubbing cannot be reversed.
Plan your system and understand the positive and negative sides to Stubbing before you continue. To use stubbing, it is strongly recommended that the GroupWise system be at least 8.02HP1. Previous versions of GroupWise do not contain critical stability fixes.
Why you might want to implement stubbing (Pros):
-
Save Disk space. Mail can be removed from the system without being ‘deleted’.
-
Users have easy access to items stored in Retain
-
Transparent access, no need to log in to Retain for common tasks.
Why stubbing may not work for your system (Cons):
-
Mobile, Web, IMAP, and POP3 clients will only see posted empty items, not actual contents.
-
Stubbing cannot be reversed. (Once a message is stubbed, it cannot be returned to the same position in the system)
-
User training for stubbed items may be necessary due to decreased access speed
-
No method for protecting stubs from deletion in the GroupWise client. (Recreation is difficult and complicated.)
-
Non-mail items should not be stubbed. (Calendar and appointment items behave erratically when rescheduled).
-
Stub items are not compatible with third party API’s. These applications view the stubs as posted items only, with no text or attachments.
Determine the correct option for your system. If you wish to enable Stubbing, you need to install and configure the Stubbing Server as well. Refer to the install guide for your specific OS and the Stubbing Server sections. Stubbing can only be active for items which have been archived by Retain.
Calendar Items should not be stubbed unless necessary, as this can cause erratic behavior if archived items are rescheduled. If you wish to only stub large items in your Post Office, you may set a size threshold. Any item larger than the specified size will be stubbed. If this option is not set, all messages will be stubbed, regardless of size.
Archive Mark
Some users may opt to use the Archive Mark in GroupWise for messages that have been archived by Retain. The archive mark is a custom flag and may be modified, therefore is not secure and should not be used for compliance. Archive Mark slightly degrades job performance. Check the check box to enable Archive Mark for the selected profile.
When the Archive Mark is active, Retain creates a custom column for mail, called “RetainArchived” which users and administrators may add to their GroupWise clients to view mail which has been archived. The “RetainArchived” column indicates an archived mail item by displaying a ‘1’ in the message row, while remaining blank when the message is not archived.

To add the column, in the client: highlight desired mailbox or folder, right-click on columns header, select More Columns, select RetainArchived, and select Add.
Messaging System Deletion
Retain can delete items from GroupWise after they have been archived by enabling "Delete archived messages from messaging system".
However, it is recommended that the messaging system do the deletion rather than Retain.
Set how far back the messages will be kept by entering a reasonable number. like 90, of "Keep x number of days in messaging system". The amount of time to keep messages is specified in days. The recommended setting depends on the archiving scheme in the system.
For example, if messages are to persist in the system for 30 days, then the system deletion setting should be set to ‘30’ and enabled.
A setting of ‘0’ will remove messages from the system as soon as they are archived. Be sure to configure the system before enabling the setting in the profile.
Message Settings Tab
The message settings tabs allows you to restrict the types of messages to be archived.
-
Mailbox type: You can restrict the type of mailbox users, resources, or both
-
Message Item: Select what type of items within these mailboxes to dredge
-
Message Source: Select whether incoming, outgoing, draft, or posted items get dredged
-
Message Status: You can decide whether to dredge an item based on its GroupWise flags
The default settings dredge all items, regardless of flag status.
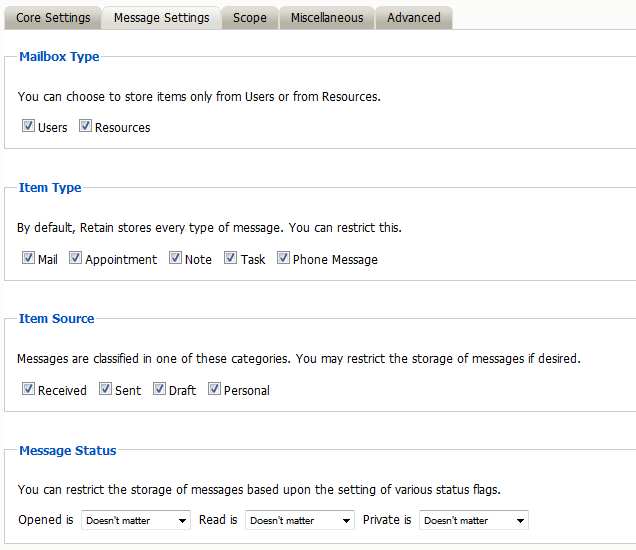
By default, all items are selected for collection.
Scope Tab
This is the most critical tab to fill out as it sets the limits on how much to archive.
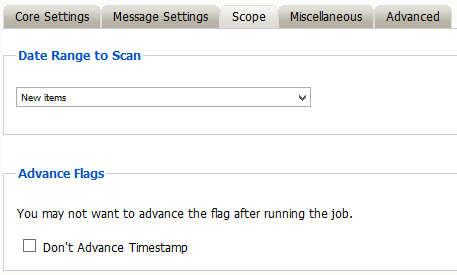
Date Range to Scan
The Date Range determines which message items are collected, depending on the date of the message.
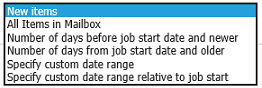
New Items: All items that have not been archived by Retain since the last time the job ran.
All Items in Mailbox: All items in the mailbox starting from 1/1/1970, duplicates will be processed but not stored if they already exist in the Retain archive.
Number of day before job start date and newer: Only items from the relative number of days from the time the job began will be archived. E.g. messages that came into the email system 7 days ago or less.
Number of days from job start date and older: Only items previous to the relative number of days from the time the job began will be archived. E.g. messages that came into the email system 7 days ago or more.
Specify custom date range: Only items between two absolute dates will be dredged.
Specify custom date range relative to job start: Only items between two relative dates will be dredged. E.g. messages that came into the email system between 7 and 5 days ago.
Advance Flags
Enabling "Don't Advance Timestamp" will not update the timestamp flag. Items that are dredged will still be considered new by Retain the next time the job runs.
This is useful when troubleshooting, but is generally not used for normal jobs.
About GroupWise’s Purge and Retention Flags
The Purge, and Retention flags perform similar functions. The Purge and Retention flags are stored internally in the GroupWise post office on a per-mailbox basis. The Retain Server also keeps its own timestamp flag internally in the Retain configuration database.
Each can be thought of as simply a “time stamp” indicating the last time data was retrieved by a third-party application. There are a few subtle differences between the three flags, which are discussed below.
The Purge flag was introduced by Novell in GroupWise version 6.0.
With Purge enabled in GroupWise:
-
The flag is a time stamp, stored in the user's mailbox.
-
Items older than the time stamp can be deleted freely.
-
Items newer than the time stamp cannot be deleted.
-
A 3rd party application, such as backup software can retrieve and/or set this time stamp value. GroupWise never changes the time stamp value.
-
The initial purpose of this was for backup software. Backup software can either manually or automatically, (via the SMS TSAGW component of GroupWise), advance this time stamp once all items are backed up. The backup software can also use this time stamp to “know” that all items older than this time stamp have already been backed up, and can be skipped.
-
Retain can use this flag to skip archived items, and automatically advance it as well. However, in practice, you'll rarely want to do this, because backup software, including Micro Focus GroupWise Disaster Recovery, already uses this flag. There's no way to “share” the flag.
Because makers of retention and compliance software wanted a flag of their own, one that wasn't shared with the backup software Purge flag, the Retention flag was introduced by Novell in GroupWise 6.5.1.
In almost all respects, the Retention flag is identical in purpose and function to the Purge flag. Like the Purge flag, it is stored internally, and is primarily used to prevent premature deletion, and to skip previously stored messages. In fact, these are so identical in purpose, in theory virtually all backup software could switch to using the Retention flag, and all Retention software to the Purge flag, and you'd notice almost no difference. The primary difference is simply it's a different value, used by different vendors.
There are some small distinctions:
-
It's enabled and configured in a different location in ConsoleOne.
-
It cannot be enabled or configured until a Trusted Application (like Retain) is installed and specifically requests it be made available.
-
The Purge flag is turned on/off globally. The Retention flag can be configured at the Domain, PO, or user level.
Most customers using Retain will want to use the Retention flag. It's logical and consistent to do so, and avoids conflict with backup software. It is recommended that you use this flag unless there is a compelling reason not to. A few possibilities are discussed below.
Retain can use the Purge and Retention flags.
Setting up Purge and Retention flags in GroupWise
It is highly recommended that Message Retention Service is enabled, so users cannot delete items before the item is archived.
In GroupWise Administration, go to the Domain or Post Office you wish to enable Retention on.
-
Open Client Options. Select Integrations and then Retention.
-
Check the box to enable the Retention Flag service.
-
Select the Trusted Application that uses the Retention Service.
-
Finally, Lock it on and Ok to exit.
In GroupWise 8 through 2012 enable by highlighting the GroupWise system, domain, post office, or user object and selecting Tools | GroupWise System Operations | Retention Services.
Miscellaneous Tab
Miscellaneous: What to do with attachments? Most of the time, you will want to store all attachments. That is the default setting.
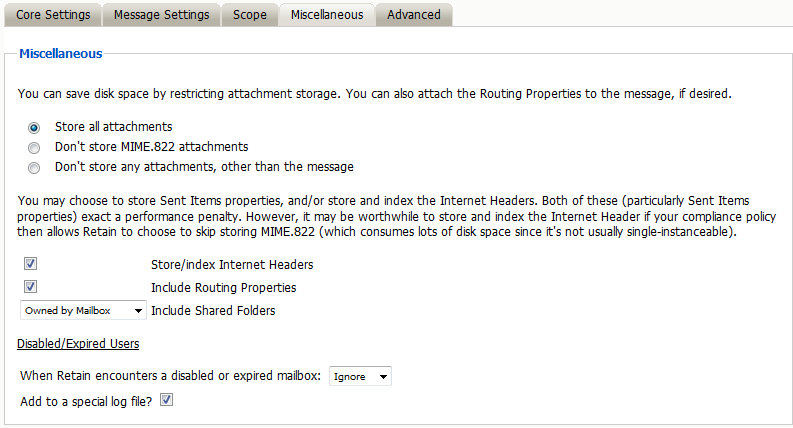
But if you don’t want to store attachments, you can control this here. Note that the attachment names and sizes will still be listed when viewing the message, but the attachments will be clearly marked as unavailable.
Retain can store the Index or Internet Headers and the Routing properties of messages. This information is stored in a XML attached to the message document and is searchable.
Store/index Internet Headers
This option tells Retain to store the headers in the SQL database. In order to use the header search option in the search interface you must have this option selected. To save disk space and still satisfy storage compliance, select this option and select “Don’t store the mime.822 attachments”. All other parts of the MIME file are already being archived, so if you store and index the Internet Header, you will already be archiving all information required.
Include Routing Properties
Routing Properties are kept in the MIME.822 file, if you are not storing that file, and are required to store the routing properties of the message then enable this option.
Disabled/Expired Users
This option tells Retain how to react to a disabled or expired user in GroupWise. Be default, Retain will Ignore a disabled mailbox and continue to the next mailbox. The Warn option will show a warning in the logs and the Reporting and Monitoring Server reports. The Error option will show an error in the log, will send an error email, if the job is configured to send error messages, and be shown in the Reporting and Monitoring Server reports.
A special log file can be created in the logs location.
Advanced Tab
Generally, since storage space is inexpensive, Micro Focus recommends that you archive all message content.
However, if you need to limit what is archived, you can use the Advanced tab to do it.
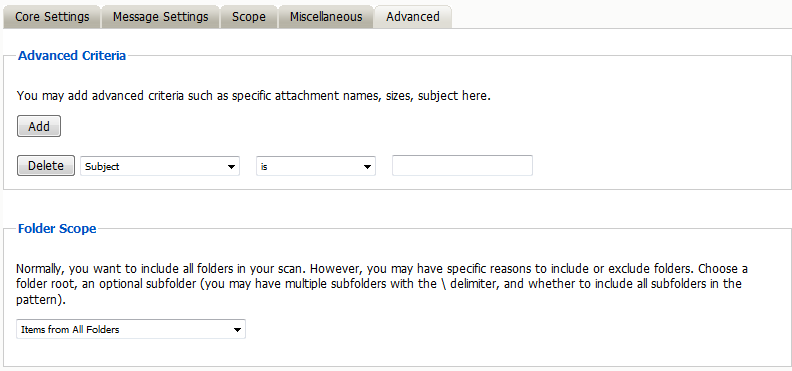
Table 2-33 Configuring GroupWise Profile Advanced Settings
|
Option, Field, or Sub-panel |
Information and/or Action |
|
|---|---|---|
|
Use this dialog to define the conditions Retain uses to determine what to archive. |
||
|
|
Each line sets a specific parameter and the lines are all added together (AND-ed). To check how Retain will interpret your settings, read through the lines in turn, inserting AND between each one.
|
|
|
|
By default, Retain archives the items from all folders. Using this panel, you can restrict which folders are archived, by either:
To specify the folders to include or exclude, do the following:
|
|
2.10.5 Creating a GroupWise Job
After completing the instructions in the preceding sections, you can create a GroupWise Job.
-
To begin creating a GroupWise Job, open Retain Server Manager > .
-
Click > .
-
Use the information in the sections that follow to configure each tab.
-
Make sure that you save your changes before leaving the dialogs.
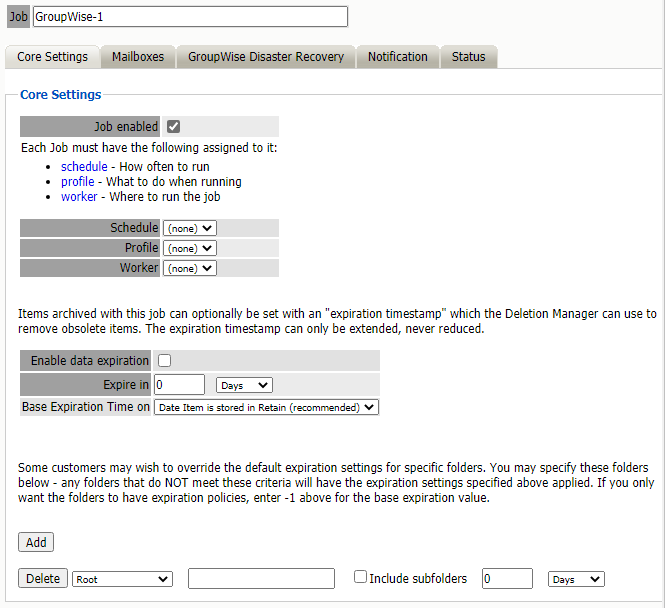
Core Settings Tab (GroupWise Job)
The Core Settings of a job contains configuration which must be set for the job to be saved and become active. A job must be enabled before it will run. Jobs must also have a specified schedule, profile, and worker. These are all selected from drop-down menus, and will not be populated unless those items are already configured in the system.
Path: Retain Server Manager > > > >
The Data Expiration setting is an option to place a time stamp on data in the Retain database, which allows for ease of automation for the deletion manager. In addition, devices such as NetApp, Centera, and Hitachi HCAP may use this number to enforce hardware level protection of the stored item so that no one (including Retain) may delete the item before its expiration date. Job Expiration is not retroactive for mail in the database, and only applies to mail archived by the job that it is active for. In order to have messages with custom job or folder expiration dates properly expire, the deletion management date scope must be set to delete messages with an Expiration Date older than 1 day.
Mailboxes Tab (GroupWise Job)
The mailboxes tab is where the administrator specifies which entities (mail servers and/or Distribution Lists) are to be scanned. This tab is not displayed for the mobile module.
Expand the Post Office and/or Distribution List trees, and check off the items you want to be dredged.
NOTE:If you desire to have a job backup a single user, or selected group of users, select the Users menu and assign the users desired
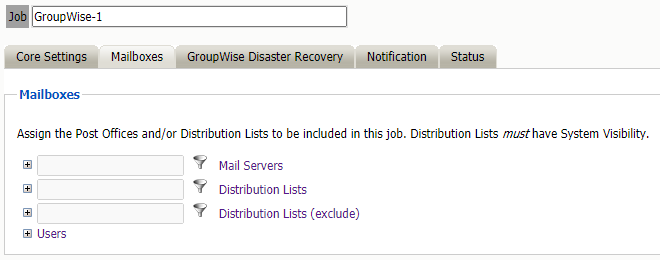
Path: Retain Server Manager > > > >
The Distribution List selection allows you to include or exclude a group of users from an archive job. If you want to use GroupWise Distribution Lists, the visibility needs to be set to “system wide”.
The users section allows you to select individual users to include, or exclude them from an archive job. For example: you can select an entire Mail Server to be archived, and then expand the users section to include or exclude users to the job.
This can also be used to select only certain users in the system for an archive job.
To add a user to the Include or Exclude list, select the respective ‘Add user’ button and search for the user. It can be helpful to unselect the ‘only show recently cached items’ option. Add the selected users to the list in the search window, then select ‘Ok’ to add them to the include or exclude list.
GroupWise Disaster Recovery Tab (GroupWise Job)
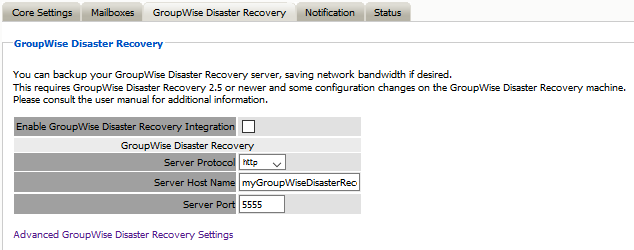
Path: Retain Server Manager > > > >
Selecting this option tells the job to use the GroupWise Disaster Recovery Integration for systems utilizing GroupWise Disaster Recovery. See the GroupWise Disaster Recovery Integration section for instructions on configuration. The Server URL must be edited with the correct contact info for the GroupWise Disaster Recovery server. The default GroupWise Disaster Recovery port is 5555.
Retain instructs GroupWise Disaster Recovery to load the corresponding backup set for each date range in the profile. If a different set needs to be specified, the override setting specifies a date range specifically for GroupWise Disaster Recovery, which then will ignore the date range in the profile. Retain will still archive according to the profile date range or settings.
Advanced GroupWise Disaster Recovery Settings

Notification Tab (GroupWise Job)
When a job is run, the Notification option allows the administrator to be emailed a summary and report of any errors, for each running job.
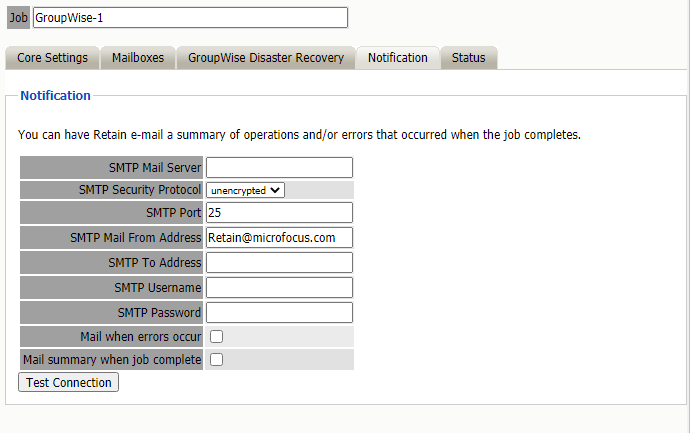
Path: Retain Server Manager > > > >
For notification to function correctly, the SMTP information for the desired SMTP server must be fully filled-out. How much information is required varies depending on the mail system used.
Status Tab
The Status tab displays the status of any currently running jobs, as well as the stats of the last completed job.
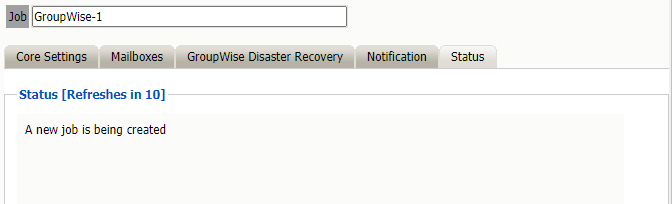
On some modules, currently running jobs may be terminated here. For the rest, this tab is informational only.
Path: Retain Server Manager > > > >
Next Step
Once a job has completed you can confirm the items are in the archive by checking the Search Message interface. See Using Retain’s Archives
in the Retain 4.9.2: User Guide.