2.3 Installing and Setting Up a Data Synchronizer System
You should already have reviewed Section 2.1, Planning a Data Synchronizer System, filled out the Mobility Pack Installation Summary Sheet, and completed the tasks in Section 2.2, Preparing to Install the Mobility Pack Software.
NOTE:If you are setting up a multi-server Synchronizer system, you should have a Summary Sheet for each Synchronizer server. Each Synchronizer server is independent of other Synchronizer servers, so you can set them up in whatever order is convenient given the overall configuration of your Synchronizer system.
The following sections step you through the process of installing the Mobility Pack and configuring a Synchronizer server.
2.3.1 Obtaining the Mobility Pack ISO
-
On Novell Downloads, click to display Novell Patch Finder.
IMPORTANT:The Mobility Pack software is located in the list, not the list.
-
Select , then click .
-
Under the current release of the Mobility Pack, click the current patch.
-
Click , then follow the online instructions to download the Mobility Pack ISO to a convenient temporary directory on the Synchronizer server.
-
Continue with Running the Mobility Pack Installation Program.
2.3.2 Running the Mobility Pack Installation Program
-
Make sure that you know the location where the Mobility Pack ISO was downloaded on the Synchronizer server:
novell-data-synchronizer-mobility-pack-x86_64-build_number.iso -
On your Linux desktop, click > , then enter the root password.
-
Under , click , then click .
-
On the Installed Add-On Products page, click , select , then click .

-
In the field, specify a name for the repository that will hold the Mobility Pack software, such as Mobility Pack.
-
In the field, specify the full path name of the ISO file from Step 1, then click Next.
-
Accept the License Agreement, then click .
-
Under in the list, select .

-
Click to start the installation.
-
Click to acknowledge the automatic changes to other aspects of your system that will be made as the Mobility Pack software is installed.

IMPORTANT:Do not click Next at this point.
-
After the software has been installed, click to configure your Synchronizer system.
-
Use the information that you have gathered on the Mobility Pack Installation Summary Sheet to provide the information that the Mobility Pack Installation program prompts you for, clicking to move from page to page.
LDAP Server Settings:
Data Synchronizer Settings:
- LDAP User Container
- LDAP Group Container
- Data Synchronizer Admin DN
- Data Synchronizer Database Password
GroupWise Connector Settings:
- Trusted Application Name
- Trusted Application Key File
- GroupWise Post Office Agent IP Address or Hostname
- SOAP Port
- Secure
Mobility Connector Settings:
- Device Port
- Secure
- Generate Self-Signed Certificate
- Enter Certificate File
- Block Incoming Devices
- GroupWise Address Book User
Add Users and Groups:
Novell Customer Center Registration
-
On the Mobility Pack Configuration page, click Next to save the configuration settings and set up your Synchronizer system.
You see the Novell Data Synchronizer Mobility Pack listed on the Installed Add-on Products page.
-
Click OK to return to the main YaST page.
If you encounter any problems during the installation, check the Mobility Pack Installation program log file for information about the problem:
/var/log/datasync/install.log
For additional assistance, see Section A.0, Mobility Pack Installation Troubleshooting.
The Mobility Pack Installation program creates the following directories and files:
/opt/novell/datasync
/etc/datasync
/etc/init.d/datasync*
/usr/sbin/rcdatasync*
/var/lib/datasync
/var/log/datasync
/var/run/datasync
IMPORTANT:Although you use the YaST Add-On Products installer to install the Mobility Pack, you must use the uninstall.sh script to uninstall it. For instructions, see Section 2.3.7, Uninstalling the Mobility Pack. If you do not uninstall the Mobility Pack correctly, you cannot install the next version.
2.3.3 Checking the Status of the Data Synchronizer Services
The Mobility Pack Installation program should start the Synchronizer services for you.
-
Open a terminal window, then log in as root.
-
Check the status of the Synchronizer services:
rcdatasync status
If the installation proceeded normally, the four Synchronizer services should be running.
Use the following commands as root to manually start and stop all the Synchronizer services:
rcdatasync start
rcdatasync restart
rcdatasync stop
The Synchronizer services can also be managed independently, as described in Synchronizer Services
in the Novell Data Synchronizer System Administration Guide.
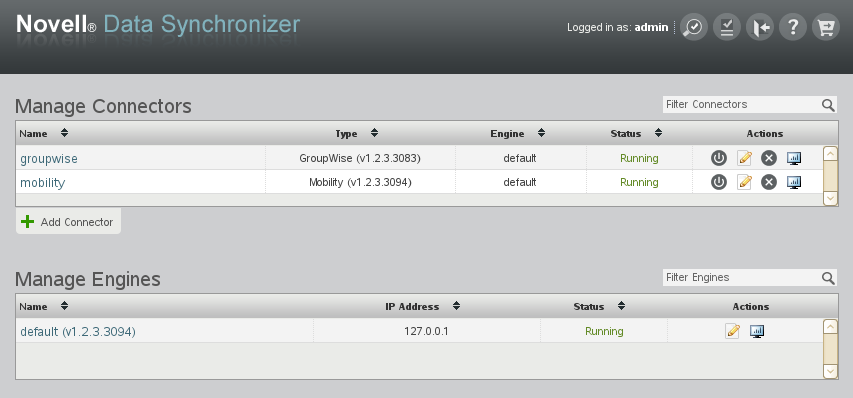
2.3.4 Checking the Status of the Connectors
The Mobility Pack Installation program starts the GroupWise Connector and the Mobility Connector for you. Use Synchronizer Web Admin to check connector status.
-
In a Web browser, display Synchronizer Web Admin:
https://data_synchronizer_server:8120Replace data_synchronizer_server with the IP address or DNS hostname of the server where you installed the Mobility Pack.
-
Log in as the Synchronizer administrator that you set up during installation.
If the installation proceeded normally, the GroupWise Connector and the Mobility Connector should be running.
-
(Conditional) If one or both connectors are not yet running:
-
Start the GroupWise Connector first.
-
Start the Mobility Connector second.
-
(Conditional) If you encounter problems starting the connectors, see Section A.0, Mobility Pack Installation Troubleshooting
See also
Working with Synchronizer Log Files
inSynchronizer System Management
in the Novell Data Synchronizer System Administration Guide.
-
-
Verify that the users and groups that you selected during installation have been added to the GroupWise Connector:
-
Click the GroupWise Connector, then click .

-
Verify that all users have been successfully added.
-
Click to return to the main Synchronizer Web Admin page.
-
-
Verify that the users and groups that you selected during installation have been added to the Mobility Connector:
-
Click the Mobility Connector, then click .

-
Verify that all users have been successfully added.
-
Click to return to the main Synchronizer Web Admin page.
-
-
(Conditional) If any users were not successfully added during installation, you can add them manually afterwards and then verify that they have been added.
See Section A.0, Mobility Pack Installation Troubleshooting for instructions
2.3.5 Managing Initial Device Synchronization
IMPORTANT:If users’ LDAP user names are not the same as their GroupWise user IDs, you must update their application names in Synchronizer Web Admin before initial device synchronization can succeed. For instructions, see Changing a User’s Application Name (Mobility Pack Only)
in Connector and User Management
in the Novell Data Synchronizer System Administration Guide.
Initial device synchronization provides the following synchronization of GroupWise items:
-
Contacts from all personal address books, excluding the Frequent Contacts address book
You can change this personal address book selection setting for users after installation in Synchronizer Web Admin, as described in
Customizing a User’s Synchronization Settings
inConnector and User Management
in the Novell Data Synchronizer System Administration Guide. Users can also change their own synchronization settings on the User Options page in Synchronizer Web Admin.The GroupWise Address Book cannot be synchronized to mobile devices. However, users can still access individual contacts in the GroupWise Address Book, if their mobile devices can do a Global Address List (GAL) lookup. As an alternative, users can create a personal address book that is a subset of the GroupWise Address Book to synchronize to their mobile devices.
-
Calendar items (appointments and reminder notes) from the last two weeks and all future items
If shared calendars are important to users, shared calendar owners can post them to the Internet using the GroupWise Calendar Publishing Host, as described in
Publishing Personal Calendars on the Internet
inCalendar
in the GroupWise 2012 Windows Client User Guide. After the owner publishes the calendar, other users can view the calendar URL in the Web browser on their mobile devices. For Calendar Publishing Host setup instructions, seeInstalling the GroupWise Calendar Publishing Host
in the GroupWise 2012 Installation Guide. -
Email messages in the Mailbox folder for the last three days.
If users want to receive more existing email messages on their devices, they can their mobile devices to request additional existing email messages.
-
Folders in the Cabinet (but not items in folders until users request them by opening folders on their mobile devices).
In Synchronizer Web Admin, you can monitor the progress of data synchronization from GroupWise to the Mobility Connector, as described in Monitoring Mobility Connector Synchronization Status
in Synchronization Monitoring and Management
in the Mobility Connector Installation and Configuration Guide.
IMPORTANT:If you selected during Mobility Pack installation, you must unblock incoming devices in Synchronizer Web Admin after all GroupWise data has synchronized to the Mobility Connector. Follow the instructions in Blocking/Unblocking Incoming Devices before Initial Synchronization
in Mobility Connector Configuration
in the Mobility Connector Installation and Configuration Guide.
To help your mobile device users get started efficiently, notify them of the following information:
-
Users must configure their mobile devices to connect to the Synchronizer system, as described in the Novell Data Synchronizer Connector for Mobility Quick Start.
-
For device-specific information, see the Data Synchronizer Mobility Connector Devices Wiki.
IMPORTANT:These two sources of information can help eliminate the need for mobile device users to contact you with functional and device-specific questions as they start synchronizing GroupWise data to their mobile devices.
2.3.6 Testing Your Data Synchronizer System
-
Test your Synchronizer system by logging into the GroupWise client and sending yourself an email message
-
Reply to the message from your mobile device.
If the message synchronizes to your mobile device and the reply on your mobile device synchronizes back to GroupWise, your basic Synchronizer system is up and running.
-
To customize and expand your Synchronizer system, see Section 2.5, What’s Next.
2.3.7 Uninstalling the Mobility Pack
IMPORTANT:When you uninstall the Mobility Pack software, certificate files are also deleted. If you have obtained commercially signed certificates for use in your Synchronizer system, back them up before uninstall the Mobility Pack software.
-
In a terminal window on the Synchronizer server, become root by entering su - and the root password.
-
Change to the following directory:
/opt/novell/datasync
-
Run the Synchronizer Uninstallation script:
./uninstall.sh
The Uninstallation script stops the Synchronizer services and the PostgreSQL database server, uninstalls all Synchronizer and connector RPMs, drops the Synchronizer and Mobility Connector PostgreSQL databases, and deletes the following directories and files from the Synchronizer server:
/opt/novell/datasync
/etc/datasync
/etc/init.d/datasync*
/var/lib/datasync
/var/log/datasync
/var/run/datasync
/var/lib/pgsql
-
Remove the Mobility Pack repository from the Linux server.
IMPORTANT:If you do not remove the existing Mobility Pack repository, you cannot successfully install the next version of the Mobility Pack software.
-
In YaST, click .
-
Select the Mobility Pack repository, then click .
-