5.3 Configuring Cluster Resources
As a cluster administrator, you need to create cluster resources for every resource or application you run on servers in your cluster. Cluster resources can include Web sites, e-mail servers, databases, file systems, virtual machines, and any other server-based applications or services you want to make available to users at all times.
For an overview of resource types you can create, refer to Section 4.2.3, Masters.
5.3.1 Creating Simple Cluster Resources
To create the most basic type of a resource, proceed as follows:
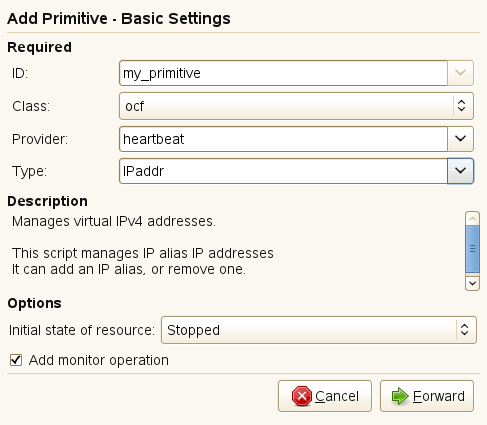
Adding Primitive Resources
-
Start the Pacemaker GUI and log in to the cluster as described in Section 5.1.1, Connecting to a Cluster.
-
In the left pane, select and click .
-
In the next dialog, set the following parameters for the resource:
-
Enter a unique for the resource.
-
From the list, select the resource agent class you want to use for that resource: , , or . For more information, see Section 4.2.2, Linux Standards Base (LSB) Scripts.
-
If you selected as class, specify also the of your OCF resource agent. The OCF specification allows multiple vendors to supply the same resource agent.
-
From the list, select the resource agent you want to use (for example, or ). A short description for this resource agent is displayed below.
The selection you get in the list depends on the (and for OCF resources also on the ) you have chosen.
-
Below , set the .
-
Activate if you want the cluster to monitor if the resource is still healthy.
-
-
Click . The next window shows a summary of the parameters that you have already defined for that resource. All required for that resource are listed. You need to edit them in order to set them to appropriate values. You may also need to add more attributes, depending on your deployment and settings. For details how to do so, refer to Adding or Modifying Meta and Instance Attributes.
-
If all parameters are set according to your wishes, click to finish the configuration of that resource. The configuration dialog is closed and the main window shows the newly added resource.
During or after creation of a resource, you can add or modify the following parameters for resources:
-
Instance attributes—they determine which instance of a service the resource controls. For more information, refer to Section 4.2.6, Instance Attributes.
-
Meta attributes—they tell the CRM how to treat a specific resource. For more information, refer to Section 4.2.5, Resource Options (Meta Attributes).
-
Operations—they are needed for resource monitoring. For more information, refer to Section 4.2.7, Resource Operations.
Adding or Modifying Meta and Instance Attributes
-
In the Pacemaker GUI main window, click in the left pane to see the resources already configured for the cluster.
-
In the right pane, select the resource to modify and click (or double-click the resource). The next window shows the basic resource parameters and the , or already defined for that resource.
-
To add a new meta attribute or instance attribute, select the respective tab and click .
-
Select the of the attribute you want to add. A short is displayed.
-
If needed, specify an attribute . Otherwise the default value of that attribute will be used.
-
Click to confirm your changes. The newly added or modified attribute appears on the tab.
-
If all parameters are set according to your wishes, click to finish the configuration of that resource. The configuration dialog is closed and the main window shows the modified resource.
HINT: XML Source Code for Resources
The Pacemaker GUI allows you to view the XML fragments that are generated from the parameters that you have defined. For individual resources, select in the top right corner of the resource configuration dialog.
To access the XML representation of all resources that you have configured, click in the left pane and then select in the upper right corner of the main window.
The editor displaying the XML code allows you to or the XML elements or to manually edit the XML code.
5.3.2 Creating STONITH Resources
To configure fencing, you need to configure one or more STONITH resources.
Adding a STONITH Resource
-
Start the Pacemaker GUI and log in to the cluster as described in Section 5.1.1, Connecting to a Cluster.
-
In the left pane, select and click .
-
In the next dialog, set the following parameters for the resource:
-
Enter a unique for the resource.
-
From the list, select the resource agent class .
-
From the list, select the STONITH plug-in for controlling your STONITH device. A short description for this plug-in is displayed below.
-
Below , set the .
-
Activate if you want the cluster to monitor the fencing device. For more information, refer to Section 9.4, Monitoring Fencing Devices.
-
-
Click . The next window shows a summary of the parameters that you have already defined for that resource. All required for the selected STONITH plug-in are listed. You need to edit them in order to set them to appropriate values. You may also need to add more attributes or monitor operations, depending on your deployment and settings. For details how to do so, refer to Adding or Modifying Meta and Instance Attributes and Section 5.3.7, Configuring Resource Monitoring.
-
If all parameters are set according to your wishes, click to finish the configuration of that resource. The configuration dialog is closed and the main window shows the newly added resource.
To complete your fencing configuration add constraints, or use clones or both. For more details, refer to Section 9.0, Fencing and STONITH.
5.3.3 Configuring Resource Constraints
Having all the resources configured is only part of the job. Even if the cluster knows all needed resources, it might still not be able to handle them correctly. Resource constraints let you specify which cluster nodes resources can run on, what order resources will load, and what other resources a specific resource is dependent on.
For an overview which types of constraints are available, refer to Section 4.4.1, Resource Order. When defining constraints, you also need to specify scores. For more information about scores and their implications in the cluster, see Section 4.4.2, Scores and Infinity.
Learn how to create the different types of the constraints in the following procedures.
Adding or Modifying Locational Constraints
-
Start the Pacemaker GUI and log in to the cluster as described in Section 5.1.1, Connecting to a Cluster.
-
In the Pacemaker GUI main window, click in the left pane to see the constraints already configured for the cluster.
-
In the left pane, select and click .
-
Select and click .
-
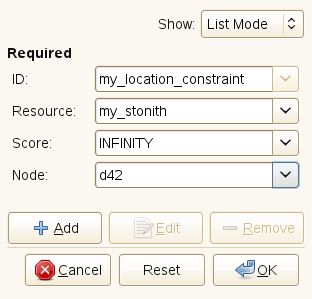
Enter a unique for the constraint. When modifying existing constraints, the ID is already defined and is displayed in the configuration dialog.
-
Select the for which to define the constraint. The list shows the IDs of all resources that have been configured for the cluster.
-
Set the for the constraint. Positive values indicate the resource can run on the you specify below. Negative values indicate the resource cannot run on this node. Values of +/- INFINITY change
can
to must. -
Select the for the constraint.
-
If you leave the and the field empty, you can also add rules by clicking . To add a lifetime, just click .
-
If all parameters are set according to your wishes, click to finish the configuration of the constraint. The configuration dialog is closed and the main window shows the newly added or modified constraint.
Adding or Modifying Collocational Constraints
-
Start the Pacemaker GUI and log in to the cluster as described in Section 5.1.1, Connecting to a Cluster.
-
In the Pacemaker GUI main window, click in the left pane to see the constraints already configured for the cluster.
-
In the left pane, select and click .
-
Select and click .
-
Enter a unique for the constraint. When modifying existing constraints, the ID is already defined and is displayed in the configuration dialog.
-
Select the which is the collocation source. The list shows the IDs of all resources that have been configured for the cluster.
If the constraint cannot be satisfied, the cluster may decide not to allow the resource to run at all.
-
If you leave both the and the field empty, you can also add a resource set by clicking . To add a lifetime, just click .
-
In , define the collocation target. The cluster will decide where to put this resource first and then decide where to put the resource in the field.
-
Define a to determine the location relationship between both resources. Positive values indicate the resources should run on the same node. Negative values indicate the resources should not run on the same node. Values of +/- INFINITY change should to must. The score will be combined with other factors to decide where to put the resource.
-
If needed, specify further parameters, like .
Depending on the parameters and options you choose, a short explains the effect of the collocational constraint you are configuring.
-
If all parameters are set according to your wishes, click to finish the configuration of the constraint. The configuration dialog is closed and the main window shows the newly added or modified constraint.
Adding or Modifying Ordering Constraints
-
Start the Pacemaker GUI and log in to the cluster as described in Section 5.1.1, Connecting to a Cluster.
-
In the Pacemaker GUI main window, click in the left pane to see the constraints already configured for the cluster.
-
In the left pane, select and click .
-
Select and click .
-
Enter a unique for the constraint. When modifying existing constraints, the ID is already defined and is displayed in the configuration dialog.
-
With , define the resource that must be started before the resource specified with is allowed to.
-
With define the resource that will start after the resource.
Depending on the parameters and options you choose, a short explains the effect of the ordering constraint you are configuring.
-
If needed, define further parameters, for example:
-
Specify a . If greater than zero, the constraint is mandatory, otherwise it is only a suggestion. The default value is INFINITY.
-
Specify a value for . If true, the resources are stopped in the reverse order. The default value is true.
-
-
If all parameters are set according to your wishes, click to finish the configuration of the constraint. The configuration dialog is closed and the main window shows the newly added or modified constraint.
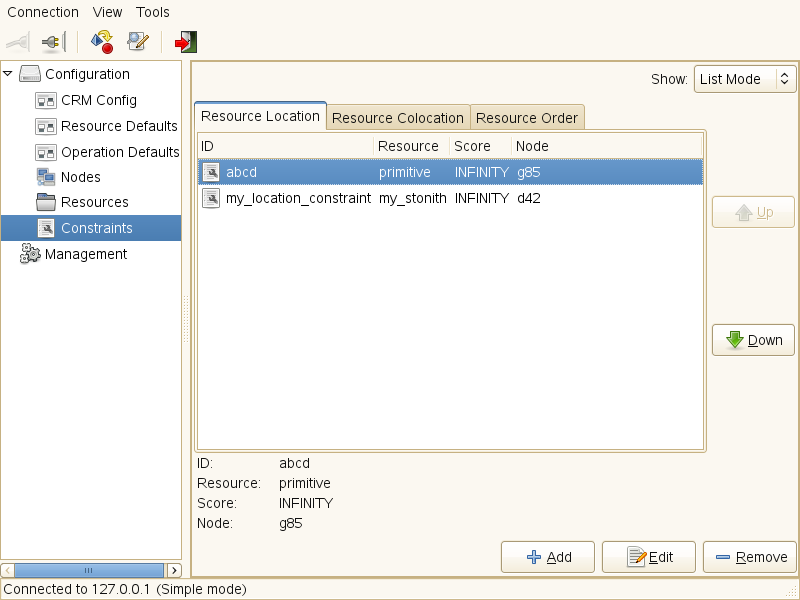
You can access and modify all constraints that you have configured in the view of the Pacemaker GUI.
Figure 5-3 Pacemaker GUI - Constraints
5.3.4 Specifying Resource Failover Nodes
A resource will be automatically restarted if it fails. If that cannot be achieved on the current node, or it fails N times on the current node, it will try to fail over to another node. You can define a number of failures for resources (a migration-threshold), after which they will migrate to a new node. If you have more than two nodes in your cluster, the node a particular resource fails over to is chosen by the High Availability software.
However, you can specify the node a resource will fail over to by proceeding as follows:
-
Configure a location constraint for that resource as described in Adding or Modifying Locational Constraints.
-
Add the migration-threshold meta attribute to that resource as described in Adding or Modifying Meta and Instance Attributes and enter a for the migration-threshold. The value should be positive and less that INFINITY.
-
If you want to automatically expire the failcount for a resource, add the failure-timeout meta attribute to that resource as described in Adding or Modifying Meta and Instance Attributes and enter a for the failure-timeout.
-
If you want to specify additional failover nodes with preferences for a resource, create additional location constraints.
For an example of the process flow in the cluster regarding migration thresholds and failcounts, see Example 4-2.
Instead of letting the failcount for a resource expire automatically, you can also clean up failcounts for a resource manually at any time. Refer to Section 5.4.2, Cleaning Up Resources for the details.
5.3.5 Specifying Resource Failback Nodes (Resource Stickiness)
A resource might fail back to its original node when that node is back online and in the cluster. If you want to prevent a resource from failing back to the node it was running on prior to failover, or if you want to specify a different node for the resource to fail back to, you must change its resource stickiness value. You can either specify resource stickiness when you are creating a resource, or afterwards.
For the implications of different resource stickiness values, refer to Section 4.4.4, Value is -INFINITY:.
Specifying Resource Stickiness
-
Add the resource-stickiness meta attribute to the resource as described in Adding or Modifying Meta and Instance Attributes.

-
As for the resource-stickiness, specify a value between -INFINITY and INFINITY.
5.3.6 Configuring Placement of Resources Based on Load Impact
Not all resources are equal. Some, such as Xen guests, require that the node hosting them meets their capacity requirements. If resources are placed such that their combined need exceed the provided capacity, the resources diminish in performance (or even fail).
To take this into account, the High Availability Extension allows you to specify the following parameters:
-
The capacity a certain node provides.
-
The capacity a certain resource requires.
-
An overall strategy for placement of resources.
For detailed background information about the parameters and a configuration example, refer to Section 4.4.5, balanced.
To configure the resource's requirements and the capacity a node provides, use utilization attributes as described in Adding Or Modifying Utilization Attributes. You can name the utilization attributes according to your preferences and define as many name/value pairs as your configuration needs.
Adding Or Modifying Utilization Attributes
In the following example, we assume that you already have a basic configuration of cluster nodes and resources and now additionally want to configure the capacities a certain node provides and the capacity a certain resource requires. The procedure of adding utilization attributes is basically the same and only differs in Step 2 and Step 3.
-
Start the Pacemaker GUI and log in to the cluster as described in Section 5.1.1, Connecting to a Cluster.
-
To specify the capacity a node provides:
-
In the left pane, click .
-
In the right pane, select the node whose capacity you want to configure and click .
-
-
To specify the capacity a resource requires:
-
In the left pane, click .
-
In the right pane, select the resource whose capacity you want to configure and click .
-
-
Select the tab and click to add an utilization attribute.
-
Enter a for the new attribute. You can name the utilization attributes according to your preferences.
-
Enter a for the attribute and click . The attribute value must be an integer.
-
If you need more utilization attributes, repeat Step 5 to Step 6.
The tab shows a summary of the utilization attributes that you have already defined for that node or resource.
-
If all parameters are set according to your wishes, click to close the configuration dialog.
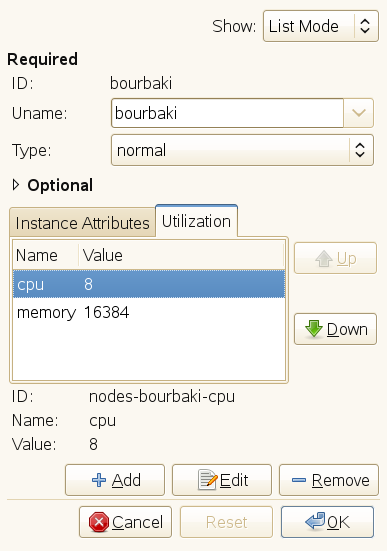
Figure 5-4 shows the configuration of a node which would provide 8 CPU units and 16 GB of memory to resources running on that node:
Figure 5-4 Example Configuration for Node Capacity
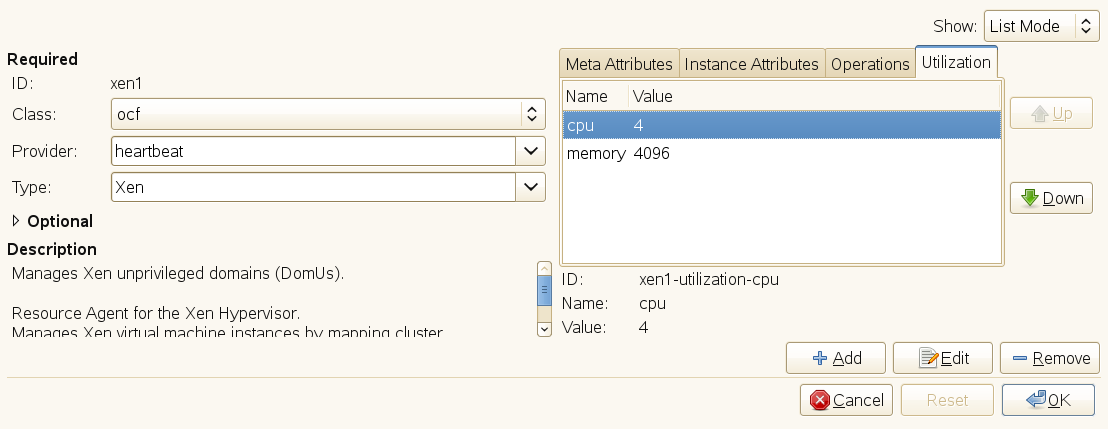
An example configuration for a resource requiring 4096 memory units and 4 of the CPU units of a node would look as follows:
Figure 5-5 Example Configuration for Resource Capacity
After you have configured the capacities your nodes provide and the capacities your resources require, you need to set the placement strategy in the global cluster options, otherwise the capacity configurations have no effect. Several strategies are available to schedule the load: for example, you can concentrate it on as few nodes as possible, or balance it evenly over all available nodes. For more information, refer to Section 4.4.5, balanced.
Setting the Placement Strategy
-
Start the Pacemaker GUI and log in to the cluster as described in Section 5.1.1, Connecting to a Cluster.
-
Select .
-
In the left pane, select to view the global cluster options and their current values.
-
Depending on your requirements, set to the appropriate value.
-
If you need to disable fencing for any reasons, deselect Stonith Enabled.
-
Confirm your changes with .
5.3.7 Configuring Resource Monitoring
Although the High Availability Extension can detect a node failure, it also has the ability to detect when an individual resource on a node has failed. If you want to ensure that a resource is running, you must configure resource monitoring for it. Resource monitoring consists of specifying a timeout and/or start delay value, and an interval. The interval tells the CRM how often it should check the resource status. You can also set particular parameters, such as Timeout for start or stop operations.
Adding or Modifying Monitor Operations
-
Start the Pacemaker GUI and log in to the cluster as described in Section 5.1.1, Connecting to a Cluster.
-
In the Pacemaker GUI main window, click in the left pane to see the resources already configured for the cluster.
-
In the right pane, select the resource to modify and click . The next window shows the basic resource parameters and the meta attributes, instance attributes and operations already defined for that resource.
-
To add a new monitor operation, select the respective tab and click .
To modify an existing operation, select the respective entry and click .
-
In , select the action to perform, for example monitor, start, or .
The parameters shown below depend on the selection you make here.
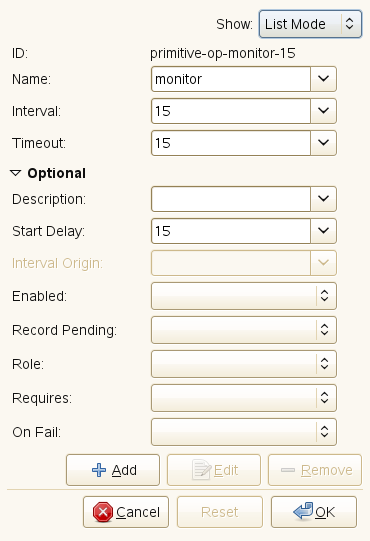
-
In the field, enter a value in seconds. After the specified timeout period, the operation will be treated as failed. The PE will decide what to do or execute what you specified in the field of the monitor operation.
-
If needed, expand the section and add parameters, like (what to do if this action ever fails?) or (what conditions need to be satisfied before this action occurs?).
-
If all parameters are set according to your wishes, click to finish the configuration of that resource. The configuration dialog is closed and the main window shows the modified resource.
For the processes which take place if the resource monitor detects a failure, refer to Section 4.3, Resource Monitoring.
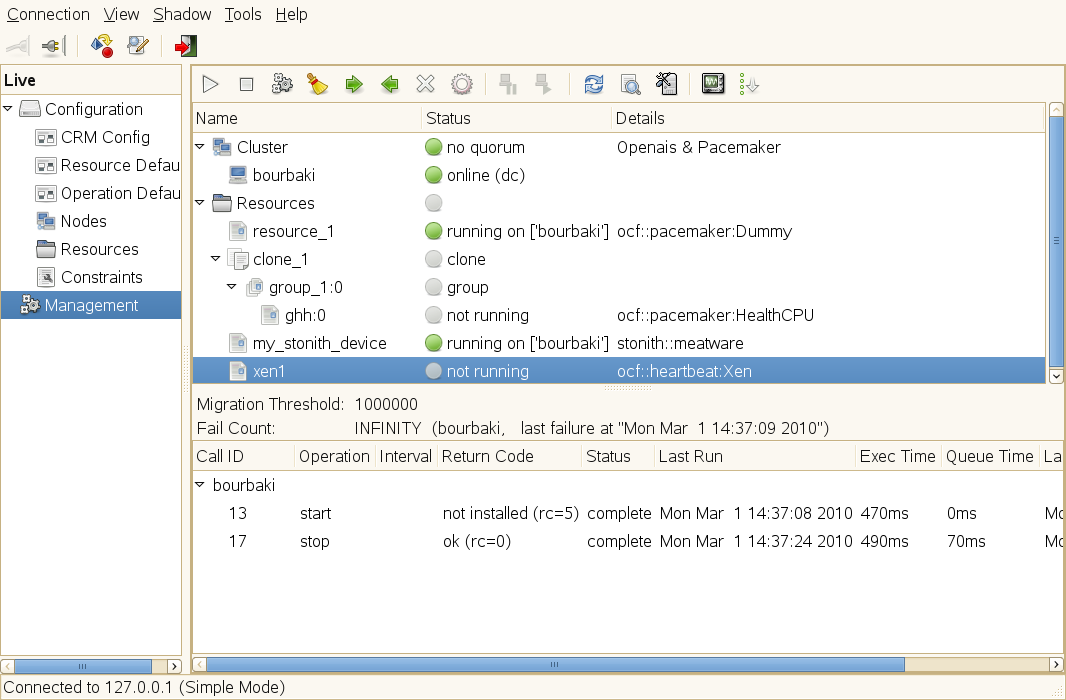
To view resource failures in the Pacemaker GUI, click in the left pane, then select the resource whose details you want to see in the right pane. For a resource that has failed, the and last failure of the resource is shown in the middle of the right pane (below the entry).
Figure 5-6 Viewing a Resource's Failcount
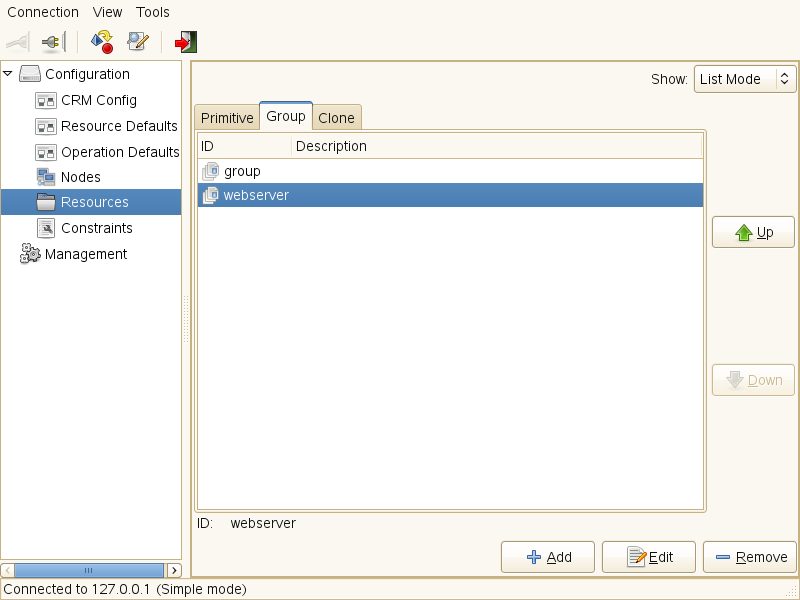
5.3.8 Configuring a Cluster Resource Group
Some cluster resources are dependent on other components or resources, and require that each component or resource starts in a specific order and runs together on the same server. To simplify this configuration we support the concept of groups.
For an example of a resource group and more information about groups and their properties, refer to Groups.
NOTE: Empty Groups
Groups must contain at least one resource, otherwise the configuration is not valid.
Adding a Resource Group
-
Start the Pacemaker GUI and log in to the cluster as described in Section 5.1.1, Connecting to a Cluster.
-
In the left pane, select and click .
-
Enter a unique for the group.
-
Below , set the and click .
-
In the next step, you can add primitives as sub-resources for the group. These are created similar as described in Adding Primitive Resources.
-
If all parameters are set according to your wishes, click to finish the configuration of the primitive.
-
In the next window, you can continue adding sub-resources for the group by choosing again and clicking .
When you do not want to add more primitives to the group, click instead. The next window shows a summary of the parameters that you have already defined for that group. The and of the group are listed. The position of the resources in the tab represents the order in which the resources are started in the cluster.
-
As the order of resources in a group is important, use the and buttons to sort the in the group.
-
If all parameters are set according to your wishes, click to finish the configuration of that group. The configuration dialog is closed and the main window shows the newly created or modified group.
Figure 5-7 Pacemaker GUI - Groups
Let us assume you already have created a resource group as explained in Adding a Resource Group. The following procedure shows you how to modify the group to match Example 4-1.
Adding Resources to an Existing Group
-
Start the Pacemaker GUI and log in to the cluster as described in Section 5.1.1, Connecting to a Cluster.
-
In the left pane, switch to the view and in the right pane, select the group to modify and click . The next window shows the basic group parameters and the meta attributes and primitives already defined for that resource.
-
Click the tab and click .
-
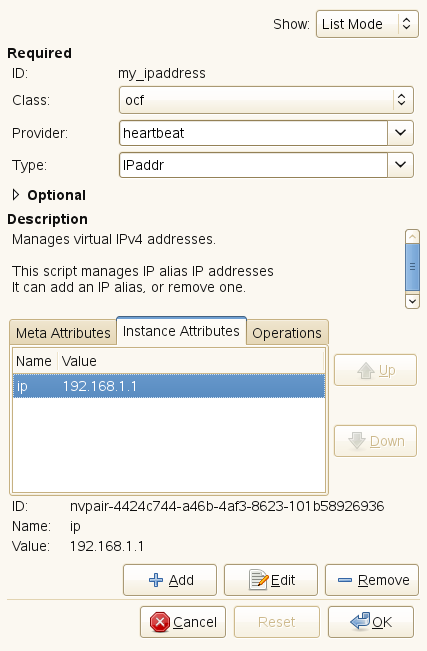
In the next dialog, set the following parameters to add an IP address as sub-resource of the group:
-
Enter a unique (for example, my_ipaddress).
-
From the list, select as resource agent class.
-
As of your OCF resource agent, select .
-
From the list, select as resource agent.
-
Click .
-
In the tab, select the entry and click (or double-click the entry).
-
As , enter the desired IP address, for example, 192.168.1.1.
-
Click and . The group configuration dialog shows the newly added primitive.
-
-
Add the next sub-resources (file system and Web server) by clicking again.
-
Set the respective parameters for each of the sub-resources similar to steps Step 4.a to Step 4.h, until you have configured all sub-resources for the group.
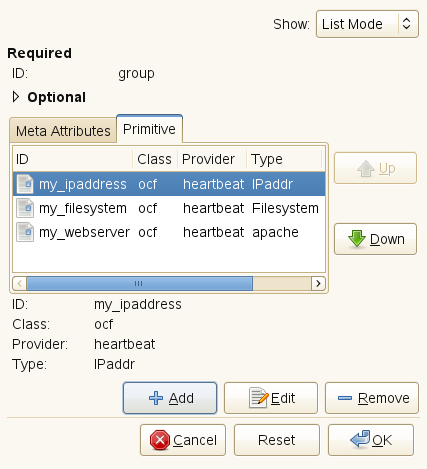
As we configured the sub-resources already in the order in that they need to be started in the cluster, the order on the tab is already correct.
-
In case you need to change the resource order for a group, use the and buttons to sort the resources on the tab.
-
To remove a resource from the group, select the resource on the tab and click .
-
Click to finish the configuration of that group. The configuration dialog is closed and the main window shows the modified group.
5.3.9 Configuring a Clone Resource
You may want certain resources to run simultaneously on multiple nodes in your cluster. To do this you must configure a resource as a clone. Examples of resources that might be configured as clones include STONITH and cluster file systems like OCFS2. You can clone any resource provided. This is supported by the resource’s Resource Agent. Clone resources may even be configured differently depending on which nodes they are hosted.
For an overview which types of resource clones are available, refer to Stateful Clones.
Adding or Modifying Clones
-
Start the Pacemaker GUI and log in to the cluster as described in Section 5.1.1, Connecting to a Cluster.
-
In the left pane, select and click .
-
Enter a unique for the clone.
-
Below , set the .
-
Activate the respective options you want to set for your clone and click .
-
In the next step, you can either add a or a as sub-resources for the clone. These are created similar as described in Adding Primitive Resources or Adding a Resource Group.
-
If all parameters in the clone configuration dialog are set according to your wishes, click to finish the configuration of the clone.