The Programming Editor is part of the SilverStream integrated development environment (IDE). You use the Programming Editor to create and modify Java code using Java APIs and the SilverStream API.
To facilitate this process, the Programming Editor automatically generates Java code for specific SilverStream API classes and method signatures associated with objects you create in the SilverStream Page Designer, Form Designer, and Business Object Designer. You can then fine-tune your application by adding your own programming logic.
Even if you prefer not to use the SilverStream IDE, the Programming Editor provides an interface that lets you develop code in your favorite external editor or IDE, as described in Using an external editor.
Here is a sample Programming Editor window, invoked from the Form Designer:
This chapter includes the following topics:

The Programming Editor is the tool you use to write the Java code for your SilverStream application. Before working with the Programming Editor, you should review these concepts:
In the SilverStream IDE, the Programming Editor offers two programming modes:
 For more information, see
Programming in Java mode.
For more information, see
Programming in Java mode.
For more information, see
Programming with Simple Actions.
The signature of a method consists of the name of the method, the names and types of its parameters, and its return value type.
The SilverStream Programming Editor automatically creates signatures for SilverStream API methods--such as event handlers--associated with objects that you create in forms and pages. You can add your own code to fill in the functionality for these methods.
In some cases, SilverStream automatically generates entire methods--such as constructors, dispatchers, and init().
NOTE You should not modify methods that SilverStream generates for you. Your changes will be lost when the methods are regenerated at compile or save time.
For more information, see
Anatomy of the Java class file and
Programming in Java mode.
An event handler is a method that responds to a particular event, such as user interaction with GUI controls in an application. Examples of events are clicking a button, pressing a key, giving focus to a control, updating a row in a database, and loading a page in a browser.
The Programming Editor lets you easily develop event-triggered code for pages, forms, and business objects by automatically creating method signatures for event handlers, and dispatchers that call event handlers based on user interaction.
For more information, see
Writing event-triggered code.
To provide flexible support for Java code development, the SilverStream Programming Editor allows you to work within the SilverStream IDE or connect to your favorite external tools.
When working in the SilverStream IDE, you use the Programming Editor to write Java code in the Page Designer, Form Designer, and Business Object Designer. You can write your own Java code from scratch or use a Simple Actions interface (with forms only) that automatically translates high-level actions into Java code.
The Programming Editor gives you access to the full Java language, Java APIs, and the SilverStream API so that you can write:
As you develop Java code in the SilverStream IDE, the Programming Editor gives you the following capabilities:
If you prefer not to use the SilverStream IDE, you can connect through the Programming Editor to the external code editor or IDE of your choice. At a minimum, the Programming Editor provides the following capabilities for external development:
Beyond these capabilities, you can configure your external environment to access the SilverStream API packages and, therefore, compile your SilverStream application externally. The only parts of the SilverStream API you cannot access in an external Java development environment are the elements that are used exclusively for SilverStream pages, forms, and views.
When you work in the SilverStream IDE, the Programming Editor helps manage the structure and content of your Java class file. Each Java class or Java interface you define in the Programming Editor is associated with its own code file. For example, each page, form, or business object you create in the SilverStream Designer has an associated Java source file that you can access from the Programming Editor.
This section describes how the code is organized in a Java source file and explains which Java constructs are generated automatically as you build your application. It includes the following topics:
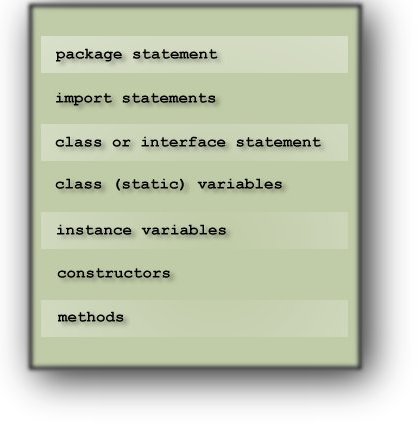
The Programming Editor organizes your Java source file according to Java conventions, as follows:
When SilverStream creates Java constructs for you automatically, they are generated in the appropriate section. You can easily access these sections by using controls in the Programming Editor dialog.
For more information about automatically generated code, see
Code generated by SilverStream.
If you develop your applications in the SilverStream IDE, the Programming Editor creates certain Java constructs automatically. Code generated by SilverStream is clearly marked by the comment line:
The following example shows three methods generated automatically by SilverStream:
NOTE You should not edit code that is generated automatically. Your changes will be lost when the code is regenerated at compile or save time.
SilverStream generates the following Java constructs for you in the Programming Editor when you create forms, pages, and business objects:
For example, the Programming Editor in the Form Designer automatically imports javax.swing.* and javax.swing.event.* so that you can add Swing controls to forms and write event handlers for these controls.
The following example shows the method signature that the Programming Editor generates automatically for the mouse click event on an Add button in a form:
Here is an example of an initializer method that includes constructors to create the controls on a form and initialize associated data:
For each event associated with a control on your page or form, SilverStream automatically generates a dispatcher and a method signature for the event handler using the following syntax:
handle_name of control_name of dispatcher
If you delete the control, SilverStream automatically deletes its event handler method and the call to this method from the dispatcher.
Two common dispatchers are the actionPerformed() method for forms and the pageActionPerformed() method for pages. For example, here is a dispatcher generated by SilverStream on a page:
In this example, the arrows show the pageActionPerformed() dispatcher and one of the event handlers, handle_btnOpenWindow_pageActionPerformed().
The Programming Editor provides a chroma-coded programming environment in which color is used to highlight code elements for easy differentiation and detection when you scan your source file.
Syntax errors that can appear after you have tried to compile | |
If you have a color printer, you can print your Java source file as a chroma-coded listing from the Programming Editor. For more information, see Printing your code listing.
You can interact with the Programming Editor in the following contexts:
Enterprise-specific business logic for server-side applications, as well as utility objects |
 To access the Programming Editor:
NOTE If you invoke the Programming Editor from the Form Designer, you have the option of programming your form using Simple Actions as well as writing your own code in Java mode. Simple Actions mode is not available for programming business objects or pages.
If you wish to develop your programming logic outside the SilverStream IDE, the Programming Editor provides an interface that allows you to work in an external Java development environment. Through this interface you can:
This section explains how to use this interface, first by specifying an external editor and then by launching the tool and exchanging information with it.
If you want to access SilverStream API packages in your external Java development environment, you must perform some additional steps to configure that environment, as described in the chapter on coding Java for SilverStream applications in the Programmer's Guide.
To specify an external code editor:
The Preferences dialog appears.
For example, the command line in this Preferences dialog specifies Borland JBuilder as the external IDE:
Now you are ready to launch and exchange information with your external editor.
To launch and exchange information with the external editor:

SilverStream opens the .java source file for the class (page, form, or business object) in the specified editor.
The SilverStream Programming Editor gives you the option of writing and editing your Java code in two different ways:
Initially, the Programming Editor opens in single-method view. Once you have used the Programming Editor, it will open the next time in the mode that was active during your last editing session.
To navigate from one method to another in single-method view, select a callable object from the Object dropdown list and an associated event from the Event dropdown list, as described in The Programming Editor dialog in Java mode. When you select an event, the Programming Editor either takes you to the existing event handler or creates the method signature for a new event handler.

The text area adjusts to display the entire class definition for the page, form, or business object. The cursor appears in the same method, declaration statement, or import statement that was displayed in single-method view before you switched modes.
Here is an example of a whole-file view of the class definition for a form. The cursor appears in the event handler method handle_New_actionPerformed(), which is displayed in the context of the entire class definition:
You now have access to all components of the class definition in the scrollable text area.
CAUTION! Be careful when working in whole-file view. It is easy to make cut-and-paste errors inadvertently and end up with invalid code. In particular, heed the warning comments that SilverStream provides about not editing definitions that are generated automatically.

The text area displays the method, declaration statement, or import statement where the cursor appeared before you switched modes.
The following example shows the same class definition in single-method view. Here the event handler method handle_New_actionPerformed() appears by itself in the text area:
When developing a business object in whole-file view, you can edit the package name--the first line of the file--and the class name for the business object. When you save the object, SilverStream automatically saves the newly named class in the newly named package.
When developing a form or a page in whole-file view, do not edit the package name or class name. Any changes you make to these names will be overridden by SilverStream when you save the object--because forms must reside in com.sssw.gen.forms and pages must reside in com.sssw.gen.pages.
You do not have access to package names and class names in single-method view.
Programming in Java mode simply means that you use the SilverStream Programming Editor to write, compile, and test your own Java source code. In Java mode you have access to the full Java language, Java APIs, and the SilverStream API.
The Programming Editor works in Java mode for developing application logic in pages and business objects. For forms, the Programming Editor gives you two options: Programming in Java mode or with Simple Actions, a wizard interface for automatically generating Java code for prepackaged actions. To switch from Simple Actions mode to Java mode in the Form Designer, click the Switch to Java code button that appears at the top of the Programming Editor window:
When you first start up the Programming Editor in the Form Designer, it opens in Simple Actions mode.
This section describes how to use the Programming Editor to develop your own Java code in the Page Designer, Form Designer, and Business Object Designer. It includes the following topics:
For information about using Simple Actions instead of Java mode in forms, see
Programming with Simple Actions.
To program in Java mode, you must configure the Form Designer Wizard to generate Java code by setting an Editor preference in the Main Designer.
To configure the Form Designer Wizard to generate Java code:
The Programming Editor in Java mode gives you access to the Java APIs and SilverStream API, and provides information about objects, methods, and events to help you develop your Java code and navigate your class definition.
Here is a sample Programming Editor dialog invoked from the Form Designer in Java mode:
The dialog consists of the following interactive controls:
The Object list also includes an item called General that gives you access to all declarations, imports, and methods defined in the Java class file, as shown:
You can access the Object and Event lists in both single-method view and whole-file view. When definitions already exist for objects and events, they appear in bold in the Object and Event lists.
The Programming Editor controls facilitate the process of Java coding by helping you navigate your class definition and select from lists of allowable events and methods for objects defined in your class or callable from your class.
To navigate the Java class file:
The Event list updates its list of choices based on what you select in Object list, as follows:
The Programming Editor updates the Code Editor window based on what you select in Event list, as follows:
In the following example, the object btnSave is selected from the Object list. This object represents the Save button that appears on the page pgContacts.html:
After btnSave is selected, the Event list displays all events associated with the Save button--in this case, the single event pageActionPerformed, as shown:
To invoke methods from callable objects in your class definition:
The Methods pane displays all methods that can be called on the selected object.
To get help on an object or method:
SilverStream help opens in your browser, displaying information about the object or method you selected.
Events are used to notify an application when user interaction has occurred, such as pressing a button or loading a page in a browser. To specify how your application responds to these events, you must define methods called event handlers.
The Programming Editor facilitates the process of writing event-triggered code by showing you the list of events that can be associated with each callable object in your class definition. See The Programming Editor dialog in Java mode for more information about using object and event lists.
To write Java code for a specific event:
The Event list is updated to display the list of events associated with the selected object.
The Programming Editor inserts a signature for the appropriate event handler method in the Code Editor window.
In the following example, the Programming Editor automatically adds the signature for the event handler handle_chkUseTransactions_valueChanged()--a method that will respond to the user action of checking or unchecking a check box. Note that the check box chkUseTransactions is selected in the Object list and the event valueChanged is selected in the Event list:
NOTE You can invoke methods on callable objects in your class definition as described in The Programming Editor dialog in Java mode, and you can write your own methods as described in Adding your own custom methods.
For more information about events, see About Properties and Events in the Property and Event Reference.
You can write your own methods for a form, page, or business object. These custom methods might support a specific business function or act as a module of reusable business logic shared by other applications.
You can call your custom methods from anywhere in the form, page, or business object. Depending on the visibility you specify for the method, you can call the method from other objects as well.
There are several ways to define your own methods:
To use the Add New Method Wizard:
The Add New Method Wizard opens:
Once you have specified the necessary information, the wizard adds the method definition. The custom method's definition is available in the General section of the Programming Editor.
When you work in whole-file view, you can delete custom methods and modify their signatures directly in the Code Editor window. In single-method view, you must use commands from the Tools menu, as described in the procedures in this section.
For more information about code file views, see
Specifying single-method view or whole-file view.
To delete a custom method in single-method view:
For more information about the Object and Event lists, see
The Programming Editor dialog in Java mode.
To modify the signature of a custom method in single-method view:
For more information about the Object and Event lists, see
The Programming Editor dialog in Java mode.
The Edit Method dialog opens, allowing you to change method name, visibility, return type, parameters, and exceptions.
The Programming Editor lets you add Java interfaces to the class definitions for your pages, forms, and business objects.
The Java Interfaces dialog appears.
The Programming Editor prompts you to handle exceptions in your Java code by flagging the following situations at compile time:
In the following example, the Programming Editor issues a compile error because an event handler in the class definition does not catch the FileNotFoundException when creating a new FileOutputStream. The offending statement appears in red and the error message appears in a pane that opens between the Code Editor window and the Status bar.
In the following example, the Programming Editor issues a compile error because an event handler in the class definition catches an AgoSecurityException that is never thrown. The offending statement appears in red and the error message appears in a pane that opens between the Code Editor window and the Status bar.
When you override a method, you replace a method in a superclass with a method in a subclass. This capability allows a subclass to inherit most of its behavior from its superclass--and therefore reuse existing code--yet override specific behavior as needed for its own unique requirements.
There are rules associated with overriding methods. For example, the new method must use the same name, return type, and parameters as the method it overrides. The parameters must match in number, type, and order.
The Programming Editor helps you override methods in your class definitions for business objects by exposing the public and protected methods in the base class. Overriding is available only if you have specified a base class in your business object class definition.
To override methods for business objects:
The Override Method dialog opens, displaying the public and protected methods in the superclass--the methods that can be overridden.
NOTE If there are no public or protected methods in the superclass, no methods will appear in the dialog.
The Programming Editor adds a new method signature to the class definition for your business object. In whole-file view, the method signature appears in the Code Editor window immediately; in single-method view, you can navigate to the new code by selecting General in the Object list and selecting the method in the Event list.
You can now add programming logic to this method to override its counterpart in the superclass.
The Programming Editor allows you to use the Action Builder Wizard to automatically generate Java code for specific actions while you program forms in Java mode. This feature is useful when you cannot remember the syntax for a particular kind of action.
The Action Builder Wizard is not available for pages or business objects.
To code in Java using the Action Builder Wizard:

The New Action dialog appears.
The Programming Editor lets you navigate your class definition by line number. In single-method view, lines are numbered relative to the start of the selected method; in whole-file view, lines are numbered relative to the start of the class definition.
To move to a specific line by number:
The Enter Line Number dialog opens.
The cursor appears at the beginning of the line you specified.
You can perform text string searches in your class definition to help you navigate and edit code in the Programming Editor. In single-method view, the search is restricted to code for the selected method; in whole-file view, the search spans the entire class definition.
The Find and Replace dialog appears.
NOTE After dismissing the dialog, you can find the next instance of the target string by selecting Edit>Find Again.
Simple Actions mode provides a wizard interface that translates predefined actions into Java code. This feature is designed as a shortcut for new programmers to generate application logic quickly even if they are not yet conversant with Java syntax, Java APIs, or the SilverStream API.
Simple Actions mode is available only for forms and only in single-method view. The first time you enter the Programming Editor from the Form Designer, the Programming Editor opens in Simple Actions mode. You can also switch to Simple Actions mode from Java mode, but only if you haven't written or edited any code in Java mode. Click the Simple Actions button that appears at the top of the Programming Editor window:
This button is disabled in whole-file view--and also in single-method view if you have written code in Java mode.
Before you use Simple Actions to program new forms, you should learn about how you can configure the Form Designer Wizard and about specific usage restrictions.
This section describes how to use Simple Actions in the Programming Editor to develop forms for your application. It includes the following topics:
If you plan to program using Simple Actions, you can configure the Form Designer Wizard to generate Simple Actions by setting an Editor preference in the Main Designer. Otherwise, the Form Designer Wizard generates Java code when you create new forms. In this case, you can still switch to Simple Actions mode selecting single-method view and navigating to a new, empty method that was generated by the wizard. If you add a new method of your own, you will not be able to switch to Simple Actions mode.
To learn how to navigate your Java class definition, see
The Programming Editor dialog in Java mode.
To configure the Form Designer Wizard to generate Simple Actions:
Here is a sample Programming Editor dialog invoked from the Form Designer in Simple Actions mode:
The dialog consists of the following interactive controls:
if statement.
while statement.
The Object and Event lists work the same way as in Java mode, as described in The Programming Editor dialog in Java mode.
The Action Builder, Action Gallery, Branches, and Loops controls allow you to select high-level actions or Java constructs that you want the Programming Editor to convert to Java code under the covers.
For example, if you want to save database changes each time you activate your form, select the formActivate event from the Event list and then choose Save Data from the Action Gallery list. The Programming Editor inserts a simple action in the Code Editor window that saves modifications in the source database table:
When you compile, test, or save Simple Actions, SilverStream internally translates Simple Actions to Java and then compiles the Java. The form behaves consistently, regardless of the mode in which it is developed. You can view the Java code generated for Simple Actions. However, if you edit the code while viewing it in Java mode, you will not be able to return to Simple Actions mode.
To use the Action Builder Wizard in Simple Actions mode:
The Action Builder Wizard is a quick and easy way to create scripts for buttons and fields on a form.

The Action Wizard appears.
The action is inserted in the Code Editor window.
To view Java code that underlies Simple Actions:
When you finish programming with Simple Actions, you can view the Java code that was generated.
The form must be in Simple Actions mode. Use the Action Builder, Action Gallery, Branches, and Loops controls described earlier in this section.

The Java code appears in the Code Editor window.
After switching to Java mode for this example, the Java code for the Save modified data to the source table action appears in the Code Editor window:
The following restrictions apply to programming with Simple Actions:
There are many actions you can use to program a control on your form.
To program a control using Simple Actions:
The Programming Editor opens displaying your control in the Object list.

Pick the event that will fire when the user interacts with the control in the desired fashion.
The action you select appears in the Code Editor window.
You can use Simple Actions as a shortcut for creating conditional statements, which are used to execute code based on a test. Conditional statements must always evaluate to a boolean value (true or false).
To create a conditional statement using Simple Actions:
If you want to insert a conditional statement in existing code, you can navigate to that location using the Object and Event lists, as described in The Programming Editor dialog in Java mode.
The Expression Builder appears.
NOTE You do not have to select a conditional operator in the Expression Builder.
value = ""
The conditional statement you created appears in the Programming Editor window in blue, as in this example:
NOTE This example also contains a Simple Action that displays a message if the condition is true. This action--Show a Message--was inserted from the Other Actions list in the Action Builder Wizard.
The Action Builder Wizard appears.
A dialog appears that prompts you to select the form and enter a caption.
The Simple Action you just created appears in the Code Editor window.
You can check your Java code for errors at any time--in Java mode and Simple Actions mode, in single-method view and whole-file view.
You can specify which compiler to use and whether to include debugging information by setting Compiler preferences in the Main Designer.

SilverStream compiles the code. Any errors are listed one at a time in a panel that appears at the bottom of the Programming Editor window between the Code Editor window and Status bar. The line of code containing the error appears in red in the Programming Editor window.
You can save pages, forms, or business objects from the Programming Editor at any time--in Java mode and Simple Actions mode, in single-method view and whole-file view.
By default, the Programming Editor compiles forms, pages, and business objects before saving them. For business objects, you can elect to save without compiling.
To save a form or page after compiling:
To save a business object after compiling:

SilverStream compiles the object.
To save a business object without compiling:
You can test your class definitions for pages and forms from the Programming Editor.
To test pages and forms from the Programming Editor:

Pages are launched in a browser and forms are invoked in SilverJRunner.
You can print your Java code listing from the Programming Editor in the Form Designer, Page Designer, and Business Object Designer. You can print your code either as monochrome output or as a chroma-coded listing on a color printer. A chroma-coded listing displays the colors SilverStream uses to highlight important code elements, as described in Chroma-coded programming environment.
To print from the Code Editor window:
The Page Setup window appears.
The Print window appears.
You can launch the SilverStream Debugger from the Programming Editor in the Page Designer, Form Designer, and Business Object Designer.
To learn how to perform these procedures and use the Debugger for your specific application needs, see
SilverStream Debugger.
In the Main Designer, you can specify the following display parameters and behaviors for the Programming Editor:
For more information, see
Setting preferences in
Main Designer.
Use these keyboard shortcuts.