1.2 Connecting Retain and the Message Router

1.2.1 How Mobile Message Routing Works

The Retain Message Router enables archiving services for mobile devices on the Internet, outside the firewall. Basic functionality is illustrated in Figure 1-1 and explained in Table 1-1.

Figure 1-1 Retain Message Router Functional Overview

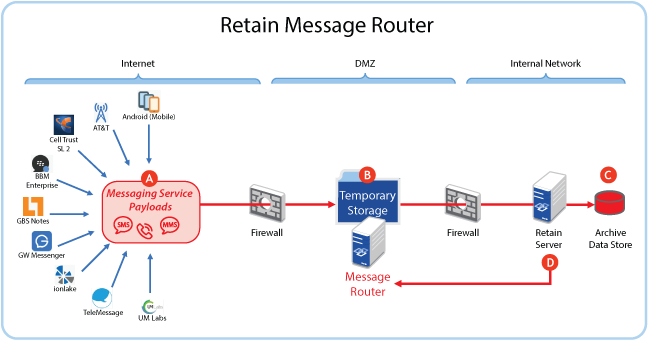
Table 1-1 Job Component Information and Links

Letter

Brief Description

Messaging platforms push message data (payloads) to the Retain Message Router.

The Message Router stores the payloads in a temporary storage area, which you create while setting up the router and connecting it to Retain.

When the Message Router sends the payload to Retain, it archives the messages in the data store.

When archiving completes, Retain confirms to the Router, which then deletes the payload from its temporary storage area.

1.2.2 Setting Up the Retain Message Router

To connect a Message Router to Retain, you must do the following:

  1. Install the Router software on a server in the DMZ, as illustrated in Figure 1-1.

    For instructions, see Installing a Retain Message Router on Linux or Installing a Retain Message Router on Windows in the Retain 4.9.2: Installation and Upgrade guide.

  2. Create a directory on the Router server for temporarily storing message payloads. For example, you might create a directory named temp-store inside the Retain folder.

    You specify this location when setting up the Retain Message Router in Step 5 below.

  3. In the Retain Server Manager > Configuration > Server Configuration > Communications tab > Retain Server Connection panel, make sure the settings for connecting to the Retain server are correct.as described in Retain Server Connection Panel.

  4. In the Retain Server Manager > Configuration > Router Configuration > Communications tab Message Router Connections panel, enter the hostname or IP address of the server the Router agent software resides on. Make sure that the Port and Security match the Retain Server Connection settings from Step 3 above.

  5. Under the Storage tab, enter the storage path you created on the Router server after installing the Router agent. Be sure to specify the path from the perspective of the router. It can be a full drive path, or a path relative to the /Retain installation directory on the Router.

  6. Under the Logging tab confirm that the log level is Diagnostic (Trace) and old logs are removed after a few days.

  7. Click Save Changes.

  8. Click Test Connection to connect to the router and send the configuration information to it.

    You can now access the router’s console. For more information, see Retain Message Router Console.

1.2.3 Setting Up the Retain Cloud Router

After you purchase the Cloud Router:

  1. In Retain Server Manager > Configuration > Router Configuration > Cloud Router Configuration, enable Connected to Cloud Router.

  2. Click Generate Credentials.

  3. The Message Router generates a Key and Secret.

  4. Click Save Changes.

  5. Contact your Sales Engineer, who gives the Key and Secret to the Micro Focus Cloud team.

  6. Complete any other instructions received from the engineer and team.