36.1 Performing Basic POA Configuration
POA configuration information is stored as properties of its POA object in eDirectory. The following topics help you modify the POA object in ConsoleOne and change POA configuration to meet changing system configurations:
36.1.1 Creating a POA Object in eDirectory
When you create a new post office, one POA object is automatically created for it. You can set up additional POAs for an existing post office if message traffic in the post office is heavy. To accomplish this, you must also create additional POA objects.
To create a new POA object in Novell eDirectory:
-
In ConsoleOne, browse to and right-click the Post Office object for which you want to create a new POA object, then click .
-
Double-click to display the Create GroupWise Agent dialog box.

-
Type a unique name for the new POA. The name can include as many as 8 characters. Do not use any of the following invalid characters in the name:
ASCII characters 0-31
Comma ,
Asterisk *
Double quote "
At sign @
Extended ASCII characters that are graphical or typographical symbols; accented characters in the extended range can be used
Backslash \
Parentheses ( )
Braces { }
Period .
Colon :
Slash /
You use this name with the ‑‑name startup switch when you start the new POA.
The field is automatically set to Post Office.
-
Select .
-
Click .
The POA object is automatically placed within the Post Office object.
-
Review the information displayed for the first four fields on the Identification page to ensure that you are creating the correct type of Agent object in the correct location.

-
In the field, type one or more lines of text describing the POA.
This description displays on the POA server console as the POA runs. When you run multiple POAs on the same server, the description should uniquely identify each one. If multiple administrators work at the server where the POA runs, the description could include a note about who to contact before stopping the POA.
-
In the field, select the platform (Linux or Windows) where the POA will run.
-
Click to save the updated properties.
-
(Conditional) If you plan to set up the additional POA on the same server with the original POA:
-
Assign it a unique port number on the Network Address properties page of the new POA object.
-
Create a copy of the POA startup file associated with the original POA for use with the additional POA.
-
Set up whatever mechanism you use for starting the original POA for use with the additional POA.
For example, if you want to use the rcgrpwise script on Linux to start the additional POA, you must add a section in the gwha.conf file for it. For more information, see
Configuring the GroupWise High Availability Service in the gwha.conf File
inInstalling GroupWise Agents
in the GroupWise 2012 Installation Guide.If you plan to install the additional POA on a different server, the installation process takes care of these issues for you.
-
-
Continue with Section 36.1.2, Configuring the POA in ConsoleOne.
36.1.2 Configuring the POA in ConsoleOne
The advantage to configuring the POA in ConsoleOne, as opposed to using startup switches in a POA startup file, is that the POA configuration settings are stored in eDirectory.
-
In ConsoleOne, expand the eDirectory container where the Post Office object is located.
-
Expand the Post Office object.
-
Right-click the POA object, then click .
The table below summarizes the POA configuration settings in the POA object properties pages and how they correspond to POA startup switches (as described in Section 40.0, Using POA Startup Switches). The table also includes settings on the Post Office object that correspond to POA startup switches.
After you install the POA software, you can further configure the POA using a startup file. See Section 40.0, Using POA Startup Switches to survey the many ways the POA can be configured.
36.1.3 Changing the Link Protocol between the Post Office and the Domain
How messages are transferred between the POA and the MTA is determined by the link protocol in use between the post office and the domain. For a review of link protocols, see Section 10.1.3, Link Protocols for Direct Links.
If you need to change from one link protocol to another, some reconfiguration of the POA and its link to the domain is necessary.
NOTE:The Linux POA requires TCP/IP links between the post office and the domain.
Using TCP/IP Links between the Post Office and the Domain
To change from a mapped or UNC link to a TCP/IP link between a post office and its domain, you must perform the following two tasks:
Configuring the Agents for TCP/IP
-
If the MTA in the domain is not yet set up for TCP/IP communication, follow the instructions in Configuring the MTA for TCP/IP.
-
To make sure the POA is properly set up for TCP/IP communication, follow the instructions in Section 36.2.1, Using Client/Server Access to the Post Office.
Only one POA per post office needs to communicate with the MTA. If the post office has multiple POAs, have a POA that performs message file processing communicate with the MTA for best performance. For information about message file processing, see Section 35.5, Role of the Post Office Agent.
-
In ConsoleOne, browse to and right-click the POA object, then click .
-
Click to display the Network Address page.

-
In the field, specify the TCP port on which the POA will listen for incoming messages from the MTA.
The default message transfer port for the POA to listen on is 7101.
-
Click to save the TCP/IP information and return to the main ConsoleOne window.
Corresponding Startup Switches: You can also use the ‑‑mtpinipaddr and ‑‑mtpinport startup switches in the POA startup file to set the incoming IP address and port.
Changing the Link between the Post Office and the Domain to TCP/IP
-
In ConsoleOne, click .
-
In the drop-down list, select the domain where the post office resides.
-
Click , then double-click the post office for which you want to change the link protocol.
-
In the field, select .

-
Make sure the information displayed in the Edit Post Office Link dialog box matches the information on the Network Address page for the POA.
When you use a TCP/IP link, the field enables you to restrict the size of messages that users can send between post offices, as described in Section 36.2.7, Restricting Message Size between Post Offices.
-
Click .
-
To exit the Link Configuration tool and save your changes, click .
ConsoleOne then notifies the POA and MTA to restart using the new link protocol.
For a sample message flow for this configuration, see TCP/IP Link Open: Transfer between Post Offices Successful
in Message Delivery to a Different Post Office
in GroupWise 2012 Troubleshooting 3: Message Flow and Directory Structure.
Corresponding Startup Switches: You can also use the ‑‑mtpoutipaddr and ‑‑mtpoutport startup switches in the POA startup file to set the outgoing IP address and port.
Using Mapped or UNC Links between the Post Office and the Domain
To change from a TCP/IP link to a mapped or UNC link between a post office and its domain:
-
In ConsoleOne, click .
-
In the drop-down list, select the domain where the post office resides.
-
Click , then double-click the post office for which you want to change the link protocol.
-
In the field, select or .
-
Provide the location of the post office in the format appropriate to the selected protocol.
-
Click .
-
To exit the Link Configuration tool and save your changes, click .
ConsoleOne then notifies the POA and MTA to restart using the new link protocol.
36.1.4 Binding the POA to a Specific IP Address
You can now cause the POA to bind to a specified IP address when the server where it runs uses multiple IP addresses. The specified IP address is associated with all ports used by the agent. Without an exclusive bind, the POA binds to all IP addresses available on the server.
-
In ConsoleOne, browse to and right-click the POA object, then click .
-
Click to display the Network Address page.
-
Select , then click to save your change.
Corresponding Startup Switches: You can also use the ‑‑ip and ‑‑mtpoutport startup switch in the POA startup file to establish an exclusive bind to the specified IP address.
36.1.5 Moving the POA to a Different Server
As your GroupWise system grows and evolves, you might need to move a POA from one server to another. For example, you might decide to run the POA on a different platform, or perhaps you want to move it to a server that has more memory or disk space.
-
Reconfigure the POA object with the new IP address and port number for the POA to use on the new server, as described in Section 36.2.1, Using Client/Server Access to the Post Office.
-
Install the POA on the new server, as described in
Installing GroupWise Agents
in the GroupWise 2012 Installation Guide. -
Start the new POA, as described in the following sections in the GroupWise 2012 Installation Guide:
-
Observe the new POA to see that it is running smoothly, as described in Section 37.0, Monitoring the POA.
-
Stop the old POA.
-
If you are no longer using the old server for any GroupWise agents, you can remove them to reclaim the disk space, as described in the following sections in the GroupWise 2012 Installation Guide:
36.1.6 Adjusting the POA for a New Post Office Location
If you move a post office from one server to another, you also need to edit the POA startup file to provide the new location of the post office directory.
-
Stop the POA for the old post office location if it is still running.
-
Use an ASCII text editor to edit the POA startup file.
The POA startup file is named after the post office name, plus a .poa extension.
Windows:
Only the first 8 characters of the post office name are used in the file name. The startup file is typically located in the directory where the POA software is installed.
Linux:
The full post office name is used in the file name. However, all letters are lowercase and any spaces in the post office name are removed. The startup file is located in the /opt/novell/groupwise/agents/share directory.
-
Adjust the setting of the ‑‑home switch to point to the new location of the post office directory.
-
Save the POA startup file.
-
Start the POA for the new post office location, as described in the following sections in the GroupWise 2012 Installation Guide:
-
Adjust the link between the post office and the domain. See Section 42.1.7, Adjusting the MTA for a New Location of a Domain or Post Office.
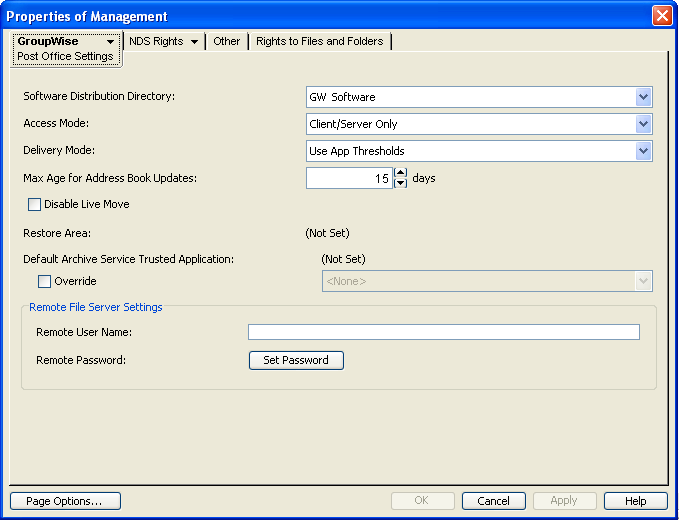
36.1.7 Configuring the POA for Remote Server Login (Windows Only)
On Windows, you can organize a post office so that some components, such as a library, remote document storage area, restore area, or software distribution directory, are located on a remote Windows server. In order for the POA access the remote Windows server, you must provide a user name and password that provide sufficient access to the remote server for the POA to perform the required task on the remote server.
-
In ConsoleOne, browse to and right-click the Post Office object that includes remote components, then click .
-
Click to display the Post Office Settings page.
-
In the box, provide the user name and password that the POA can use to log in to the remote server where post office components are located, then click .
36.1.8 Adjusting the POA Logging Level and Other Log Settings
When installing or troubleshooting the POA, a logging level of Verbose can be useful. However, when the POA is running smoothly, you can set the logging level down to Normal to conserve disk space occupied by log files.
-
In ConsoleOne, browse to and right-click the POA object, then click .
-
Click to display the Log Settings page.

-
Set the desired settings for logging.
Log File Path: Browse to and select the directory where you want this POA to store its log files. The default location varies by platform:
Linux:
Windows:
For more information about log settings and log files, see Section 37.3, Using POA Log Files.
Logging Level: Select the amount of data displayed on the POA agent console and written to the POA log file.
-
Off: Turns off disk logging and sets the logging level for the POA to its default. Logging information is still displayed on the POA agent console.
-
Normal: Displays only the essential information suitable for a smoothly running POA.
-
Verbose: Displays the essential information, plus additional information that can be helpful for troubleshooting.
-
Diagnostic: Turns on and on the POA Web console Log Settings page.
Maximum Log File Age: Specifies how many days to keep POA log files on disk. The default is 30 days.
Maximum Log Disk Space: Sets the maximum amount of disk space for all POA log files. When the specified disk space is consumed, the POA deletes existing log files, starting with the oldest. The default is 102400 KB (100 MB). The maximum allowable setting is 102400000 (1 GB).
-
Corresponding Startup Switches: You can also use the ‑‑log, ‑‑loglevel, ‑‑logdays, ‑‑logmax, and ‑‑logdiskoff switches in the POA startup file to configure logging.
POA Web Console: You can view and search POA log files on the Log Files page.